Hello everyone and good day! The topic of our conversation today will be a door closer for a sliding wardrobe. This is an example of modern fittings that are equipped with furniture in order to increase the ease of use and increase its service life.
In addition to handles and hinges with closers, the elements recommended for installation include a door closer under the compartment. This device allows you to close the doors quite smoothly. This eliminates clicks, knocks and unnecessary noise. Schlegel performs similar functions, although the latter has somewhat different tasks. You can read about this at the link.
From this material you will learn which closers you can buy, which one to choose and how to install them on the sliding system of a modern coupe. In fact, installation can be done by yourself. There are visual videos and fairly detailed instructions for this. Please note that additional adjustment of the wardrobe doors may be required.
Device contents
- Actual number 108442 – four self-tapping screws for connecting the block (123073) with the holder (12089)
- Article 10182 – three screws for attaching brackets (123075 and 123076) to cabinet doors
- Article 106917 – two self-tapping screws for assembling brackets
- Article 12074 – two hooks
- Article 123077 – left bump stop
- Article 123078 – right bump stop
- Article 123089 - four block holders
- Article 123073 – two blocks
- Article 123075 – external door bracket
- Article 123076 – internal door bracket
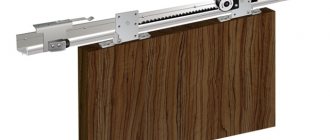
Assembling the block into a module
We lay out the door closer blocks (123073) in a mirror image, and use self-tapping screws (108442) to tighten the blocks with the holders (12089). We get two modules.
Bracket assembly
We insert the plastic hooks (12074) into the grooves of the brackets (123075 and 123076). We fix it with self-tapping screws (106917).
Installing fittings for the closer into the cabinet body
We dismantle two old bumpers and unscrew the screws.
We insert the unscrewed nuts into the closer module, as shown in picture 7.
We insert the modules into the upper guide from the inner side, where the bumpers were located. Installation of left and right modules.
The grooves of the module and the guide, the hole in the guide with the nut in the holder must match. We insert the bolt from the old fenders into the new ones, and connect the fender with the closer module. The relationship is the right bumper (123078) and the right module, the left bumper (123077) and the left module.
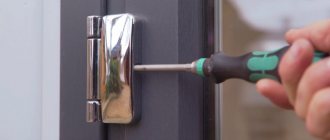
Installing closer brackets on wardrobe doors
Take a screwdriver and unscrew the screw on the roller mechanism of the inner cabinet door, right side. Place the bracket (123076) and tighten it with a new bolt (101082)!
Remove the unscrewed bolt! We don't need him.
On the outer door on the left side, unscrew the two bolts from the roller mechanism, put on the bracket (123075) and screw in the two bolts (101082) from the kit.
We remove the two unscrewed bolts.
We move the hook on the module to the opposite position and close the doors. The bracket is grabbed and the door is smoothly moved from the side of the cabinet. The cabinet is closed, the door closer is installed. Not confident in your skills? Our service is assembly of Ikea furniture at your home or office!
Installing a door closer: instructions with photos
To install the closer on the door, you only need a drill, a ruler, a pencil and a screwdriver. A drill is usually required “3” (three), but you need to look at the diameter of the fastener, which usually comes with the kit.
What is needed to install a door closer
Most manufacturers, to facilitate self-installation of the closer on the door, complete the products with installation templates. These templates schematically depict the parts of the closer in full size. They also have mounting holes for each element. In models that can create opening forces of different classes, the holes are drawn in different colors; in addition, they are labeled - the class of the closer is placed next to it.
Example template for installing a door closer
The template is printed on both sides of the sheet. On one side - for opening the doors "towards you" - from the side of the hinges (pictured above), on the other - "from you".
Installing a template
The template has two perpendicular red stripes. We align the horizontal one with the top edge of the door leaf, the vertical one with the axis line of the hinges.
Installing a template
Everything is clear with the upper edge of the door leaf, but to avoid mistakes during installation, you need to draw the axis line of the hinges. If the door closer is installed from the hinge side, there are no problems - use a long ruler and pencil to move the line of the middle of the hinges upward. If installation will be carried out on the other side, measure the distance from the edge of the canvas to the middle of the loop. Mark this distance on the other side and draw a line.
Holes for door closer
On the template we find marks for holes according to the selected class. Using a drill or awl, we transfer them to the door leaf and frame.
Transfer the marks for the holes to the canvas and frame
Typically, the kit includes two types of fasteners: for metal (metal-plastic) and wood. We select a drill of a suitable size and use a drill to drill holes in the designated places.
Door closers are equipped with two types of fasteners - for metal and wooden doors
Drill holes according to the marks
Next, the actual installation of the door closer begins. Please note that for installation it is necessary that the housing and arms are disconnected. If they are assembled, they are separated (the washer is unscrewed, the screw connecting the levers and the body is removed).
Installation
We attach the parts to the holes made and install the fasteners. In the diagram we find the class of opening force that we need (in this case EN2) and install the parts as shown in the figure.
Door closer installation diagram
To open “towards you,” we place the body on the door leaf and install a rod on the frame.
Installing the case
We fasten the rod
Now you need to connect the traction lever to the body. There is a special protrusion at the bottom of the case. We put a lever on it and tighten it with a screw.
Installing the traction lever
Now all that remains is to connect the lever to the rod. There are two options.
Self-installation of the front door is described here.
Connect the lever to the rod
The connection of the lever with the rod itself is very simple: the two parts are combined and slightly pressed with your fingers. They lock into place with a slight click. The trick is how to position them relative to the door. The rate of movement of the door leaf at the final stage of closing depends on this. The position can change due to the fact that the rod consists of two parts and can be adjusted in length - one of the parts of the rod is a long threaded pin. Rotate the pin to shorten or lengthen it.
If you just need a smooth finishing, the rod is placed so that it is perpendicular to the door leaf. To do this, reduce its size slightly (pictured on the left).
Lever and rod placement for setting finishing force
If the door has a latch, a significant force is required to overcome its resistance. For this option, a shoulder is placed perpendicular to the door (the rod is untwisted, making it longer).
Having arranged the parts accordingly, they are combined and connected. That's all, the installation of the door closer is complete. And you can handle it with your own hands, and without much difficulty. The final stage remains - setting the closing speed. To do this, you need to understand the adjustments of door closers.
How to put on a gate
Frost-resistant models that can be used outside are suitable for installation on a gate. But not all gates have a top crossbar. But everyone has side racks. In this case, the rod is attached to the side post by unfolding the mounting plate along the post.
Installing a door closer on a gate without a top crossbar
But hydraulic devices (discussed in this article) do not do well in the cold. The oil that is poured into the body and serves to “brake” the door leaf becomes more viscous, and the gate closes more slowly. From this point of view, it is better to choose a pneumatic model for the gate (read about selection and installation here).
How to install on a metal door
Installation of a closer on metal doors differs only in the type of fasteners used and the size of the drill. Since the canvas is usually heavier, powerful models of at least class 5 are selected (check the table). Accordingly, on the installation template you will need markings for another class.
The door closer is installed on a metal entrance door in the same way.
You may also need a more powerful drill, but these are all details. Otherwise, you need to install a closer on metal doors in the same way as wooden or metal-plastic ones.
Closers for kitchen cabinets
Closers are installed on most modern furniture models. Having the instructions at hand, it will not be difficult to independently install the mechanism on any model of kitchen facades.
The hinges are designed to hold the doors closed. This means that the doors are not protected from sudden closing (strong bang, surface damage). If there is glass inside the door or the door is completely glass, then strong impact on it can lead to cracks.
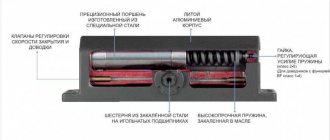
Operating principle of furniture door closers
The operating process of door closers is simple. The mechanism is a spring, which is securely hidden inside a special metal capsule filled with oil or liquid with silicone. The door closing speed is controlled using special valves.
Pressure is applied to the solid wood facade door, and it begins to close under the influence of its own weight. In turn, the door begins to act more and more strongly on the closer’s emphasis. The liquid that covers the spring flows into the capsule sleeve (its rear part). It is held in the sleeve by a double system of seals. A special adjustment element that narrows and expands the outflow channel allows you to control the speed of closing the doors. This occurs by adjusting the speed of the piston movement with this element.
When closing, the door has a stronger effect on the closer. The adjusting element expands more and more and the piston outflow channel becomes smaller because of this. The piston slows down, allowing the door to close smoothly and quietly.
Gas closers are often installed in cheap kitchens. The principle of their operation is as follows - the door closes at maximum speed until a certain moment. At the end of the closing cycle, the door acts on the closer, which uses the gas contained in the capsule. Thanks to this, the furniture door closes silently and smoothly.
Purpose and functions
A furniture closer is often installed to ensure smooth opening of the units. The device allows you to protect furniture from mechanical deformations during operation. The device is recommended for installation on facades with a mirror or glass surface, because If such a door is abruptly closed, these fragile materials can break and become deformed.
The mechanism consists of the following elements:
- A housing equipped with a spring and a piston-pusher.
- Springs and stoppers for fixing on the upper roller guide.
- Fasteners for installation work.
- Decorative fittings.
The principle of a cabinet closer is based on the mechanism being activated when it comes into contact with the facade of the furniture. After this, the doors smoothly move back to the required position and stop. You can adjust the closing speed of the valves using a special valve.
How to install
At any furniture or hardware store you can purchase hinges with a special place for closers. This is a very convenient invention - the mechanism is hidden in furniture hinges.
To install the closer on the modules, you will need special self-tapping screws or furniture euroscrews, a screwdriver and instructions for the mechanism. Installing the finishing element is an easy process, even an inexperienced builder can handle it. It is necessary to strictly follow the instructions included with the closers.
When installing large closers for massive doors, the piston always remains on the immovable part of the wooden shelf. The rest of the closer is attached to the cabinet door. Just like large closers, any compact mechanism is installed on a fixed part of the cabinet.
Internal gas closers that are inserted into a hinge are the easiest to install. After fastening the hinges, you need to insert the closer into a special hole in it until it clicks - the mechanism is installed.
The closers are screwed onto the furniture body with euroscrews or self-tapping screws.
How to adjust after installation on the doors
After the mechanism is installed, it must be adjusted. It is worth paying attention to the following factors:
- Sliding speed.
- Closing speed of the base cabinet door.
- Closing tightness (fit).
The mechanism is adjusted using a screw on the body. By tightening the screw, the speed at which the door (or drawer) closes increases.
When weakened, it decreases. This is explained by the capacity of the piston outflow channel. The liquid flows at different speeds through the capsule into the sleeve and back, controlling the movement of the doors.
Correct installation of the closer is a guarantee of its long and trouble-free service.
Review of furniture fittings:
Installation and adjustment rules
Installation of devices on compartment blocks is carried out taking into account the following rules:
- installation instructions are studied depending on the type of mechanism and material of manufacture;
- tools and layout diagrams are prepared;
- markings are carried out on furniture doors;
- work is carried out only after the hinges are securely fixed on the opening doors of the compartment;
- After installation, the mechanisms are adjusted and the reliability of the fixation of the elements on the surface of the blocks is checked.
Installation of a door closer on a compartment door is carried out using the following tools:
- yardstick;
- pencil or marker for marking fastening locations;
- electric drill for making holes for fittings;
- screwdriver;
- screwdriver;
- hex wrench for adjustment work.
Mounting on cabinet body
You can install the closer on the cabinet after studying the installation instructions for the device type:
- the location of the fittings on the opening compartment blocks is determined;
- the accuracy of the placement of the element is checked, the fittings should not impede the movement of the doors and freely open the furniture;
- holes for fasteners are drilled;
- the upper and then the lower fastenings are fixed on the compartment blocks;
- the closer body is mounted, the device is inserted into the prepared holes and fixed by pressing;
- if necessary, adjust the loop according to the instruction diagram;
- To extend the shelf life of the device during operation, cleaning, lubricating with oil, etc. is performed.
Installation of hinges with closers
Loop closers for compartment-type structures are installed in compliance with the following sequence of steps:
- furniture doors are removed from their hinges; to do this, the hinge body is first disconnected from the striker plate;
- old hinges are being dismantled;
- Holes for new parts are drilled, then fasteners are fixed.
Finally, the hinges and other working mechanisms are adjusted. The work involves checking the sliding speed of compartment doors and the tightness of the elements. For adjustment, a screw is required on the closer body. When the screw is tightened, the closing speed of the shutters will increase, and when the tension is loosened, their movement will become smoother.
Manufacturers of fittings for kitchen cabinets and bedroom furniture
Expensive oil closers use higher quality and more expensive oil. Let's look at the most popular manufacturers of kitchen furniture fittings:
- BLUM fittings . Austrian company producing various kitchen accessories. The most popular manufacturer of lifting mechanisms in Russia is bloom. The price of products is very varied (from 140 rubles to 800 rubles).
- Vauth Sagel . The second most popular manufacturer, popular in Russia. The German company is recognized as the best in the world. The price for closers is from 300 rubles to 1000 rubles.
- Hettih . German company - manufacturer. The cost of mechanisms and handles for furniture ranges from 150 to 400 rubles.
- Siro . Austrian company. The price of door closers ranges from 130 rubles to 500 rubles.
- agoform. The German company is a manufacturer of fittings for kitchen furniture. The cost of the company's products varies from 200 rubles to 900 rubles.
Video presentation of Bloom fittings:
Kitchen cabinets are used daily, which wears out the fittings. It is necessary to timely care for and clean the door closers from dirt.
- When a squeak appears, you need to tighten all the screws on the hinges.
- All fittings and roof rails in the interior are cleaned with a soapy solution and clean napkins.
- The hinges must be lubricated periodically.
- Do not clean the door closer mechanism with soda or other granular cleaning agents.
- You cannot “help” door closers close the doors all the way.
The mechanism of the closers is very simple, so breakdowns with proper operation are practically excluded. If a breakdown does occur, it is better to call a specialist or replace the broken door closer with a new one.
There are many manufacturing companies with different prices for accessories, so it is quite easy to select and install door closers according to your capabilities and needs. Installing the mechanism is also not difficult. The main thing is to follow the instructions exactly. You need to take care of kitchen fittings in the same way as all other household items. Proper installation and maintenance will allow you to enjoy silent closing of kitchen cabinet doors for a long time.
Closers for kitchen cabinets
Closers for kitchen cabinets occupy an important place among other furniture fittings, because they allow the furniture to retain its original appearance. This mechanism ensures smooth closing of the doors without much effort, which is especially important for glass cabinets. A high-quality mechanism made from durable materials can last a long time. In this case, you need to know its types and installation rules.
Closers for kitchen cabinets
When arranging a kitchen, you should not skimp on furniture fittings. If the headset does not work well, you will immediately feel it, so you need to choose it responsibly. To choose the right product, you need to:
- take into account the design and type of cabinets;
- pay attention to the option of placing the mechanism: there are designs that are placed on cabinet doors and do not require complex hinges;
- determine the weight of the structure that needs to be secured using a closer;
- To save time, you can purchase designs with self-adjustment.
Operating principle
To understand how a kitchen door closer works, let’s look at its operating principle:
- The basis of the mechanism is a spring, which is located inside an oil-filled capsule.
- The door closing speed is controlled by special valves.
- Pressure is applied to the furniture door, and under the influence of its weight it begins to close.
- The door begins to put more pressure on the special stop of the closer.
- The liquid covering the spring flows into its rear part (sleeve), where it is retained by a double system of seals.
- The speed of closing the doors is determined by a special adjustment element, which narrows and expands the outflow channel.
Advantages and disadvantages
A correctly installed mechanism has a number of advantages:
- Ensures complete and smooth closing of the cabinet door.
- Easy to install and operate.
- A high-quality mechanism is durable and does not require constant oil changes and repairs.
- The oil and liquid inside the closer are securely fixed in the capsule, so in the event of a breakdown they will not damage the furniture.
- With the right option, the mechanism can withstand a sufficient load.
We list the disadvantages of this mechanism:
- For kitchen cabinets with a closer, installation must be carried out strictly according to the instructions.
- The appearance of the structure is not particularly attractive.
- Oil closers perform worse in low temperature conditions, which is determined by the viscosity of the oil.
Depending on the mechanism of action, structures are divided into the following types:
Oil driven kitchen cabinet mechanisms require constant maintenance and lubrication, but are the most common due to their longevity of use.
Gas closers are inexpensive mechanisms containing special gas inside.
According to the installation method they are:
- installed on the surface of furniture;
- placed between furniture hinges;
- mounted on furniture hinges.
For drawers, there are special types of products made from special guides.
Closers for kitchen cabinets are made in different shades and are selected according to the type of furniture. This makes it easy to install single-color fittings.
Types and principle of operation of door closers for sliding wardrobes
The types of fastening mechanisms differ in the following characteristics:
- material of manufacture;
- installation method;
- type of operating mechanism;
- device dimensions, etc.
In accordance with the installation method, devices are divided into the following subtypes:
- The cabinet model is fixed to the surface of furniture or cabinet doors. The advantage of this type of design is its low cost and the possibility of installation on different types of cabinets. During installation, it is necessary to control the absence of distortions for long-term operation of the furniture.
- Loop - the advantage of this type of device is increased reliability and durability in operation. However, it must be taken into account that such a mechanism is installed only on swing doors. A hinge device is not installed on retractable or sliding doors and drawers.
- Self-tapping - the model has a simple design solution and is low in cost. Self-tapping fittings are installed on various types of furniture.
According to the type of working mechanism, fittings are divided into the following subtypes:
- Oil models consist of a spiral placed in a hermetically sealed housing filled with oil. Fitting elements are often placed in retractable cabinet drawers or kitchen fronts. Oil devices use a spring mechanism, supplemented by valves that allow you to change the degree of resistance to the spring and change the speed of slamming the valves. The device is suitable for equipping cabinet doors and drawers. The devices are reliable, durable, but expensive.
- Gas models are installed on gas lifts or hinges. The design of the gas fitting element contains a rod, which, when pressed, helps slow down the movement of the valves. The fittings are activated before the cabinet doors are closed, and the element is fixed in the groove. There is no sudden slamming of the doors, so the furniture body retains its aesthetics for a long time. The sliding wardrobe with gas-type closers is convenient to use. The fittings are budget-friendly, but the service life of the products is shorter than that of oil-based ones.
- Electric drives have been developed to equip doors that open and close when you press a button or door surface. The products are used in modern kitchens and are distinguished by their quality and high cost.
The mechanisms differ in their scope of application:
- for swing facade structures;
- drawers;
- flaps.
Advantages and disadvantages
Closers for cabinets have the following advantages:
- silent operation;
- smooth closing of the valves;
- protection of furniture facades from damage;
- high level of operating safety for children;
- things in the closet are protected from dust and dirt;
- installation of some mechanisms can be done independently;
- the device ensures a tight fit of the doors to the furniture body and prevents spontaneous opening;
- a large selection of models by design and cost;
- long period of operation.
The list of disadvantages of closers:
- not all overhead models are aesthetic;
- After installation of fittings, the cost of furniture products increases.
Selection rules
Closers for compartment doors are selected taking into account the dimensions of the furniture, the type of cabinet door design, the size of the room, and the requirements for the strength of the device.
The standard requirements for choosing a door closer are as follows:
- The dimensions of the model are determined taking into account the dimensions of the cabinet on which the fittings will be installed. For compact furniture, experts recommend closers measuring 10 mm, for massive cabinet doors - 16-18 mm.
- The strength of the fastening element is assessed. A weak device is short-lived and will lead to deformation and breakage of the fittings. Standard door closers are designed for a door weight of 20-60 kg; typical furniture door widths range from 0.7 m.
- When choosing, the direction of door opening is taken into account; depending on this parameter, closers are divided into left and right. However, you can choose a door closer that is universal for a coupe, which is mounted on aluminum and steel systems, with doors in different directions.
- Products must be of high quality, certified, from a reliable manufacturer.
- Depending on the characteristics of the furniture, standard door closers or devices with additional functions are provided. Improved models are self-regulating and do not require additional adjustments.
Restrictions on the use of door closers for compartment doors
The closet door closer has the following restrictions on use:
- The width of the doors of a product of this type should be at least 700 mm, and the weight should be 20-60 kg.
- After installing the closers, it is necessary to take into account the protrusion above the upper wheels - about 8 mm. When calculating the height of the doors, there should be a gap of 40 mm.
How to install
To install door closers yourself, strictly follow the instructions, and also purchase special screws and a screwdriver.
After studying the instructions and preparing the necessary materials and tools, you can begin installation.
- To simplify the process, furniture can be removed from the wall and placed in a convenient place.
- The first step is to secure the holding part of the mechanism in the cabinet. When using large closers, the piston is installed on the immovable part of the shelf, the rest of it is attached to the doors. The compact-sized door closer is installed on the stationary part of the shelf.
- Having marked on the opposite side the place where the entire body is attached, small holes are made using a hammer and screwdriver.
- Using a screwdriver, screw the fastening elements.
- At the end of the process, you should check the quality of the installation. If the furniture door opens and closes freely, then everything is done correctly.
What is a door closer?
The closer is a special mechanism that “grabs” the door a few centimeters before the final position, and then smoothly and silently brings and locks it in the closed position. Thanks to the closer, the impact of the door on the side wall is eliminated, the need to re-close the cabinet disappears, and the service life of the Schlegel (brush seal) is extended.
The closer can be installed on both new and working doors. Closers are available for installation on the top or bottom of the door. The former are used more often.
Detailed instructions on how to repair a door closer
A door closer is a unique mechanism that helps in operating the door. Thanks to this device, opening and closing the door has become much easier. Unfortunately, like any mechanism, the door closer can fail. There could be a lot of reasons for this. However, in any case, this problem must be solved. In this article we will tell you in detail how to repair a door closer depending on its damage.
As experts note, it is not recommended to repair the device yourself. Since its design has certain features, and the slightest mistake can put an end to the door closer. In addition, in some cases it is easier and cheaper to buy a new device than to try to restore the functionality of the old one. We will consider those breakdowns that can be eliminated on our own, without inviting professionals.
Main types of door closer breakdowns
There are several most common breakdowns to which all door closers are susceptible. First of all, this is damage to the rod or device guides. This is caused by improper use of the closer, hitting the door or fixing the door leaf in the open position using a stone, mop, etc. A broken rod is relatively easy to repair. All damage to this part of the closer can be divided into three main groups:
- bending of the lever or its slight kink;
- lever jamming;
- breakage of fasteners.
If this is an ordinary break, the appearance of cracks, then in this case there will be no problems with how to repair the door closer . It is enough to use conventional welding. When bending the product, the closer should be disassembled and try to carefully align the rod. It is not a fact that she will be able to return to her original form. Therefore, you can buy a new product, which is sold in the appropriate stores. The cost of the rod is low and in the end it will be much cheaper than purchasing and installing a new door closer. Worn fasteners are also quite easy to replace. You just need to purchase the appropriate screws and install them in place of the old ones. You may have to use washers, but it all depends on the degree of wear of the fasteners.
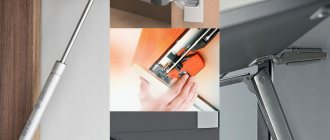
How to install a door closer on a wardrobe door
Closers can be installed on symmetrical and asymmetrical doors. They are also mounted on left, right, double-sided doors. The latter are equipped with two closers.
The finishing mechanism is installed instead of the upper rollers. The installation process includes the following operations:
- Determine which closer is needed - right, left or both.
- If the wardrobe is assembled, you must first remove the door.
- From the end we install an insert for fastening the mechanism into the groove of the upper guide.
- Fasten the closet door closer on the side with the façade mounting assembly screw, and on top with the self-tapping screw from the kit to the pre-installed insert.
- According to the instructions, the door closer must be cocked before installing the door.
- With the door completely closed, mark on the top guide the installation location of the trigger (the mating part of the closer) and screw it in with the self-tapping screws included in the delivery kit.
- Check the operation of the finishing mechanism.
- Perform similar operations for the second door.
When installing the closer, you need to take into account a number of adjustments that allow you to customize the mechanism to suit the user’s wishes. If the closer does not work, perhaps the technologist has set too much margin and the trigger does not come into contact with the activator. To correct this, use the lower adjustment screws to raise the front. Using the built-in valve, you can increase or decrease the finishing speed. The adjusting screws in the closer adjust the width between the rollers so that the door does not hang in the ceiling guide.
With the installation of the closer, the phrase “with a slight movement of the hand” loses its meaning. Light, heavy, medium - it doesn't matter. The closer will pick up the door before closing, smoothly bring it in and lock it.
The Mebax company offers door closers of economy, middle and premium classes in bulk at competitive prices. And if you need to clarify how to attach a closer to a closet door, our managers are always ready to help, provide the necessary instructions and advice.
Ikea install door closer
Installation of door closers in Moscow and the Moscow region.
Any difficulty. Urgent call of a specialist to your apartment or office - around the clock. Extensive work experience. Find out the cost of the service
How to call a specialist
- The most convenient and easiest way to call our customer service
- Send us a photo of the lock, handles, cylinders, doors via WhatsApp and our master will contact you within 5-10 minutes.
At a time convenient for you, the master will come to you with an assortment of locks and fittings necessary for your door.
Depending on the complexity of the required work, your order will be completed within 10 minutes - 2 hours.
Installing a door closer is a service offered by the Spets-Zamkov service department at a low price. Installation of a door closer is necessary for offices, shops and multi-storey buildings. We install door closers in Moscow and the region, provide a guarantee and service.
What is it for?
In offices and premises with high traffic, each time the doors are closed, the comfort of the citizens inside is disrupted. Installing a closer is a solution to the problem, since it ensures smooth closing of the door leaf.
With the help of a closer, the following tasks are solved:
- adjusting the door closing speed by giving acceleration at the moment of slamming;
- the risk of the door leaf hitting obstacles is minimized;
- fixing the door in the open position;
- The service life of the box and canvas increases.
Categories and types
When installing a closer on a door, you need to choose an option based on a number of parameters. The operating principle, regardless of the model, is based on the complex interaction of the spring and shock absorber. Due to the viscosity of the shock-absorbing fluid, which flows through the shock absorber chambers, sliding door opening and closing is ensured. The type is determined by the mechanism that activates the spring:
- the top location involves mounting the housing above or on the door;
- floor-mounted, installed in shopping and entertainment centers on glass and metal doors in the lower part;
- hidden type closers, the mounting location of which is hidden from prying eyes.
Our craftsmen will install the necessary devices for each case and make additional adjustments to the door closer to ensure smooth opening and closing of the entrance doors.
Specifics of installation of door closers
An element with an upper position is considered simple. These mechanisms are allowed for installation on doors that open to the right or left. They are attached to the side of the door hinges or to the frame on the side opposite to the hinges. We recommend an internal installation scheme to minimize the risks of negative external factors affecting the system elements. In accordance with the installation instructions and template, the locations of the mounting holes are marked.
In mechanisms that involve stepwise force control, the distance from the hinge axis is marked in advance, and the place for the lever is also marked. Most often, the opening angle is limited to 100-1100 degrees. If the closer provides for force regulation via a screw, then the final adjustment is made at the last stage.
The closing speed is regulated by screws in the end, which provide two ranges of lever action, and is set within one turn.
When implementing non-standard solutions, if installation is not possible on the side opposite the hinges, then installation is carried out complete with an angle for parallel fixation of the lever.
All work is carried out following the installation instructions from the manufacturer and technological standards. Therefore, this design has a long service life.
Prices for services
Installation and replacement of customer mechanisms
Travel outside the Moscow Ring Road - 7 km free of charge, then 30 rubles. for 1 km.
Official registration of completed work. Warranty up to 3 years. The visit of the master is FREE.
*prices are for work. *free visit of a specialist when placing an order.