Typically, searching for information on how to install hinges on a cabinet involves three situations. You have decided to either make the furniture yourself, or save on professional assembly when purchasing, say, a kitchen set. Or you want to replace old hinges that have failed. In the first case, you will also need to learn how to correctly calculate the required number of canopies for the facade and make markings and drilling for their installation. And also read how to choose furniture hinges. In the latter - to correct errors due to which the furniture hinges on the cabinet for some reason failed. Also, restore the sidewalls, if the fasteners are torn out, prepare the chipboard for re-installation. Let's first consider the general algorithm of how to install furniture hinges on a cabinet correctly with step-by-step instructions. And then - special cases.
Calculation of the number of four-hinged hinges
| Facade material | |
| Width (mm) | |
| Height (mm) | |
| Weight, kg) | |
| For the facade it is necessary | |
| Note: — This information is for reference only; — If you have any doubts, it is better to make a prototype; — To increase the maximum load, the distance between the loops must be the same; — Furniture handles can significantly increase the overall weight of the facade. | |
| Hinges with cup 26 mm Don't forget to purchase dampers Hinges with cup 35 mm Don't forget to purchase dampers Hinges with cup 40 mm | |
Don't forget to purchase dampers
Don't forget to purchase dampers
Hinges for aluminum profiles
Don't forget to purchase dampers
And you will always be aware of the latest events, new products and promotions!
Source
Correct calculation of the number of furniture hinges
Furniture hinges are a compact and reliable mechanism for a special purpose. Thanks to their correct installation, the correct functioning of furniture doors installed on different fittings is ensured. Today you can find a huge number of different types of furniture fittings. Therefore, an inexperienced specialist may find it difficult to select hinges for the cabinet. And also with the correct calculation of the required number of the above elements.
Most people know that hinges are considered a key element of cabinets, hanging and floor tables and any other furniture fittings. Since they ensure proper functioning of existing structures. Therefore, today you can find a fairly relevant request on the Internet: how many furniture hinges are needed for doors.
For a correct calculation, it is necessary to take into account many key points. In this article we will look in more detail at how to calculate furniture hinges. The impressive amount of variety makes it easy to find the hinges needed for a particular application. Due to the impressive range of products, complexity may arise. Therefore, it would be correct to read in more detail the manual associated with the request: how to correctly calculate the loops.
Calculation of quantities and sizes
It is known that during the operation of various accessories, the load on the furniture hinge can be quite significant. Therefore, it would be advisable in this situation to sort it out to specialists and select loops according to size and existing endurance. Initially, you need to find out the weight of the doors, because the heavier the door of the furniture, the more stable the elements you need to choose.
If you do not know the mass of door leaves, then it would be advisable to consult a specialist. If the mass of the doors is unknown, then you need to make an independent calculation. Accordingly, you will determine the required number of hinges that will be needed to install the furniture door.
Calculating the number of furniture hinges for doors is not an easy procedure for a beginner, so we decided to look in more detail using an example. So that a beginner can independently calculate the number of hinges for the correct installation of furniture doors.
For example, if you need to hang two existing fronts consisting of chipboard on a frame. With dimensions such as: the first is 500 by 300 millimeters, and the other is 1600 by 400 millimeters, and you are interested in the number of hinges that will be required for each of the existing facades, then we have the answer to that too. In this situation, the answer is simple: the first one will require at least two loops, and the second one will need four pieces. It is known that the larger the facade, the greater its mass will be, as well as the greater the load on the hinge. In this situation, it would be advisable to hang a larger number of loops. Of course, the more loops you hang, the better, but this is not always the case. Indeed, during operation it will be more difficult to regulate the front and the functioning of the entire structure will deteriorate.
Source
How to calculate the dimensions of cabinet doors and drawers |
The front part requires utmost attention - after all, it is the quality and finishing of the doors that determines the design and “status” of the furniture. It is important not only to choose beautiful facades, but also to correctly calculate the dimensions of the cabinet doors, with uniform gaps for trouble-free opening. Errors in calculations are unacceptable, because most often it will not be possible to redo the facade, you will have to order it again. This means time and additional costs.
You can read how to calculate the fronts for a wardrobe here. This article will describe the process of calculating the sizes of swing doors and drawers for cabinet furniture (including kitchens).
Minimum and maximum cabinet door size
For a swing facade, the dimensions are strictly limited by the ability of the furniture hinges to support its weight. If the load is disproportionate, the cabinet doors will inevitably sag and adjusting the hinges will only give a temporary effect. The weight of the facades is capable of tearing fasteners out of the side walls. Therefore, at the design stage it is necessary to correlate the desired dimensions of the facades with the possible ones, according to the technical characteristics of furniture hinges.
Usually, when determining the number of hinges and the size of the cabinet doors, they rely on the following table:
The maximum permissible width of the facade is about 500-600 mm. For large sizes, it is worth considering the option with two swing doors or sliding systems.
The maximum permissible height (length) of the facade is about 2200 mm. If you make the door longer, it will be inconvenient to open it.
The minimum dimensions are limited only by considerations of aesthetics and functionality. If the cabinet body is narrower than 300 mm, the hinge mounting pads should be screwed in before assembling the body itself.
The principle of calculating the dimensions of swing doors and drawer fronts
According to the generally accepted standard, the gap between the sashes should be about 1.5-2 mm. To calculate the size of the front for the drawer, the same gaps are used. And not only so that it “looks” the same with the doors. But also because the loaded box sags a little, and the gap serves as a kind of “insurance” that the facades will not rustle against each other when they are pulled out.
For kitchen furniture, it is customary to subtract 4 mm from the dimensions of the niche. For example:
- For a cabinet with dimensions of 720x400 along the front part, the door will have dimensions of 716x396.
- For a cabinet with dimensions 720x600, two doors with dimensions 716x296 are installed.
But many people find that a gap of 4 mm is too much. Therefore, leave 3 mm, as for all other cabinet furniture. This is completely acceptable and not an error.
Nuance! When subtracting 3 mm for gaps, do not forget that you are calculating the final dimensions for the cabinet doors. If these are facades made of laminated chipboard and will then be edged with 2 mm thick PVC, then this should be taken into account. And subtract not 3 mm, but 7 (+2 mm will be added on each side, total 3+2+2). The same applies to façade options with aluminum ends and other types of edges.
To calculate the dimensions of drawer fronts, the same principle is used: subtract 1.5 mm from each side.
For example, in a cabinet 720x400 it is planned to install three drawers, two narrow and one wide. We divide the cabinet according to the height with the desired capacity of the drawers, let it be 180+180+360, as for kitchen furniture. We get the dimensions of the facades:
- 176x396 – 2 pcs.
- 356x396 – 1 pc.
If you decide to leave a 3 mm gap on all furniture:
- 177x397 – 2 pcs.
- 357x397 – 1 pc.
If the facades are designed for a 2 mm thick PVC edge:
- 173x393 – 2 pcs.
- 353x393 – 1 pc.
For the internal facades of the cabinet, the calculations will be similar. You should only subtract 3-4 mm from the internal dimensions of the niche.
How to calculate the dimensions of corner cabinet doors
The difficulty in calculating doors for a corner cabinet is determining the width of the sash. To do this, first calculate the width of the opening. Here you will have to remember school mathematics and the well-known formula - the square of the hypotenuse is equal to the sum of the squares of the length of the legs.
Let's take as an example a wall-mounted corner kitchen cabinet, standard dimensions 600x600 and side depth 300 mm.
With a sidewall thickness of 16 mm, the length of the legs will be (600-300-16) = 284 mm.
We calculate the opening in two steps: 284x284x2 = 161312, without the square root of 401.63. Round up to 401.
When calculating the width of the façade for a corner cabinet, one nuance is taken into account: due to the furniture hinge, the door will “move forward” a little and will not fit tightly into the opening. That is, it will come out on a large diagonal and the gaps will form on their own. Therefore, it is not worth subtracting 3 mm from the opening size, as for ordinary cabinets. In our case, we can round up to 400 mm.
But the height is calculated similarly to conventional cabinets. In our case, for a kitchen module with a height of 720 mm, it will be 717-716 mm (depending on how the rest of the kitchen facades were calculated, with a gap of 4 mm or 3 mm).
If the opening width is more than 500 mm, then there is a reason to install not one, but two sashes. When calculating the width, it is necessary to take into account the gap between the facades so that the doors do not interfere with opening to each other. That is, with an opening width of 600 mm for a corner cabinet, the width of each door should be about 298 mm.
Important nuance! This calculation method is only valid for facades whose thickness is comparable to the thickness of the cabinet body sides. For example, the body is 16 mm laminated chipboard, the facade is 16-18 mm thick laminated chipboard or MDF. If the facades are much more massive, 20-22 mm thick, then a gap is simply necessary to open them and it can be significant, up to 10 mm.
Dimensions of beveled end cabinet doors
Often a row of kitchen or wardrobe cabinets ends with an end module with a beveled door. Its width is calculated by analogy with the previous option with the only difference.
Rules for installing furniture hinges
As in the article about the types of furniture hinges, we will consider the installation of four-hinged fasteners, with three degrees of adjustment.
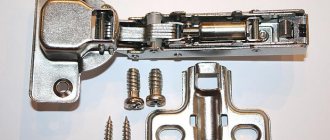
The four-hinged hinge consists of two detachable parts:
Correct installation of furniture hinges with your own hands involves preliminary calculation of the required quantity, depending on the height and width of the door, and its weight.
Hinges with a quantity of three or more per swing door are distributed at an equal distance from each other, and you need to follow the markings so that the fastening strip does not “get” into the shelf.
The distance from the edge of the façade along the body is usually 100 mm. Since the door is always 3-4 mm smaller, for the overhead version the distance to the center of the hole for the bowl is about 98 mm.
Marking
Installing furniture hinges with your own hands involves precise markings. If you make poor markings, you can get defects when opening the door. The process of marking for furniture hinges involves finding the center of the hole for them. You should retreat 7-12 cm from the edge of the facade. The number of hinges installed on the door may vary. But you need to maintain a certain distance between the canopies, equal to 50 cm. There is a certain dependence of the number of canopies on the door parameters.
| Facade weight, kg | Front length, cm | ||||
| Up to 50 | 50-100 | 100-150 | 150-200 | More than 200 | |
| Number of canopies | |||||
| 4-5 | 2 | ||||
| 6-9 | 2 | ||||
| 10-13 | 3 | ||||
| 14-18 | 5 | ||||
| Over 19 | 5 | ||||
When the number of canopies is determined, the central holes are marked relative to the width of the door. Moreover, the distance from the side of the door should be 2.1-2.2 cm. It should also be taken into account that the fastening should not lie on the location of the shelves.
Thus, having measured the required distance from the top and bottom of the door, a mark is made. Next, keeping the indentation relative to the width, the point of the future location is also marked. At the intersection of the measured marks, a notch should be made using a self-tapping screw or nail. If the facade height is more than 100 cm, marks must be made every 50 cm.
Scheme for calculating the number of furniture hinges for installation
There is no clear answer to the question of how many hinges need to be installed on one swing façade. Each manufacturer of fittings and components gives its own recommendations. Typically, the scheme for calculating the number of furniture hinges is based on two values, the size and weight of the door:
The standard installation scheme for furniture hinges is as follows.
It can be followed if there are no other recommendations from the manufacturer.
Adjusting furniture hinges with your own hands
According to the diagram for installing furniture hinges, a mounting plate is separately attached to two 3x16 mm screws and a bowl (also to two screws), on the side of the frame and on the inside of the door, respectively. After the furniture is placed in the designated place, they begin to hang the facades. To do this, the arm of the hinge with the bowl is threaded into the fastening bar and tightened with a fixing screw. There is no need to tighten the fasteners too much near the plank - all of them are involved in the process of adjusting the furniture hinge with your own hands.
If the floors are piled towards the center, then most likely the doors will not press tightly against the frame. Adjusting the furniture hinges in depth allows you to tighten them more tightly or, conversely, loosen the pressure.
For uneven floors, lateral adjustment (horizontal) in combination with vertical adjustment may be useful. With its help, you can even out gaps on double facades and align them more evenly relative to the frame.
Also, the adjustment “removes” unpleasant squeaks when opening and closing. It is worth tightening the screws on the hinges from time to time - furniture doors inevitably sag under their own weight. Timely adjustment will extend the service life of fastening fittings.
Source
Installation process
Correct marking is the key to success
Marking for furniture hinges is one of the main installation steps, which determines the ease of use of furniture and the service life of the entire structure. For this reason, it is important to correctly apply the markings along which the hinges will subsequently be installed. To do this, follow these steps:
After marking, be sure to carefully check its correctness again, make sure that the distance between the hinges and the edges of the door is exactly the same.
Marked area for milling on the cabinet door
Drilling holes for hinges
You've probably noticed more than once that furniture hinges are installed not on the surface of the door, but in special recesses. You will also have to make a hole for the furniture hinges in order to install them correctly. For this, a drill with a cutter is used. The procedure is as follows:
Do not overdo it with the depth of drilling holes - too much depth can negatively affect the appearance of the outside of the door, and also subsequently lead to deformation of the structure and loosening of furniture hinges.
Hole for hinge cut with a milling cutter
Putting the hinges in place
After preparing the holes, you can begin directly installing furniture hinges with your own hands. To do this correctly, follow the instructions below:
In order to fix the hinges on the door as evenly as possible, you can use special templates that help to correctly mark the places for drilling holes. If you trust your eye, you can do without the help of such templates.
Dependence of door dimensions and required number of hinges
Adjusting furniture hinges
Adjustment of the position of the facade in the horizontal plane, as well as the gaps between the facades, can be done using a screwdriver and an adjusting screw screwed into the hinge body. The adjusting screw has a groove in the lower part, which fits into a special groove in the mounting plate. In this case, during adjustment you need to slightly loosen the clamping screw.
To adjust the furniture façade in the vertical plane, you need to loosen the screws securing the mounting strip and by moving the strip up or down, adjust the height of the façade, then fix the strip by screwing in the screws that secure the strip.
Recently, innovative NEO hinges with 3D adjustment have appeared. It allows you to adjust the position of the front vertically, horizontally and overlay without loosening the screws, which greatly simplifies and speeds up the adjustment process. Even non-professionals can do it at home.
Installation of BOYARD furniture hinges
The durability of the loop largely depends on the accuracy of the filler holes. Exact hole matching can only be achieved using filler equipment.
It is impossible to use Euroscrews to install a hinge without first accurately drilling holes of the required diameter. The use of screws does not guarantee the perpendicularity of the hinge installation relative to the doors, which will lead to increased loads on the hinges (the main structural elements) and to their premature wear (door sagging, jamming when opening and closing, creaking). Taking these specific features into account, a range of BOYARD hinges was developed, with the ability to manufacture each hinge according to different additive standards for the rapid transition of furniture factories from hinges from other manufacturers to BOYARD hinges with economic benefits without loss of functionality.
Parameters and requirements for installing BOYARD hinges
Preparation for mounting the hinge cup
Calculation of the required number of loops for installation
The question of the number of hinges required for installation on one facade does not have a clear answer. The dimensions of the facade, as well as its weight, matter. In special cases, such as the use of glass facades, facades with aluminum profiles or unusually wide facades, a trial installation of the fastening hardware is necessary.
Façade designs in which the width is too large in relation to the height should be avoided.
In borderline cases, one additional loop should be planned. For hinges with a reduced cup diameter, you can use scheme 2, also not forgetting about an additional hinge for non-standard dimensions and weight of the facade.
Methods of fastening during installation and drilling for various types of fasteners
Attaching the mounting plate
Installing the hinge on the body
For Slide-on loop:
The upper part of the hinge body is inserted with a slot under the pre-mounted screw of the strike plate (1) and is fixed in the desired position.
For Key-hole loop:
The upper part of the hinge body with the hole is lowered onto the pre-mounted screw of the strike plate (1), inserted under it (2) with a translational movement and fixed in the desired position.
For Clip-on:
The upper part of the hinge body with quick-release fastening is inserted into the grooves of the pre-installed strike plate (1), fixed by pressing from above (2) and adjusted with a fixing screw.
For more accurate and accurate installation, calculations are used using hinge installation formulas, taking into account their design features and installation method.
Let's consider the principle of using calculation formulas using the example of a four-hinged standard hinge H301 for overhead A
, semi-overlay
B
and inset
C
doors:
Source
Types of fastening structures
Manufacturers make several types of hinges. Different models differ in appearance, design, material used for their manufacture, and method of fastening.
Overhead and internal
Fittings of this category do not require preliminary drilling of holes in the facade. Installation of overhead parts is carried out when inserting furniture hinges of a 4-hinged design is impossible, for example, due to the small thickness of the cabinet panels.
The disadvantage of such fasteners is the impossibility of adjusting them in planes.
Cupless (secret) hinges
Elements of this type of fittings are used quite rarely. They can often be found on domestically produced furniture. Cupless fastenings are used for interior door structures. They mainly perform decorative functions and are mounted on hinged lids of tables or secret doors.
Four-hinged for swing structures
This fitting option is used for furniture sets with hinged leaves.
4-hinged models consist of a bowl with an elbow and a strike plate. This makes it possible to regulate the horizontal and vertical arrangement of the panels relative to the frame of the cabinet (cabinet), and the tightness of the individual parts of the set.
Specific furniture hinges
This type of fastening is used for prefabricated structures with aluminum frames of different widths. Specific loops are overhead and internal. They are used for corner cabinets, the leaf of which opens to 45, 135 or 180 degrees.
Installing furniture hinges yourself
Many people, in order to save money, when buying furniture, decide to assemble it themselves, so as not to pay for the services of an assembler if they come for a separate fee. In fact, it is very easy to assemble modern interior items, following the included instructions and having at least minimal skills in working with the tool.
However, there are still some nuances. For example, installing furniture hinges with your own hands is a fairly simple task, but one that requires attention and accuracy, because how well the doors of cabinets and cabinets will close will largely depend on correct installation.
Installing furniture hinges yourself
Additive Tools
First you need to prepare the tools and materials for work. The additive does not require much technology. It is enough to have a machine for adding furniture hinges, which will allow you to perform installation quickly and efficiently.
Additive Tools:
- Construction square for determining the ideal perpendicular;
- Marker for marking;
- Punch punch – a metalworking tool for marking;
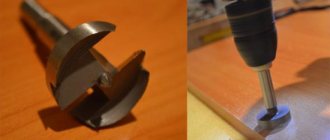
- Fostner cutter - for standard hinges its size is 35 mm, and for compact hinges a diameter of 26 mm is used;
- A metal drill with a size of 2 mm, but this is an optional requirement;
- Electric drill.
For the additive, a Fostner machine is used. It allows you to make small indentations when working with soft materials. When choosing such a drill, several nuances need to be taken into account. It is important that the central needle is well centered, without noticeable runout. You also need to pay attention to the incisors. They must be made of hard alloys, otherwise they will soon become dull.
An important selection criterion is the length of the central needle. If this parameter exceeds the norm, the tool will make a through hole. A small needle will move the cutter to the side when working manually. The needle on a new machine, as a rule, has to be ground down by half a millimeter.
Professional Fostner machines are equipped with a needle that is already reduced in size. In such equipment, accuracy is controlled by other elements. Before drilling, it is recommended to practice separately on material of similar thickness.
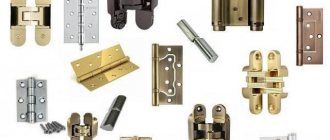
Furniture hinges: features and types
A furniture hinge is a semi-mechanical design that makes it possible to open and close part of the furniture body (usually a door), retracting it to a certain angle. It is completely invisible from the outside, but at the same time it is capable of not only holding it in the desired position and helping to open the facade (door), but also preventing it from opening without permission. Typically, hinges are used for the so-called hanging of doors made of various materials - wood, glass, aluminum profile. Also, most hinges are capable of closing on their own. The most common type of hinges is four-hinged . They are highly functional and very reliable, durable and can serve for many years without breaking.
Four-joint furniture hinge
On a note! For the first time, a design that can close on its own appeared only in the twentieth century; it was patented in Italy.
History of furniture hinges
The design of a furniture hinge is represented by the following elements.
Furniture hinge - structure
Each hinge of this type has a spring that allows the design mechanism to hold the cabinet door closed and prevent it from opening without permission. These hinges can be adjusted in three planes at once, which is very convenient and allows you to adjust them perfectly in almost every case. They are made of steel and have high protection against rust.
On a note! Such loops in Russia are also called cup loops or a more prosaic name - frog.
What is it and how does it work?
Hinges with four hinges can be:
Types of furniture hinges
In fact, there are not only four-hinge hinges, although they are the most common and are most often used during furniture assembly to connect the frame to the doors. There are also other varieties that we will now get acquainted with.
What material to choose a kitchen set from: inexpensive and practical
There are some disadvantages here. But there are not many of them. This is a higher cost, complex installation and installation scheme, as well as a limited angle for opening the doors, since the door front is located inside the furniture body. In fact, the loop itself does not play a key role here. Decide for yourself how significant these disadvantages are for you specifically. They still need to be weighed against the benefits.
There are just as many strengths. Only they, as for me, turned out to be more significant.
To begin with, such hinges will be invisible when the door is in the closed position. This provides a better appearance and improves aesthetics.
Further, the internal hinges do not allow access to them from the outside. More relevant for entrance doors to protect the room from penetration. Although this can also play a role for furniture.
Furniture hinges are well protected from external factors and influences. This can especially be an important advantage for those who buy fittings for kitchen furniture located in close proximity to the sink or hob. Being inside, the hinges will be better protected from negative influences, and therefore will last much longer.
Objectively, we can say that there are more advantages than disadvantages.
But it's up to you to choose.
Other types of loops
So, all types of loops can be classified in different ways. Thus, there are different types according to design, purpose, method of fixation and application. In general, there are several dozen types of furniture hinges, some are more common, some are less common, but almost all find application in various types of furniture designs. In addition to four-hinged hinges, let's look at a few more variations of hinges that may be encountered by furniture assemblers or people who have bought new interior items and decided to assemble them themselves.
Card loops are considered the oldest. Their ancestor is a forged hinged hinge with a long overlay. Outwardly, they resemble an ordinary door hinge, only slightly smaller in size. The design consists of two metal strips connected in parallel using a thin rod that acts as a hinge. Nowadays they are rarely used, but are indispensable in the manufacture of retro-style furniture.
On a note! Such hinges can be collapsible or non-dismountable, with a different number of hinges. Also, sometimes the hinge plates can be shaped.
Butterfly door hinges
Pendulum type hinges or bar hinges make it possible to open the door 180 degrees. What happens is something similar to how the doors open at the entrance to a saloon in old westerns.
Mezzanine hinge structures are designed to attach horizontally oriented doors that will open upward. The hinges have a spring mechanism and also allow you to fix the door when open. They resemble ordinary overhead variations of loops.
Mezzanine hinge MK01
Ombre structures are used for so-called hinged doors. They will be mounted on both ends of the cabinet and do not require insertion, but may require minor milling (up to 2 mm). Then the sash can be opened 180 degrees. This is an ideal hinge for a folding table.
Hinge for folding elements
Secretory structures are similar to the card ones described above; they have an axial hinge and plates. They make it possible to open the façade downwards and keep it in a horizontal position. They can be accompanied by a special bracket that provides a supporting function. Usually installed in those cabinets where a bar is provided.
Blind hinges, otherwise called adit hinges , are used for doors on the side of the cabinet that is adjacent to the wall. They can be used to attach the door to the false panel.
Heel products are extremely rarely used because they are designed only for lightweight doors. But they can be installed on facades with any type of opening. Installation is carried out in the lower and upper parts of the sash.
Heel loops for furniture
There are special hinges for glass sashes . They also come in different types, but their advantage is that they can withstand significant loads, and they look very beautiful.
, hinges with 8 hinges, eight-hinged, appeared on sale . To install them, you do not need to resort to milling or cutting. This is an improved variation of the usual four-joint hinge. True, they are more difficult to install, and therefore, despite the absence of the need to carry out any preparation, such loops are rarely used.
8-joint hinge
What to consider?
If suddenly, for some reason, a person needs to choose and buy hinges on his own, then this issue must be approached wisely. And you need to purchase only high-quality awnings, despite the fact that they all look the same on the display case. It is better to take those that are more expensive, but from a trusted manufacturer, than suspiciously cheap ones. Poor quality hinges can:
How to choose furniture hinges
Important! It is worth refusing to buy Chinese hinges. These structures are very unreliable, as a rule, they collapse very quickly and cease to function. Low-quality alloys are used for their production. And China supplies defective hinges to our markets in very large quantities.
By installing cheap hinges, you can save money only in extremely rare cases. Typically, such structures require early replacement, which means additional costs and a waste of time for dismantling the old loop and installing a new one. The miser pays twice - a saying that is very true when it comes to furniture hinges.
How to choose furniture hinges
How to prepare for installation?
Installing hinges is a simple job and does not require much effort and time, but provided that the person has all the necessary tools at hand and also has certain work skills. For those new to the project, the task of installing a hinge can be very challenging. You can't just screw it on.
So, the most important tool you will need is a Forstner drill . It has a special working part with the same diameter as the hinge bowl (35 or 26 mm). Using this drill, you need to make special holes in a clearly marked place. The hinge bowl will be inserted into it, and the structure will be secured using screws screwed into special ears.
To install the hinges you will also need:
It is important to take into account the material on which the loop will be fixed. Thus, fibrous or loose materials are quite soft, glass ones are fragile and at the same time strong, etc. Each material uses its own specific type of fasteners, and in different quantities.
Materials and tools used
Furniture hinge diagram
It is not an easy task to install fasteners on the doors and sides of cabinets. In this case, accuracy is important in order to use them without fear of their breakage. But you can still install the hinge fasteners on the cabinet yourself.
Tools that may be useful for installing hinges
At the initial stage, you need to select the material and prepare the tools that will be used in the work. In this case, the material used to make the cabinet is very important, since its strength will directly depend on this, and each type of wood has its own fastening, which will also need to be taken care of in advance. As a rule, fixation is used from below and from above. If the doors are massive, that is, they have a length of more than one meter and are heavy, then another hinge is installed in the middle. If the door weighs about 20 kg, then it will require 5 hinges.
When assembling furniture, no complex devices are used. To install the hinges you will need the usual tools. It will be attached directly to self-tapping screws (4*16 mm), for which we will need a screwdriver. To correctly measure the distance, you will need a tape measure, and to mark the measurements you will need to prepare a chalk or pencil. To ensure the door stands level, you must use a building level.
Work order
Marking is a very important step when installing hinges. It involves marking the door where the hole for the hinge bowl will be drilled. Moreover, it is important to first find the place where the center of the hole will be located. And here it is important to understand that the number of hinges directly depends on the size of the facade itself and its weight . But in any case, you need to retreat about 7-12 cm from the edge of the door. The distance between installed canopies should not be less than 50 cm, provided that several of them are attached.
Table. Required number of loops.
| Options | Number of loops, pcs. |
| Length up to 1 m, weight – no more than 9 kg | 2 |
| Length 1-1.5 m, weight – up to 15 kg | 3 |
| Length up to 2 m, weight – up to 20 kg | 4 |
| Length 2-2.5, weight no more than 20 kg | 5 |
After marking, you will need to make holes for the hinges. They are performed using a special drill. It is best to place the door on a flat, hard surface, this will make it easier to work with. The depth of the recess should be approximately 1.2-1.3 cm. If you make it deeper, there is a risk of damage to the outside of the facade. And you need to drill the hole clearly vertically.
Diagram: loop fitting dimensions
Important! The cutter must be sharp and preferably new.
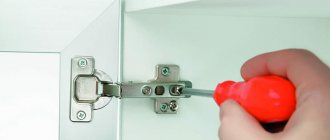
After drilling, you can install the hinges, and you will also need to adjust them. Only in this case will the door hang straight.
Calculation of the number of furniture hinges for installation
How to replace furniture hinges on an old cabinet
As the old saying goes: an old friend is better than two new ones. This also applies to furniture. I want the old, comfortable, favorite wardrobe to serve as long as possible. It is easier to replace fittings than to search for or order a similar piece of furniture.
First you need to determine how door hinges are used and which ones will be replaced. You need a tool, attention and instructions with step-by-step actions:
- Using a Phillips screwdriver, we unscrew the old hinges from the side where they are attached to the sides and, after removing the facades, we unscrew them from the door.
- If you choose the simple option (don’t understand the types of hinges) on how to install hinges on a door, take all the unscrewed elements with you to the store and they will select the same or similar ones for you.
- Screw on the new ones, but make sure that the holes match.
- And the last thing is adjusting the hinges.
After unscrewing the hinges and removing the doors, remember how and where each door hung so as not to waste time re-hanging.
It wouldn’t hurt to invite an assistant to support the door leaf when screwing in the new hardware.
For these steps you will need:
- Screwdriver.
- A ruler or tape measure for measuring the distance between old holes in order to select new ones with an accurate hit.
- A drill with a Phillips bit or the same screwdriver for screwing in new hinges.
Advice from a furniture installer: when installing hinges, it is better to replace the mounting screws with new ones.
If you are doing everything for the first time, it will not be superfluous to first understand the structure of the loop itself and its components.
detailed instructions
Step 1. You need to indent approximately 7-12 cm from the upper and lower edges of the door. In this case, the indentation in the instructions is made at a distance of 8 cm. You need to draw two lines strictly perpendicular to the edge of the door.
An indentation of 8 cm is made
Lines are drawn perpendicular to the edge
Step 2. Next, from the edge of the door to the center of the place where the hole will be drilled, you need to make an indent of 22 mm. This is the standard distance. And you also need to draw lines through the marked point, perpendicular to those drawn earlier.
Bottom space - 2.2 cm
Perpendicular lines are drawn
Step 3. Next you need to take a special drill with a standard diameter of 35 mm.
Take a drill with a diameter of 35 mm
Step 4. To make drilling easier and the drill clearly positioned, you need to make small notches using an awl at the intersections of the lines on the markings.
Using an awl to make indentations
Step 5. Now you can drill the holes. You can do this with a drill, or you can use a special router.
You can start drilling holes
Step 6. Once the holes have been drilled, you can try on the hinge bowl, and also, by aligning the holes for the screws on the ears of the bowl along the line drawn earlier, mark where the drilling will be done, but with a thin drill. Moreover, the points will not be on the line itself, but slightly to the side, with the ears aligned along the line.
Fitting the hinge bowl
Markings have been applied for future holes
Step 7. Now, using an awl, you need to make notches at the designated points to position the drill.
Notches are made to position the drill
Step 8. Next you need to drill holes for self-tapping screws measuring 4x16 mm.
Step 9. It is necessary to attach the canopy to the door again, placing the bowl in the hole, and screw it to the facade with self-tapping screws.
Step 10. Now you can attach the door to the cabinet wall. This is done like this - first you need to attach the door to the wall, choosing the position in which it should stand.
Now you can attach the door
Step 11. When applying markings, you need to ensure that the upper hinge screw, which will be attached to the wall, is in a position close to the door itself.
You need to mark carefully
Step 12. Next, it is important, after taking simple measurements, to set aside 17 mm from the center line on which this part of the canopy lay.
From the center line you need to set aside 17 mm
Step 13. After this, you need to attach the door again and make marks with a marker through the holes in the hinge, aligning them with the lines drawn at a distance of 17 mm.
Markers are used to make marks through the holes in the loop.
Step 14. Now you need to drill holes for Euro screws with a drill.
Holes for Euroscrews are drilled
Step 15. Next you need to screw part of the loop to the wall.
Part of the loop is screwed to the wall
Step 16. Then you can attach the door to the wall. It is important to get the front part of the hinge attached to the door onto the screw located on the part of the hinge that is fixed to the wall. Also, under the hinge that is fixed to the door, there is a screw with a “heel”, which is important to get into the groove located on the other side of the part of the hinge that is fixed to the wall.
This part needs to get onto the screw
The door is attached to the wall
It is important to do everything according to the instructions
Another photo of the process
Step 17. To prevent the hinges from coming apart, the outermost screws need to be tightened a little. There is no need to wrap them all the way yet.
The outer screws are tightened a little
Step 18. Now you need to adjust the door. To begin with, you should move it away from the cabinet wall by about 1-2 mm; you do not need to fix it tightly to it. Once the gap has been maintained, the screws can be tightened.
Step 19. There is another screw that will help you move the door left or right if necessary. In this case, there was no need to adjust it.
This screw in our example did not need adjustment
Video - Marking and drilling
Installation stages
Installation of hinges on facades is carried out in 4 stages:
What modern furniture is made of, an overview of the main materials The most important and difficult stage is considered to be adjusting the position of the door relative to the furniture body. If the work is done incorrectly, the sash will quickly sag and the cabinet (or any other product) will fail.
Creating markup
To install furniture hinges correctly, you must initially make even markings that correspond to the parameters of the hardware plate. Otherwise, there will be problems with opening and closing doors. The marking of furniture hinges is done as follows:
Despite the fact that templates for furniture hinges are made of durable materials, they must be handled very carefully. It is strictly forbidden to drill through them, otherwise the service life will be reduced. To determine the number of loops needed, it is worth studying the recommendations presented in the table.
| Door weight, kg | Facade height, mm | Recommended number of loops |
| 4-5 | up to 500 | 2 |
| 6-9 | 500-1000 | 2 |
| 10-13 | 1000-1500 | 3 |
| 14-18 | 1500-2000 | 4 |
| 19-22 | 2000-2500 | 5 |
It’s easy to make a template for inserting furniture hinges yourself.
Hole preparation
The next step will be preparing the holes. To make the notches correctly, you need to accurately follow the markings already made. To carry out this operation, a drill with a special drill and a milling cutter are used. The holes are made like this:
How to correctly arrange furniture in a small room, advice from designers
When the main holes for the screws are ready, you can move on to the next stage. Inserting canopies in accordance with the markings and formed recesses is much easier and of better quality.
To avoid damaging the decorative surface of the furniture, you should use a cutter. If drilling is carried out only with drills, then chips may form at the edges of the holes.
Hinge Attachment
The hinges are attached in the following sequence:
After fixing the screws, you need to check the strength of the canopy. It is recommended to try to loosen the hinge in the cup and move it relative to the surface of the facade. If no changes are observed, then the fittings are secured well.
Hanging the door
The most difficult stage in this work is the installation of the door. To simplify the task, if possible, it is worth laying the furniture body so that the doors are attached to the hinges in a horizontal position. Algorithm for installing doors:
Advantages of individual furniture design, stages of work
Hanging the door is not the final stage of work. Even after the initial adjustment, additional measures must be taken to align the position of all components.