<
>
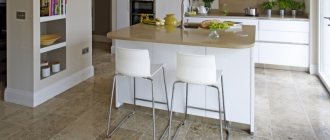
A beautiful and at the same time comfortable kitchen is the dream of any housewife. To arrange the space stylishly and rationally, you must first decide on the furniture that will be located in the kitchen. Particularly popular are islands - free-standing furniture structures, one of the varieties of which is an island with a bar counter.
Kitchen bar counter - countertop
Before we dive into the world of wonderful kitchen dining bars, let's take a look at their more practical versions. It can really be an alternative to an island in a kitchen where you would normally install a sink. Some of these designs have additional features such as drawers, built-in ovens or shelves if you wish.
It makes more sense to combine a breakfast bar with one or two practical features if you don't want to buy a separate dining table and have cooking space. Some counter kitchen peninsulas are designed specifically to accommodate both countertops and kitchen areas. The difference in height can be one of several solutions for separation from the main kitchen
Design functionality
There are several ways to use an island combined with a bar counter:
- Kitchen work area. There are two design options: with or without technology.
Option with a work area without equipment
- Part of the work triangle. A sink or stove is installed on the island.
- The storage system is located at the bottom of the island. Both open and closed shelves are used. An open island looks visually lighter; it is used more often in kitchens with medium dimensions.
Island with storage system
The stand itself is additionally equipped with rotating shelves and hanging holders for glasses.
Option with glass holder
- Module for built-in equipment. Household appliances can be installed in the island, for example, a coffee maker, freezer, oven.
With built-in oven
Dining peninsula for the kitchen
A bar counter in the form of a dining peninsula can be simple and practical. With these, you really don't have to buy a dining table. These dining areas may look more modern, but that doesn't mean they can't be stylish and elegant.
Some kitchens include retractable breakfast bars, while others have full, full-size dining space. There are many creative solutions for the kitchen table. It can be in old metal or attached to the main kitchen at a sharp angle. The possibilities are endless.
Which form to choose
There are several options:
- The rectangular island part of the set with a bar counter is convenient to use for storage; the design does not take up much space. It is also easier to install appliances and a sink on the lower-level rectangular countertop.
Rectangular shape
- For zoning and as an interesting, unusual interior detail, a square island with a bar counter is used. In this case, the stand can not only be standardly positioned and run along one side of the square, but also run along both sides.
Standard square shape
- In medium-sized kitchens, where there is not much space for people to pass through, round islands with bar counters are installed. They do not have sharp corners, look cozy, and you can create a lot of seating.
Round shape
- Non-standard shapes are used for corresponding styles in the interior. Such designs are created to order; they can have a triangular shape and consist of several related elements. They are used only in spacious kitchens, possibly combined with a living room, since non-standard shapes are not very convenient in everyday life and take up a lot of space.
Custom shape
Kitchen breakfast bar
If the dining room seems unnecessary and uncomfortable to you, install a small bar table for breakfast. Just don't forget to pay attention to the chairs.
A breakfast bar not only allows you to grab a quick bite before heading to work, but can also welcome guests with the utmost hospitality. If you plan to use it to entertain friends and family, perhaps a longer, more spacious peninsula will suit you. Otherwise, this is the perfect place to bond with your child or spouse.
Rack manufacturing process
Now let's move on directly to performing the work. First, prepare all the necessary tools so that you don’t have to frantically run to the store during the process. The list of what you need depends on what materials you are going to use for production. But there are some elements that are included in the general list:
- fasteners. These can be self-tapping screws, screws, corners, staples, etc.;
- pencil, tape measure, ruler;
- building level. Do not neglect using this tool, this is the only way you can get a perfectly level tabletop.
Also stock up on all the necessary materials for making the tabletop and base. Let's get started.
laminated chipboard
The easiest way to start is to purchase a table top or window sill made from this material. At the same time, in most stores you can immediately order slab cutting. To do this, the service needs to provide specific measurements, or better yet, a drawing.
However, you can make the cut yourself. In this case, it will be necessary to then cover the sections with a special film, which will protect the internal structure of the chipboard from external influences.
Everything else is simple.
- Screw the support to one edge of the tabletop. This could be a special bar “leg” or just a piece of metal pipe.
- Screw two brackets (large corners) to the other edge.
- Then turn the prepared tabletop over, place it in the place intended for it and mark on the wall the places where the fasteners will be located, and on the floor - the location of the support.
- Remove the stand. Drill holes in the wall and drive dowels into them. Attach a thrust bearing to the floor into which the support will be inserted.
- Put the stand back in place so that the “leg” fits into the heel. Using self-tapping screws or self-tapping screws, attach the tabletop to the wall.
You can install a kitchen sink in the same rack. To do this, first cut a hole of the appropriate size in the tabletop slab, and then follow all the above steps. After installing the stand, you can mount the sink and connect it to the sewer.
Board and foam blocks
To make it you will need boards for the tabletop, foam blocks for the base and elements for wood paneling.
- Place the foam blocks in the location chosen for the rack, securing them with cement.
- Lay one or more boards on top of the foam concrete, securing them securely to the base.
- Sand the countertop thoroughly. This will protect you from splinters, and at the same time help show off the beautiful grain of the wood.
- Paint the boards intended for cladding the base in the chosen color. After complete drying, sand.
- Attach a sheathing of wooden slats to all sides of the foam concrete. This can be done using self-tapping screws.
- Secure the boards to the sheathing using nails.
- Paint the countertop. To do this, you need to choose the most durable, but non-toxic paint.
- After the countertop has completely dried, coat it with varnish.
Instead of foam block, you can use part of the wall left after redevelopment. This often happens when complete dismantling is prohibited. Place a countertop on top of the remaining area and you will get aesthetic and functional zoning of the room.
Wood
Consider creating a wooden bar counter with a closed base. You will need timber, plywood, a sanded board for the tabletop, and wood varnish.
- First of all, you need to assemble the base frame. Connect the beams according to your drawing. At the same time, each angle between the frame elements must be strictly straight so that the stand is level.
- Next, the frame should be covered with cladding. Plywood is often used for this, but MDF panels can also be used. If the frame is completely closed, then it needs to be sheathed on all sides. If there are supposed to be niches or cabinets inside it, then leave the corresponding space uncovered.
- Place the bar top on the finished base and secure it. Cover the ends with decorative strips.
- Thoroughly sand all surfaces of the structure so that they are perfectly smooth.
- Treat all surfaces with impregnations: first with an antiseptic, then with a composition that makes the wood fire-resistant. Wait for it to dry.
- Next you can do the finishing touches. This can be coating furniture with varnish or paint, creating patterns on the surface, stuffing decorative strips, etc. It all depends solely on your taste.
Drywall
All actions are performed in exactly the same way as in the case of wood. There are only a few differences:
- to make the base lighter, it is better to use a thin metal profile instead of a wooden beam;
- For the countertop, you can choose not wood, but, for example, glass or plastic. This way there will be less load on the drywall;
- The finishing can be absolutely anything; both plaster and panels are suitable. You can even cover the base with wallpaper. Drywall has a perfectly flat surface, so any finishing material fits perfectly on it.
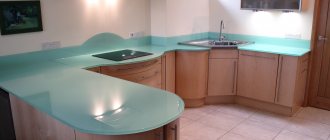
Stone
A stone countertop requires a very strong base. The best option is the same foam blocks that were already mentioned above. Foam concrete is good because it has high strength despite its fairly low weight. In addition, it is very easy to attach sheathing to it, due to the porous structure of the material.
The process of making a stand is no different from one made from foam blocks and boards. Just replace the wood with a stone countertop here. By the way, you should approach the choice of a specific material thoughtfully. Not every stone is well suited for kitchen furniture.
Marble is considered the best option. It is beautiful, almost impossible to break or scratch, but it is very easy to clean from any dirt. True, the cost is high. If you are not ready to bear such expenses, then you can pay attention to granite. It also has excellent characteristics and beautiful appearance.
Board and bricks
Another design option with a monolithic base and a wooden tabletop. This bar counter is perfect for loft-style interiors or for use in a gazebo in a country house, in a private house, etc.
As you might guess, the base of the rack is ordinary brickwork of appropriate dimensions. A wooden tabletop is placed on top of it. If you are planning a loft-style counter, then the base does not need to be decorated in any way - bare brickwork would be quite appropriate. As a last resort, it can be whitened.
Pallets
To make a rack from pallets, you need very little time and effort.
- Remove all nails from the pallets and replace them with self-tapping screws. This will increase the strength of the structure.
- From the pallets placed on the end, assemble the rack body.
- Place a plywood tabletop on top of the body and secure it.
- Finally, apply the finishing touches.
This design is characterized by its low weight and, therefore, mobility. You can place it on the balcony, since it will not load the ceiling in any way. If you make the tabletop removable, then this option is perfect for small-sized apartments - for example, for Khrushchev. You can put up the counter only when you are receiving guests, and then put it away in the pantry.
Foldable design
The best option for small homes is a folding stand. It is a tabletop mounted on the wall using hinges. Both the narrow side and the long side can be used for fixation. In the first case, the length of the stand will be limited, but in the second there is no such problem.
- Make markings on the wall to indicate where to place the fasteners.
- Drill holes and screw hinges to the wall.
- Screw the second part of the hinges to the tabletop.
- Also attach the support tube to the tabletop using a hinge mechanism.
- Fix a thrust bearing on the floor, against which the pipe will rest when the tabletop is raised.
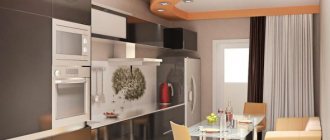
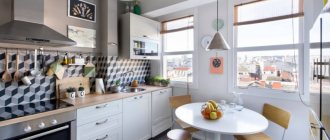
Small kitchen bar counters
Although small kitchens look better without upper cabinets or other visual obstructions, such as a peninsula or island, the design can be very pleasing. Even internal columns may not be a problem.
A tiny peninsula may seem gimmicky, but in a small home it can make a beautiful transition space between the kitchen and dining room. You can also use it as a work area if you are dedicated to finding a chair that won't ruin your back. Very useful for small apartments.
Photo ideas
You can see what a kitchen with an island and projects with photos look like below.
Let's discuss this article together:
Click to cancel reply.
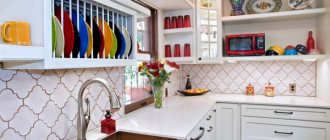
Convenient storage kitchen peninsulas
Some kitchen peninsulas are more convenient for storage than others. Most come with cabinets, but you can choose drawers, cubes or shelves instead. This is especially useful in open layouts. For example, a dining peninsula can look more impressive with glass fronted kitchen drawers.
Open shelving is another great way to display your best accessories or store books for your morning reading. Drawers are designed for more organized storage, so if you are planning to store cutlery on your peninsula, then this is the best choice.
Selection of materials for manufacturing
You can make a bar counter from different materials. Each of them has certain advantages and disadvantages. Most often, to create such furniture at home, the following is used:
- plastic. Lightweight and inexpensive material, which is presented in stores in a very wide assortment. The advantage lies in the wide choice of designs, as well as the simplicity of work: plastic is easy to cut and process. The downside is that the material has low strength;
- Chipboard. Cheap material consisting of sawdust and resins. It does not tolerate moisture well, so it needs a waterproof topcoat. In addition, it can be quite harmful due to the adhesive component;
- Chipboard. This is the same particle board, but covered with a laminate. Kitchen worktops and other similar furniture are often made from this material. Lamination reliably protects the base from various external influences;
- drywall. The best option for complex structures (for example, two-level). A stand from it can be made into a shape, since drywall can be given any shape - it is easy to cut. The material is absolutely environmentally friendly and perfectly accepts any finishing. Minus - not very high strength;
- wood. Natural wood always looks very advantageous in interiors. It is durable and beautiful, and treatment with various impregnations helps make it resistant to water and fire. But working with wood is quite difficult. Besides, it is expensive. It is better to take on making your own bar counter from wood when you already have at least some experience working with this material;
- bricks. This is a rather original option, which is usually used for a certain stylization. As a rule, loft interiors are created using bricks. Brick blocks are used to lay out the base. The tabletop in this case is usually a board;
- natural or artificial stone. Of course, this means that you will purchase a ready-made countertop from this material, and will not process it yourself;
- wooden pallets. The use of pallets has recently become very popular in the hand-made industry. Among the undeniable advantages are the low cost and high strength of the source materials.
As you can see, there are many different materials you can use. You should choose one of them based on the following criteria:
- complexity of the work. If you are new to making furniture, then take something simpler: drywall, pallets, plastic;
- style requirements. Many design areas require the use of only natural materials. For example, plastic will be completely unacceptable in eco-style. For such interiors it is necessary to choose wood, stone, brick, etc.
Also consider the weight of the future rack. For example, a brick product has a large mass; not every floor can withstand it. The same can be said about a bar made of stone.
Kitchen peninsula projects with decorative countertops
The current trend for bar counters doesn't stop at dining tables. Even kitchen countertops are getting natural, organic materials. Apart from natural wood, you will find that marble and marble effect materials are in high demand. Metal and glass are also widely used for kitchen peninsulas and bar counters.
Corian, melamine and other more affordable materials can also look quite engineered. It all depends on what the manufacturer can do with any of them, but also what kind of design you're going to work with.
Kitchen island
Many modern designers adhere to the principle of centralization. It is no longer fashionable to place kitchen units exclusively along the walls. An additional work surface is installed in the center of the room.
Reference. The kitchen island is a free-standing part of the set. It serves many functions: additional work area, bar counter and storage space.
Initially, this arrangement of furniture was used by restaurateurs. A table in the center of the room allowed more cooks to cook at the same time without anyone interfering with each other. In the 60s, the idea migrated to residential apartments.
The kitchen island is loved by many housewives for its practicality and ease of use. Its advantages:
- Functionality. Furniture can become anything depending on your preferences. The island has a cooking area, a bar, and a mini-fridge.
- Practicality. This solution will fit perfectly into any style from classic to loft. The large surface of the table will allow several people to cook at the same time, and will also replace a full-fledged dining group.
- Convenience. An important rule for arranging a kitchen is maintaining the work triangle. The island will create an ergonomic space with three work areas one step apart from each other.
- Design. The solution looks stylish and modern. It seems that everything in the kitchen has been thought out to the smallest detail. An island will be a great idea for a studio - it will separate the work area and the living room, preserving free space and comfort of movement.
The size of the room does not always allow installing this type of furniture. For such cases, there are peninsular options that will fit into a small kitchen.
Kitchen peninsula designs with sectional countertops
Like an island, a peninsula can also have a cantilevered, stacked, or sectional top. This can be done to combine the kitchen and breakfast bar, add some length to a dining peninsula, or divide the space between work and eating surfaces.
Modern kitchen peninsulas and breakfast bars are as functional as an island and can be a stylish addition to any kitchen. When planning your kitchen, keep this in mind because a peninsula might just help you save precious square footage.
Combination of shape and layout of the kitchen unit
The distance between the island part with the bar counter and the rest of the furniture should be at least 120 cm. There are recommendations from designers regarding the shape of the structures.
| Kitchen set shape | Island shape with bar counter |
| Straight | Everyone fits |
| L-shaped | T-shape or custom |
| U-shaped | Straight |
L-shaped kitchen with T-shaped island
Mini island idea for small urban kitchen
This mini island idea for small urban kitchens comes from La Cornue.
They offer a mini island that will allow you to simply shift some of your usual kitchen areas.
Just because you're in a compact living space doesn't mean you have to give up the chef's kitchen.
What about that yellow color spot? Isn't this great?
You don't have to give up design or functionality in a small space.
Calculation of dimensions for drawing
Before you start making a rack, you need to build a drawing or diagram. This will help you correctly calculate all the necessary indicators, and also not get confused during subsequent assembly.
The construction of the drawing is based on the dimensions of the structural elements. There are standard dimensions that you can use as a guide:
- height: for island structures from 110 to 130 cm, for those adjacent to the set from 85 to 90 cm;
- the width can vary from 55 to 80 cm. The wider the stand, the more convenient it will be to use;
- length depends on the expected number of users. Installed at the rate of 60 cm per person.
Sculptural kitchen island by Pininfarina
It's not often that we find a design that surprises us - but this is one of them. To celebrate 25 years of collaboration, Edi Snaidero and Paolo Pininfarina have created this limited edition kitchen worktop with 84 components to help you choose the style and configuration that best suits your lifestyle.
The material is carbon fiber with a glossy black lacquer finish. The cabinet doors are in a soft champagne lacquered finish and the work surface is clear black glass.
And the sum of the details adds up to something impressive. The thoroughly modern style is also classic.
This high design island and countertop can be found anywhere from a modern glass loft to a traditional fine home.
Combining design with function isn't always easy, but Sanidero and Pininfarina get it done. This is, of course, the work of true masters.
Designer tips for planning an island kitchen
To correctly calculate the size of the kitchen island and equip it inside, you just need to follow the designers’ rules:
- The easiest way to achieve harmony is to use the working triangle rule. It was designed specifically for comfortable control of three kitchen components: sink, stove and refrigerator. In the classical sense, they should be positioned so as to form a right triangle.
- If the island is intended only for decoration or as a replacement for the dining table, but the space does not allow it, a through model is needed. That is, without cabinet furniture, which does not visually compress the space.
- The color of the table may differ radically from the general color scheme. In this case, you can use the complementary method of tone mixing.
- There should be lighting above the island. If there is a stove there, the hood should have a powerful lamp. Often several hanging lamps are simply placed above it, creating directional light. Spot or track lighting will do.
- You can win a lot if you install mensol. In traditional country and Provencal style, this is a small hanging shelf. Its purpose is arbitrary: a place to store glasses and mugs, an additional holder for knives, etc. In fact, it does not take up space, it is easy to install, but it is very helpful in the work.
- Since it is expensive, countertops are often made from cheaper materials, such as MDF, artificial stone, and various types of ceramics.