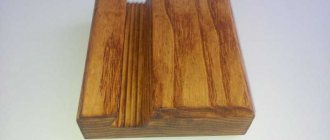
Drawings and diagrams of a cabinet made of chipboard with your own hands for calculating the details
A do-it-yourself drawing based on the above photo of a chipboard cabinet will look like this:
DIY chipboard cabinet diagram with dimensions:
You always want to make furniture with the greatest possible savings. When developing a project, the Basis-Furniture Maker program turns out to be very convenient. Just go to the “Cutting” application and the product automatically drawn in the drawing will be “decomposed” into parts onto a sheet of chipboard.
Judging by the way the parts “lay down” on a laminated chipboard sheet of 2440x1830 format, we can conclude that the costs for materials are quite optimal. If desired, you can expand the case to 400 mm - in this case, the capacity of the cabinet will increase, and the cost of its production will remain practically the same. You can also fill the central part with drawers (you will have to buy additional guides) or add shelves to the sections. When making changes, be guided by the size of the balance.
If you make a chipboard cabinet with your own hands for an aquarium, then you need to include a solid back wall (in our case, about 900x1200). Then for production you will need a larger sheet of chipboard, format 2750x1830 - a sheet of 2440x1830 will no longer be enough.
If the bedside table will be in the aisle, with a visible “side”, then I usually put a chipboard backdrop on this side.
So that the overlapping fiberboard is not visible, it will “start” from the next section.
Of course, fiberboard can also be inserted into a groove, but this is more labor-intensive to make with your own hands at home.
Hanging flower shelf
Simple wooden shelves suspended on a rope are well suited for country style, or as they also call eco-style. There are many advantages: space is saved, it’s exclusive, and plus your walls will be safe. I suggest making a hanging shelf for flowers like in this photo; as you can see, it’s a whole mini garden.
For manufacturing, you can use step-by-step photos, an excellent master class that clearly shows the whole process.
A few nuances. Instead of marking each board, mark one and drill small holes through the entire stack. This way it’s faster and you won’t make a mistake with the sizes. Also make sure that the brackets or beam (depending on where you will hang it) will support the weight; the shelf is not small. Fix the knots only after you have carefully leveled the boards; use plastic ties for alignment, as in the photo.
The main stages of forming a frame system, collecting equipment and marking
Modern TVs not only have a wide screen diagonal and an attractive appearance, but are also lightweight.
One of these solutions is the formation of a frame system, which in its finished form will act as a bedside table for the TV. It can be made from various materials and their combinations, but the simplest and most economical would be to create a plasterboard system. Such a decision has many advantages, but requires a responsible approach and care.
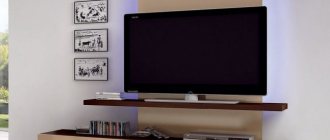
TV stand shelf option
- collection of tools for drywall;
- design and marking;
- frame assembly;
- covering the structure with plasterboard;
- finishing.
The principle of creating a TV table does not necessarily have to have the above structure. However, it is precisely this that is optimal and makes it possible to complete the work in the shortest possible time. In this case, the first stage, marking the beginning of construction, is the collection of the necessary tools, the list of which is as follows:
Tools for working with drywall
- pencil;
- drywall knife;
- roulette;
- building level;
- plumb line;
- Screwdriver Set;
- metal scissors;
- screwdriver;
- set of spatulas;
- container for mixing the solution.
To create a simple TV stand from plasterboard, you don't need many tools. However, the above list is more than enough to carry out the installation of a frame structure. Design is the most important stage of work, since the result of the work largely depends on its accuracy and quality. Initially, you need to decide on the installation location of the system, its size and purpose. The creation of the frame is carried out exclusively using a ready-made template based on the available geometric data.
Drawing with the dimensions of a homemade plasterboard cabinet. For a standard ray TV, more massive reinforced cabinets are used that can withstand the large weight of the device, and for new LCD models the design can be miniature but durable. Options for homemade TV stands can be seen in the photo:
In addition, creating a plan allows you to not only get an idea of the location of the TV, but also the practicality of its placement. You can draw it purely schematically on a sheet of plain paper. However, it must necessarily indicate the dimensions of the object, its aspect ratio and the number of racks. After creating the project, appropriate marking is carried out, i.e. information from the plan is transferred to the surfaces of the floor and walls.
Cinder block construction
Remains of building materials are often used in interior and landscape design. Cinder blocks are loved by users due to their brutal appearance and versatility. It also acts as a strong base for the TV, making the homemade stand stable.
To build a stand, you will need an even number of blocks and 2-3 boards to suit the size. You can stack them on top of each other, assembling the parts like a construction set. The middle board will serve as a shelf for devices, and the top one will serve as a tabletop.
How to choose?
When you go shopping for a tabletop TV stand, you need to have a clear idea of the type of model: it will be an effective decorative product that supports the overall design of the room, or a convenient functional design on brackets.
When choosing a decorative stand, you should pay attention to a number of criteria
The shape, color and material must match the style of the room. To do this, you should remember that metal is suitable for the high-tech, loft, and minimalist trends; glass - fusion; plastic – for modern interiors; wood is universal. You can choose a stationary or rotating option.
If there are small children in the house, it is better to prefer a stand with a clamp
Rigid fixation will protect the equipment from falling. For a TV installed on a desktop, it is advisable to pay attention to a stand with shelves for stationery or computer supplies, or an organizer stand. This choice will increase the functionality of the table and help put little things in order.
There are stands with channels and special fasteners for wires
Such options significantly improve the appearance of the countertop containing the equipment.
The most important selection criterion is stability, reliability and compliance with the weight of the electronic device. You should ask the seller about the load that the stand can take, comparing it with the weight of your TV.
When it comes to choosing a table stand with brackets, you should also take into account certain nuances.
It is better to prefer a tilt-and-turn or tilt-and-slide option. This will allow you to move the screen in the desired direction
But you should remember the limitations - the display diagonal should not exceed 40 inches. If the TV is fixed in one position, you should not overpay - you can purchase the simplest fixed brackets.
Those who love comfort and are willing to pay for it should pay attention to models of self-adjusting fasteners on the control panel.
Be sure to check the mounting capabilities with the weight of your TV.
You should not purchase holders with plastic elements. You can find a lot of fakes on the equipment market, and stands are no exception. But they will have to hold on to expensive electronics
It is better to choose products from trusted brands. Or ask the seller for a safety certificate: if the bracket meets modern requirements, it will be marked TUV.
When choosing a TV stand, you should remember that the presentation of technology to the viewer is very important. An inconveniently located screen can make it impossible to enjoy watching your favorite movie. And yet, the stand must be 100% reliable, especially if there are small children living in the house.
For a review of the desktop monitor bracket Kroma [Office-11, see below.
Types of shelves for TV
Modern flat-panel TVs come with wall brackets. This is convenient, but only when the TV screen has a sufficiently large viewing angle - at least 120 degrees. Opposite a window or other light source, such a mount is not justified - the display glares, and there is no way to rotate the TV. For small “cubes” such shelves are produced, but CRT TVs are becoming a thing of the past along with bulky VCRs.
Factory model for CRT TV
If you set yourself the goal of making a universal TV shelf with your own hands, then nothing simpler than the classic “almost invisible” option has yet been invented. Two purchased furniture boards 500x500 mm, an electric jigsaw and a little fiddling - an ordinary universal shelf can be made in an hour, including installation time.
Classic shelf option
However, in my opinion, the optimal model of a TV shelf should combine the following functional features:
- The ability to rotate the screen, that is, not a rigid mount on the wall, but a classic stand.
- Corner location. In the kitchen and small rooms, it is most convenient to place the TV in the corner.
- Additional shelves for a DVD player (Blu-ray, Transgalactic transmitter, magic ball or whatever else they invent) and all kinds of control panels.
- The possibility of hidden wiring to all this crap, that is, the absence of a back wall.
What to make a cabinet from?
The main materials for the manufacture of cabinet furniture include:
- Wood, or rather furniture panel. The material is not the easiest to work with and use. Different species “behave” differently; you need to have experience working with wood in order to assemble a high-quality structure. On the other hand, it allows you to create a unique design.
- MDF is a popular material: it has a wide range of veneer and laminate cladding, and is easy to cut and assemble.
- Plywood is the most affordable and lightest. Most of the furniture of the last century is made from this material.
- Chipboard is an analogue of plywood, a little cheaper, has the same advantages, but differs in appearance.
For those who chose wood there is another nice feature. In the workshops you can ask for a pattern or engraving to create a unique interior.
Element edging
To make the ends of the cabinet itself look attractive and unique, it is recommended to trim all parts before assembly. For this purpose, it is considered optimal to use a special edge made of PVC or other material. PVC edging is considered inexpensive and easy to use, so the work is accessible even to beginners.
PVC edging can be embedded or glued to the edges of existing parts, and the choice of method depends on the wishes and skills of the person creating the structure.
A wooden cabinet can be edged in different areas, but most often this process is performed for those places where there is a high probability of damage during operation of the product. The entire process of edging parts is divided into stages:
- The cutter is correctly positioned in the center of the end;
- the edges of the parts are polished, and it is important to ensure that chips or other problems do not appear that are almost impossible to eliminate;
- various grooves are carefully milled;
- Next, the edge is stuffed carefully, for which you need to use a rubber mallet, and during work you need to ensure that impacts do not lead to damage to the integrity of the parts;
- the ends of the edging are cut off from the ends, after which the elements are ground flush.
Article on the topic: When matchmakers will be shown on TV
A design made with such edging will look really attractive and modern, so there will be no unsightly and untreated areas.
Fastening the edging
Classification
The width of the shelves directly depends on the size of the TVs being installed, so if you have a wide TV of an older model, then the shelf should be appropriate. Flat models are attached with special brackets and plugs that allow you to position the TV screen at a certain angle for the eyes. But if we talk about old “boxes”, then for their installation large structures are used that can withstand heavy weights.
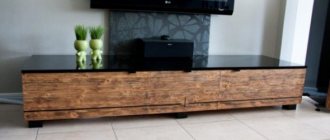
Samples of shelves for TV
When choosing a future design for a TV, you need to start from the size of the device. But if for old TVs shelves with simple designs that do not turn or tilt are mainly used, then for modern models there is a wider choice. Below are the main options for hanging shelves that you can make yourself.
Wide hanging shelf
Table. Types of hanging shelves.
| Shelf name, photo | Description |
| Corner | A simple shelf, made in external or internal version. Making a corner shelf is not difficult, so many beginners choose this option. |
| Wall-mounted | An excellent presentable shelf that allows you to conveniently and beautifully install a TV or other items. But if the TV is an old model, then it will not look so stylish on such a modern shelf. |
| Hanging | Another type of wall shelves. This option will fit perfectly into the interior of small rooms where you need to save space. The disadvantages of hanging shelves include the complexity of their design. |
| With bracket | This type of shelf is used quite rarely, although it looks very attractive. It is very difficult to make such a product yourself, especially without special skills or experience working with wood. |
| Shelf-stand | A small cabinet that does not stand on the floor, as is usually the case, but is attached to the wall. The design of the shelf-cabinet has additional shelves where you can store useful things, for example, a tuner or discs with films. |
Wall shelves in the interior
Metal stand
A metal flower stand, which can be made independently, looks very aesthetically pleasing and openwork in the interior.
Those who have little skills in working with a welding machine can make stands with only:
- thin metal rod;
- welding wire;
- white, silver or gold paint.
For a simple floor stand you need:
- several rods (3-5), of different sizes, twist both ends tightly into a curl;
- Align the rods along the bottom edge and weld in the middle;
- move the ends with curls in different directions;
- weld small shelves to the upper curls;
- paint.
Making a shelf for a TV
As a result, I ended up with this structure. It can be hung or placed on the floor, which only increases its functionality.
Let's look at how to make such a shelf for a TV
List of necessary preparations
If you are faced with the question: “How to make a shelf for a TV with your own hands?”, and you mean a single copy, there is no point in bothering with buying solid sheets of chipboard, especially in two colors. Furniture panels and a few tools in combination with a working head and “straight” arms will allow you to achieve the desired result.
We take furniture panels of standard sizes, 16 mm thick (and the corresponding edging).
First color:
600x600 mm – 3 pcs. Blanks for shelves. The following diagram shows how they need to be cut to get closer to the ideal. An electric jigsaw with a file for finishing cuts on wood and chipboard will help you.
Layout of horizontal shelves
Second color:
- 450x200 mm – rear insert.
- 450x400 mm – 2 pcs. Sidewalls.
Manufacturing and mounting to the wall
In the case of a shelf, we use a U-shaped edging instead of an edge. It will also serve as a side to prevent the equipment from slipping. Before clicking the edging, prime the ends with PVA emulsion and wait for complete drying. Then we apply a “roll” of “Moment” glue on the surface and put on the edging. It is better to trim the excess edging with a stationery knife, but very carefully so as not to damage the laminate.
The picture shows the slots in the rear insert, but you can do without them - there is enough space for the wires.
All ties are made using 5x70 mm confirmats - they are ideal for assembling such structures. Let me remind you that we drill through the plane with a diameter of 8 mm, and into the ends - 5 mm to a depth of approximately 60 mm. The disposable key for confirmation breaks after the third scroll, so stock up on a hex bit - it will come in handy in the future for assembling other furniture.
The resulting structure must be fastened to the wall correctly and permanently, if you do not want to ruin all the equipment at the same time. I used 6x120 mm dowel nails, which I used to screw the shelf to the wall directly through the sides. I hid the entire bundle of wires (antenna, electrical wiring and Internet) in a corner cable channel, running it from the bottom to the middle of the height of the shelf.
As a matter of fact, I have already explained how to make a shelf for a TV. However, such a narrow specification of this design upsets me and prompts me to comment. The fact is that this version of the corner design is actually universal. By changing the dimensions and number of horizontal planes, you can fill the corners of the rooms with simple and convenient:
- Bookcases.
- Shelves for flowers.
- Cabinets for various equipment…
... and other devices, including spare storage for women’s cosmetics and perfumes, as well as keys and mobile phones, on which all sorts of women’s cosmetics and perfumes are always spilled. All in your hands.
Good luck to you!
Lightweight hammock
The hammock is made of 100% polyester fabric, which is durable, non-stretchy and comfortable. It's inexpensive and easy to do.
You will need:
- 4 m of 100% polyester fabric.
- Gutermann polyester thread
- Sewing machine
You will need to cut the fabric to create a rectangle that is 2.9m long and 1.5m wide. This is usually the original width of the fabric on sale. Sew the long edges. Roll up the hem with the long edges. This will prevent the fabric from stretching under the weight. Then sew on the short edges. Make a roll edge, but with three parallel seams. Now that you have the main part of the system, you just need to cut the hanging lines along the channels and you are ready to spend long pleasant nights in your new hammock!
Photo source www.instructables.com/id/Ultralight-Backpacking-Hammock/
Home Hammock Stand
If you already have a hammock, then you don’t have to wait for summer, you can hang it at home. To do this, the author suggests making a simple stand like this. For this you will need:
- 2 2x4 beams, lengths 2.5 m, 1.8 m and 1.2 m.
- 8 bolts 14 cm
- 4 bolts 15 cm
- 24 washers and 12 pcs clamp washers
First step, make corner cuts for the beams that will hold the hammock. The author made a 30 degree cut so that the angle to the floor was 60 degrees.
The most difficult part is drilling the holes through which the corner beams will be attached to the base. The inclined beams must be “sandwiched” between two 2.5 m beams and bolts that will pass through all three parts. It should also be noted that the inclined beams are not flush with the support beams. This is because the base will rest on top and therefore must be raised approximately 5cm from the floor.
Photo source www.instructables.com/id/DIY-Hammock-Stand/
Installing a hammock indoors
The motive for installing a hammock in a room can be different, in this case the author thus saves space in a small room. The main problem is to make strong fastenings and not damage the wall. You can read how the author solved this problem in the instructions on the author’s website, because you won’t understand much from the photographs in the gallery. You'll just need to do some calculations. Think about how high you want to hang the hammock, how far it should be from the floor, and what the distance between the attachment points should be. You should consider these factors when planning where to install your hooks.
Photo source www.instructables.com/id/Hang-your-hammock-indoors/
Assembly
After preparing all the parts that act as parts of the future structure, the assembly of this bedside table is carried out. To make your own TV stands truly high-quality and reliable, the basic rules of this process are taken into account:
- All parts are connected. To do this, you can use different fastening methods. Most often, holes are drilled in different elements, after which dowels are used for a reliable connection. Another method involves the use of self-tapping screws designed for working with wood or special confirmations, and the caps of all fasteners should be recessed quite deeply into the material. To prevent them from spoiling the appearance of the structure, special decorative stickers are used. The third option for connecting parts involves the use of eccentrics, which are used everywhere in the process of manufacturing various furniture. The difficulty of this method is that to work with eccentrics you must have the appropriate skills, since if you incorrectly calculate the depth or drill not too accurately, a through hole can be obtained;
- different shelves or doors are installed if they are planned in such a bedside table. Their number may vary, so it is possible to make a bedside table containing the optimal number of different compartments. Their sizes depend on what exactly is planned to be stored here;
- The boxes are being assembled. They are usually made from the same material that was used to create the entire cabinet. The depth and other parameters of such boxes completely depend on what will be contained in them. The facade must certainly be well suited to the entire structure;
- The fittings are fixed, making it easy to use different drawers or cabinets. For this purpose, handles and guides are used along which the boxes move.
Thus, the procedure for creating a cabinet on which the TV will be installed is a fairly simple and understandable process, for which different materials and elements can be used.
Front panel elements are glued together using acrylic
Front Panel
All elements of the cabinet are glued together and dividers are added
Trying on the front panel and cover
Before gluing the stand, assemble it and secure it with clamps
We adjust all sides and glue the stand
Tools
Assembly of any furniture is not possible without a certain set of tools. you need to prepare them first. The easiest way is to order cutting of the material in the appropriate workshop, but if you plan to make the parts yourself, then you will definitely need an electric jigsaw with suitable blades.
Use professional tools to make furniture.
In addition, you will need:
- pencil or chalk for marking;
- cardboard or whatman paper for cutting out templates of cabinet elements;
- roulette;
- clamps for pressing parts;
- glue suitable for your material;
- edge tape;
- building level;
- sandpaper or sanding machine;
- fastening elements (screws, guides, etc.).
If the product is of a more complex format, then another tool may be required.
Materials
Bedside tables and shelves for a TV set are furniture components, and the choice of materials in such a situation is quite extensive, varied and limited only by the consumer’s budget. Wood, glass, steel, plastic - the use of the appropriate material will both increase the functionality of the product and add additional sophistication to the interior decoration.
Glass stand. It can be colorless, tinted or matte in the form of tempered glass (Stalinite), which meets safety standards.
All presented materials have excellent performance qualities, will perfectly complement any interior space and, with proper care, can last for many years.
Attaching the legs
After creating the bedside table, the final processes are implemented, consisting of simple steps:
- legs are installed, and they can be stationary and adjustable, and their number depends on the size and parameters of the cabinet;
- the structure is processed with sandpaper and then covered with high-quality putty;
- after the coating has dried, it is cleaned using sandpaper;
- The finished piece of furniture is painted with nitro paint, for which you can choose different shades, and photos of the finished results are located below.
Thus, if it is not possible to purchase a TV stand or it is difficult to find a suitable design for the existing interior style, then creating such an item is a simple and straightforward job. It is easy to do with your own hands, for which different materials can be used. To obtain an ideal result, you must strictly follow the successive stages of this process, and also use only high-quality materials and tools.
Cutting out the legs
Cutting a corner bevel on the legs
Cabinet legs
Attaching the legs
Finished cabinet
Wooden rack
At home, the easiest way to make a rack with your own hands is from wood.
Required arsenal of materials and tools:
- Boards or a set of slats
- Beam 4x4 cm
- Plywood sheet for the back wall
- Wood glue of category D2, if the rack will be used in conditions of high air humidity, then use glue D3
- Paint coatings upon request
- Screws and self-tapping screws
- Screwdriver, sander, jigsaw.
We cover the base and top of the frame with boards or slats.
We assemble the shelves. To increase the load-carrying capacity of the shelves, we make the part on a frame made of timber with a transverse stiffener. We attach slats or boards on top of the frame. We connect the shelves with the frame using self-tapping screws. The parts are pre-polished.
To enhance the strength of the frame, fill the side gaps between the shelves with decorative crosses.
The wooden rack made of pine and larch has a beautiful texture, so the product can be coated with clear varnish or pre-tinted with stain. To ensure that the shelves fit harmoniously into the interior, the rack can be painted in accordance with the color palette of the room.
Manufacturing methods
There are different ways to make TV stands depending on the material and design chosen, so they may work differently from each other. Let's look at how you can make this design with your own hands.
The floor-standing option allows you to place not only a TV on the surface, but also related equipment and various small items. The design of the room should be taken into account so that the design looks good in the interior. The material from which the stand will be made depends on the choice of the future owner.
Here are step-by-step instructions for making a wood base:
- you need to draw up a drawing and calculate the required amount of material;
- prepare the necessary tools and materials;
- cut out the parts according to the pattern and process the edges (sand);
- drill holes in the places of future connections;
- fold the structure;
- clean debris from the workpiece and coat it with varnish;
- secure the fittings.
If you choose plywood material, the work procedure will be as follows:
- transfer the sample to plywood and cut it out, and sand the edge;
- fix the edges (plastic or wooden) alternately on the ends of the shelves, the front side of the structure and the table top using glue or nails for finishing, then sand;
- Depending on the chosen model, assemble the frame parts with fasteners.
- following the diagram, drill holes;
- assembly should begin with the tabletop: it must be secured to the sides or legs, then install the bottom shelf, then the remaining parts;
- shelves inside the structure must be installed on special holders (if installation of drawers is provided, then guides must be attached to the side part and the partition);
- you need to assemble the drawers, fix the fittings, screw in legs or rollers at the bottom of the model;
- the finished structure can be coated with 2-3 layers of varnish to preserve the shade of the wood; you can also use stain or special paint.
8 photos
The most commonly used material for creating tabletop and floor-mounted TV stands is chipboard. The procedure and processing method are similar to the previous ones.
To cut this material, you will need a glass cutter and certain fittings - special hinges for glass sashes.
Having certain skills, it is possible to make complex and expensive options from high-quality material.
Important aspects when making a bedside table
In fact, making a bedside table with your own hands is not at all difficult, the main thing is to draw up a clear plan of action.
It is recommended to start with simple models; due to their simplicity, anyone can make a bedside table, even if they have not previously held a tool in their hands.
If you nevertheless decide to make a bedside table of a non-standard type, with many shelves and sections, then you need to carefully consider the drawing of such a product and, when preparing the parts, strictly comply with all measurements.
Immediately think about the mechanisms responsible for pulling out the drawers and opening the doors.
In order to decide on the size of the cabinet, you need to think about what it will be used for, other than as a TV stand. What accessories do you plan to store in the nightstand, for example, a tuner, set-top box, discs, etc.
The color of the product should be combined with the interior of the room and the rest of the furniture in the room.
When choosing a material, you should consider where the bedside table will be placed, the weight of the TV and other equipment, and the model itself. Especially if you plan to mount the bedside table on plasterboard walls. Plus, we also don’t forget about the service life; when making a product with your own hands, you want it to last as long as possible.
- Before cutting some parts, it is necessary to drill holes for self-tapping screws, since after this they may split, especially if they are small in size.
- When making a bedside table, it is necessary to take into account the wires coming from the TV and other video equipment so that they do not hang haphazardly, but are complete and, if possible, hidden from view. And also take into account the location of the wiring in the house and drill a hole in the nightstand close to the outlet.
- If wood is used to make the cabinet, it is recommended to open it with varnish to preserve the quality of the resulting product and make it easy to care for.
- It is recommended to install stiffening ribs every 40 cm of the length of the bedside table, especially if the TV is heavy. Fulfilling this requirement will prevent the canvas from deflecting and will prevent the sash from skewing, which in turn prevents them from opening. It is also advisable to make a small gap between the lid and the doors, literally a few mm.
- If the weight of the video equipment is too heavy, it is better to abandon the legs. In this case, it is best to install the cabinet directly on the floor, on a flat surface, having first laid a rug or a piece of linoleum.
DIY cabinet assembly technology
The technology for assembling a TV stand is not complicated; the procedure is always the same, regardless of the complexity and functionality of the design. To begin with, individual parts are manufactured and processed, then they are connected to each other, and the legs are mounted.
Assembling a TV stand with your own hands requires meticulousness and a correctly structured step-by-step scheme for installing parts.
At the end, the product is decorated with decorative elements. Let's take a closer look at each of the manufacturing stages.
Preparing materials
First you need to make patterns of the main parts. To do this, concentrating as much as possible, draw them on thick cardboard in accordance with the drawing. Then the finished templates are cut out, applied to the material, contours are drawn on them and cutting is carried out.
This allows you to save materials and accurately manufacture individual parts of the bedside table without errors. The sawn part is subjected to the following processing:
- When working with chipboard, parts are sanded along the edges and taped.
- when working with natural wood, all surfaces are sanded;
- Drywall is not treated, just coated with a primer and painted.
Collecting all the parts
The second step is to assemble the prepared parts. A level is used to level the structure. The legs or sides are attached to the tabletop if necessary with pre-screwed cabinet rails, and then the bottom.
Often, a TV stand can accommodate CDs, magazines, newspapers and decorative items.
After this, the product is supplemented with cabinets, shelves, and drawers.
Installation of legs
The second step is to assemble the prepared parts. A level is used to level the structure. The legs or sides are attached to the tabletop if necessary with pre-screwed cabinet rails, and then the bottom.
By assembling a TV stand with your own hands, you can not only get a unique design, but also save significantly on the purchase of a ready-made model.
After this, the product is supplemented with cabinets, shelves, and drawers. Before finally connecting all the parts, you must once again carefully check the product for evenness of their fit.
Cabinet decor
The bedside table should be decorated depending on the material used.
Often, the decor of TV tables consists of combining different materials and decorating it with glass parts.
The laminate will look beautiful immediately after assembly. Solid wood must be primed and treated with stain; this protects the material from water and dirt. After this, you can apply artistic carvings, varnish or paint.
The variety of materials allows you to make very cheap and simple models, as well as go for the chic.
You can also stick a decorated film onto the finished product or apply images using a stencil. Beautiful handles on cabinets, glass or stained glass doors can become stylish decorative elements.
The TV stand can be decorated to your liking.
Thus, a DIY TV stand is an excellent choice. If you approach the work wisely, it will save money, as well as bring warmth and comfort to the decor of your home and even prevent the purchase of additional furniture, such as a table.
The technology for making furniture is quite simple, and by using your creative abilities and talents, you can make a independently made piece of furniture unique, a kind of “highlight” of the interior.
Drawing of a nightstand
In order to properly make a wooden bedside table for a TV and not mess anything up, the first step is to prepare a drawing and a list of blanks that need to be prepared for assembling the frame.
The above project of a wooden bedside table for a plasma TV is very long, which allows you to install any model of LCD TV on it, regardless of the diagonal.
So, let's look at the layout of a bedside table for a large TV, which we have to assemble with our own hands.
Drawing – Drawing of a TV stand
Among the design features we highlight the following:
- due to the large length, we will use not four legs, but six, placing the additional two in the center of the bedside table;
- to strengthen the frame, we will not use metal corners, but will constructively connect the left and right pairs of legs with a cross made of timber;
- To increase the functionality of the bedside table and the strength of the frame, we will add two shelves.
Article on the topic: How to display an image from a meizu phone to a TV
The dimensions of the bedside table in accordance with the drawing are: length – 186 cm, width – 42 cm, height – 75 cm.
Selection of materials for making the bracket
So, to make a swivel bracket on which you could install a TV, we will need:
Two perforated corners with stiffening ribs
This is very important, since the corners for making the bracket should not bend; Several M6 nuts, screws and washers; Aerosol paint.
When choosing mounting corners, special attention should be paid to their thickness. To make the bracket, it is recommended to use corners with a thickness of at least 2 mm
Just as mentioned above, stiffening ribs must be present at the corners.
The size of the corners depends on the dimensions and weight of the TV. At the same time, the wider the corners, the better and more reliable the homemade bracket will be. To install a small TV, the width of the corners for making the bracket must be at least 65 mm, for larger TVs, at least 100 mm.
Preparing for work
Before you begin the process of making a cabinet, you need to prepare well. You have to select the material from which it will be made and calculate the required quantity. And also decide on the design of the future product, prepare the necessary tools, consumables and accessories.
Let's look at these stages in more detail.
When choosing a material for making a bedside table, you should focus on the optimal price-quality ratio. You should also take care of the functionality and appearance of the future product.
Frame
- The most popular today is a sheet of chipboard, which is pressed chips. This material is practical, inexpensive, and comes in a variety of colors.
- MDF is also wood chips that are treated with glue. The material is more durable and resistant to moisture.
- You can also use special plywood for furniture. However, finding high-quality plywood suitable for these purposes can be difficult. Moreover, its cost is higher than that of other materials.
- A TV stand can also be made directly from wood. For this purpose, pine or oak boards are often used. However, in this case, you need to have some carpentry skills and tools.
Accessories
You should also be responsible when choosing accessories.
Depending on what material you choose, use screws, self-tapping screws or regular nails.
Important! If your cabinet model includes drawers, do not forget to purchase special rails for them, as well as handles
Selecting a model and drawing up a drawing
When choosing a specific model of your future TV stand, focus on the interior and the size of the room in which it will stand. Consider also your own strengths and capabilities. It is better to choose a laconic model of a simple shape, not overloaded with unnecessary details.
Before starting work, you should make a drawing of the future cabinet with a calculation of the dimensions of each individual part.
You can also use ready-made drawings from the Internet.
Preparing tools
For comfortable work you will need:
- electric drill with various drills;
- hacksaw;
- sandpaper;
- screws or furniture ties;
- roulette;
- pencil.
The list can be expanded depending on which model of cabinet you have chosen.
Simple and fast
The easiest and fastest option to implement is a shelf in the form of a ladder. The photo below shows an example.
You will need:
boards or thick plywood; wood screws; drill; saw; pencil; ruler; special glue for wood products; sandpaper; paint or glaze on wood
Just make sure that they are intended for interior work.. First, decide what width and height your product will be, how many shelves you want to place
Use a pencil and ruler to mark the required dimensions and cut the required parts.
First, decide what width and height your product will be, how many shelves you want to place. Use a pencil and ruler to mark the required dimensions and cut the required parts.
Now on the racks you need to mark the places where the shelves are attached. Since our shelf-ladder will be placed against the wall, it is necessary to take into account the inclination of the shelves. It will also be necessary to cut at an angle the side of the racks that will stand directly on the floor. This will give greater stability to the structure.
It is better to mark the places for screwing in the screws with a drill. Then coat the surfaces with glue and assemble the bookcase. Now you can start painting.
A couple of painting tips:
- If you want the same product as in the photo, then choose a paint with more covering power. For example, universal enamel. Some craftsmen impregnate the wood with a special oil to create the effect of wood that has not been painted. You can also tint the material, which will even help “change” the type of wood;
- If your shelf will be used in a dry room, then there is no need to prime it.
Related article: Irish lace dress with patterns: master class with photos
This shelf is suitable for books and magazines, framed photos, flowers, etc.
How to make a TV stand
To ensure high-quality work results, the following sequence of actions must be followed.
Preparation of bedside table parts
Next, cut out the parts and sand the edges with sandpaper. If necessary, cover the raw edge of the edge with special tape.
Assembly
First, attach the side backs to the tabletop, and the bottom shelf to them. If the design includes a middle shelf, attach it to the side backs. Lastly, the back wall and doors are attached.
Once the cabinet is assembled, all that remains is to attach the legs.
Design and decor
This stage, as a rule, consists of painting the finished cabinet, covering the surface with varnish or stain, as well as attaching decorative parts.
TV stand: how to choose the right model
Among the huge number of different types, it is not so easy to settle on the appropriate option. Therefore, it is necessary to highlight the main criteria that influence the choice, namely:
- TV sizes. Everything is obvious here: if the screen diagonal is small, we choose a more modest stand, but for large models a reliable overall base is needed;
- financial opportunities. The quality of the materials from which the furniture is made will depend, first of all, on this factor. The most expensive options will be natural wood or glass, while chipboard and plastic are much cheaper, but usually less practical. Although, if you adhere to the necessary care of furniture and its correct operation, even an inexpensive model can last for quite a long period and, at the same time, look no less elegant than expensive designs.
Room style and size
- room dimensions. This is one of the key indicators that a TV stand must correspond to. For example, in a small room, a large massive model will look ridiculous and will take up quite a lot of space. Miniature cabinets are completely unsuitable for large living rooms, since in such rooms televisions, as a rule, have large dimensions, and installing them on a small base is stupid and risky;
- stylistic direction in the interior. The overall design of the room must be taken into account when choosing a TV stand. Modern models often have non-standard shapes, which is completely unacceptable for classics and vice versa. We will dwell in more detail on what distinctive features furniture of a particular style has in a separate section of the article;
- surface height. When choosing a cabinet, you need to take into account the height of the sofa and armchairs in order to make watching TV as comfortable as possible;
- possibility of placing additional accessories. In modern interior design, there is a tendency to use a minimum number of elements of a furniture set, due to their functionality, when one piece of furniture can replace two or three. Nowadays, the manufacturer is trying in every possible way to embody this idea, thanks to which a TV stand in a modern style can have additional niches, shelves or holes for placing the necessary accessories and storing things;
Of course, product quality is always a determining factor that should be given great attention, because furniture is not purchased for one or two years. Therefore, in addition to the good performance of the main material from which the TV stand is made, it should also have high-quality and practical fittings, which is worth asking when purchasing, since in the future, its service life will depend on this
Vibration protection
The components of the speaker system need not just to be placed on shelves, but to be protected from vibrations. Record players are most sensitive to their influence. All lamp elements are also subject to vibration. Digital and other transistor technology are more resistant to vibration, but vibration can come from disk drives or power transformers. Therefore, racks for acoustic equipment must have the most effective vibration isolation.
Vibrations have an even stronger effect on speakers, especially those installed on shelves. To improve sound quality, floor-standing speakers have a tweeter or mid/high frequency unit, which is made in a separate housing and is mechanically decoupled from the main unit. A similar effect is achieved when installing compact bookshelf speakers on high-quality inert speaker stands. When installing speakers on an unstable shelf, every millimeter of displacement leads to micro-oscillations through the woofers and significant distortion at the HF.
Popular varieties
There are only 3 main types of TV stands: wall-mounted, floor-mounted, built-in. Each type has its own distinctive features, advantages and some disadvantages. To make the right choice, you need to become more familiar with the pros and cons of designs.
Mounted
A hanging TV stand is a unique and convenient solution that will save space in a house or apartment, and also allow you to diversify the interior. Models hung on special fasteners to the wall will add modernity and emphasize the style of any room.
Main advantages:
- Space saving. A hanging TV stand can be at a fairly high distance from the floor, which will free up space below and visually make the room larger. This is the best option, especially if you have small children or pets at home.
- Huge assortment. Hanging designer TV stands are presented in a variety of solutions: they can be simple horizontal surfaces or massive structures with shelves and original LED lighting.
In addition to its positive properties, this furniture also has its disadvantages. For example, installation of such products is a labor-intensive and expensive process. A suspended TV stand made of solid wood or other similar materials requires installation only on a load-bearing wall. Failure to do so may result in the TV suddenly falling down. The consequences will be especially dire if the height of the cabinet is 1.5–2 meters.
Floor-standing
Such TV models are practical and convenient products, easily transportable (with small dimensions) and harmoniously occupy their place in the interior of the room. If necessary, they can be moved from one room to another.
The advantage of this design is its stability and quite affordable cost. There is no need to invite a specialist for installation - for a floor-standing model, you only need to choose where it will stand. The downside is that it’s a pointless waste of free space, especially if the cabinet is long or wide enough. This drawback is mitigated if the furniture is equipped with additional drawers or compartments.
Built-in
The advantage of built-in products is the same savings in free space as wall-mounted models. Cabinets are usually made in the spirit of minimalism, there is nothing superfluous in them. Such designs, niches recessed into the wall, can be additionally equipped with beautiful LED lighting or exquisite incandescent lamps.
The main disadvantage is that the installation is too complex. For such a cabinet, it is necessary to first prepare a cavity in the wall. For brick or concrete, make a special niche; for drywall, install a stable structure with additional fasteners and supports.
Read with this
- Inserting a signature into a ms word document
- Let's make a TV from a monitor with our own hands. How? I'll tell you
- How to set up a Rostelecom universal remote control for your TV
- 10 Popular Date and Time Functions in Microsoft Excel
- Adding columns to a microsoft word text document
- What to do if the TV has no picture, but there is sound?
- Remote control applications for controlling smart TV functions from mobile devices
- Entering the boot menu on a laptop and computer. fast boot from flash drive or disk
- How to connect a USB flash drive to a TV
- How to find or restore a file
Requirements for equipment racks
Regardless of whether you decide to buy or make a stand for audio equipment with your own hands, it should:
- Promote high sound quality – create favorable acoustic conditions for sound transmission. A vibration-isolated stand improves dynamics by 10–20%, creates tighter and more powerful bass, makes the sound richer and more voluminous, and provides clarity and depth.
- Provide vibration isolation and damping - cut off all resonances or manage vibrations, control them, intelligently respond to vibrations, differentially absorb or reflect them.
- Provide convenient access to all system components.
- Ensure reliable installation and safe use of equipment - withstand heavy weight loads and do not interfere with natural ventilation and cooling.
- Harmoniously complement the system and fit into the interior.
- Use the occupied space rationally.
The equipment rack is not capable of eliminating electronic defects, but it is not required to do so. Its task is to perform the listed functions and contribute to the maximum disclosure of the equipment’s capabilities. Thanks to such stands, clear sound is achieved, creating conditions for watching films and listening to music in the same high quality as in a cinema.