Home » Assembly
Many people wonder whether it is possible to assemble a spacious and high-quality wardrobe on their own? Yes it is possible. With a competent approach to assembling the cabinet, it will last at least 10 years.
- Necessary tools and components
- Schemes of cabinets and filling
- Installation process and features Assembling a built-in wardrobe
Sliding wardrobe BOSS-200 Sonoma, white glass
Loan from 69 ₽/day |
Installments from 217 ₽/day Calculation of the payment amount is approximate and is for informational purposes only. More details
Loan from 69 ₽/day | Installments from 217 ₽/day
The calculation of the payment amount is approximate and is for informational purposes only. More details
Color: white glass
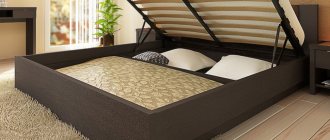
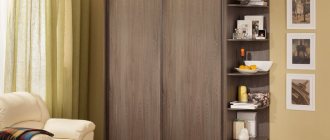
The convenient and functional wardrobe BOSS 200 is an excellent solution for organizing storage for the whole family.
Coupe doors will save space. The hinged door mechanism is “hidden”, which emphasizes the modern BOSS style, while the mechanism securely holds the doors in the guides.
The model uses top German Hettich fittings, ensuring smooth and silent door movement.
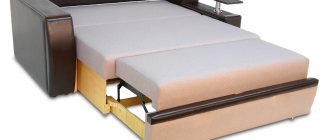
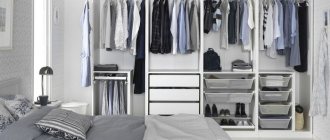
The wardrobe size is 200 cm and a well-thought-out storage system allows you to organize an “individual” wardrobe for two. Completely symmetrical parts will allow each family member to store things in their own style. Each has its own small built-in “chest of drawers” with full drawers.
Necessary tools and components
To assemble the wardrobe you will need to prepare the following tools:
- Screwdriver;
- hammer;
- hex wrench;
- roulette;
- crosshead screwdriver;
- corner ruler.
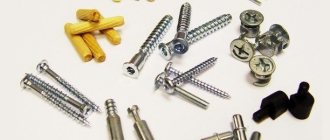
You will also need to purchase a set of furniture fittings and components for the cabinet. This list includes:
- Small nails for fiberboard - about 100-130 pieces;
- confirmations - 50-80 pieces;
- caps in the color of chipboard - 20-40 pieces;
- profile for fiberboard - 1 piece;
- rod holders;
- barbell;
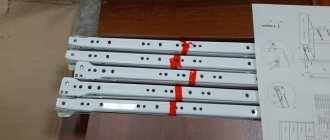
- drawer guides;
- legs - optional.
Instructions for assembling the wardrobe must be included with the purchased piece of furniture. They rarely provide detailed descriptions and are aimed more at professionals. Let's talk about how to assemble a wardrobe yourself.
Material advantages
- Long service life
- Retains its shape and physical properties for a long time
- High safety class E1
- Resistant to scratches and other mechanical damage
- Chipboard is a strong and durable material
The convenient and functional wardrobe BOSS 200 is an excellent solution for organizing storage for the whole family.
Coupe doors will save space. The hinged door mechanism is “hidden”, which emphasizes the modern BOSS style, while the mechanism securely holds the doors in the guides.
The model uses top German Hettich fittings, ensuring smooth and silent door movement.
The wardrobe size is 200 cm and a well-thought-out storage system allows you to organize an “individual” wardrobe for two. Completely symmetrical parts will allow each family member to store things in their own style. Each has its own small built-in “chest of drawers” with full drawers.
Installation process and features
Installation of a sliding wardrobe includes several standard steps:
- cabinet body assembly;
- installation of guides, installation of the rear wall;
- door installation.
Let's talk about how to correctly complete all stages of the work if you have the materials listed earlier.
You need to assemble the cabinet on the floor. It is optimal to do this in such a position that lifting a heavy body after assembly requires a minimum of effort and energy. Since the cabinet has three drawers, you should mark and secure the guides. They come in two types:
- roller;
- telescopic.
The master is required to accurately calculate their location. The difference is that telescopic models are located strictly in the middle of each drawer, and roller ones hold the bottom of each drawer, that is, they must correspond to the level of the bottom line of each drawer. Please note that the guide systems of some companies require that the front part of the drawer be indented from the edge of the section. It is important to mark the position of the elements, secure them on the side wall and on the internal partition.
It is important to know that a number of cabinet filling elements will also require preliminary marking and installation of fasteners, since this work will then be complicated.
The next stage: installation of supports (legs) that will prevent moisture from coming into contact with the chipboard during operation. Now the side stack is connected to the bottom of the cabinet using a screwdriver and confirmations. The next part to connect is the inner wall. In order for it to obtain optimal rigidity, it is necessary to connect both walls using a connecting shelf.
Assembling a sliding wardrobe with your own hands requires the master to have a clear understanding of the functions of all structural parts and fittings. Some shelves can be put back in place only after the furniture has been installed in a vertical position.
We assemble the structure further, gradually expanding it. Connecting shelves and another internal wall will be added. Before installing the side outer wall, we advise you to pre-fix the corner shelves that will be on the outside. Once the structure is assembled, you can attach the final element - the top cover.
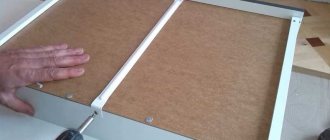
An approximate diagram of the wardrobe assembly is shown in the photo below. All parts must be edged, and all filler work must be carried out. In order for the cabinet, assembled and installed by yourself, to be of high quality, it is better to carry out this work on specialized machines.
The confirmations are screwed in at low speeds with a screwdriver while firmly holding the parts strictly at an angle of 90°.
We move on to the next stage: we nail the back wall made of fiberboard. This is done by nailing it to the structure. If the width of the sheet does not allow closing the section, use a connecting profile of the appropriate color. You need to nail the wall from top to bottom.
Now the assembly of the wardrobe is almost complete, all that remains is to install it in place, assemble the drawers, equipping them with guides, and hang the doors.
Assembling a built-in wardrobe
Installation of a built-in wardrobe in almost every way repeats the steps of assembling a conventional one. It can also have side walls made of chipboard, or it can be assembled in a vertical position using metal guides.
There are many ways to make the internal filling of a built-in wardrobe.
Since part of the structure is attached directly to the wall, this type of wardrobe can be installed vertically. Professional furniture makers know that making a cabinet in a finished niche on site is difficult and time-consuming work. When ordering, they try to make a cabinet from laminated chipboard in the workshop to fit the size of the room and assemble it on site.
A person who decides to do such work independently in his home has time and can assemble a reliable, inexpensive and spacious structure.
If the perimeter of the built-in structure will be walls, floor and ceiling, it is important that they are as smooth as possible. A level is useful for measuring the angle of inclination and leveling surfaces before installing shelves, walls and doors. Preparing a niche is serious business. To do this, the surface of the walls is cleaned, primed and covered with acrylic enamel.
When installing additional lighting inside any structure, we recommend using low-power halogen lamps to comply with fire regulations.
Still have questions? We are ready to help.
Seven days a week from 08:00 to 22:00 Moscow time.
Seven days a week from 08:00 to 22:00 Moscow time.
Send us a message
Checkout
We will call you back and clarify the details.
Application sent
Wait for the operator to call
Buy in 1 click
We will call you back and clarify the details.
Application sent
Wait for the operator to call
MnogoMebeli.com © 2009-2021 MnogoMebeli LLC; OGRN 1126432002135
MnogoMebeli.com © 2009-2021 MnogoMebeli LLC; OGRN 1126432002135
I hereby give my consent to Mnogo Mebeli LLC, registered at the address: Russian Federation, Saratov region, Saratov district, s. Kleshchevka, Liter G2 1 building for the processing of my personal data (hereinafter referred to as “PDN”), which is specified in this form, as well as other personal data that became known to Mnogo Mebeli LLC.
The purposes of providing PD to Mnogo Mebeli LLC are:
- processing and execution of orders placed by me;
- providing customer support;
- processing messages from the client sent through the feedback form;
- promotion of goods, works, services presented for sale;
- conducting customer marketing research;
- provision of distance trading service;
- carrying out promotions and campaigns to increase customer loyalty, notifying customers (SMS, WhatsApp, etc.), managing access to the client’s personal account;
- other purposes permitted by the current legislation of the Russian Federation.
Sliding wardrobe BOSS-200 craft tobacco, mirror
Loan from 68 ₽/day | Installments from 211 ₽/day
The calculation of the payment amount is approximate and is for informational purposes only. More details
Loan from 68 ₽/day | Installments from 211 ₽/day
The calculation of the payment amount is approximate and is for informational purposes only. More details
The convenient and functional wardrobe BOSS 200 is an excellent solution for organizing storage for the whole family.
Coupe doors will save space. The hinged door mechanism is “hidden”, which emphasizes the modern BOSS style, while the mechanism securely holds the doors in the guides.
The model uses top German Hettich fittings, ensuring smooth and silent door movement.
The wardrobe size is 200 cm and a well-thought-out storage system allows you to organize an “individual” wardrobe for two. Completely symmetrical parts will allow each family member to store things in their own style. Each has its own small built-in “chest of drawers” with full drawers.
Material advantages
- Long service life
- Retains its shape and physical properties for a long time
- High safety class E1
- Resistant to scratches and other mechanical damage
- Chipboard is a strong and durable material
The convenient and functional wardrobe BOSS 200 is an excellent solution for organizing storage for the whole family.
Coupe doors will save space. The hinged door mechanism is “hidden”, which emphasizes the modern BOSS style, while the mechanism securely holds the doors in the guides.
The model uses top German Hettich fittings, ensuring smooth and silent door movement.
The wardrobe size is 200 cm and a well-thought-out storage system allows you to organize an “individual” wardrobe for two. Completely symmetrical parts will allow each family member to store things in their own style. Each has its own small built-in “chest of drawers” with full drawers.
General assembly rules
These tips apply to all types of furniture without exception; be sure to follow the general recommendations, which will help you avoid many mistakes.
- Carefully read the instructions, check the completeness of the hardware supply, find out the purpose of each part and fastener. You must understand not only what is fixed, where and in what sequence, but also what functions each part performs and what loads it is designed for. This knowledge will make it possible to select the permissible forces of cabinet elements during assembly. During this period, they are subject to loads not provided for by the manufacturer, and the risks of mechanical breakdowns increase. You always need to control how much you can deflect individual shelves and walls during installation, when the hardware only needs to be attached, and when it needs to be tightened to the limit.
It is imperative to prepare the place for assembly: make room for connecting large parts, provide good lighting.
Prices for popular models of screwdrivers
Practical advice. It is difficult to assemble a cabinet alone; it is advisable to involve an assistant.
Still have questions? We are ready to help.
Seven days a week from 08:00 to 22:00 Moscow time.
Seven days a week from 08:00 to 22:00 Moscow time.
Send us a message
Checkout
We will call you back and clarify the details.
Application sent
Wait for the operator to call
Buy in 1 click
We will call you back and clarify the details.
Application sent
Wait for the operator to call
MnogoMebeli.com © 2009-2021 MnogoMebeli LLC; OGRN 1126432002135
MnogoMebeli.com © 2009-2021 MnogoMebeli LLC; OGRN 1126432002135
I hereby give my consent to Mnogo Mebeli LLC, registered at the address: Russian Federation, Saratov region, Saratov district, s. Kleshchevka, Liter G2 1 building for the processing of my personal data (hereinafter referred to as “PDN”), which is specified in this form, as well as other personal data that became known to Mnogo Mebeli LLC.
The purposes of providing PD to Mnogo Mebeli LLC are:
- processing and execution of orders placed by me;
- providing customer support;
- processing messages from the client sent through the feedback form;
- promotion of goods, works, services presented for sale;
- conducting customer marketing research;
- provision of distance trading service;
- carrying out promotions and campaigns to increase customer loyalty, notifying customers (SMS, WhatsApp, etc.), managing access to the client’s personal account;
- other purposes permitted by the current legislation of the Russian Federation.
This consent is given to carry out the following actions in relation to my personal data: collection, recording, systematization, accumulation, storage, clarification (updating, changing), extraction, use, transfer (provision, access), blocking, deletion, destruction of personal data, in the manner as automated and non-automated processing of personal data.
The procedure and conditions for processing personal data are regulated by the Policy of Mnogo Mebeli LLC regarding the processing of personal data; additional information on the processing of personal data can be found in the Site Rules.
This consent can be revoked by sending me a written application to revoke consent to the processing of my personal data, but subject to the verification of my identity.
Source
Sliding wardrobe BOSS-200 Sonoma, white
Loan from 60 ₽/day | Installments from 189 ₽/day
The calculation of the payment amount is approximate and is for informational purposes only. More details
Loan from 60 ₽/day | Installments from 189 ₽/day
The calculation of the payment amount is approximate and is for informational purposes only. More details
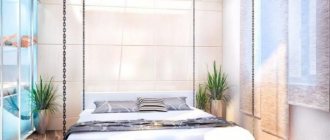
The convenient and functional wardrobe BOSS 200 is an excellent solution for organizing storage for the whole family.
Coupe doors will save space. The hinged door mechanism is “hidden”, which emphasizes the modern BOSS style, while the mechanism securely holds the doors in the guides.
The model uses top German Hettich fittings, ensuring smooth and silent door movement.
The wardrobe size is 200 cm and a well-thought-out storage system allows you to organize an “individual” wardrobe for two. Completely symmetrical parts will allow each family member to store things in their own style. Each has its own small built-in “chest of drawers” with full drawers.
Wardrobe assembly instructions
Our procedure for assembling the wardrobe will be as follows.
You need to start assembling from the bottom of the cabinet, namely by assembling the base and installing the legs.
We take a part called the bottom and mark its lower side for installing the base and legs as shown in the diagram below:
The plinth can be secured to the bottom using mini fixes (eccentrics, rasteks - whoever calls them), confirmats or ordinary plastic corners.
Since this will still be an invisible area, and the cabinet will not stand on a plinth, but on legs, I decided to secure the plinth using plastic corners. The legs were secured with 3.5*30 screws.
Just when you screw the legs, don’t overdo it (you can over-tighten it, and the sharp part of the screw will come out from the back side).
We attach the four parts of the base to each other using confirmations. For convenience, take yourself a corner clamp. You can use the instructions for drilling for confirmations.
Do not twist the front plinth with corners, as To adjust the legs you will have to remove it.
Next we will need to install the cabinet sides, the central partition and install the roof.
We will attach the sides to the bottom and roof with minifixes. They are great for fastening perpendicular parts, and they also manage to completely hide the fastener.
If space allows, it is convenient to assemble the sliding wardrobe lying on the front part and fasten it using confirmations. But since I didn’t have any free space in my room, I had to assemble it standing up and use eccentrics (rastexes, minifixes) as fasteners.
On the bottom and roof of the cabinet (from the inside) we mark holes for installing the minifix rod.
Next, along the marked points, we make holes with a confirmation drill, NOT through, 10-11 mm deep, and screw in the minifix rod.
Before installing the sides, using a level, the bottom of the wardrobe must be leveled as evenly as possible. Simply lean the level and adjust the legs to the maximum horizontal position.
Now you need to mark the sidewalls, the holes should exactly coincide with the installed rods on the bottom and roof. In the sidewalls you will need to do two different drillings in two different planes.
The first hole is made for a metal eccentric, which will tighten the rod, it is made in the inner side of the sidewall, with a special 15mm cutter, at a distance from the edge of the end to the center of 34mm (this is if the rod has a total length of 44mm, like mine).
In general, when fitting a part onto a rod, its head should protrude 6 mm. If this is your first time installing minifixes, practice better on rough parts, so you will feel more confident when assembling.
The second hole is made at the end of the part, with a 6-6.5 mm drill, strictly in the center (8 mm from the edge).
For a more detailed understanding of this assembly step, you can use our materials on installing an eccentric coupler.
- When you have made all the necessary holes, do not rush to install the sides and roof right away.
- To give the structure initial rigidity, immediately assemble the central partition with the upper shelf (we fasten it with confirmations).
- At the next stage, we need to place the sidewalls, the rear wall of the console and the assembled T-shaped partition on the lower rods, tighten them with eccentrics, and secure the upper shelf to the sidewalls (with confirms). Use an angle clamp for support.
- Next, we attach the roof and check the verticality using a level.
- If everything is fine, to provide additional rigidity, we install additional shelves using confirmats.
- Now, using 3.5*16 screws, we fasten the back wall of the fiberboard. We start from the two upper corners, and after perfect alignment, we begin to screw in screws throughout the box, in increments of 15-20mm. The fiberboard should also be secured to the central partition and the top shelf.
The hardest part of the job is finished. We put the cabinet in its place, once again check the position of the cabinet by level and proceed to installing shelves, hangers and drawers.
Shelves can be made either rigid (secured with confirmations) or removable (on shelf holders).
To have fewer plugs for holes on the visible side of the wardrobe, I decided to install the shelves on shelf holders.
Everything is simple here. We mark the required height on the sidewall, use a 4.5-5 mm drill to make a non-through hole, up to 8 mm deep, and hammer the shelf holder into it.
Characteristics
Facade fastening system
Coupe, with overlay profiles
German fittings: Hettich fittings.
Silent system: silent closing of doors.
Full roll-out ball guides for drawers.
Vertical assembly: quick and easy.
A clothes rail will help keep things clean and tidy.
Still have questions? We are ready to help.
Seven days a week from 08:00 to 22:00 Moscow time.
Seven days a week from 08:00 to 22:00 Moscow time.
Send us a message
Checkout
We will call you back and clarify the details.
Application sent
Wait for the operator to call
Buy in 1 click
We will call you back and clarify the details.
Application sent
Wait for the operator to call
MnogoMebeli.com © 2009-2021 MnogoMebeli LLC; OGRN 1126432002135
MnogoMebeli.com © 2009-2021 MnogoMebeli LLC; OGRN 1126432002135
I hereby give my consent to Mnogo Mebeli LLC, registered at the address: Russian Federation, Saratov region, Saratov district, s. Kleshchevka, Liter G2 1 building for the processing of my personal data (hereinafter referred to as “PDN”), which is specified in this form, as well as other personal data that became known to Mnogo Mebeli LLC.
The purposes of providing PD to Mnogo Mebeli LLC are:
- processing and execution of orders placed by me;
- providing customer support;
- processing messages from the client sent through the feedback form;
- promotion of goods, works, services presented for sale;
- conducting customer marketing research;
- provision of distance trading service;
- carrying out promotions and campaigns to increase customer loyalty, notifying customers (SMS, WhatsApp, etc.), managing access to the client’s personal account;
- other purposes permitted by the current legislation of the Russian Federation.
This consent is given to carry out the following actions in relation to my personal data: collection, recording, systematization, accumulation, storage, clarification (updating, changing), extraction, use, transfer (provision, access), blocking, deletion, destruction of personal data, in the manner as automated and non-automated processing of personal data.
The procedure and conditions for processing personal data are regulated by the Policy of Mnogo Mebeli LLC regarding the processing of personal data; additional information on the processing of personal data can be found in the Site Rules.
This consent can be revoked by sending me a written application to revoke consent to the processing of my personal data, but subject to the verification of my identity.
Source
Step-by-step instructions for assembling a sliding wardrobe with 2 doors
We will look at an example of assembling a specific model; if you understand the nuances well, then no difficulties will arise during the installation of other types of furniture. To carry out the work you will need a screwdriver, a hammer, a mounting knife and PVA glue. Glue will be needed only in one case - the cabinet has connections on dowels.
Step 1 . Bring the packages into the room, find a bag of hardware and sort them. As we mentioned above, you need to understand the purpose, location and features of each type of fixation.
Step 2 . Open the package with the bottom and top of the cabinet. It is shorter in length than a package with sides and an internal partition. Check the condition of the elements. This package also contains some shelves.
Step 3 . Select minifix connecting bolts from among the hardware. Screw them into the holes prepared by the manufacturer. Tighten until it stops, but watch the force. It must be remembered that chipboard does not belong to the class of durable materials and reacts extremely negatively to exceeding critical forces. In our case, there are six pieces of hardware, two for the sidewalls and two for the internal partitions.
Step 4 . Find the bottom of the cabinet and install the legs in place. They are made of plastic and have metal inserts to increase the strength of the connection. Assemble the legs and prepare them for installation.
Step 5 . Turn the bottom upside down, find the holes into which the elements are installed. If the holes are not deep enough to screw in the screws, you need to drill a little to fit the hardware.
Step 6 . Turn the bottom into working position and screw the minifix bolts into it.
Step 7 . Insert the eccentrics of the minifixes into the partitions and sidewalls. Make sure that the slots of the eccentrics point towards the heads of the bolts: downwards at the bottom, and upwards at the top, respectively. The elements should fit into the holes prepared by the manufacturer easily, but at the same time not wobble. If the holes are larger than required, then a big problem appears. Which? Under normal conditions, the eccentric rests along the entire lower arc of the hole, otherwise the contact area is significantly reduced. This is a very negative factor. At the lowest point, the thickness of the slab is insignificant, its strength is very low. As soon as the actual loads exceed the maximum values, the thin part of the chipboard is destroyed. The holes will have to be redone, which means additional costs and loss of time. In addition, there will be unsightly holes in the sidewall slab, which are also noticeable from the outside.