In order for a birthday to feel truly festive, a delicious cake and gifts are not enough. The type of room where the celebration will take place also plays a very important role. Therefore, to make this day truly unforgettable, we offer you several ways to decorate the room for your birthday with your own hands.
These economical decoration options will help you save money and make your birthday unforgettable.
Decorating walls with corrugated paper
This is a fairly quick, simple and original way to decorate walls for a birthday. Materials you will need:
- rolls of colored paper,
- Whatman paper sheets (preferably thick),
- stationery knife, scissors and tape.
Now let's look at the manufacturing steps.
- You must decide on the color scheme. Draw a sketch of the design you want to make.
- Of course, later you can correct or change something, but having a sketch will give you an idea of how it will look in the end and will significantly speed up your work .
- Lay out whatman paper - this is the base on which you will work. Depending on the size of the embroidery you plan to make, you can take one sheet of whatman paper, or glue several together (with the edges to increase the area). It will be much easier to work with thick paper, since it will remain strong when you cut it and weave ribbons.
- Place the base from sheets of whatman paper so that it is convenient for you to work with both sides of the paper. You can place two chairs at a distance from each other so that you place the ends of the Whatman paper on the chairs, weighing them down with books or something heavy so that the Whatman paper does not fall.
- You can also hang whatman paper in the doorway. But do not lay it out on the floor or table, as in this case you will only be able to comfortably reach the front side.
- Using a stationery knife make two cuts in the paper , thread the tape into each of them so that a strip of tape remains on the front side, and both ends are on the back: leave one end small and attach it to the paper (with glue or double-sided tape), the other one is longer if you want to continue this weaving, or fasten it too if this pattern is finished.
- Repeat the previous steps until you fill the entire Whatman paper with paper embroidery patterns. In this case, the cuts do not have to be strictly opposite each other, and the lines do not have to be even. Take ribbons of different widths and make your own design.
- Hang your creation on the wall and enjoy the work done and the festive mood!
Bouquet
Preparing a bouquet is definitely a “male” job. Of course, all invited guests, if there are any, will come with flowers, but the task of the young dad is to surpass everyone else with a bouquet prepared in advance. Naturally, decorating a room at the birth of a child with a bouquet is intended more for the mother, however, the needs of the baby must also be taken into account.
A bouquet that will exceed all expectations
Fresh flowers for decoration are not always a good idea. A weakened child's body may not perceive the smell of flowers and even cause an allergic reaction. Therefore, if you give fresh flowers, you need to immediately prepare a place with a vase in another room, where they can then be rearranged.
Find a place for a bouquet with a vase
There are many options for decorating a room with bouquets that would not harm the baby, but at the same time would look aesthetically pleasing and beautiful. If previously bouquets of artificial flowers were considered exclusively for mourning, modern decor ideas make it possible to adapt them even to such an event as the birth of a child.
Original toy made from fresh flowers
To make flowers, corrugated paper of different, bright shades can be used. They can be placed either in ordinary bouquets wrapped in paper or in a basket. A fashionable idea is also to give a bouquet of soft toys. The undoubted advantage of such room decoration is originality and practicality.
Choose a bouquet without harming the child
The bouquet will remain in its original form for several months, and then it will gradually be disassembled into “spare parts”, and the growing child will have ready-made toys. Such practicality of bouquets of soft toys justifies their high cost.
You can prepare several bouquets and fill a whole children's table with them. There may be fresh flowers, which will then be transferred to another room, or a bouquet of soft toys, which will last for a long time.
Even guests will not be left without attention
You can also complement the room decor with bouquets of sweets that will please your guests. Considering that the baby’s mother can hardly eat sweets, you can prepare another option for her - a bouquet of fruits.
We decorate a large room for little money
If you need to quickly decorate a large, spacious room, using a minimum of money and effort, this method is just for you. All you need is colored corrugated paper in rolls .
Then everything depends on the room you will decorate. Strips of paper can be pulled from the cornice, pipes, chandeliers, cabinets or shelving, in general, anything that will be there. Moreover, you can pull the paper with different forces so that the sagging is greater in some places and less in others.
TIP: You can also twist the ribbons. Hang colors in a random order.
You will definitely be able to create a joyful and festive atmosphere! Don't forget to make a beautiful cake stand - there are a lot of ideas in the link
Create a festive atmosphere in nature
If the holiday is organized outdoors, it doesn’t hurt to accompany everything with holiday paraphernalia. You also need to think about lighting, which you cannot do without when evening comes. It would be optimal to use unusual flashlights, bright LED strips, and garlands. They can cover the openings in the gazebo, and the structure itself can be draped with weightless fabric. This way your table will be delicately protected from prying eyes and will turn into a real oriental tent. Balloons, large numbers and photo attributes in the form of signs with funny inscriptions will also be useful for celebrating in the gazebo. Setting the table with plastic dishes is a great idea that will save a lot of time for conversation, competitions and dancing in the fresh air. After all, it is for the sake of fun that such events are organized!
Idea: walls with balls!
Both children and adults are all crazy about balloons. So, by choosing this method of decorating a room, you will definitely cheer up everyone present!
For this you will need the following materials:
- 160Q latex balloons (use a mix of different colors: orange, yellow, pink, purple, green, light green, blue and white),
- hand pump for inflating balloons,
- scissors, tape, double-sided tape.
Follow these steps and you'll soon be admiring the colored ball powder on your walls:
- Divide the ball into 6 equal parts by tying knots on it.
- Using a pump, inflate the first part of the balloon until you get an inflated sausage, tie a knot at the end. Then trim the inflated part of the balloon as close to the knot as possible. Then do the same with the next part of the ball, and so on until you get six small balls.
- Cover the knots with tape so they don't stick out.
- Repeat the first three steps until you have hundreds of colorful balls.
- Attach the balls to the wall with small pieces of double-sided tape.
This decoration is perfect for an original party or photo shoot. And don’t forget to stock up on enough sweets, since the appearance of the room will definitely encourage you to eat something tasty.
Here are some more great ideas for decorating with balloons.
Table and chair decor
Don’t forget about the design of the table and chairs. There can also be so many ways to decorate these items. Household members can let their imagination run wild and develop any design methods that will harmoniously fit into the festive atmosphere.
Let's consider several suitable options.
- You can decorate the backs of chairs using light and beautiful woven materials. Tulle or organza will do. It is desirable that the fabrics match the color of the surroundings or the tablecloth that is laid on the festive table.
- You can tie a balloon inflated with helium to each of the chairs. In its inner part it is worth placing a piece of paper on which the guest’s name is written. A little surprise will do instead.
- Place soft pillows of different colors on the chairs.
- Complete the chairs with decorations based on the immediate style of the celebration (for example, it could be pirate sabers, space attributes, magic wands and other similar elements).
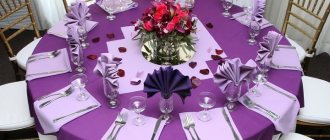
To decorate the table, you can choose a beautiful and bright tablecloth and place original folded napkins on it. In the evening, you should turn to elegant glowing garlands or combinations made of burning candles.
Decorating the walls with large homemade “lollipops”
Beautiful colored lollipops are not inferior to balls in their ability to create a great mood. With their help, you can decorate a party or birthday and provide an original photo area for those present.
To create a festive atmosphere with your own hands you will need:
- wooden dowels measuring 12" x 1/2" (30 cm x 1.25 cm),
- acrylic paint (must be a wide range of colors: white, purple, dark blue, light blue, green, yellow, orange, red, pink, etc.),
- brush, stand for dowels (a glass or cup will do),
- palette, 4 sheets of A4 paper, scissors, pencil, foam disks measuring 10″ x 1″,
- glue gun, tape (regular or double-sided).
Assembly technique:
- Apply white acrylic paint to the wooden dowels . It's best to paint one half first and let it dry (in a container with the painted side facing up), then paint and dry the other side. While the dowels are drying, start making the candy itself.
- Cut out 8 identical curlicue stencils from paper and place them on a foam disk, as shown in the figure. Next, lightly trace the stencils with a pencil.
- Choose a paint color and use a brush to paint the curls one at a time . First trace the outlines so as not to go beyond the edges. You can do several layers to make the color look more saturated.
- By this time your dowels should be dry. Use a glue gun to apply glue to the end of the dowel and quickly press it onto the foam disc, holding it for a while to secure it.
- Do the same with the other discs, using different colors for painting.
- Glue the finished candies to the wall. You can stick it with tape on the leg, or with double-sided tape on the lollipop itself.
That's all done, enjoy the beautiful background!
Recommendations
When decorating a house for your husband’s birthday celebration, it is worth considering that, most likely, all the guests will want to take pictures with him. In order to make this task easier and provide everyone with high-quality cards, it makes sense to organize a photo zone yourself. As a rule, the most illuminated wall in the room is selected, which is decorated with decorative flowers, flags and balls.
It would be nice to place a basket filled with photo accessories nearby.
Make a volumetric figure
The big number will not only remain as a keepsake, but will also become the central photo area of the party. Detailed master classes on how to make numbers for a birthday - 10 lessons
Fan garland for birthday
On hot days you crave coolness, and on cold days you crave reminders of warm days. This garland, which consists of many fans, will wonderfully help cope with both of these desires! Having made such a garland for your birthday to decorate your room , you will be transported to a fairy tale! And surprise everyone!
Materials:
- colored paper for scrapbooking,
- scissors, tape,
- colored cardboard, glue stick,
- ruler, stationery knife.
Steps for making a garland:
- If you immediately bought accordion folded decorative paper, you can skip this step. If not, fold the paper into even accordion shapes.
- Form semicircles from accordions.
- Cut out strips, circles, triangles or some other figures from colored cardboard - you will need them to decorate fans.
- Cut out semicircles from cardboard (the size should be smaller than the fans). Attach them to some fans using a glue stick. They will perform two functions at once - decorative and strengthening, that is, they will not allow the fan to curl up.
- Glue shaped cardboard cutters onto the fans , combining colors and creating your own pattern designs. You can take the drawing as an example.
- Connect the fans together to form a garland . To do this, stick them all on tape. You can first fasten the joints of the fans with a stapler to strengthen the structure.
- Hang a garland and cheer up!
Making large paper Martenitsas
These decorations are made very simply and quickly with your own hands. You will need two A4 sheets - red and white, scissors and a glue stick. If you want to make a lot of decorations, then take more paper, the main thing is that both colors are in the same quantity.
The products have this color scheme because Martenitsa comes from Bulgaria and there is a ritual there to welcome spring with similar products in exactly these colors, as it is a talisman for good health for the whole family. But if you don’t delve into this folklore, you can take paper in the colors you like.
Let's now look at the manufacturing steps:
- Fold each sheet of paper in half (lengthwise).
- On each sheet, draw 10-12 straight lines, as shown in the picture.
- Make cuts along the marked lines with scissors.
- Unfold the leaves and glue their ends together, there should be glue on both ends.
- Form circles, securing them with glue.
- In the middle of the circles you can also attach strips of paper that differ in color from the circles themselves.
- Hang items around the room.
Garlands without using glue
Even a child who knows how to use scissors can make such a decoration, since the pattern is very simple. You will need: A4 paper (calculating one sheet of paper for 4 elements of the garland), scissors, pencil.
The order of assembling the garland:
- Cut a sheet of paper into 4 even pieces.
- Take one part, fold it in half (across), and then in half again (also across).
- Draw with a pencil the shape you will use to cut out.
- Cut out the shape and carefully unfold it.
- Connect together the individual elements of the garland (as shown in the picture), alternating colors.
- Hang the garland.
We offer you several alternative designs for this garland.
Beautiful examples
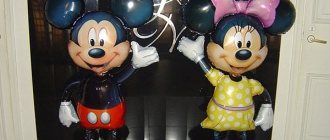
It is necessary to clarify that a very correct, albeit expensive, solution would be to order a ready-made composition of helium balloons from a specialized company. Firstly, this service allows you to create any inscriptions on inflatable figures, which means that it will be much more pleasant for the birthday person to receive a personal congratulation. Secondly, high-quality balloons can delight you for a long time, and not deflate the very next day. Finally, due to the fact that the balls are created by professionals who choose harmonious combinations of shapes and shades, the composition looks advantageous and almost completely solves the whole issue of interior design.
Another important aspect is the combination of table setting and the decor of the room itself, including colors. For example, if compositions of black and gold inflatable balloons are used to decorate a superhero party, then the theme is continued by the use of gold-plated cutlery and black table linens. A Batman mask, straws decorated with bat figures, character nameplates, retro posters - all these will be the details that a man will definitely like and which should be used for decorating both the room and the table.
For an example of decorating a room for your husband's birthday, see the following video.
A little holiday in a box
On cold autumn and winter days, such a box of positivity will be just a great gift and will definitely create a sunny mood! You will need: a box, small helium balloons, as well as paints (or ribbons, colored paper) to decorate the box.
How to make it yourself:
- Paint or cover the box with rainbow stripes, flowers, or any other joyful patterns that come to your mind.
- Place small helium balloons in the box (the number depends on the size of the box. The ends of the ribbons tied to the balloons can be attached to the bottom of the box if you want the balloons to jump out to the length of the ribbon when opening the box, or not attached if you want they flew spectacularly to the ceiling or into the sky.
- Close the box.
- Give a gift and watch carefully the surprise recipient's amazement!
IMPORTANT: It is important to remember that small helium balloons lose their ability to fly after about three hours. Keep this in mind when preparing a gift.