- 50586
- 13-10-2020
- Author: Mysekret Team
- 2
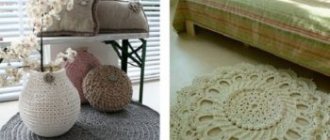
Crocheted blankets are no less interesting than knitted ones . Some craftswomen prefer to knit large items only with crochet, since the peculiarity of this method allows them to achieve beautiful openwork patterns on blankets, and the delicate, almost jewelry-like work is very much to the liking of those who like to create beautiful things from details.
Crocheted blankets will perfectly warm adults and small children, the main thing is to choose the right yarn. Another important function of blankets is to decorate the home and create the right mood. All this directly depends on the shape and method of crocheting, which we will look at in detail in this article.
Selecting knitting material
When choosing yarn, it is worth considering whether you are a beginner or a professional. It is worth noting that beginners should not choose:
- plush yarn, despite its popularity. Plush yarn is quite a difficult material for a beginner;
- thin cotton threads, since for a beginner the work will be quite painstaking.
At the initial stage of mastering the skill of knitting, you should choose the simplest threads, for example, Turkish yarn from Alize. In terms of thickness, medium-thick threads are suitable. With their help, you will easily learn how to knit and see all the nuances of the loops.
Be sure to pay attention to the yarn label. On the label you can see the recommended hook size for the yarn you choose. The standard yarn composition is 55% cotton and 45% acrylic, or 50% wool and 50% acrylic. Accordingly, the thread will be quite soft, pleasant to the touch and non-slip.
Choose the color and material you like and enjoy the activity, it’s so calming.
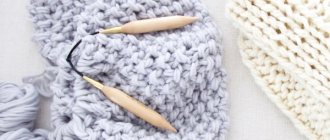
Choosing the right tool
The range of knitting needles and hooks is quite extensive. The simplest and most convenient tool is a completely metal hook or a metal one with a plastic handle. There is no huge difference between them, it is a matter of habit and convenience for your hands. Each hook has its own numbering, displayed in millimeters.
The minimum hook thickness is 0.5 millimeters. Accordingly, the thickness of the hook depends on the thickness of the thread.
Remember that you should definitely pay attention to the recommendation when choosing the thickness of the hook indicated on the thread label.
Memo to the beginning master
Crochet blankets (knitting patterns for blankets and descriptions are simple and clear) can become a stylish element of room decor, a cozy addition to your favorite chair or a warm gift for a loved one. You just need to learn how to easily select the required hook size for a certain type of thread, for this we advise you to save this reminder:
| Hook number | For which threads |
| 0.6 mm - 1.0 mm | thin cotton threads |
| 2.00 mm - 3.5 mm | medium thickness yarn |
| 4.00 mm - 5.00 mm | medium thickness yarn with double thread |
| 5.50 mm – 6.00 mm | double fluffy thread |
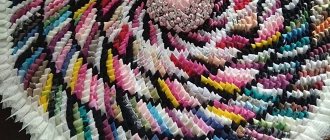
LiveInternetLiveInternet
For example, we took 2 squares of denim and 2 lining fabrics. The lining fabric is contrasting for clarity, all the necessary tools are nearby, except for the sewing machine and my hands!
The square of jeans is placed on the square of the lining, inside out to inside out!!! - this is important!
Combine all sides carefully!
All 4 squares are folded together, the lining is inside, the jeans are right side out!
We make a line, retreating from the edge of the squares (there are 4 of them together) 1.5-1.7 cm.
This is what the sewn squares look like on the outside, I took ready-made ones left over from my bedspread, so the lining looks different.
This is a type of sewn squares from the inside out.
All ready-made “sweet couples” are then sewn into transverse stripes, the transverse stripes are assembled longitudinally into the finished bedspread!
We cut all the seams of the finished bedspread every 1.2-1.5 cm with special nippers from a hardware store, trying not to damage the machine stitching!
This is what any seam on our bedspread looks like after a week of intense work (my son’s hands).
Now the most interesting part! With frenzy and fanaticism, we begin to tear through every seam with an animal brush! It will take time and effort! If it is possible to attract outside labor, this will make your life much easier.
At a certain stage, the seams begin to look very fluffy and you begin to understand that it has been passed and done and your moment of glory is approaching!
If I haven’t yet discouraged you from starting this rigmarole, I want to give you a few little tips that will simplify the whole process of this work. It is advisable not to cut out squares from worn “knees” and between the legs. The reason is clear. Actively use ripped pockets, this will add additional zest into your masterpiece. The underpocket area will also look very advantageous on the bedspread. The lining is cotton, make sure there is enough of it! The threads in the sewing machine must be strong, the color does not matter. Errors in the straightness of the stitching are acceptable, but remember that you you do this for your loved ones, and everything should be “perfect”. Observe the direction of laying the seams! The joints in the corners of the squares are cut out and thrown away (we cut out a small square) Due to this, all the seams “stand up”. You need to assemble the blanket on a comfortable spacious table, and the stripes for it, it is better to place a small piece of fabric on the floor; unsewn strips can be rolled up on the same fabric until the next working day. Cutting and mowing seams is also better with a covered floor, you will understand why in the process! But you can’t stop! there will be a vacuum cleaner, a husband and sympathizers! If it is possible to use something bright for the lining, this is an ideal option in terms of decor! And lastly: we cut out the squares only strictly along the lobar or transverse thread, no obliques or diagonals! Well, that seems to be all! verbosity, I really want everyone to succeed!
Basic Crochet Skills
For crochet, the first thing you need to do is make the first loop. The first loop is created very simply:
- - take the yarn and put it on your index finger. Pinch the end of the loop between two fingers;
- - take the hook and place it on the left side of the yarn;
- - turn the hook 180 degrees, we get a small loop;
- - holding the loop with your right hand, place the hook on the left behind the working yarn.
The initial loop is ready, keep up the good work!
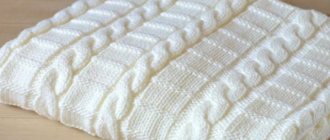
The softest blanket made from Alize Puffy yarn
At first glance, it would seem that knitting a thick blanket yourself is an overwhelming job, but this is far from the case, because you can knit without using a hook. In order to knit a blanket, you will need yarn and a little patience.
For a large size blanket you will need five packs of Alize Puffy yarn (one pack contains 5 skeins), respectively, this number of skeins is suitable for a blanket 210:240 cm. Please pay attention to the pattern of the blanket, this may also vary its size.
So, let's look at the type of knitting. We will use a slightly more complicated knit stitch. We count 125 loops, twist it in any direction, for example, to the right, and thread the 126th loop of the working thread into it. Take the 124th loop, turn it to the right and thread it into the 127th loop of the working thread.
We carry out the action until the end of the loops. Having knitted this row, we continue to move in the opposite direction. With the help of such simple movements we get a fairly simple and beautiful drawing.
To finish knitting the blanket, take the 1st loop and knit it into the 2nd loop and pull it through. Next, we pull the 3rd into the previous loop and so on until the very end. Thus, you get a beautiful pigtail at the edge. This way the plaid will be completed.
This soft plush blanket is the perfect decoration for your bedroom. The most important thing is that everyone can knit it!
Simple and beautiful
If your skills are limited to knowing only the knit stitch, don’t despair.
Take several colored balls and knit stockinette stitch. In this way, the skill of casting on loops will be practiced, and the finished product will bring positive emotions. For this method of creating a warm miracle, shades from dark to light are suitable; they will form a fashionable color game - ombre.
Knitting a blanket is a long and monotonous task. Use combinations of multi-colored threads, different patterns and be patient - the result is worth it.
Crochet blanket made of square motifs
To knit a blanket from square motifs, as in those most popular photos of a knitted blanket on Instagram, we will need two types of yarn: grass (three colors for knitting one square motif, it contains 100% polyester) and Caucasian yarn (it contains 50% polyester) acrylic and 50% wool), hook number 3.
Let's get acquainted with a detailed description of knitting a blanket. When knitting a blanket, we will use the creation of air loops, single crochets, double crochets and connecting semi-crochet stitches.
We knit the first three rows using grass yarn. The first row is the first color, the second row is the second color, and, accordingly, the third row is the third color. We knit the remaining three rows with Caucasian yarn of the same color.
In the first row there is a ring, we knit 15 double crochets. In the second row there are double crochets and one chain stitch between them. In the third row - between the columns of the previous row we knit two double crochets, between which there is one chain loop.
Thanks to this knitting pattern, you will get a chic, bright blanket that will perfectly decorate your sofa in the living room.
In the style of patchwork knitting
- Any yarn and comfortable knitting needles will do. You can use any leftover yarn. This method allows you not to bother selecting threads by color and thickness.
- Thick knitting needles will add volume, the work will progress faster, even if the threads are much thinner than those expected for this number of knitting needles.
- We choose garter stitch and knit only with knit stitches - the simplest, most popular and warmest version of knitting.
- Cast on 10 loops. Knit the first row.
- We knit until the width of the cast-on loops matches the height of the connected rows. This will be the central element, square in shape. Gradually, rectangles will be attached to it.
- We tie another square to it, but take a thread of a different color. When introducing new threads of different thicknesses, we focus on the first motif - if the thread is thick, we knit fewer rows. With this knitting method, the guideline is the size of the element, and not the number of rows.
- You will get a rectangle with an open short side.
- We re-slip the knitted loops of the short side onto a pin or small spare knitting needles. We cast on new loops from any long side equal in length to two squares. The last stitch of the row will always be the first stitch for the new piece.
- Each time we strive to form a square. When closing the rows, do not tighten the thread too much, but do not loosen it too much either.
- We complete the required number of squares.
- To connect motifs, use yarn of the same color. First, the motifs are connected along the short side. It turns out to be a long narrow strip. Along the long side, loops are cast on knitting needles with fishing line and the motifs are connected.
- If this method seems difficult, you can use a hook to connect the strips.
Children's blanket crocheted from yarn
Let's take a look at the step-by-step instructions for crocheting a baby blanket from merino yarn.
First step. We create a chain of air loops. Let's calculate the required number of loops, for example, 20 pieces. We lift the air loop and insert a hook into the first column and thereby knit the edging. We continue the same action for knitting the first row.
Second step. We thread a hook through the bottom loop and knit another stitch to create a pattern. Insert the hook into the third loop and knit. In this way we knit three double crochets to the very end of the row.
Third step. We choose the number of columns at our discretion. You can knit two or six columns; the appearance of the pattern will depend on their number.
Fourth step. We decorate the edge of the resulting chain beautifully and neatly.
Fifth step. To finish, knit three double crochet stitches.
Sixth step. We knit the required number of chains and connect them together to get a beautiful children's blanket.
A hand-knitted baby blanket would be an excellent option for a baby’s birthday gift.
Knitted blanket for the sofa
This blanket is also knitted in squares, very beautiful, and has long aroused great interest among needlewomen.
The leaf pattern uses embossed columns, which look very impressive, the center and diagonal braids are made of convex cones; they can be knitted either from several columns knitted together or with “popcorn”. We tried both options, it turns out good either way.
I answer a question that is sometimes asked: these convex bumps do not interfere with sitting at all)).
For one square (its side is 27 cm) when knitting from Caucasian yarn, it took me about 80 grams.
We have a separate post dedicated to this bedspread, which contains all the diagrams, description, master class and video.