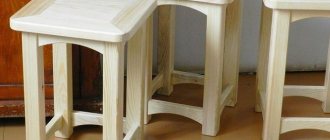
Options for knitted capes
Most covers, covers and rugs for home furniture can be divided into two categories:
- Mat-cover for a stool. According to the design option, such a cape can be round or square. Distinction is usually achieved through the use of patterns, color combinations, types of edges and embellishments. It should be borne in mind that round covers are less labor-intensive to manufacture, while the square shape gives more space for imagination.
What function they should perform determines what shape, threads and style to choose in the final result. - Chair cover. There are two types of such covers: element-by-element and made as one whole. In the first case, the seat and back covers are made as separate parts. In the second, the case is a solid product. Therefore, it requires quite a lot of time for knitting, fitting and finishing: such products are most often provided with an elastic collar so that the cover does not slip off the chair.
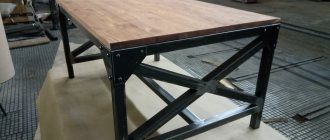
Hand-made products will help add individuality to the environment.
Tips for beginners
In order for a knitted product to serve for many years and delight its owners, you should take care of the yarn. For work, it is better to choose synthetic yarn, for example, acrylic or cotton with the addition of synthetic fibers. For the crocheting process, it is recommended to use thicker threads. This is necessary to ensure that the rug fabric is dense and warm. Accordingly, you need to choose a larger hook. Before starting work, you need to knit a sample, a small square, wash and iron it. This technique will help with determining the size of the finished product. When the sample has dried, you need to measure it and, using a simple arithmetic proportion, calculate the number of loops that are needed to obtain a rug of the required size.
You can choose any knitting pattern. The main criterion is its attractiveness. You can even use a diagram for a napkin, or any other one you like, as well as use the diagrams and descriptions presented below.
Small scraps of yarn of different colors will make a rather attractive and interesting rug. This technique will allow you to use the accumulated remnants of threads that are a pity to throw away, but you won’t be able to knit anything from them. But it is worth remembering that the thickness of the thread should be the same over the entire surface of the product.
Related article: DIY credit card wallet
In order for the product to serve longer and maintain its appearance, you need to make a base for the future rug from dense fabric. If the rug is of insufficient size, the situation can be quite easily corrected with the help of a border. The rug must be tied around the perimeter with the required number of additional rows.
In order not to have to unravel the knitted rug and redo part of it, you need to carefully follow the icons in the diagram.
How to crochet a cover for a stool
Knitting as a process seems simple and easy only from the outside. In fact, there are a lot of subtleties and nuances here. Therefore, when starting to knit a new product, you need to pay attention to the following points:
- Knitting technique. This is the determining factor. Ultimately, the appearance of the future cover depends on it.
- Yarn. It is not necessary to buy a separate skein for each option. In some cases, it is possible to make beautiful things knitted exclusively from leftovers.
To create one cape, it is not necessary to buy new skeins of thread.
Use remains in a variety of ways. Little tricks:
- If you fail to guess the size and the rug turns out to be smaller, you can increase the size using a border.
- It is better to make bedding from wool.
- To avoid “walking” in height, it is advisable to choose threads of the same type and, if possible, from the same manufacturer.
If your goal is to create a product “for the soul,” one that will attract the eye and complement the interior, then you need to first of all include the designer’s thinking.
Note! Knitting using a crochet hook takes significantly more time than the same amount of work done using knitting needles. Therefore, it is recommended to carefully select the scheme you like.
The harmony of the color scheme with surrounding objects and walls can be seen, as well as such nuances as ornaments and patterns that can become the highlight of any style.
Typical patterns of knitted rugs
To crochet a stool cover the way it appears in your imagination, you need to be able to read patterns well and strictly adhere to them. To begin with, you should choose models that are simpler, either based on practical considerations or specific operating conditions.
To preserve the finished product for as long as possible, it should be based on a dense base.
Square, under a stool
The square cover is one of the most popular, since most stools and chairs have this exact seat shape.
Typical knitting pattern:
A very interesting and simple option is the scheme for creating a square seat from colored stripes.
The process usually starts with measuring the seat. If you have no ideas for decoration, a cover with alternating colors and stripes would be a good solution. This will not affect the process itself, but it will look interesting. You can choose colors in a certain order or make a “chessboard”; the choice here is purely individual.
The required strip length is easy to calculate. It should be the same as the length of the seat. The width of the stripes themselves should be the same.
The most difficult thing with this pattern is tying the corner. Having reached the edge, you should add a little more knots: two elements starting in the same arch. As for the assembly, it is best to do it using a contrasting thread: the connecting column must be formed on symmetrical loops at the edges of the squares.
Thus, you will receive a fashionable piece of furniture in a hand-made style.
Important! To avoid the appearance of “waves”, you should choose a hook for the connection that is a size smaller than the main one.
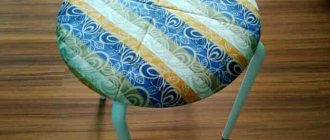
Round, for seat with sides
Since it is much easier to crochet a round stool cover than a square one, denser threads are usually used for such products.
Example diagram:
The simplest option is a round knitted chair cover.
The main thing is to always start the circle from the center! In its simplest form, knitting is carried out according to the rule of addition.
In general, to create a foundation, the work order might look like this:
- Fit the air loops and roll them into a ring.
- Wrap around the ring. The first row comes with single crochet stitches.
- Use the resulting base in accordance with the chosen scheme.
For a crocheted stool cover, it is best to use thick acrylic yarn and a large hook.
The required diameter is determined by the number of rows completed. The edge (last) row can be passed through connecting posts with an elastic thread to form a collar.
Rug-flower
Recently, crocheting patterns for stool covers in the stylization of a flower have become popular: chamomile or sunflower.
Example diagram:
The thing will be voluminous, softer, and sitting on such a stool will be a pleasure.
To knit the same sunflower, you will need yarn of two colors: brown and yellow. In general, such work includes three main stages: creating the middle, knitting the petals and connecting the resulting parts. It is best to use cotton threads for such a cover.
Sequencing:
- Tie the base in any convenient way
- Start the petals with air loops, tying a single crochet on both sides.
- You can attach the petals with a simple thread.
DIY knitted cover for a stool in the shape of a bright sunflower.
Chair back cover
Typically, such covers are equipped with additional decorations and are knitted using patterns and several colors.
Example diagram:
To create a rectangular cape, you can use the same pattern as for a square one.
Since such a product is not a crocheted cover for a stool, it requires great skills and abilities. Therefore, as an algorithm of action, it is worth citing several general techniques:
- The base is a solid canvas. Can be made in both color and pattern. In order not to miscalculate the dimensions, you will need to measure the height and width of the backrest. You need to knit it in a single piece of double height, then fold it in half and sew it together.
- You can tie lace along the edge.
Rectangular covers for the backs of chairs, made by yourself.
Full chair cover, with backrest
Such covers use the principle of a continuous passage, so the type, type and style are selected individually. In principle, they always look good, and they are quite easy to knit:
- Measure the dimensions of the seat and backrest.
- Start with air loops - they are typed to the required width.
- As for the technique, you need to knit with simple double crochets: just like crocheting a cover for a stool, only in parts: along the length of the seat, back and bend. All elements are connected to each other by air loops.
- The sides and back are hemmed in the same way.
For decoration, simple ornaments are chosen, like this:
Choose the color at your discretion, based on the color scheme of the interior.
Materials
Requirements for materials stem from the place and nature of operation of the future product. If this is a decorative cape, it is preferable to use a simpler type of thread, while a chair cover will require stronger yarn. From here we can formulate general recommendations in relation to the preparation of materials:
- The choice of threads with different colors should take into account the length of the skein. Ideally it should be the same.
- It is advisable to select skeins of the same length (on average, 150 m per 100 g).
- For beginners, it is better to stick to cotton yarn (“Iris” or similar).
- It is allowed to take “prickly” threads.
If the pattern for knitting pillows on a stool involves the use of threads of different colors, their type and brand should still be the same.
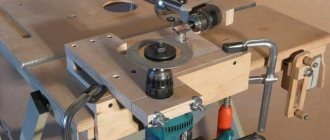
Important! The hook should be selected based on the thickness of the yarn - the narrowest point should be twice as thin as the selected thread. Otherwise, the structure may turn out to be “loose” and sloppy. For most cases, the optimal diameter will be 3mm.
Crochet cover for a stool
Many people have a desire to knit, but only a few actually get into knitting. Most people are put off by the need to memorize dozens of types of loops, and especially to understand the complex patterns that are often given in magazines. In fact, there is nothing super complicated here. It's not that hard, just remember a few rules:
- Rectangular and square diagrams are “read” from bottom to top. Round - from the center.
- When knitting covers on a round stool, you need to put it on from the center. You should remember about the lifting loops so that the radius is the same. The number of added columns must be equal to the number of existing ones.
- For an even row, counting goes from left to right. For odd numbers it’s the other way around.
If you follow the description of the patterns, the time spent knitting will not be onerous work.
In addition, you can print out and put a sheet of symbols next to it - this will make it easier to read the diagrams.
Note! Covers and rugs, knitted according to simple patterns, are made using basic types of loops (connecting, columns, double crochets, double crochets).
Create a stunning flower that will soon bloom on your stool with intricate ethnic or abstract patterns.
Decoding the scheme
The process of creating covers for stools and chairs may seem difficult for beginning craftswomen. First of all, you need to use detailed crochet tutorials with patterns. The latter consist of symbols that should be carefully studied:
- Oval - air loops (VP).
- Crosses - single crochets (SC).
- T - half double crochet.
- T crossed out - single crochet.
- T crossed out twice - with two double crochets.
- T crossed out three times - with three double crochets.
- X with a loop on top - a twisted column.
- X with a line on top is a connecting loop.
Making your own baby high chair and stool
Crocheting for beginners requires following some rules. Schemes are always viewed only from bottom to top; circular options are read in the direction from the central part to the edges. Odd rows are determined from right to left, even rows, on the contrary, from left to right. The creation of round capes begins from the middle; thanks to the lifting loops, the optimal parameters of the product are maintained.
A square or round cape for beginners usually consists of 3 types of loops: chain stitches, double crochets and single crochets, and connecting stitches. Despite this, the products turn out to be attractive and interesting.
How to decorate: types of decor
Knitting is a process that is impossible without the work of imagination and imagination. Since crocheting patterns for a stool cover mostly involve simple shapes, why not decorate them:
- Lace and tassels. This element looks good around the edges. Especially on a square shape.
- Embroidery. Both classic beads or rhinestones and top processing with threads are used.
- Bows. They look good made from ribbons or fabric, and also knitted.
- Pompoms. Like tassels, they will perfectly decorate a cape, except that this is more suitable for children’s furniture.
To create it, you need to knit a sufficient number of individual colors and then connect them, guided by the diagram.
You can also use various patterns or unusual combinations of all kinds of circles, squares, lines and zigzags as decorations. For more experienced ones, it makes sense to “play around” with the form.
Required materials and tools
Before you get started, you need to familiarize yourself with the recommendations for choosing threads and tools. After studying the diagrams and descriptions, make sure that the selected material is suitable for the job. Difficulties arise when selecting yarn. It is necessary to take into account the characteristics of the threads and the intensity of use of the seat so that the product lasts a long time and is comfortable.
Recommendations for choosing threads:
- You should not use yarn with a high wool content, with the exception of a cape for insulating a chair or stool;
- the width should be average (from 120 to 230 m per 100 g);
- when choosing threads of different colors and shades, it is important to take the same width of each yarn;
- needlewomen recommend choosing “Iris” threads; they wash well and the product does not shrink.
If you need to knit square, round or any other capes, use a hook that must be the same size as the yarn, but not less than 3 mm. It is recommended to create the product using three threads, so the cover will be dense.
The main condition for choosing a hook is convenience for the craftswoman. The wrong tool will make the cape loose. If knitting is not going well, you should reconsider the choice of hook; its thin part should be half the size of the thread.
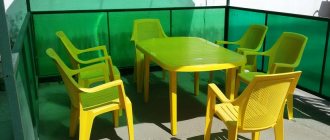
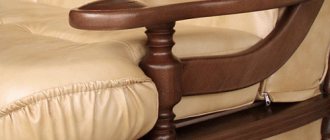
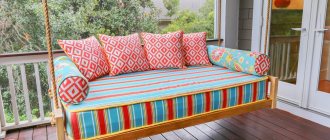
Work examples
Below are several examples that clearly show how interesting and attractive a hand-knitted cover or rug can be.
Thus, if you have free time, a skein of yarn and imagination, you can do a good job updating old, battered furniture. But even if it’s not old, an original crocheted stool cover will be able to add zest to the interior decor and bring a touch of harmony to the home microcosm.
Decoration methods
Ready-made covers for a stool or chair can easily be made even more attractive. To do this, you can use one of the ways to decorate them:
- add lace or fringe around the perimeter;
- attach lush tassels at the corners;
- tie the edge with fancy yarn (for example, a pompom or “grass”);
- decorate a plain product with bright embroidery;
- use the appliqué technique;
- sew large flat buttons onto the cover;
- turn children's capes into animal faces;
- complete the composition by dressing the chair legs in knitted “socks” or “gaiters.”
When decorating capes, you shouldn’t try to use all the ideas at once. The finish should be in harmony with the color of the cover and its texture. There is no need to decorate an openwork product with pompoms, or sew an applique onto a colored cape.
Some decorating tips:
- bright details will look good against a plain background;
- fringe and pompoms are suitable for products made from thick yarn;
- small covers for chair legs are best made from the same yarn as the main cape;
- if the item is knitted from several types of yarn, the finishing should repeat one of them.
Using simple recommendations, you can create a stylish and cozy item suitable for any interior. Even a beginner knitter can knit a cover. It should be remembered that capes should fit favorably into the interior of the room.
Master class on sewing a seat using the “Biscuit” technique
The “Biscuit” technique consists of a large number of voluminous small pads that form a general covering. For manufacturing you will need the following materials:
- cotton fabric as the main material, it is best to choose shreds with a small pattern that match in color;
- base material;
- tape measure, scissors;
- holofiber;
- sewing machine, iron;
- safety pins, threads, needles.
A DIY chair cushion is easy to make:
- First, you need to measure the surface of the seat and add 5 cm on each side (after stuffing, the seat will shrink). Using these measurements, cut out the base.
- The size of one square is determined as follows: the base of the seat is drawn into squares. They should not be too large (6-8 cm). The size of the outer square will be larger; allowances and folds are taken into account, so another 3 cm is added to the base square on each side.
- The squares are laid out on a flat surface. According to the intended pattern, they are sewn in horizontal rows.
- The first row is pinned to the base. The side seams are shifted according to the markings on the base.
- The top lines are ground down. In this case, you need to make symmetrical folds on all sides of the square. Then vertical seams are laid.
- You end up with pockets that need to be filled with holofiber.
- The next strip of squares is applied to the underside of the stuffed pockets, wrong side up. Sewn on.
- Then the algorithm is repeated: vertical lines are laid, pockets are filled with filler. So until the end of the base.
- A border is sewn along the contour to hide the seams. It can be braid, ruffles, lace. The product is ready.
The independent process of making a seat for a chair or stool cannot be called difficult. Even a housewife with minimal sewing skills can handle this. As a result, you can get a comfortable and functional product that will decorate furniture that has lost its attractiveness.