As a rule, novice craftsmen cannot knit a blanket with knitting needles. Creating such a product requires a lot of work and patience. But the result will not be long in coming. The result is a blanket that keeps family members warm on long winter evenings. It can be placed on an armchair or sofa, complementing the interior, creating a cozy atmosphere. If you are unfamiliar with knitting and this is your first job, choose the simplest version of a blanket with sectional patterns to learn. It is quite simple and will help you get your head around.
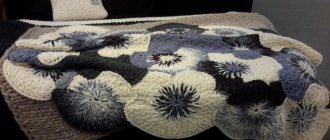
Blanket with convex circles, knitted using sectional knitting technique
Choosing the right yarn and knitting needles
When choosing a material for knitting, you should first decide for what purpose you plan to further use the resulting product. To work on a blanket for a newborn, you need to make sure that the threads are hypoallergenic and as natural as possible and, as a result, that there are pleasant sensations when in contact with the body.
In this case, merino wool would be the ideal choice. It does not cause allergies, does not prick, is warm, soft and does not require special care. When choosing yarn for a product designed to protect the sofa from wear, it is important to pay attention to the strength and density of the threads.
To obtain a warm, damage-resistant material that can minimize the risk of damage to furniture, the best choice is high-quality acrylic. When knitting a blanket used as a blanket, when choosing threads, you should decide on the time of year when it will be most often used.
If you need to cover yourself with the resulting product in winter, it is best to use wool or cashmere yarn.
The above-mentioned types guarantee not only heat retention during the cold season, but also pleasant sensations when they come into contact with the body. For the summer version, it is better to use cotton threads. It is worth considering the fact that a blanket knitted entirely from cotton may be too stiff.
To avoid getting a product that is not comfortable to use, it is recommended to knit from a combination yarn: cotton + acrylic in a ratio of 50:50. When studying the question of how to knit a blanket with knitting needles, the principle of choosing the tools used may become unclear to beginners. Here again, everything depends on the intended pattern on the product, the yarn purchased, and so on.
The most common patterns for knitting blankets are using circular knitting needles No. 7,3.5,5 and straight knitting needles No. 6,3.5,2.5,3. These types are the most suitable for obtaining the required density of the product and are easy to use even for beginners.
It is important to pay attention to the notes from the manufacturer of the selected threads about the preferred knitting needles for working with them, indicated on the label.
Two-color plaid
The dimensions of the bedspread are 125cm x 165cm.
To work you will need:
- mixed yarn: white and red - 1.2 kg each. Total 2.4-2.5 kg;
- straight knitting needles No. 6;
- hook No. 5.
Description of work
The product includes 35 parts, each of which is knitted according to the pattern. The edging is knitted separately. When knitting, use stockinette stitch. The peculiarity of knitting this bedspread is the need to very carefully weave the threads on the wrong side, avoiding long broaches.
Knitting patterns
Crochet the knitted parts together.
Ways to knit a blanket
Before starting work, it is worth understanding the basic statement: a blanket can be a product made on the principle of connecting separately connected elements or be a single piece. Such connecting parts can be the simplest geometric shapes (square, rhombus, triangle, etc.) or unusual details (zigzag, braid, etc.).
For beginning needlewomen, the most optimal in terms of complexity and labor intensity would be to create a fabric from squares or knit a single blanket.
Technique for knitting a single blanket:
- There should be an odd number of stitches on the knitting needles.
- Completely work out the first row using the classic knit method.
- Turn the product over and knit a row of knit stitches again.
- When starting to work on the third stage of knitting, you need to remove the loop intended to create an edge and knit with a knit stitch using the front wall method.
- Remove the thread without knitting from the front of the loop.
- In this way, knit the entire row and turn the knitting over.
- In the 4th row, remove the edge loop and purl the first loop behind the front wall.
- Remove the thread without knitting, leaving the thread behind the loop.
- Knit the fourth row in a similar manner.
- Knit rows 5 and 6 with face stitches.
- Knit the 7th and 8th rows according to the example of the 3rd and 4th rows.
- Alternating the techniques described above, repeat until the product of the required size is obtained.
- Close the loops.
Knitting technique for composite fabric:
- Cast on an odd number of stitches.
- Calculate the size of the side of the square (the side is equal to half the length of the set row).
- Work the entire first row in knit stitches.
- Knit the second and all other rows, multiples of two, located on the front side with front stitches, tying the middle 3 loops of the row together, leaving the one in the middle on top.
- Work the 3rd and all other odd rows (wrong side) face-mi, leaving unknitted the loop obtained from connecting the three in the previous paragraph.
- Continue the algorithm until the last 3 stitches remain on the knitting needle.
- Knit them together with a knit stitch.
- Break the thread, thread the end into the last loop, and tighten.
- Create the required number of squares in this way, then sew them together.
Plaid zigzag
Zigzag pattern for a blanket
The plaid strips are knitted gradually, without requiring stitching. Each strip can be knitted from a different yarn, thereby creating a special pattern. Experienced craftswomen use leftover yarn from other projects.
Zigzag pattern diagram
Description of work
Zigzag blanket knitted from 10 loops
Cast on 10 stitches and knit ten rows, always decreasing one stitch on the left and one on the right. Repeat this step, but increasing on the left and decreasing on the right. This will give you an uneven stripe that looks like lightning. The zigzags themselves can go diagonally or vertically (depending on your preference). Periodically recalculate the number of stitches on the knitting needles. There should always be the same number (in our case 10).
Beautiful zigzags are easy to knit and look beautiful
Having reached the desired length, close nine loops on the strip, one should remain on the knitting needle. Turn the future masterpiece 180 degrees and knit the next zigzag in the same way, fastening it with the previous one. After knitting another blanket using knitting needles, wash it with warm water.
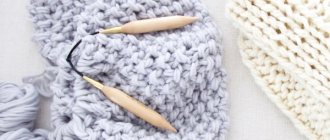
Using circular knitting needles
This type of knitting needles is used when it is necessary to obtain a seamless product or in case of insufficient length of conventional knitting needles.
Circular knitting principle:
- Cast on the number of stitches corresponding to the size of the intended blanket.
- The needle with the last stitch cast on should be in your right hand, and the first one in your left hand.
- Knit the loops together, alternating, for example, 2 knits and 2 purls, discarding excess loops that interfere with knitting onto the fishing line between the knitting needles.
- Repeat this knitting algorithm until the required size of the product is obtained.
- Close the loops.
When using circular knitting needles, it is important to consider that, as a rule, only the front side of the blanket is created in this way.
Tools for knitted patchwork
Preparing the tools is another important part before the actual work. You will need the following.
- Hook
Even if you plan to use knitting needles, this tool can be useful to pre-cast on a number of chain stitches. Its type depends on the yarn parameters.
- Spokes
For different techniques, from 2 to 5 double-edged knitting needles can be used simultaneously. Larger quantities are rarely needed for such products.
- Pins
Safety pins or regular tailor's pins may come in handy.
- Scissors
To trim the thread if necessary.
- Needle
It will be required for some knitting methods, when individual fragments are first created. And only then are they combined into a single fabric.
After making sure that you have everything you need, you can get to work.
How to knit a blanket for a newborn
The question of how to knit a blanket with knitting needles for beginners will disappear after studying the below diagram for creating a product for a newborn using the “big tangle” method:
- Cast on the number of stitches corresponding to the size of the intended blanket.
- Knit several rows in garter stitch, turning the product one by one (knit rows only).
- Remove the edge loop and knit in an equal number of stitches cast on in the previous step.
- Knit the rest of the row, alternating purl and knit stitches, ending the row with the same number of knit stitches as in the previous step.
- Turn the product over and repeat the above described scheme for creating a row.
- Follow the algorithm until you obtain the required size of the product.
- Close the loops.
Wool for a blanket
Natural fiber with a pleasant appearance. It features the greatest possible variety of shades, which allows you to work on creating an original design.
The thread is strong, but the finished product is not durable. After several washes, the blanket may stretch, shrink, or lose its original appearance.
In addition, it will be extremely difficult for novice needlewomen to work with this type of yarn. Baby blankets should not be knitted from pure wool yarn, as the material will scratch the baby’s delicate skin.
We recommend reading:
- Knitting bactus with knitting needles - detailed description with photos and diagrams. Step-by-step instructions and recommendations from craftswomen. TOP 30 best models
Knitting socks with knitting needles - step-by-step master class with instructions. A selection of the best knitted socks models
Garter Stitch Knitting - 140 photos and videos of basic garter stitch patterns and projects
How to knit a baby blanket
Scheme:
- Cast on 175 stitches.
- Work 11 rows using the garter stitch described above.
- Knit the first stitch behind the back wall.
- Make 11 knit stitches, yarn over, 18 knit stitches.
- Repeat point 4 8 times, continuing with a yarn over, knit 13, yarn over, 7 knit stitches.
- Knit 7 loops on each side of the next row, followed by creating the selected pattern according to a separate pattern.
- Create 264 rows.
- Close the loops.
How to knit a plush blanket with knitting needles
Knitting a plush blanket, like creating other products with knitting needles, can be quite a feasible task for beginners who have learned the basics of knitting.
The simplest algorithm for knitting a plush blanket:
- Cast on the number of stitches corresponding to the size of the intended blanket.
- Remove the loop designed to create a straight edge.
- Knit the first row with a knit stitch, finishing with a purl stitch.
- Make 4 knit stitches for the border (repeat in each subsequent row at the beginning and end).
- Purl a row.
- Turn the product over, knit a row with facial loops.
- Repeat the described 4 rows until the required size of the product is obtained.
- Close the loops.
Product made from multi-colored stripes and squares
Knitting pattern for a blanket of multi-colored stripes:
- Cast on 34 loops.
- From 1 to 7, all odd rows of the product must contain: 4 purl and 6 knit loops repeated along the entire length. Complete each row with 4 purl stitches.
- Second and all other rows that are multiples of two: alternate 1 knit stitch, 1 purl stitch. It is important to move the pattern in every 2nd repeat (repeating part of the pattern) by one stitch.
- In the ninth row, knit 4 purl stitches (3 loops should be placed on the auxiliary tool), 3 knit stitches. Knit the stitches left on the “helping” needle.
- Repeat step 4 along the entire length of the product. Finish the row with four knit stitches.
- Repeat the third point.
To understand how to knit a blanket for beginners, you need to familiarize yourself in detail with the knitting technique. - Close the loops.
- Connect several strips using the described scheme.
- Sew the resulting parts together using a knitted seam.
A detailed pattern for knitting a blanket from squares can be found in the section on methods of knitting a blanket.
Basic principles of knitting
The “granny square” pattern itself, as it is commonly called, is not very complex. Even a novice needlewoman can quickly master it. The basis of any crocheted square is a simple single crochet. Having mastered this technique, you can proceed to more complex elements with several yarn overs and air loops.
The symbols in all crochet patterns are basically the same. It won't be difficult for you to figure out any pattern. But before you jump into complex patterns, be sure to fully master simple, basic knitting techniques. Otherwise, from a pleasant process, creating an exclusive bedspread will turn into a tedious and endless process.
Basic patterns make no less attractive bedspreads than complex and textured ones.
Patchwork style blanket
How to knit a blanket with knitting needles is already clear enough for beginners to start learning how to create a blanket in the patchwork style (in addition to sewing together the related parts described above, this term also involves connecting elements, usually geometric shapes, made from pre-prepared scraps).
Scheme:
- Cut 2 strips of the same width from pre-prepared fabric.
- Place on top of each other, stitch along one edge.
- Cut a strip of a different color, equal in width to the previous two together.
- Fold the narrower strips face to face and sew a third strip to them on both sides.
- Cut out isosceles triangles, unfolding them to form squares.
- Lay out the resulting parts in any way (zigzag, snake, diamonds, etc.).
- Sew the parts together. Press seams.
Blanket made from fabrics of different sizes, sewn with contrasting threads
Knitting a blanket with knitting needles is not the only option for beginners to get a unique product made with their own hands. For this work, you will need several skeins of yarn (the number depends on the size and purpose) and 3 skeins of woolen threads, contrasting with the main color, to tie the fabrics together.
Scheme:
- Cast on the loops on a knitting needle.
- Remove the first (edge) loop.
- Knit a row with facial loops.
- The last stitch in the row should be a purl stitch. Pass the knitting needle behind the loop, catching the thread located in front.
- Turn the product over and knit the second row in the same way.
- Knit according to this pattern until the required size of the element of the future blanket is obtained.
- Close the loops.
- Create several pieces of different sizes in a similar way.
- Tie the pieces together using a contrasting thread threaded through a needle. Sew the details along the edge, hooking the loops under the edge row, without tightening too much.
Angora for blanket
Natural soft and fluffy fiber allows you to create children's blankets with bright patterns and delicate pile.
We recommend reading:
- How to knit a turban with knitting needles - 115 photos and videos of ideas, patterns and features of knitting a turban
Knitting bags - 155 photos and videos on how to quickly knit a stylish bag with descriptions and diagrams
- Knitting a jacket: 125 photos and video description of knitting with patterns for beginners and masters
Unfortunately, some of the fluff will be lost during use, and after washing the fluff must be tidied up to return to its original appearance.
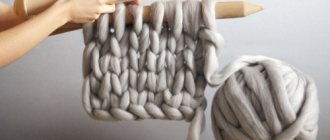
Methods of knitting in chunky stitch
Seeing a large knitted product, the question immediately arises in your head about how to knit a blanket with knitting needles. For beginners, it is important to know that in addition to using special giant wooden knitting needles, most often sold in online stores, you can also create a large knitted blanket using your own hands.
In addition to knitting tools, in a particular case, the needlewoman will also need special bulky merino wool yarn.
In further three-dimensional diagrams, abbreviations will be used for ease of perception:
- pt (loop(s),
- lpt (facial loop(s),
- kpt (edge loop(s),
- ipt (purl loop(s).
Scheme:
- Dial the number of working points corresponding to the desired size of the product.
- Remove the first classic CP.
- Knit a row of lpt.
- Turn the knitting over.
- Repeat steps 2.3.
- Knit using this algorithm until you get a blanket of the required size.
- Close off knitted stitches.
What will you need for work?
On the Internet you can find a large number of patterns for knitting bedspreads from squares; anyone, even a novice needlewoman, can complete them. The main thing is to learn how to make air loops and introduce a new thread as you work. To make a blanket measuring 120 by 200 cm, you will need about 1700 g of yarn (we recommend buying several 300 g skeins of different shades).
It is important that all selected colors harmonize well with each other, which is why it is better to opt for cold or warm tones.
Most experts recommend using either wool blend yarn or acrylic, as well as a hook number 4, 5. You will need sharp scissors and several needles for your work. You can't do without an iron. This is the entire list of necessary materials and tools.
Blanket made from leftover yarn
Having figured out how to knit a blanket with knitting needles, the next logical question for beginners will be what to do with the leftover yarn.
Surprisingly, such leftovers can similarly be used to make bedspreads, blankets, and rugs.
Scheme:
- Cast on an arbitrary number of stitches on the needles.
- Tie the strip using any method described above.
- Similarly, make the maximum number of multi-colored stripes - the components of the future blanket.
- Tie the strips together by connecting the edges of the elements with contrasting threads, prying and connecting the existing stitches under the edge.
Blankets made from squares knitted in different patterns.
This is a more complex method in the sense that you need to think very carefully about what patterns and colors of yarn to knit so that it looks harmonious. But this is such a flight of fancy! And if you choose simple patterns, then this method is suitable for beginner knitters.
As you can see, the patterns are not very complex, but everything combines beautifully in both color and design. You just need to first draw a general picture (technical drawing) of your future blanket on paper, imagine what it will look like, and then start knitting individual squares with different patterns.
If you wish, you can even create a masterpiece if you use different techniques - jacquards, Aran knitting. See for yourself what beautiful designs the blankets come with:
Plaid with openwork patterns
To create a simple openwork pattern (rapport of 8 loops, including edge loops) on a blanket, you need:
- Cast on 32 pts on needles.
- At the beginning of each row, remove 1 stitch.
- The first row should consist entirely of free points stretched upward.
- You should start row 2 by knitting 5 stitches together (from left to right).
- Without tightening the stitch obtained from joining, put it on a knitting needle and knit a knit stitch, followed by removing the stitches.
- Repeat steps 4 to 5 4 times.
- This is followed by 1 lpt.
- Repeat this algorithm five times, given in the fourth and fifth paragraphs.
- Until the end of the row, alternately knit 1 stitch and five times 5 stitches together.
- At the end of the row there should be 1 lpt, 1 standard kpt.
- Turn the product over.
- Make row 3 completely lpt.
- Row 4, same as 3, knit lt.
- The 5th row must be knitted with elongated stitches, as the first row was knitted.
- At the beginning of the 6th row, as in the previous rows, remove the clutch.
- Knit 2 sts together, placing the resulting st on the left needle. Knit lpt. Remove existing pts.
- The next step is to make 1 st and then recreate the 5 st repeat 5 times. Next, tie 1 lpt and repeat the steps described in steps 4 and 5 again 5 times.
- It is necessary to complete the row with 1 lpt, 3 sts knitted together 3 times and 1 standard stitch.
- 7.8 rows knit completely lpt.
- Repeat the above algorithm until you obtain an openwork pattern of the required size.
- Close created pts.
Step-by-step making of a blanket with a square pattern
- We put 40 loops of blue yarn on the knitting needles.
- We remove the first loop, then knit a row, alternating the front and back loops. We must knit the last loop in the row purlwise.
- We knit the next row with an elastic band, removing the first loop: we knit the front loops with knit stitches, and the purl loops with purl stitches. In total, you need to knit 6 rows with an elastic band.
- We knit the next 6 rows in garter stitch - all knit stitches. Don't forget to purl the last stitch of each row.
- Using the same pattern, we knit 3 more times - 6 rows with an elastic band and 6 rows with a garter stitch.
- We close all the loops. To do this, remove the first loop. We knit the second loop and cast on the first loop. Again we knit the next stitch and throw on the outer loop.
- According to the diagram, you need to knit 10 such squares.
- We put 44 loops on the knitting needles with yellow yarn.
- We remove the first loop.
- We knit the second and third loops purl.
- The next 6 stitches are knit stitches.
- We knit this way until the end of the row: purl 2, knit 6. At the end you will have 2 purl loops.
- We knit the next row according to the pattern: knit stitches with knit stitches, purl stitches with purl stitches. The last loop is a purl stitch.
- We knit a total of 6 rows with this pattern.
- In the seventh row, remove the first loop and knit 2 purl stitches.
- Slip the next 6 stitches from the left needle to the right one.
- Then, using the left knitting needle, we remove the first 3 loops, and simply remove the remaining 3 loops from the right knitting needle and put them back on the right knitting needle behind the left one.
- We remove these 3 loops with the left knitting needle, as a result it turns out that we have swapped the loops in places, this knitting is called a “braid”.
- We knit these 6 loops. Next we knit 2 purl stitches, and from the next six loops we knit a braid again. And so on until the end of the row.
- We knit the next row, purl, according to the pattern - knit 2, purl 6.
- We also knit the next 4 rows according to the pattern.
- Next, we form the braids again, knit the purl row according to the pattern, then 4 more rows according to the pattern. In total we knit 7 braids.
- After the last weave, we knit a purl row according to the pattern, then 2 more rows, and then close the loops.
- You will need 10 such squares.
- All that remains is to sew four multi-colored squares in a row. A blanket of squares can be knitted with a needle or crochet, threading the thread through the braids of the outer rows. At the end of sewing the square, we tie knots.
- We sew 5 rows of 4 squares each, and then sew them together, after tying the threads in knots at the corners of the squares.
- We finish knitting a blanket using squares by crocheting it around the edge with blue thread. We start from the upper right corner, knitting a single crochet into each loop. We knit the ends of the threads into a common fabric.
- Having reached the corner, we knit 3 single crochets in the outer loop.
- In this way we tie the entire blanket, not forgetting to knit 3 single crochets in each corner.
- In the initial loop we knit 3 chain loops, and then we begin a row of double crochets.
- We knit to the first corner, knit 3 double crochets in one loop and the next side, the side, knit 2 double crochets in one loop.
- The next side is one double crochet, and the last side is 2 double crochets in each loop.
- From the leftover yarn you can knit booties and a hat for your baby.
Using braids and harnesses
When creating a blanket with additional elements, you should use any of the above methods in the main knitting, and in some places adhere to a certain algorithm for creating a pattern (braids, strands).
To decorate the product “oblique”:
- Cast on the number of stitches corresponding to the size of the intended blanket pattern.
- Remove the first gearbox.
- Knit the second stitch first, then the first stitch.
- “Discard” the point of the knitting needle.
- Repeat the above steps to obtain a second thin braid, but knit the lpt not one at a time, but two at a time: first the two farthest ones, then the closest ones.
- Throw the pt onto the knitting needle.
- Repeat point 3.
- Repeat until you get the desired number of braids in the product picture.
- Complete a series of ipt.
- Close Fri.
To create “bundles” on a blanket:
- Cast on 28 stitches on needles, including 2 stitches.
- From the first to the eighth row - 2 purl loops, 2 - opposite stitches alternately throughout the entire row.
- Ninth row: purl 2 stitches, 2 opposite stitches, purl 2 stitches. Drop 8 stitches on the outside needle and leave at work. Work 6 stitches from the left needle: 2 knit stitches, 2 opposite stitches, 2 knit stitches. Return the left stitches to the knitting needle and knit: 2 purl stitches, 2 knit stitches, 2 purl stitches, 2 knit stitches. Complete the row by knitting: 2 purl sts, knit 2 sts, purl 2 sts.
- Rows 10-16: repeat step 2.
- Row 17: purl 2 stitches, knit 2 stitches, purl 2 stitches. Skip 8 sts and insert needle in next 6 sts. Remove all existing stitches from the left needle, picking up the remaining stitches to work with. Complete the row: 2pt, 2pt, 2pt, 2pt, 2pt, 2pt, 2pt, 1pt.
- Rows 18-25 repeat step 2.
- Repeat the above sequence of actions until the required size of the harness pattern on the product is obtained.
- Close the loops.
How to knit a blanket with a relief pattern of knit and purl stitches
To create a simple “Chess” pattern on a blanket (pattern repeat of 14 rows):
- Cast on the number of stitches corresponding to the required size.
- The first row implies: 6 knit stitches, 5 purl stitches behind the back wall, 5 knit stitches, 5 purl stitches, 5 knit stitches, 1 purl stitch.
- Switch to the reverse side of knitting.
- The second row should contain: 1 lt, subsequent ip loops throughout the entire row.
- The third, fifth, seventh rows must be worked in the same way as the 1st.
- In the fourth and sixth rows, repeat the sequence of stitches knitted in the 2nd row.
- 8th row: 6 lpt, 5 ipt behind the back wall, 5 lpt, 5 pt, 5 lpt, 1 pt.
- Turn the product over.
- Row 9 should consist entirely of lpt.
- Knit rows 10, 12, 14 based on the pattern of row 8.
- Rows 11, 13 repeat 9.
- Repeat this algorithm until the required size of the pattern on the blanket is obtained.
- Close the loops.
Oblique knitting technique
To create a diagonal pattern on a knitted blanket, you need:
- Cast on the number of loops corresponding to the size of the product. It is important to keep in mind that this number must be a multiple of four (plus 1 loop at the end for the edge).
- The first row should be worked from the front side: 1 k-ayapt, 3 stitches together, knitted-voypt, yo, 3 pts, knitted together knit-oh pt. Discard all existing stitches from the left needle. Next: 1 knit stitch, 3 stitches together, knit stitch, yarn over, 3 stitches joined together, knit stitch, 1 knit stitch.
- Continue knitting to the end of the row, based on the given algorithm.
- Row 2 should be completely knitted.
- 3rd row from the front side: 2 stitches, 3 stitches together, knitted in a knit stitch, yarn over, 3 loops together, knitted in a knit stitch. Reset all existing pts. Next: 1 pt, 3 pt, knitted together lt, yarn over, 3 pt together, knitted lt, 1 lt.
- Repeat the proposed sequence of stages of bias knitting until there are “extra” stitches left that do not fit the repeat. Knit the remaining pts in lpt.
- Turn the product over.
- Knit row 4 with classic stitches.
- Turn the knitting over to the right side.
- 5th row: 3 lpt, 3 pt, knitted together lpt, 1 lpt. Repeat until the remainder of the points not included in the rapport. “Extra” pt knit lpt.
- Turn the product over.
- Make row 6 completely purl.
- Row 7 (front side): repeat (3 sts, knitted together knit stitch, 1 lpt), repeating until the end of the row. Knit the remaining pt.
- Turn the future blanket over.
- 8 row knit ip.
- Repeat the given sequence of work using the bias knitting technique until you obtain a blanket of the required size.
- Close Fri.
Acrylic for knitting
A synthetic fiber characterized by a pleasant shine of the finished product. The thread is strong, glides easily along the knitting needles, even a novice craftsman can work with it. Finished products are resistant to deformation and frequent washing.
However, acrylic threads are quite cold, so only summer knitted blankets are created using them.
And here https://gidrukodeliya.ru you can visit a real club for lovers of needlework and crafts.
How to knit a large blanket without seams
To obtain a seamless seamless fabric, you can use the rapport described below:
- Dial the required number of points (multiples of 5 + 65).
- Row 1: slip 1 edge stitch, 4 knit stitches, slip 5 stitches on the back thread, 4 knit stitches, slip 5 stitches on the back thread. Repeat the sequence until the end of the row. Finish the row with 4 knit stitches and 1 purl stitch.
- Turn the product over.
- Row 2 should consist entirely of ipt.
- Row 3: slip 1 stitch, 4 stitches, slip 5 stitches on the back thread. Repeat this pattern until the end of the row. Finish the series of classic items.
- Turn the knitting over.
- Row 4 is knitted entirely from IPT.
- Do the 5th row in the same way as the 1st and 3rd rows.
- 6th row: 4 lpt, 1 ipt, 4 lpt, i1ipt, 4 lpt. Repeat the sequence to the end of the row, ending with pt.
- Starting from the 7th row, repeat the sequence given above from the 1st to the 6th row. Continue knitting, based on the rapport description given, until you obtain a seamless blanket of the required size.
- Close existing pts.
The step-by-step diagrams in the article will be useful not only for novice needlewomen learning the basics of elementary patterns on knitted items, but also for professionals wondering how to knit a blanket with knitting needles using an unusual technique (bias, coarse knitting, patchwork).
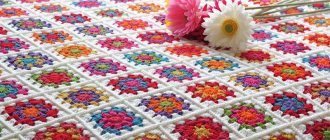
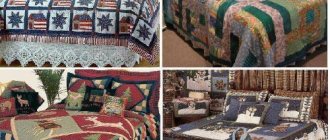
A selection of plaids and square motifs knitted with knitting needles
Warm blanket made from leftover threads and square motifs with embroidery
Once upon a time, when my daughter was still very little, my only hobby was knitting. My husband then gave me a knitting machine and I sat at the carriage for days. I knitted everything for the child, she was always the most fashionable and the most elegant one. And not only the child, even my father-in-law sported a fashionable pullover (he was still unhappy with his daughter-in-law).
What I mean is that over several years of such knitting practice I have collected a huge amount of leftover threads - three huge boxes with balls of different threads. There is nowhere to use them, but they keep piling up. When I saw this blanket, I felt great joy - after all, this is a great way to empty the house of what has been in the way for years.
You will need to crochet or knit several squares and embroider them according to the patterns below, or you can knit them - whichever is more convenient for you) Then collect all the squares, knit them together and tie the blanket around the edge.
Knitting pattern for square motifs
Floret blanket made of beautiful square flower motifs
Knitted square pattern plaid
See the link for description
Knitted pattern plaid
- Finished blanket size: 87cm x 63cm.
- Size of the finished motif: 12cm x 12cm.
Knitting density: motif A – 21p.x29r.=10x10cm, motif B – 23.5p.x29r.=10x10cm, motif C – 29p.x29r.=10x10cm, motif D – 24p.x29r.=10x10cm.
The blanket consists of 35 motifs of 4 types (A, B, C and D). The layout of the motifs is shown in the diagram.
Refer to the pattern and pattern numbers at the very top of each pattern. The blanket uses 4 main patterns, which are marked with the corresponding English letters - A, B, C, D - on the pattern and on the diagrams.
- A - relief pattern in a checkerboard pattern of knit and purl stitches - 9 squares;
- B - figured rhombus on the reverse surface with bumps and a rope in the center - 8 squares;
- C - four relief strands - 9 squares;
- D - openwork pattern of yarn overs - 9 squares.
You can see how to knit a cone in the schematic photo next to the placement of the squares.
It is necessary to knit 35 squares according to the proposed patterns:
Blanket with voluminous square motifs
Snow-white plaid made of square motifs with knitting needles
Schemes and descriptions in English and many other languages except Russian...
Square motifs for knitting a blanket
For more patterns of square motifs, see the link