Decorative cord for suspended ceilings is one way to hide the technological gap that remains next to the wall after installation. It is also used to mask the gap between levels in two-tier structures. In this article we will tell you how to choose and install decorative edging on the ceiling correctly. We will also consider the advantages and disadvantages of this finish compared to traditional ceiling plinths.
What is decorative cord
Kant is a rope woven from fibers. The composition includes both natural (for example, cotton) and artificial (polyester). Decorative cord has long been used for tying curtains, finishing furniture, etc.
Recently, edging has had another use - masking the gap between the suspended ceiling and the walls. Also, the edging is laid at the joints between different levels of multi-tiered structures and next to plasterboard boxes.
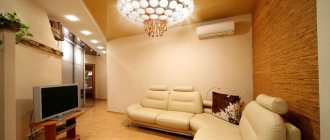
Decorative cord is combined with all types of wall coverings and ceiling textures. The edging is attached to both horizontal and vertical sections (for example, along a plasterboard box or the lower tier of a two-level ceiling). The insert becomes a bright and modern accent in the interior.
What are the inserts for?
Undoubtedly, a stretch ceiling is an effective finishing option with many design variations, but it has some disadvantages, including:
- gaps between the wall and the film fastening elements;
- slightly open grooves between the fastening parts of the canvas structure;
- small openings at the joints of ceiling films.
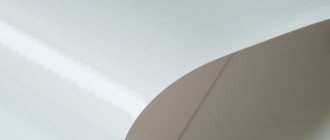
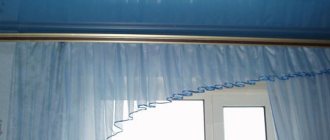
Decorative insert for stretch ceiling
To disguise these shortcomings, various inserts are actively used, which cover unsightly technical openings between the tension structure and the wall and decorate the ceiling. Masking tapes not only cover cracks, but also act as a decorative element.
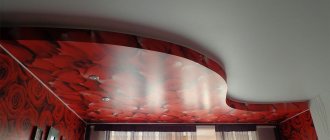
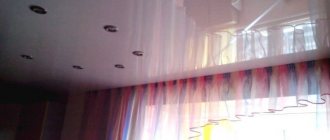
Stretch ceiling with and without masking tape
If it is necessary to carry out repair work in a niche of a stretch ceiling, the inserts can be easily and quickly dismantled. After removal and repair work, they are easy to reinstall.
If necessary, the decorative insert can be quickly and easily removed
Let's look at what types of inserts there are for suspended ceilings.
Advantages and disadvantages of this finish
In addition to the edging, the gap between the wall and the suspended ceiling is covered with a ceiling plinth or masking tape. Decorative cord has the following advantages compared to other options:
- It bends easily and takes any shape, so it is suitable for all types of structures and shapes.
- It fits tightly to the ceiling and leaves no gaps even on uneven walls.
- Thanks to its small width, it does not distort the proportions of the room.
- Tolerates temperature changes and high humidity, so it is used in any room.
- Easy to glue (in a room of 20-25 square meters, installation takes about 40 minutes).
- If necessary, cleaning or replacement can be quickly removed.
- Resistant to sunlight (does not fade over time).
- Available in a variety of colors and fits into almost any interior.
- It has been used in this capacity recently, so the finish looks fashionable and modern.
- It's inexpensive and you can install it yourself.
There are also disadvantages, but they are few:
- Collects dust (the disadvantage is compensated by the fact that the cord can be washed or cleaned with a vacuum cleaner).
- Due to its small thickness, it is not able, unlike plinths, to close large gaps. That is, it is not suitable for very curved walls.
When should masking tape be used?
There is only one case - after tensioning the ceiling sheets to seal the gap between the material and the wall. It will not be possible to eliminate the gap in other ways; it is also impossible to stretch the canvas with a perfect connection to the wall - the work technology involves leaving an open hole in the profile, where the tape is attached.
Important! You should not choose a hard or soft ceiling plinth due to the adhesive fixation. By applying glue you can ruin the ceiling canvas; it will go in waves. In a draft, the canvas will move, and rigid gluing will not allow free movement - the baguettes will fall off under load.
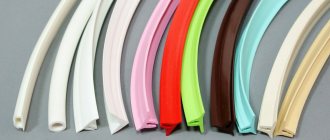
Varieties of decorative edgings
Cords differ in composition, external finish and thickness. The basis of the rope can be:
- metal wire (the most durable option);
- rubber band;
- or cotton core.
The outer layer of the edging is made:
- wicker;
- twisted (easier to style, since the ends don’t get frizzy);
- knitted.
The thickness of the decorative cord is available from 8 to 20 mm. The optimal diameter that fits most ceilings is 10-12 mm.
The edgings can be plain or with a combination of two or three colors. The palette is very diverse, there are both light, bright and dark tones. The combination of canvas and edging can be contrasting or, conversely, complementary.
Cords with woven lurex threads (gold and silver) look expensive. The most commonly used are white, beige, all shades of brown and pastel colors.
How to choose a decorative cord
To choose the right decorative cord for a stretch ceiling, it is important to consider two parameters:
- The size of the technological gap (affects the appropriate thickness of the edging).
- The style of the room (the appearance, including the color scheme, is selected according to it).
The thickness of the decorative cord should match the size of the gap between the ceiling and the walls or be slightly wider (a few millimeters). Then the trim fits easily into the gap and does not fall out.
The appearance is matched to the interior. For example, in a lush decoration, a edging with gold thread or mother-of-pearl shine looks good. And in minimalist styles, plain cords are used.
The shape of the room is also taken into account. An edging matching the color of the stretch ceiling visually expands the space, making it suitable for narrow rooms or corridors. Finishes that match the tone of the walls are used in low rooms. This will make the ceiling appear higher.
Various color variations are possible. A cord that matches the tone of the ceiling, walls or combines their shades looks good. But such a coincidence is not necessary. Modern interiors are decorated with contrasting variations. This technique looks impressive if there is a photo print or pattern on the ceiling. But the walls must be perfectly smooth; any curvature due to the bright edging will be noticeable.
Peculiarities! To visually unify the interior, the same cord is used both to mask the joints and to decorate the curtains.
The type of outer layer (woven, knitted or twisted) is chosen according to your own preferences, taking into account the style of the interior. But the latter option is more common and there is a larger assortment, so it’s easier to choose.
Tips for choosing the color of the tape plug
Using polyurethane plugs of various tones, you can not only get rid of technical openings, but also decorate the interior in any style. With the help of the right color insert, you can visually transform the room. The modern market is saturated with plugs of various shades or ribbons made in several colors at the same time.
Prices for stretch ceiling kits
Selecting a decorative insert
When choosing the color of the ribbon insert, you need to consider the following rules.
- A brightly colored insert should match the tone of some decorative component or interior items.
- An insert with a touch of wall decoration makes the room visually taller.
- The tape to match the ceiling covering visually expands the ceiling.
- Installation of an insert whose color differs from the color of the walls and ceiling is carried out only on smooth walls. Otherwise, the tape will make even minor unevenness of the walls and ceiling noticeable. It is advisable to use a contrasting plug to decorate curved elements of a stretch ceiling structure.
The color of the masking tape is of great importance for the interior design. For example, an insert to match a stretch ceiling visually increases the visible part of the ceiling. The tape matches the walls visually making them taller. The contrasting color of the cap will create a clear boundary between the walls and the ceiling, but the walls must be perfectly smooth.
If it is not possible to choose a plug of a suitable color, then you can paint it in the chosen tone yourself. This must be done a day or two before installing the insert. For painting you need to use only acrylic paint.
How to properly glue edging to a suspended ceiling
The decorative cord is fixed last, after the canvas is installed and the wall decoration is completed. The wallpaper is glued close to the ceiling, the maximum distance to the film or fabric is 0.5 cm (otherwise the cord will not be able to cover the joint).
To determine the amount of edging required for a single-level ceiling, measure the perimeter of the room. For complex structures, take into account all the joints where the masking cord will be located.
Decorative edging is supplied in 25 meter reels, from which the required length is cut. Like other finishing materials, it is recommended to buy the cord with a small margin (0.5-1 meter) for undercutting or errors in calculation.
Additionally you will need:
- hot melt adhesive (sometimes replaced with sealant);
- a special gun for him;
- extension;
- stepladder or stool;
- sharp knife;
- “superglue” or “cosmofen” for finishing edges.
Before installation, the furniture is moved away from the walls to create a free passage. To start laying, choose the least noticeable corner or the most curved section.
Peculiarities! Sealant is available in different colors. White is universal, but you can choose another one that matches the ceiling or the product itself.
Working technology:
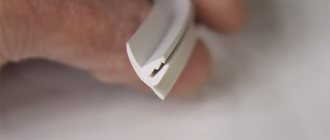
- The beginning of the decorative cord is filled with “cosmofen”, and after hardening it is cut with a knife. This will prevent the edge from falling apart into fibers.
- Lay out the edging on the floor next to the walls.
- Using a hot-melt gun, apply glue to the wall into the gap near the edge of the stretch ceiling.
- Press the cord along the gap. There is no need to press hard so as not to damage the canvas.
- Having reached the corner, they turn and continue to install.
- Carefully trim. The ends of the rope are secured end to end. There should be no noticeable gap or overlap.
Important! It is not recommended to use a spatula or other sharp tool for installation - you can damage the canvas.
Let's look at one example
You will need: a stable, comfortable stepladder, a heat gun with special glue, and an extension cord.
Operating procedure:
- Free up as much as possible for the unobstructed passage of the stairs.
- Identify a corner of the room that is hidden from view - perhaps behind a closet. The junction of the ends of the cord will be located in it.
- Spread the product around the perimeter of the clean floor.
- Apply superglue all the way through the ends of the cord. Let it dry. This is done so that it does not fluff up later.
- Cut 1.5-2 cm from the edge.
- Using your hands and a gun, glue the edging around the perimeter of the ceiling. Carefully trim and form a high-quality joint. There will be enough traction to support the weight of the edging.
How to insert piping into a gap without glue
This installation method is used for narrow types of edging. The width of the decorative cord should be slightly larger than the gap. During installation, the rope will compress slightly, then straighten out and will not fall out.
As in the first case, installation occurs at the final stage of finishing. The edge is processed.
The edging is applied to the gap and pressed inward. Use your hands or a spatula (but with great care). The end is cut so that it fits evenly to the beginning.
Advice! If furniture cord is purchased in small pieces, which are not enough for the whole room, it is better to make joints in the corners. This way the connection will be invisible.
This method is more labor intensive. But the trim is easy to pull out to clean it from dust or replace it with another one.
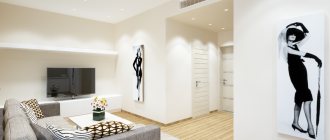
Photos of suspended ceilings with edging
A decorative cord is used instead of a plinth to hide the technological gap when installing suspended ceilings. The edging is easily attached and, if necessary, removed and reinstalled. The choice is quite wide, so the textile edging can be selected to suit any design.
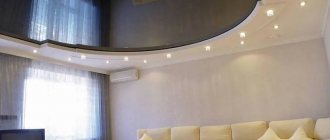
Skirting boards for hidden lighting
Such designs are produced with an additional niche that provides for the placement of fluorescent lamps or LED strip. Illumination around the perimeter creates the effect of a “floating ceiling”. To improve the design, the gap is closed with foam or polyurethane foam skirting boards. The inside may have a foil coating to better reflect light rays.
Examples of using plinths with hidden lighting for a stretch ceiling.
If you notice an error, a non-working video or link, please select a piece of text and press Ctrl+Enter .
0