If you take on something, then do it with all your heart and be sure to finish it. The full design of the ceiling surface is not limited to stretched canvases alone - for proper integration into the interior format, you need to try to work out all the elements. One of the most common questions is which curtain rods for suspended ceilings are best to choose? It would seem that what to think here - take it and install it, but the existing variety of ceiling cornices on the market makes all owners tormented by doubts about the optimal choice. How to make the right decision?
Some of you may object: “But there are wall cornices, so why reinvent the wheel?” At first glance, this is a completely reasonable objection, in which there is enough common sense, life experience, and the desire to complete the repairs started as soon as possible. However, this solution is clearly lacking in aesthetics and expressiveness: in the dispute between the usual wall cornices and their ceiling versions, the latter win the clear advantage on the scale of visual perfection.
Supporters of the first, more familiar option have their own arguments:
- cheap
- practical
- fast
- easily
- beautiful (sometimes)
And it’s hard to disagree with these arguments. A great variety of models with various design features fully satisfy the aesthetic needs of the average consumer.
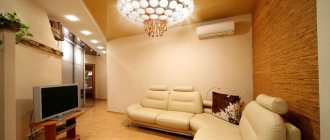
The above photos clearly demonstrate how, when successfully used in the interior, wall cornices successfully complement suspended ceilings and generally help create a stronger impression of the room.
Now take a look at the images below and feel the difference.
Cornices for a house with a suspended ceiling
Two types of cornice designs are used with suspended ceiling systems. Wall-mounted ones are attached directly to the walls of rooms. Their installation can be done when the blade is already secured, although preparatory drilling work can be done in advance.
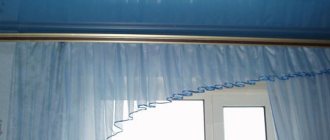
With ceiling mounting everything is more complicated. It may require an embedded beam or a niche in the recess of which the cornice system will be hidden.
A hidden cornice for a suspended ceiling is more difficult to install and requires more expense, but it looks so impressive and changes the proportions of the home that the result is worth the expense.
What else do you need to know about ceiling cornices?
- There may be a slight loss in ceiling height. A complex design can take away at least 5, or even 10-15 cm, but well-chosen curtains visually compensate for such losses.
- Loss of height can be completely avoided if you use the open beam method. In this case, first fix the baguette of the glazing bead or harpoon system, and after fixing it according to the existing level, adjust the location of the site.
- You can not limit yourself to just one wall with a cornice, but extend the plasterboard box or profile along the entire perimeter. If you connect the LED strip along the inner box, you can get a beautiful two-level structure like a floating ceiling.
- In small spaces, the use of both hidden and open variations is justified. But it’s better to refrain from using wall mounting; remember the immutable rule: the fewer elements, the better.
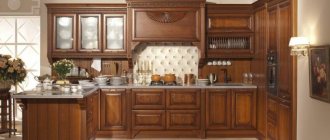
Finally, remember how important it is to correctly fit the cornice into the style of the interior. For large rooms decorated in a classic style, a wooden wall cornice is suitable - it will only emphasize the luxury of the room. In a modern minimalist interior, hidden cornices, perhaps with lighting, will look much better.
The article was written for the site.
Tags:Windows, Ceiling
Types of closed installation of cornices
The structures holding the curtains can be made invisible, then they will come out directly from the ceiling surface. Visually this increases the height of the room, giving it special beauty and charm. Moreover, you can hide both ceiling and wall versions of cornices.
You can get this effect using a niche device. To do this, an indentation is made from the wall on which the window is located. It is calculated depending on the type of model and the width of the curtains when folded, since the folds should not be wrinkled and touch the ceiling fabric with each movement.
Usually this is a distance of 10-20 centimeters to the embedded element, where the fastening of the tensioned ceiling surface ends.
Most often this is a wooden beam, but sometimes a special lightweight metal profile is used. In the resulting niche you can place any system for curtains, with a mechanical or manual method of sliding.
What types of materials are there?
Cornices are made from 4 main materials.
Plastic
The most budget option, available in a variety of colors and models. White ceiling rails and baguette cornices are made from plastic profiles. But there are also rods, the range of which includes mainly colored products or with imitation wood texture.
Of course, you can’t call a plastic product decorative, but if you make a hidden cornice or hide an overhead curtain behind a curtain, it won’t spoil the interior.
Tree
Beautiful, environmentally friendly, but the most expensive option. But thanks to its 100% naturalness, it can be installed even in a child’s room: it will not have any harmful effects on a growing organism.
Baguette ceiling cornices and rods for rings are made of wood. One of the advantages is also a disadvantage: the tree cannot be telescopic, but it can be ordered strictly according to the size of your window. However, when moving, there is no guarantee that the cornice will be ideal for the new apartment.
Steel
The main advantage of a metal rod is strength. Steel can withstand even the heaviest curtains made of velvet or large-width tapestry, but it also looks harmonious with flowing fabrics like organza. Unlike wood, which is used mainly in classic or eco-friendly interiors, steel fits harmoniously into modern minimalism or high-tech.
Aluminum
It weighs little, is inexpensive, and looks, on the contrary, expensive: an ideal compromise between the three previous options. Tires are made from aluminum profiles, and rods are made from pipes. The latter are most often sold as construction kits: you can choose a telescopic base and select suitable tips, brackets, and rings for it.
Visually, metal looks much better than plastic and does not spoil the design even when the mount is open. Another plus for aluminum: it can easily withstand heavy curtains, the average limit for 1 row is 10 kg, 2 – 15.
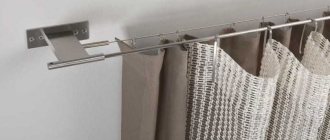
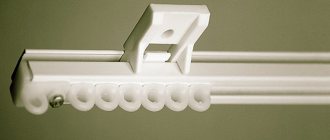
Tire type of curtain rods
They can be made of aluminum or plastic and represent a guide profile, like a tire with grooves arranged in it for laying stretched strings. Curtains move along them using hooks or loops.
Rail curtain rods for curtains under suspended ceilings can consist of a different number of rows:
- single-row - used when it is necessary to zone the living space or as an addition to blinds;
- double-row - the most common, suitable for daytime tulle and nighttime blackout curtains;
- three-row - used in more elegant interiors, where the third row is occupied by a lambrequin, draperies or a second night curtain that overlaps the first.
What do they look like in the interior?
Living room
Textiles in the main room of the house are primarily responsible for decor and comfort. Curtains here are usually hung in 2 layers - tulle and the curtains themselves. It is best to use a hidden method - the perimeter can be additionally decorated with baguette.
Often, living rooms have unusual shapes that can be easily wrapped around with stretch fabric and enhanced with hidden cornices.
Bedroom
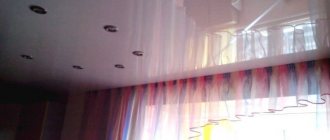
In a sleeping room you cannot do without curtains - thick curtains will protect you from the scorching morning sun, light curtains will create a comfortable atmosphere for relaxation. By choosing hidden installation, you can create decorative lighting along the contour of the ceiling, which will make the bedroom even more cozy.
The photo shows a suspended ceiling with lighting
Ceiling placement behind a baguette or on the wall is also possible - the room does not lose its charm.
Kitchen
The idea of installing in a niche is also suitable for the kitchen. But to make the curtains more practical, designers recommend choosing Roman or roller blinds - their profiles are also easy to attach to the ceiling in the opening.
If hidden mounting is no longer possible, take a look at other options: they can also be beautiful. For example, installation in a plane with a canvas, a wall rod or mounting directly on a window opening (blinds, pleated blinds, and roller blinds of a similar type can be found on sale).
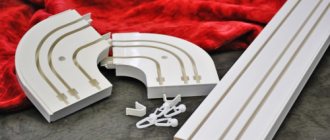
Profile cornices and their advantages
This type is the most reliable and common. Rugged aluminum or plastic construction is easy to install and durable to use.
It is a profile, straight or curved, with a guide structure along which hooks with curtains move. They can consist of several rows or be composed of several single rows.
Their weight is very light and does not create a deforming load on the ceiling or walls, especially when drywall is installed instead of plaster.
A variety of such curtain rods are flexible, which easily bend in any direction. They can be rounded at the edges or given a wavy shape just by fastening along a given line, which can be very convenient when designing unusual layouts and bay windows.
Cornice material
Before we move on to a review of various mounting options, let's study what materials curtain rods are made from. This is the easiest thing to deal with.
- Wooden cornices are distinguished by their impressive weight, they look solid, but they are also the most expensive. Such a cornice will fit perfectly into a classic interior, and in some cases, into a modern setting. The main thing to remember is that wood does not like sudden changes in temperature (more than 7 degrees) and does not welcome high humidity, but it is durable and able to withstand the weight of heavy panels. Wooden cornices come in a wide variety, but carved models look especially luxurious.
- Aluminum cornices are the golden mean; there is a margin of safety combined with low weight and an adequate price. They are not afraid of cold, heat or humidity, do not put a load on the floors, can withstand three-layer lambrequins, but the hollow structure is easy to deform and should be used with caution. There are both laminated and painted models on sale, so choosing the right product will not be difficult.
- Steel curtain rods are a good companion to heavy curtains, but such a product is heavy in itself. It is used when the length of curtains is more than 3 m. It is steel curtain rods that are used to decorate stages, and there the weight of the curtain is more than substantial. They can be decorated with wood or plastic to look more harmonious in the room. The cost is higher than that of the aluminum counterpart.
- Plastic – a bestseller in any city. Plastic can be painted or laminated in almost any way, so it allows you to bring any design idea to life. Although the material is not so noble, the strength without defects is impressive. However, there are minimal restrictions on the range of movement of curtains. However, it is better not to hang heavy curtains on a plastic curtain rod.
Additionally, sometimes there are forged cornices , which have all the same advantages as steel ones. They are strong, durable, reliable, can withstand the weight of heavy curtains, and look interesting, but it is difficult to call such products universal. They will fit well only into certain interior styles, incl. Provence, country, classic.
In addition, there are also combined cornices. The base, for example, can be made of aluminum, on top of which plastic is used. This combines the strength of aluminum and the wide decorative possibilities of plastic.
We also note that, regardless of the material of manufacture and method of fastening, curtain rods can be designed for 1-4 sets of curtains, i.e. you can hang tulle, thick curtains and a lambrequin for decoration on the same cornice.
Automatic way to control curtains
An existing mechanical system for controlling the movement of curtains can be automated if an electric motor or special sensors for combining with a remote control and telephone are built into it.
Then it will be possible to program the movement of the curtains by the clock, as well as control them using an electronic smart home program.
General installation rules
Much depends on the quality of installation. Inept installation of the structure will negate all the advantages of the latter. Therefore, one cannot be irresponsible about the process of fixing the cornice.
First of all, the high quality of installation is largely due to the presence of preliminary markings - they must be applied with maximum precision, especially in cornices, the main guide elements of which are composite.
The second important point is that in most cases, mistakes made when working with stretch ceilings are difficult to correct. Therefore, you must try to do everything carefully the first time.
Third rule: almost all cornices are attached at the edges, and then the attachment points are at least one and a half meters apart. It doesn’t matter whether they directly attract the cornice to the surface, or whether the installation is carried out using external brackets.
Photos of cornices for suspended ceilings
Special cornice for LED strip
It is, of course, not special, but the fastening technology is exactly the same as a regular hidden one. There is only one difference: if a simple cornice is needed only for curtains and is located next to the window, then the curtain rod for the tape can be placed anywhere.
Maybe you decide to make a two-tier structure right in the middle of the ceiling and place lighting there? Or, around the perimeter of the room?
In general, this is not the point. If you are attaching an LED strip, then you just need to try to make sure that it is not visible from any angle, otherwise the whole effect of the mysterious light goes away and the bare strip looks very ugly.
Also, when planning such a cornice, do not forget that you will need to route and hide the wires somewhere. Well, and perhaps most importantly: do not forget that any LED strip does not last forever.
Therefore, secure it in such a way that it can later be dismantled and replaced without consequences. If you rush and “plant” it on the glue in a continuous layer, you will later damage the putty coating or even the ceiling film itself.
Well, our article has come to an end. We hope you find the information presented here helpful!
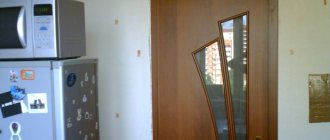
Technology for fastening wall cornices
Installation of wall moldings is usually used when the installation of the tension structure is completely completed, and it is no longer possible to screw on the hidden ceiling cornice. You can choose this method when you carry out renovations indoors with your own hands. It is not complicated, so the decorative coating on the ceiling will not be damaged. However, sometimes owners prefer to attach the cornice to the wall before installing the canvas, for several reasons:
- installation of wall products will be almost free, while installation of hidden cornices will cost 1,500-2,000 rubles;
- the film will not be damaged as a result of installation work. In this regard, it will be possible to completely maintain the waterproofness of the canvas;
- If you decide to replace the curtains with blinds, just remove the cornice from the wall and decorate the attachment points.
In construction markets, wall cornices are offered to customers in different variations. They can be, for example, stick-shaped. This is the simplest type, used for tension structures or ordinary painted ceilings. The baguette is installed against the wall, and the textiles are hung on special rings, which ensure easy movement of the curtains along the bar.
On a note! Before hanging the curtain, you need to correctly determine the distance from the ceiling to it. If you don't guess the size correctly, you will have to reweigh the product, and there will be unsightly holes on the wall.
How to install?
The installation of built-in and open cornices is quite different. If you are not confident enough in your abilities, do not have suitable experience in the construction business, and if you have the opportunity to hire professionals, we strongly recommend that you contact the company. Installing a cornice is not a quick and rather painstaking task. However, it is possible to do everything yourself if you follow the instructions.
It should be repeated again that the decision to install any type of ceiling cornice is made at the planning stage of installing a stretch ceiling.
To hang an open structure, you must complete the following steps:
- Mark the future position of the cornice on the ceiling.
- Attach the fixing frame to the walls.
- Secure a wooden beam the length of the cornice, and such a thickness that it fits against the future ceiling sheet. Please note that the beam must be well processed to remove all irregularities and roughness. It is also necessary to treat it with an antiseptic solution to prevent the growth of fungi and mold.
- Stretch the ceiling. First you need to glue protective rings onto it with holes burned inside for twisting. It’s better to just burn the holes, so you’ll melt the edges.
- Screw the cornice using self-tapping screws to the beam.
Make sure that the screws fit exactly into the holes in the ceiling panel. Without securing a sufficiently fragile canvas, you risk tearing it and sending the “arrow” further across the entire surface.
To attach a niche cornice, do the following:
- Screw the cornice to the main ceiling where you have planned its location.
- Attach the beam with clamps almost close to the cornice. It should help hide the cornice, so choose the right height.
- Attach the canvas fastener to the beam and, based on the height of the fastening, tension the ceiling.
- All precautions for the beam and for the canvas are the same as for fastening an open structure.
When installing the mount on a bay window, try to choose solid bars up to each of the kinks. This way you will avoid insufficiently secure fastening of screws in the beams.
It is recommended to choose good quality solid wood beams for beams. If the quality of the board is poor, there is a possibility that it will crumble as a result and that the screws will not hold securely enough.
Be extremely careful when installing hidden curtain rods. Its edges must first be wrapped with masking tape so that when stretching the ceiling fabric they do not damage the material with sharp corners.
It is generally recommended to sharpen the edges a little so that they do not cause problems or complaints in the future.
How to remove?
Removing a ceiling cornice is much easier than hanging it. All that is required is to unscrew the screws and remove the cornice.
If you dismantle the structure yourself, it is recommended to start unscrewing it from the sides, gradually moving towards the middle. This way you will avoid damage to the cornice itself.
When removing, you need to be extremely careful and make sure that the sharp edges of the profile do not scratch the ceiling. The least this can entail is unsightly tightening, but you can also make a hole in the ceiling, and replacing the fabric will be quite expensive.
Remember that you can only hang another cornice in the same place where the previous one hung, and you will have to fall into the same holes in the ceiling sheet. If you plan to change the cornices in the future, it is recommended to install dowels for repeated use instead of self-tapping screws.