The polyvinyl acetate emulsion is easily diluted in water and, when dried, creates a smooth film with good adhesion. At the same time, it penetrates deeply into the surface of the walls and is compatible with most building materials. Therefore, PVA-based putty is universal in use for interior work. The low cost of the components and their availability for free sale allows you to make the mixture yourself at minimal cost.
PVA based putty
What is PVA?
This product is widely known as an adhesive, but in relation to putty we should talk about a type of composition based on polyvinyl acetate, diluted with special additives. Unlike stationery PVA, construction modifications are characterized by higher adhesive ability, strength and resistance to external influences. Accordingly, PVA-based putty of this type has several improved qualities that allow it to bond materials that are rough and poorly interact with foreign structures. The adhesive contains special plasticizers with thickeners and solvents, as well as stabilizing ingredients, which, in particular, increase the reliability of laying the solution, its water resistance and the speed of setting after application.
Features of PVA-based putty
PVA putty is produced in accordance with GOST 520-20 from 2003. This product is based on polyvinyl acetate, which acts as a binder and is part of the glue of the same name. PVA is environmentally friendly and provides a high degree of adhesion to various substrates. Since polyvinyl acetate is easily diluted with water and is suitable for many construction works, the putty is considered universal and multifunctional.
Composition and technical characteristics
In addition to PVA, the putty also contains other components. Chalk is used as a filler, and some manufacturers also add talc to the product, since it has the finest fraction and helps to give the mass evenness without bubbles and potholes. Other components of the putty are:
- carboxymethylcellulose (CMC) and other plasticizers - to increase softness, reduce the effort required to grind treated surfaces,
- latex - to prevent cracking of the putty layer after drying and during the entire service life,
- antiseptics and special additives - to protect surfaces from fungus, mold, prevent insect infestation,
- drying oil - to give the solution elasticity and for more convenient application,
- emulsifiers and preservatives - to prevent deterioration of the composition and increase shelf life.
Typically, PVA putty is sold ready-made, since only in a diluted form it meets the requirements of GOST, and when diluted independently it can acquire other technical parameters. Dry building mixtures based on PVA are often sold in large volumes and used in industry.
The product characteristics are:
- high adhesive force (up to 450 N/m),
- guaranteed adhesion to basic building materials,
- no shrinkage, detachment, cracking,
- ensuring a smooth surface,
- ease of application,
- non-toxic, completely safe for humans,
- high drying speed - up to a day.
Purpose of putty with PVA
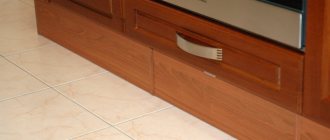
Despite the fact that the function of fastening two foreign materials is auxiliary for conventional putty, in this case the main emphasis is placed on it. Tasks such as leveling and priming on concrete and brick surfaces are carried out more efficiently thanks to the adhesive component. The intended purpose of polyvinyl acetate putty is still the interior finishing of surfaces that are planned to be further treated with whitewashing, painting or other finishing coatings. What is also important is that the increase in strength parameters allows the use of PVA-based putty for floors, including those made of wood. Restoring load-bearing joists or boards using polyvinyl acetate allows you to level the geometry of the flooring, as well as eliminate pockets of biological damage without resorting to a complete replacement of the covering. Another thing is that it must be a special composition of adhesive putty with additives that ensure biological restoration of the structure.
Purpose and scope
Typically, PVA putty is used for finishing bases made of concrete, brick, wood, foam blocks, cinder blocks and other popular building materials. The product is suitable for treating previously plastered bases or walls covered with a basic building mixture. After puttying with a PVA-based product, the following can be applied to the surface:
- water-based paint,
- latex paint,
- lime whitewash,
- oil paints and emulsions,
- adhesive compositions.
PVA putty is considered the most suitable for interior work in rooms with low and medium humidity. It is not suitable for the bathroom, kitchen and other rooms where the humidity level is too high.
Homemade putty with PVA
Putties today perform many tasks that require special combinations of ingredients in the composition, which is confirmed by the same example with strengthening wood. Therefore, there is also a growing fashion for individual formulations of these compositions, taking into account a specific set of components and at the same time eliminating unnecessary additions. Also, do not forget that ready-made PVA-based putty is not cheap - about 25-30 rubles / kg. Obviously, a homemade solution will be cheaper.
So, what exactly can you make with your own hands from polyvinyl acetate? The simplest option is to combine PVA with chalk, which will act as a filler. In its pure form, this combination can be used as a finishing putty, but for rough work covering large areas it should be diluted with sawdust or shavings. Another recipe involves adding water-soluble varnish to the above composition. A feature of this mixture will be higher elasticity, which is more suitable for finishing work on delicate surfaces.
Making your own mixture
Moreover, you can make the putty mixture yourself. To do this, just take regular PVA glue and mix it with powdered chalk or plaster. If you only need a little mixture, you can use tooth powder.
The proportion of the components of the mixture should be as follows: for a three-liter jar of crushed chalk, take one glass of glue with a capacity of 200 ml. The mixture must be thoroughly stirred until the consistency of thick sour cream and the absence of lumps, after which it is ready for use.
The mixture must be thoroughly stirred until the consistency of thick sour cream and the absence of lumps.
To treat the surface of wood, part of the gypsum or chalk must be replaced with small oak sawdust, and then the masked defect will become completely invisible.
Preparing the surface for applying putty
Before starting work, special preparatory measures must be carried out. They include the elimination of deep defects with cracks, dents and chips, abrasive cleaning of dust and removal of greasy stains. Moreover, at the very beginning it would be useful to carry out defect detection of the surface to identify weak areas that could provoke the collapse of the old coating under external influence. Further restoration of the structure is carried out using cement-based plaster or special primers. It is not advisable to use PVA-based putty for such tasks, since it is a more delicate and targeted means of preparing the surface for further decorative finishing work. As for stubborn greasy and oily stains, they can be dealt with with acetone, white alcohol or other organic solvents.
Disadvantages of PVA putty and errors in application
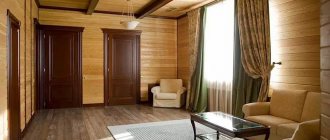
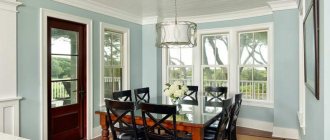
Wall decoration
For all its uniqueness, PVA-based putty cannot be used:
- outside;
- in damp areas;
- for leveling;
- as decorative textured;
- under tiles.
Putty made from PVA glue and chalk is applied in a layer of 0.5 mm and up to four layers. Otherwise, a network of cracks will form. Used only as a finishing touch. It is applied to a flat surface, smoothing out irregularities equal to the size of the fraction of the main components of the plaster - sand and cement.
Many people complain about the difficulty of removing protrusions and sanding PVA putty. I smooth out the next applied layer with a float after setting until it dries completely. The surface is smooth, almost mirror-like. It takes little time and effort to do the work. Each layer must be sanded and primed.
Advice! Buy putty or dry mixture only in branded stores. Choose a reputable manufacturer. There are especially many fakes for putty made from simple components.
To improve the adhesion and service life of the putty, the surface should be thoroughly cleaned of dirt and dust before finishing. A primer made from PVA diluted with water is applied in 2 layers.
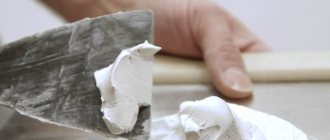
Application technique
The main working tool is a spatula, and it will be useful to have a wide and narrow model on hand. The first will help in finishing large areas, and the second will make it easier to spot seal defective areas. The technique for using PVA-based putty is similar to laying plaster, but adjusted for a smaller volume. The mass is also distributed throughout the entire working area using uniform movements. If there are still bumps or dents, they must be filled completely. It is recommended to seal newly opened cracks with a mounting gun using polyurethane foam or sealant. The optimal layer of putty is 0.5 mm. It takes about 24 hours to fully gain strength for subsequent finishing stages at this thickness.
Mode of application
PVA putty is applied over the base plaster. It is not applied as a thick leveling layer - only gypsum and cement products are suitable for this. It is advisable to carry out work at a temperature of +20…+30 degrees.
Preparing the base
The better the wall or ceiling is prepared, the less material is consumed and the more even the surface is. Usually the bases are leveled with base plasters, removing all significant defects and differences. Next, the walls are cleaned of dirt, dust and primed. If required, degrease with solvents (usually for substrates that have not been plastered).
You cannot ignore priming the walls and ceiling - this stage helps to increase the adhesion between the putty and the plaster, and increase the service life of the finished coating. The primer is applied with a brush or roller in 2–3 layers. Each subsequent layer is performed only after the previous one has dried.
Applying putty
In addition to the PVA plaster itself, polyurethane grout and primer, the following equipment will be required for work:
- two spatulas - wide and narrow,
- mounting gun and sealant (if you need to seal deep cracks),
- masking tape,
- polyethylene film.
When working with finishing plaster, only clean spatulas can be used - even a small piece of dried material will leave stripes and dents on the wall. Before applying the putty, cover the floor and cover doors and window openings with masking tape. Deep cracks are widened, cleaned out with the sharp end of a spatula, and then sealed with sealant.
The PVA mixture is thoroughly mixed to prevent separation of the components. First, spread the mass over a wide spatula using a narrow spatula, after which the composition is applied to the surface with sweeping movements. The layer thickness should be up to 0.5-1 mm, no more. After drying (after 2–3 hours), treat the walls and ceiling with polyurethane grout, and then after 24 hours with a primer. The surface will be completely dry in another day, and then you can glue wallpaper on it or paint it according to the user’s idea.
Material advantages
The main advantages of putty with PVA glue include high plasticity, versatility and many positive effects that appear already during the operation of the finished cladding. The material retains the original structure of the coating without succumbing to abrasion and other mechanical stress. As noted in reviews of PVA-based putty, there are also practical advantages for plasterers. In particular, the material does not get dirty, does not smell and is easily laid in a given shape, without causing inconvenience when distributing the mass on the surface.
Advantages and disadvantages
The product has a lot of advantages, which is why it is very popular among professionals and beginners in repair work. The material has a natural composition, which includes natural components and harmless synthetic additives. During drying and during use, the putty does not emit any odor, so it can even be used in children's rooms, gardens and hospitals.
After puttying, the walls will be resistant to the development of fungus and the colonization of microorganisms. As the putty is applied, the surface becomes snow-white, neutral in tone to any type of subsequent finishing - it can be painted even with the lightest paints. Other advantages of PVA-based material:
- low consumption (up to 0.5-1 kg/square meter),
- low price,
- evenness, perfect smoothness of the dried layer,
- ease of use and quick drying,
- resistance to temperature fluctuations,
- long shelf life,
- strength and non-shrinkage.
PVA putty also has its disadvantages. It is highly hygroscopic, therefore it is absolutely not suitable for wet rooms and outdoor work. Manufacturers also do not recommend applying the material under ceramic tiles and for leveling walls with large differences - for this purpose it is necessary to use more durable cement-based compounds.
Disadvantages of the material
The inclusion of polyvinyl acetate in traditional putty also provided it with several weak points. These include the following:
- Restrictions on use. Such coatings are not recommended for use in rooms where high humidity prevails or where tiles are planned to be laid.
- Long drying period. As already noted, PVA-based putty undergoes a polymerization period of about a day, while traditional compositions can dry in a few hours, which reduces the time for carrying out work activities.
- High training requirements. PVA glue is extremely sensitive to the condition of the surface on which it is applied. Therefore, it will be possible to achieve high adhesion only if the working base is thoroughly cleaned.
Application methods
Before applying the first coat, carefully prepare the base surface by removing moisture, dust, dirt or residues of previous coatings. Hygroscopic surfaces of gypsum or wood must be pre-treated with a primer mixture.
Then mix the putty thoroughly and apply it using a clean, well-polished steel spatula in a thin layer of no more than one millimeter. It is not advisable to apply a greater thickness; there will be a risk of slipping, and the drying process will take much longer.
After three hours, you can apply a second layer on top of the first. After another day, you can begin sanding the surface using fine-grained sandpaper and treating it with a polishing polyurethane sponge, and after finishing polishing, use a vacuum cleaner to remove loose small particles of putty. After this, the wall or ceiling is ready for whitewashing, painting or wallpapering.
Significant irregularities are first corrected by plastering. It is not recommended to apply putty in a thick layer.
It is not advisable to apply a greater thickness; there will be a risk of slipping.
What kind of PVA can be added to putty?
PVA is a group of compounds with polyvinyl acetate as the main substance. However, it may contain other impurities. Thus, stationery PVA-K contains a large amount of starch and a reduced content of polyvinyl acetate. PVA-M is intended for paper and wood, it is also less effective. Only two compositions can be added to the putty:
- PVA-MB is a universal option, which contains enough polyvinyl acetate and no other impurities. It has a yellow color and a homogeneous mass.
- Dispersed base is the best option for putty. It is a thick mixture of yellowish color with excellent properties.
PVA glue helps make putty better quality
The latter composition is frost-resistant only in its unplasticized form, so the dispersion is not suitable for external use.