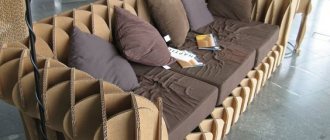
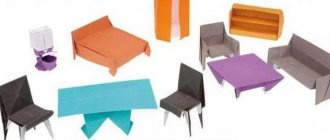
Cardboard furniture is a great alternative if you can’t afford regular furniture! Tables, chairs and sofas can be made from cardboard with your own hands!
Such an ordinary thing as cardboard, which we often throw away without thinking with the rest of the garbage, can turn out to be an excellent material for building good furniture. Of course, you can assume that such interior items will be fragile and will easily bend under the weight of objects placed on it, but this can and should be avoided by properly processing the cardboard.
Advantages of cardboard furniture
Such furniture has a lot of positive advantages:
- Stylish design. You can design any thing for your home, based only on your taste or the preferences of your family;
- Economy. Spend very little money to buy the necessary tools, and you won’t have to spend money on delivery/installation;
- Mobility. With lightweight, immediately foldable furniture, moving will not be your nightmare - you will only have the joy of packing things for your new life;
- Ergonomics. There is no need to walk around an endless store in search of “that very thing” that will simultaneously appeal to you, fit into the interior and be comfortable - from now on you can combine these three qualities;
- Safety. There are absolutely no harmful or dangerous elements in cardboard furniture - after all, you make furniture from boxes with your own hands, which means you check and see all the components;
- Environmental friendliness. The furniture has lost its former appearance and attractiveness, or you decide to change the design - just take it apart and put it in a bag. You can throw it away without worrying, or you can use it to light a fire for barbecue - cardboard will not harm the environment in any way!
- Strength. If cardboard is processed correctly, furniture made from it will last a very long time.
Despite the large number of advantages, cardboard furniture has one extremely unpleasant feature - when it is in a humid environment, the furniture deteriorates and becomes unsuitable for use.
Take this fact into account and always remove cardboard furniture from the street, otherwise sudden rain may render it unusable.
Our hands are not for boredom: how to make a table for dolls from paper, cardboard and matchboxes
You want to go for a walk with your favorite toy, change its outfit, comb its hair, feed it, put it to bed. Through play, the baby seems to be rehearsing her future role as a mother, wife, and housewife. And the doll’s favorite must certainly have everything - outfits, a house, furniture, and a car.
Of course, today everything can be bought in specialized stores. But, firstly, it is not so cheap, and secondly, it is much more pleasant to prepare a pleasant surprise for your daughter with your own hands. In addition, you can introduce her to needlework. Then it will not be just a homemade project, but a pleasant time together.
Tools and materials for manufacturing
What is needed to make cardboard furniture with your own hands? The constant materials will be:
- Packaging cardboard/cardboard boxes – you can ask for boxes in the store or look for purchased equipment at home;
- Regular and colored tape, paper tape, double-sided tape;
- A stationery knife for cutting cardboard (watch the sharpness of the blades and change them as they become dull);
- Sharp scissors;
- Dull knife;
- Roulette/iron ruler;
- Pencil and eraser;
- Glue (PVA, hot melt glue, wallpaper glue, liquid “moment” - depending on the situation, but sometimes you can only get by with tape);
- Sandpaper (you will use it to sand the cardboard sections);
- Kraft paper (white and dark) and tracing paper.
Types of cardboard
To make cardboard furniture with your own hands, you will need different cardboard, depending on the situation.
Cardboard can be one-, two-, or three-layer, depending on the number of layers, which, in turn, consist of small waves that can be seen on the cut of the cardboard. The more layers of cardboard with waves, the thicker the cardboard. Also, do not forget to determine the sides of the cardboard before starting work:
- smooth (sometimes with drawings) side - front,
- rough - purl.
To strengthen the edges of cardboard furniture, use dark-colored kraft paper, gluing all the seams with it, using wallpaper glue. Stick white paper (or tracing paper) on all furniture - it makes decorating the furniture easier.
Remember: craft paper and tracing paper must be torn by hand before gluing, not cut!
How to beautifully design and decorate storage boxes
How to make cardboard furniture more durable
Depending on the purpose of the item (whether it be a chest for children's toys or a TV stand), cardboard is strengthened in different ways. For a more reliable and durable fastening, you must remember the following:
- To strengthen the cardboard and protect it from moisture, use parquet varnish, applying it to finished and decorated parts of the furniture;
- Try to make furniture symmetrical - it is more stable than irregularly shaped furniture;
- If you make asymmetrical furniture, then add more supports to it for strength;
- The more cross sections your furniture has, the more stable it is;
- To give more strength to your structure, use a trick - make two layers of cardboard on all furniture elements. But, pay attention, the layers must be different: one layer must have horizontal waves, the other must have vertical ones;
- Light cardboard is less durable than dark cardboard;
- The thicker the cardboard, the stronger it is.
Universal tips when working with cardboard
Regardless of the type of furniture and the method used for its manufacture, there are general rules for performing certain work.
- Gluing individual parts. Use PVA glue; in all respects it is excellent for this type of work. When spreading, remember that cardboard critically loses strength as humidity increases. Do not press the parts with a weight, just fix their position with masking tape.
PVA glue
If you have a small volume of parts, then you can use hot or polymer glue; its composition is completely free of liquids. You should not use expensive synthetic adhesives; cardboard softens equally when wetted with water or chemical solvents.
Thermal gun (glue gun) - If possible use kraft paper. It has improved performance characteristics and significantly increases structural strength. In addition, the spring appearance improves; films can be glued to it or various designs can be made with paints.
Kraft paper - Only cut corrugated cardboard with a sharp cutting knife.. Scissors crush the edge, then it is difficult to work with it, it becomes very soft, loses its original thickness and strength.
Cutting cardboard with a sharp mounting knife
General advice - do all work carefully, cardboard does not forgive mistakes. Furniture manufacturing consists of several stages:
- development of a drawing (project);
- preparation of parts;
- strengthening individual elements;
- assembly;
- finishing.
How to use cardboard furniture
How to properly use hand-made cardboard furniture
In order for your cardboard new thing to serve faithfully for a long time, do not forget that:
- Cardboard furniture is afraid of moisture (varnish will not save you from rain);
- Use it for its intended purpose: if you have made a table for letters/keys/changes, do not place a bulky flower pot on it;
- Make sure that there is no open fire near cardboard furniture (be it a fireplace, a fire, or even a cigarette) - you may lose not only a piece of furniture if you allow a fire hazard.
How to make furniture from cardboard with your own hands if only a box comes to mind? What can you make from a shoe box? We are in a hurry to surprise you - you can make a lot of amazing things from cardboard that harmoniously fit into the interior, from the nursery to the hallway, and if you are completely overwhelmed by inspiration, then there are many ideas for the office and country house.
Below you will see how to make cardboard furniture with your own hands using patterns and diagrams. For the first time, choose something that is not too complicated to get comfortable with the manufacturing technique.
Important! When designing furniture, remember that 0.6 cm will take up furniture decoration, and always add these centimeters when measuring dimensions.
What can you make a doll table from?
First you need to decide on the material.
Suitable for creativity:
- cardboard;
- matchboxes;
- pieces of plywood;
- unnecessary CDs;
- ice cream sticks;
- plastic bottles;
- paper rolls for toilet paper.
On the Internet you can find a lot of different master classes that tell and show how to make a table for dolls with your own hands. Let's look at some of them.
Master class No. 1: Cardboard shoe stand
We decided to simplify your task - we put the first master class that anyone can assemble. So, armed with all the necessary items, let's get started.
Step 1
- Take sheets of cardboard - approximately 21x24cm - and divide them into three equal strips; Using a dull knife, press the strips thoroughly so that they bend.
- Cover the long sides of the sheet with any colored tape.
- Then fold the sheets into triangular oblong shapes and secure with the same tape.
Step 2
You can make any number of triangles. To secure the shelves, take whole sheets of cardboard and glue the triangles to them with double-sided tape or PVA. You can put a sheet of cardboard on the very top and put high boots on it.
Decoration methods
Decorating finished products is a separate stage in the production of paper furniture.
For finishing you can use:
- self-adhesive paper for furniture (it is easy to cut, and the adhesive layer will help you decorate the surface without any problems);
- acrylic, water-based or gouache paints mixed in a 1:1 ratio with PVA glue;
- fabric imitating the structure of furniture;
- glitter and stickers;
- colored tape;
- templates;
- ribbons, lace.
You shouldn’t limit yourself to just the options listed; to create truly original furniture you need to give free rein to your imagination.
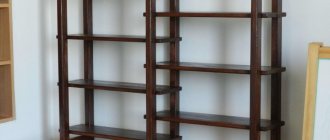
Master class No. 2: Cardboard bookshelf
Step 1
Take long, not wide sheets of cardboard - some of the sheets will be used for vertical bases, so they should be a little longer; in general, the size of the sheets can be any size at your discretion. You can look for such sheets in hardware stores - sometimes they throw them away with just such cuts.
If you can’t find it, take solid (without bends!) sheets and measure for the cutting line so that on all sheets they coincide when threaded into each other.
Step 2
If you take thick cardboard sheets, then when you connect them together they will hold tightly and without additional means. Thin sheets can be secured together with hot glue; it will dry quickly, so you will have to act quickly when joining the sheets. After joining the sheets, you can already use the shelf.
Master class No. 3: Hanging shoe rack
- Take a couple of large sheets of cardboard and mark them into equal rectangles based on the size of your shoes. Then cut them out.
- Fold each rectangle as shown in the photo, and secure the resulting pockets with tape.
- Insert the pockets into each other so that it is easy to secure them with double-sided tape, but still leaves room for shoes.
- You can fix the shelf on the door - it will not interfere with you at all and take up a lot of space.
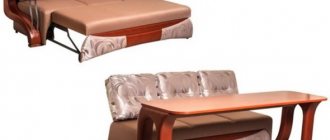
Making a countertop
First you need to make a tabletop. In order for it to withstand the load, for example, from a monitor or laptop, it needs to be made two-level. It is necessary to use a stationery knife to cut three pieces of cardboard in the shape of the future tabletop. One of them is a part for the top level, and the other two are for the bottom level. Cut thin strips of cardboard and bend them like an accordion. These strips need to be glued to one of the parts of the lower tier. To do this, coat a piece of cardboard with Moment glue or use a glue gun. The last option is much more convenient.
Drawing of a cardboard table.
The strips, folded like an accordion, are glued edgewise. It is very important that the strips of cardboard are the same width. To do this, it is best to cut them with one movement of the knife or mark them very carefully. If the difference in their width is significant, then dents will very soon appear in the surface of the tabletop. The tighter you pack the strips of cardboard, the stronger the tabletop will be.
After laying the accordion on top, the second part of the lower level of the tabletop is glued on top. When the bottom element of the tabletop is ready, you can move on to the top part. You also need to glue strips of cardboard onto it like an accordion. When the glue dries on it, you need to glue the upper and lower elements of the tabletop together. To do this, use the same “Moment” glue or a glue gun.
From the same cardboard you need to cut strips equal in width to the thickness of the tabletop and glue them to its sides. Additionally, they need to be secured with masking tape. Pay special attention to the corners.
Return to contents
Master class No. 4: DIY laptop stand
Almost each of us has an indispensable tool for work and communication - a laptop. And we have to buy all sorts of peripheral devices for it (mouse, flash drives, removable hard drives, etc.). And so, when there is a desire to put it on a stand for ease of use, we are forced to go to the store and spend extra money. For those who want to avoid unnecessary expenses, but do not want to give up the stand, there is an excellent solution - to make it yourself. And how to do this - you will read in this article.
Materials and tools:
- Laptop to measure stand size;
- yardstick;
- several sheets of paper or newspaper for a stencil;
- thick cardboard for the stand itself (you can use an unnecessary box);
- long ruler;
- marker or pencil;
- large scissors or a utility knife.
You already understand that we don’t need any special materials - everything listed is probably available in any home. Let's start production.
Step 1.
Take paper or newspaper and spread it on a flat surface. It is better to carry out all actions related to measuring the size of the stand and making a stencil according to the “measure seven times, cut once” principle, because at best the stand will be crooked, and at worst it will not hold the laptop.
- First we will make a leg (this is a crossbar between the legs to give the stand more rigidity). We take a tape measure and measure the length of the laptop along the keyboard, from corner to corner.
- Mark exactly half of this length with a marker on paper.
- We draw a line - this will be half of the base of the pole. It's better not to draw this detail entirely. Make a slight inaccuracy and the laptop will stand crooked.
- We measure up from the edges of the segment 4 cm and 7 cm. Draw a rectangle.
- Mentally divide the rectangle into 3 parts: the first third is an almost straight line at a height of 4 cm, the second third is with a pattern or hand making a bend at an angle of 45 degrees to the 7 cm line, the last third is from the right end of the segment we draw a line to the 7 cm line at an angle 45 degrees.
- All this is simply and clearly shown in the photo (detail 1). At the point where the two curved lines meet, a narrow sleeve is made - at this place there will be a cutout for aligning the parts.
Step 2.
The same photo shows a template for the legs of the stand (detail 2).
You select the angle of the stand based on your personal preferences. This will add up to the height of the right and left sides of the leg. When drawing the template for the leg, pay attention to the tooth that will subsequently keep the laptop from falling.
In height, it should be at least a third of the thickness of the laptop. The slot in the leg for coupling with the leg should not be in the middle, but at a distance of approximately 1/3 from the far edge. This also affects the stability of the structure. Curves are at your discretion.
The slots in the legs and leg can be no more than 3-4 cm in height. They can be 3-5 mm in width depending on the thickness of the cardboard, but in both parts they can be the same.
Step 3.
Cut out paper templates. We attach the template of 1 part with the bottom cut to the even edge of the box chosen as the future stand. It is desirable that the stable parts of the stand are perfectly level (the stand will not wobble on the table).
- Carefully trace the template on one side, then flip it over to the other side and continue tracing. We get one continuous symmetrical part (leg). Apply parts only to smooth parts of the box (pieces of cardboard) where there are no folds.
- On another cardboard (for example, the bottom of a box) we place the paper template of part 2, i.e. leg. We circle and repeat the same a second time. The legs must be absolutely identical.
Step 4.
We cut out all the details with scissors or a stationery knife. We move them along the slots, as shown in the photo.
If everything is combined correctly, then you can be glad that a simple (like all ingenious), functional, strong stand for your digital friend is ready! Install a laptop on it and attach additional keyboards to it, watch movies at a comfortable height, sweep cookie crumbs under the stand - you are now the happy owner of a homemade laptop stand!
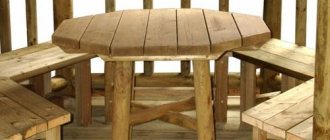
Small coffee table in nautical style
The marine theme is always successful because it is associated with vacation and relaxation - things about which it is impossible to have negative emotions. Such a set will always lift your spirits, especially if you use souvenirs brought from the south to decorate it: shells, stones, sand, etc.
But first you need a base. The material at hand that can be found in any pantry is suitable for it: an old window frame and a wooden handle.
The frame is first cleaned of dust and dirt, the paint is removed, the surface is treated with sandpaper and sanded, and then re-coated with fresh paint of the desired color. If necessary, new glass is inserted into the frame. The role of the base will also be played by the usual available materials: plywood or furniture board.
The cutting is sawn into four equal parts - these will be the table legs. They are carefully cleaned, painted and attached to the base using self-tapping screws.
The table is ready! All that remains is to add decorative details to the empty box, which is a frame: multi-colored sand, pebbles, imitation coral, photos. As an additional decoration, you can use a thick rope that is wrapped around the legs.
Here's another interesting option for a coffee table
The video tag is not supported by your browser. Download the video.
So, you have decided to make a coffee table from cardboard, now you need to understand the technology of its manufacture.
Initially, you should design a tabletop. In order for it to be strong enough to withstand the loads of a monitor or laptop, it is best to design it on two levels.
To do this, using a stationery knife, three elements of cardboard are cut out in a shape reminiscent of the designed tabletop. The first part is the top level, the second and third parts will be used for the bottom level.
Then thin cardboard strips are cut, bent like an accordion and attached with glue to the lower parts of the tabletop. It should be remembered that they are fastened with an edge and the width is of equal size. Therefore, when markings are made, it is better to use a ruler. If, however, the strips turn out to be different in width, this may lead to the appearance of dents. The density of the cardboard strips is also of great importance for the strength of the tabletop.
The next step after laying the cardboard is to attach the second part of the bottom of the tabletop. Next we move on to manufacturing the top level. Strips of cardboard are also glued onto it and after the glue has completely dried, both parts of the tabletop are connected.
To increase the strength of the cardboard strips, it is best to additionally secure them with tape and the corners require special attention.
So, the tabletop is ready, now let's move on to making the base. When making a corner table, you only need two legs. At the same time, to increase functionality, you can also build several shelves.
To make the legs you will need four equal sized pieces of cardboard. Moreover, they can be either rectangular or square. It all depends on the size of the leg. You can also use glue to attach them. It is necessary to make grooves at the junction and secure them with glue.
If you decide to make a solid table leg, then in this case the stiffening ribs can be single-layer, but should be placed quite tightly. It is best to glue strips for shelves and stiffeners 2-3 pieces at a time, which will lead to a more reliable result.