The functionality of furniture items is largely influenced by the installed fittings. To increase comfort when using pull-out structures (shelves, drawers, etc.), you can install hidden drawer guides. What is this type of fittings? What are its advantages and disadvantages? How to independently select and install hidden guides, read on.
Drawer on hidden guides
The design and principle of operation of hidden guides
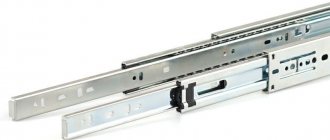
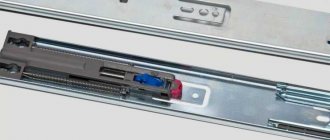
The flush-mounted guide kit includes:
- metal strips;
- metal bases along which the slats move;
- roller or ball mechanisms that facilitate the process of moving the slats;
- pins for fixing fittings to the box;
- fasteners.
Complete set of concealed mounting guides
Standard kits can be supplemented with:
- soft closing devices. Fittings with a closer allows you to extend the life of the furniture, since the absence of cotton when closing eliminates the possibility of damage to the material;
- return springs, allowing you to smoothly and quickly close the extended drawer;
- locking locks that facilitate the process of using and dismantling the structure;
- opening systems by pressing on the drawer front (Push-to-open).
All concealed installation guides are made from high-quality materials and differ in:
- accessibility. The cost of the accessories is significantly lower than the currently popular metaboxes and tandemboxes, and the functionality is much closer to the specified kits;
- quiet operation;
- possibility of fully extending the drawer;
- compactness and the ability to use the maximum amount of space of a piece of furniture;
- durability.
The disadvantages include the complexity of installation, but the detailed instructions included with the hardware kit and the availability of basic skills in working with a simple set of tools will greatly facilitate the process.
Installation of guides
If we are not talking about replacing broken devices, the choice of a guide system is made at the design stage, since its parameters must be taken into account. When installing the mechanism, it is necessary to correctly calculate the attachment points. Do not tighten the screws completely. It is recommended to bait them all first, and then tighten them all the way. Otherwise, the entire system may become distorted, causing it to become incapacitated.
Replacing a worn roller mechanism with a similar one
Situations where rollers wear out and drawers become difficult to pull out and close are common. It is with roller fittings that problems are most often possible.
Photo of a worn-out roller
The easiest way to fix the problem is to replace the device with a new one. If you want to save money, you can take the same roller guides, fortunately they cost no more than 100 rubles.
- Damaged parts must be removed. It's not at all difficult to do this. You don't even have to have a power tool at home.
To begin, remove the guides - It is necessary to open the packaging and check the functionality of the new set of guides.
Inspection of new guides - You can start fixing the fittings. The existing screw holes are used for fastening. We should not forget about the silicone gaskets that are installed between the metal parts and the inner wall of the furniture.
Silicone gaskets must be used - As noted above, it is important not to forget about the additional screw in the upper part of the bar (perhaps its absence was the cause of the breakdown).
Don't forget to tighten the extra screw - The new fittings do their job perfectly.
Checking the functionality of new fittings
Video - Causes of breakdowns of roller guides
Replacing roller guides on dresser drawers with telescopic ones
If the roller fittings break down, it is not necessary to install the exact same set. In order not to step on the same rake, it is recommended to purchase modern telescopic models from a trusted manufacturer.
Table. What will be needed to carry out the work?
| Name | Illustration |
| Ball guides | |
| Self-tapping screws | |
| Screwdriver, ruler and pencil |
The sequence of actions is given below.
- Removing faulty guides. This is not difficult to do, armed with a screwdriver or a simple screwdriver.
First, the old guides need to be dismantled - To replace broken mechanisms, German fittings will be installed, the service life of which usually exceeds the service life of the furniture itself.
New German fittings - After dismantling the roller mechanisms, an important step must be taken - marking for installation of the guides. Unlike models with rollers, one part of which was fixed to the bottom of the drawer, and the second - at its level to the wall of the chest of drawers, telescopic strips are mounted in the center. It’s easy to determine the center line on a box - just divide its height in half. If the height of the side wall of the box is 96 mm, 48 mm are measured at two points and a line is drawn. The line is applied on both sides of the box.
Markings are applied for mounting guides - It is a little more difficult to apply markings for fastening on the chest of drawers - you need to take into account the gap from the top point of the drawer front to the dresser lid (4 mm) and the height of the edge of the front protruding beyond the dimensions of the drawer (20 mm). By adding these values with the already determined half of the height of the box itself, we get the value that needs to be measured to draw a horizontal line (from the lid down) - 72 mm.
Marked chest walls - On the other side, the same segment is drawn.
- If a small error occurs in the calculations, there is no reason to be especially upset. The holes for fastening the guides are made in such a way as to provide some free movement of the slats during installation. They can be slightly shifted in height in one direction or another.
Holes ensure free movement of the bar - The guide is disassembled for installation. To do this, on the back side you need to press the lever, which allows you to remove the guide segment. The removed part of the fittings will be attached directly to the drawer, the remaining mechanism will be attached to the inner wall of the chest of drawers.
The guide is disassembled - The separated segment of the telescopic device is installed on the box (it should rest against the facade). Using self-tapping screws (16 mm), the strip is attached to the drawer at three points (the fasteners are installed in holes, the size of which allows you to adjust the vertical position of the guide).
The fittings segment must rest against the façade - The main part of the guide is fixed to the inside side of the chest of drawers. When installing it, it is necessary to take into account the thickness of the facade (recess the bar to this distance). In our case, the thickness of the facade is 16 mm. In addition, the installation of the guide must be carried out with an indentation of 2 mm. As a result, the bar is installed at a distance of 18 mm from the edge of the chest of drawers. This should not always be done. In our case, the facade is recessed, but the overhead installation method is most often used.
The main part of the guide is fixed on the inside - To insert a drawer with guides into the chest of drawers, you need to align them and wait for a click confirming the mechanism is activated.
A drawer with guides is inserted - If desired, it is possible to install a closer that allows drawers to close smoothly and without effort. The universal device can be fixed on any side of the chest of drawers. For fastening you will need two self-tapping screws attached to its edges.
Additionally, you can install a door closer
Important! For better functioning of the closer, the rubber clips should be removed from the guides. The structure is assembled and ready for use.
Problems may arise when using the system. As a rule, they arise due to incorrect installation (you can try to correct the situation by adjusting the fasteners), exceeding the load capacity of the mechanism, or poor quality components. But in general, modern guides, when used correctly, serve without fail for a long time.
Selection of accessories
The key to long-term use of hidden guides is primarily the correct choice of fittings. To choose the right mechanism for a drawer, you need to consider:
- overall dimensions of fittings;
- maximum load;
- variety;
- manufacturing company.
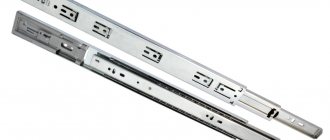
Types of guides
Concealed mounting guides can be:
Ball guides are made of two or more metal profiles connected to each other using rolling balls (cage).
Hidden ball-type guide device
The advantages of this mechanism are the complete absence of noise during operation, the possibility of regulation and the ability to use with loads of up to 60 kg - 65 kg. A significant disadvantage is the high cost of fittings.
The roller mechanism is a simpler and cheaper design. The guides consist of two metal strips, at the ends of which rollers are installed to facilitate the movement process.
Advantages
Hidden guides are attached to the bottom of the drawer, making them invisible. They also allow you to maximize the internal space of the drawer: the guides do not take up space on the sides, they are at the bottom.
Among other advantages we note:
- Possibility of full extension;
- Quiet operation;
- Long-term operation without maintenance;
- Compatible with automatic roll-out and smooth return devices.
Plus the availability of premium fittings. In the official Hafele store, prices for concealed mounting guides start from 380 rubles. You can choose partial and full extension mechanisms, with a damper and an automatic roll-out system.
Hafele – furniture fittings for those who choose the best.
Installation of hidden guides
So, each set of guides manufactured by Blum, Hettich, and so on, is accompanied by a hardware installation diagram, in accordance with which it is recommended to carry out installation.
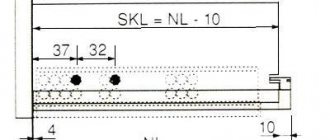
Schematic illustration of the installation process
In general, installation of Boyard, Bloom, etc. fittings is done as follows:
- At the bottom of the box, the fastening points of the guides are marked with a guide lock in accordance with the recommendations of specialists specified in the instructions;
- the clamps are secured with self-tapping screws (included with the hardware kit);
Placement and fastening of the clamp for the guide bar
- opposite the clamps, holes are drilled for a latch hook, the size completely corresponding to this element of the retractable system;
- guide strips are installed;