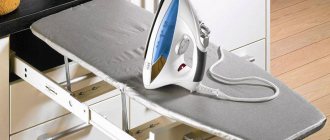
A sliding wardrobe is an ideal place to store both clothes and household utensils
These are modern realities: no matter how many square meters there are in an apartment, there is no separate room for household equipment. And even if there are a couple of free squares left, there will always be a more original solution for their use than storing household appliances. Since the times of the USSR, housewives have become accustomed to storing an iron on the windowsill, a drying device behind the closet, washing powders behind the toilet, and ironing boards under the sofa.
The most ridiculous fate is observed here at the vacuum cleaner. Most often, he goes out the door, if space allows, or migrates to the balcony, constantly reminding himself of himself and spoiling the mood of the owners. Even if the owners acquire a new wardrobe, it is not a fact that there will be room for such a unit.
In fact, this is not the fault of furniture manufacturers or manufacturers of household appliances, but solely of the owners. After all, when purchasing household goods, you need to know exactly everything about the place in which they will be stored. But not everything is as complicated as it might seem at first glance. If you approach this issue wisely, you can easily put all the puzzles into one and make a specific decision.
A small compartment can serve as a place for cleaning equipment
What sizes are there?
The depth of the shelves depends on the type of cabinet (built-in or cabinet), the place where it is located and the choice of the customer. If you choose a built-in option, which is located in a wall niche, then the depth can reach 80 centimeters or more. The average depth of shelves for storing clothes in most wardrobes is no more than 65 cm.
The suitable height of the shelves for storing things is 32-40 cm, but if you plan to place large items on them, then it should be revised upward
Optimal shelf sizes:
- for an ironing board in assembled and normal form: height 130 cm, width 15 cm (minimum), height 180 cm, width 15 cm (maximum);
- for storing the stepladder when assembled: height 60 cm, width 30 cm (minimum), height 215 cm, width 20 cm (maximum);
- for placing a clothes dryer: height 80 cm, width 10 cm (minimum), height 140 cm, width 20 cm (maximum);
- for a vacuum cleaner and iron storage: height at least 100 cm, width at least 60 cm.
If the furniture is located in a narrow area, for example on a balcony, then deviations from the standard sizes are possible, but only for cabinets with hinged doors. The sliding sliding door system is designed in such a way that it is not intended for cabinets that are too small and narrow.
To place the assembled ironing board, special holders are often made. The vacuum cleaner pipe is also placed on a frame with holders. Sometimes separate shelves for detergents are made in the niche for the vacuum cleaner.
How to order?
Having chosen the company where you will order the cabinet, invite a measurer and ask him to do all the calculations for the shelves. You can also use an online wardrobe calculator to see how the price changes as you increase and decrease dimensions such as width, height and depth.
The height between the shelf and the bar is usually 40-50 mm, and the width of the hangers is no more than 51 cm. The bars are traditionally located according to the height of the clothes. For children's things, a meter section is enough, and for an adult, at least 1.4 meters of area will be required.
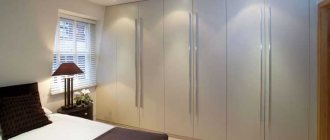
Separate cabinet or niche in the wall
If there is free space in the apartment, it is best to install a special utility cabinet. In addition to the vacuum cleaner, you can place an iron, broom, rags, detergents, towels and attachments for equipment there.
Owners of private houses, as a rule, allocate an entire laundry room for these needs, which also houses a washing machine.
Often apartments have niches or storage rooms. You can make a built-in wardrobe in them. This is the most convenient method, suitable for small families or simple one-room apartments. This is a simple and cheap option because it does not require a lot of material. It is better to equip a built-in utility closet with louvered doors for free ventilation.
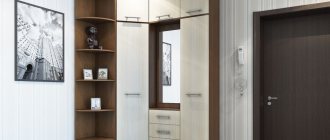
Examples of placement of cleaning equipment in separate and built-in cabinets.
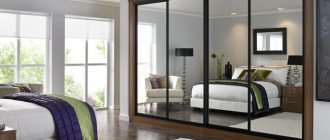
Wardrobe - the optimal solution
If you still haven’t made a decision about where exactly your housework equipment will be placed, the best option for “parking” all materials and tools will be a specially equipped cabinet. It has several advantages.
Compactness. The closet can become truly compact, and if you figure out where to put it, the final solution will delight you with the possibility of saving free space. Convenience. You will not need to run around the entire apartment in anticipation of cleaning and look for the necessary equipment, because they will all be stored in one place. Versatility. You can put in such a piece of cabinet furniture not only an ironing board and a vacuum cleaner, but also mops, shovels, hatchets, and household chemicals. Availability. A good wardrobe can be bought at competitive prices if you know how to choose it correctly. And these aspects will be covered in detail later in this material. Hygiene. When all things are in their places, the house becomes clean and comfortable. Therefore, it is not surprising that by finding a “home” for each household item, you will be able to comply with hygiene and safety standards. This rule is especially relevant if there are children in the house. They can create traumatic situations by accidentally finding a vacuum cleaner or ironing board
| Advantages |
Types of sliding wardrobes. Pros and cons of each type
In order to decide on the choice of a sliding wardrobe suitable for your hallway, it is worth remembering all the existing types of this furniture, and also think about the advantages and disadvantages of each type.
Table. Types of sliding wardrobes.
| Variety | Advantages | Flaws |
| Built-in | Fits perfectly into any suitable space. Embodies any design idea. Possibility to make it yourself. | Cannot be moved to another location. |
| Semi-built | Attaches securely to the wall. Fills empty niches in space. | Cannot be moved. |
| Hull | Can be used to divide space into zones. Easily disassembled, assembled and rearranged from place to place. | There is a lot of free space that cannot be filled with things. Suitable for people with few belongings. |
| Angular | Using corners, expanding the usable area of the wardrobe. | Often you have to make it to order, which is more expensive than other options. |
| Straight | Versatility and simplicity. | Suitable only for the simplest set of things. You may find that the standard design for your wardrobe is inconvenient. |
| Radial | Extraordinary. It will fit into any interior and become its decoration. | Expensive and not always practical. |
| Modular | It is convenient to create and supplement the storage system with various modules and options. | The cabinet will be limited to those modules that are in the manufacturer’s collection. |
About the storage features of washing vacuum cleaners
Washing units involve working with a cleaning solution. After cleaning and drying the container wall, the filters may remain damp. To prevent moldiness and the accompanying odors, you need to either store the device in a ventilated place, or spend a little more time drying.
Multifunctional models come with many attachments. At home and in apartments, you have to allocate a separate container, shelf or drawer in the closet for them. Storing vacuum cleaner accessories is a responsible task, because the device owes its multitasking ability to them. The advantage of Thomas washing vacuum cleaners is that the attachments can be stored in a clean water tank between cleaning sessions. This life hack has a lot of advantages. You don't have to look for extra storage space or lose attachments. And during cleaning, the most popular attachments can be installed in special slots on the vacuum cleaner body. Then you won’t have to be distracted; the nozzles are always at hand.
And also all Thomas vacuum cleaners can be stored not only horizontally, but also vertically. Therefore, they park without problems even in narrow closets.
As you can see from the article, storing a vacuum cleaner correctly is very simple, and following the basic principles of storage will ensure the longevity of the device.
Where not to store
The bathroom is not the best place for a vacuum cleaner, scrubber dryer and other cleaning equipment. The bath often contains large vapors and sudden changes in temperature. Basements and garages are also very damp, and storing a vacuum cleaner on a balcony can be either permanent or seasonal, depending on climatic conditions.
Something to remember! Household appliances and power tools should be stored in a heated room with a moderate level of humidity.
A variety of ways to store vacuum cleaners
Each version of household appliances, including a vacuum cleaner, has its own specific technical parameters and storage features, which is why special attention to detail is required.
But the important thing is that the vacuum cleaner is a compact device that does not require much effort during storage, which can be considered an important technical advantage. But you must remember that the vacuum cleaner must have its own specific place so as not to disturb or create inconvenience to others.
TOP 10 best manufacturers of sliding wardrobes
| Photo | Name | Rating | Price |
| #1 | Aristo | ⭐ 5 / 5 1 — voice | Find out more |
| #2 | Cideco | ⭐ 4.95 / 5 | Find out more |
| #3 | Komandor | ⭐ 4.9 / 5 1 - voice | Find out more |
| #4 | RAUMPLUS | ⭐ 4.85 / 5 | Find out more |
| #5 | Ronikon | ⭐ 4.8 / 5 | Find out more |
| #6 | Ariani | ⭐ 4.75 / 5 | Find out more |
| #7 | Stanley | ⭐ 4.7 / 5 | Find out more |
| #8 | Best Furniture | ⭐ 4.65 / 5 | Find out more |
| #9 | FRAN | ⭐ 4.6 / 5 | Find out more |
| #10 | MnogoMeb | ⭐ 4.55 / 5 | Find out more |
Which wardrobe manufacturers would you choose or recommend to purchase?
Take the survey
Where should toilet cleaning supplies be stored?
Cleaning equipment storage room
and the preparation of washing and disinfecting solutions should be part of a catering unit operating on raw materials and in a catering unit operating on semi-finished products.
Cleaning equipment for the toilet
is marked with a bright color and stored in the toilet room in a special cabinet.
Interesting materials:
How to define a non-profit organization? How to determine load-bearing walls in a monolithic house? How to determine if a watermelon is nitrate or not? How to determine the rate of depreciation of fixed assets? How to determine the rate and amount of depreciation? How to determine whether a battery is new or not? How to determine the volume of a pit? How to determine the volume of a square container? How to determine the volume of traffic? How to determine the volume of an object?
Master Class. How to assemble and install wardrobe doors
Let's see how the process of installing sliding doors for a built-in wardrobe takes place. In this case, the interior of the furniture has already been assembled and installed; to use it, you only need to install the doors.
Step 1. The first step is to buy or rent all the tools. In this case, you will need a screwdriver, an aluminum saw (a miter saw will be used here), and a hammer drill equipped with a drill. Scissors and tape measures, drills and hexagons, etc. may come in handy.
Step 2: The first step is to install the top rail of the coupe system on the ceiling. To do this, you first need to measure the width of the opening (for example, from wall to wall).
Step 3. Next, you need to measure with a tape measure and cut off the required piece of aluminum profile with a saw.
Step 4. Now you need to drill holes in the profile to mount it on the ceiling. There are three pairs in total, at the beginning of the profile, in the middle and at the end. But there may be more.
Step 5. Together with an assistant, you need to lift the profile and align it along the end of the cabinet, and then screw it using self-tapping screws. This will not be easy to do without the help of another person.
Step 6. Now you can proceed to installing the bottom rail for the doors. Just like with the top rail, first you need to take measurements.
Step 7. Again, you need to mark the desired size of the rail on the metal profile, and then cut off the section with a saw.
Step 8. Next, in the place where the rails will be mounted, you need to lay the prepared section of the profile, without fixing it yet. At this stage, you need to insert compartment doors into it and make marks on the bottom rail in the places where the stoppers will be installed.
Step 9. Then, after fitting, you need to install stoppers on the rail in the right places and then screw the bottom rail to the floor or bottom of the cabinet. The bottom rail can be fixed with double-sided tape. Then, before applying the sticker, you first need to degrease the surface, and only after that glue the tape itself.
Step 10. After this, you can install the doors in place. The wheels on the bottom of the doors should fit into the corresponding grooves.
In this case, the wheels are already installed on the doors themselves. But how to fix them correctly if they were separate? There is nothing complicated here either.
Step 1. The cabinet must include special fittings. If the cabinet is made by hand, then such accessories can be purchased separately in the store. It consists of metal elements of different types - with and without a wheel. Those that do not have wheels are mounted at the top of the door at a short distance from its side edge, but flush with the top end. The fittings must be screwed on using self-tapping screws.
Step 2. The second type of hardware, which has wheels, needs to be fixed at the bottom of the door so that the height is optimal. Two pieces of each type of element must be attached to each sash.
Step 3. Next, you just need to screw on the handles, and you can install the doors on the cabinet body.
Step 4. First, you need to insert the sash into the far upper rail, and then, carefully lifting the door, install the wheels on the lower rail. The remaining doors are installed in the same way, but on the nearest rail, etc.
Attention! Depending on the type of construction, the wheels on the doors can be located either at the bottom or at the top of the cabinet.
Wardrobe door leaf width calculator
Go to calculations
Put away in a drawer
Compact ironing boards without legs are hidden in a drawer in the kitchen or bedroom or laundry room. A home craftsman can easily cope with the problem by attaching a couple of runners and a board.
When choosing a location area, pay attention to ease of access. Some housewives prefer to leave the board in plain sight. They build a beautiful cover, the piece of furniture becomes an interior detail. You can also build an open storage system - place a board next to a hanger or clothes rack and a large mirror.