The desire to bring comfort and warmth into the environment of your own home is natural, so any little things are used to decorate the premises. Curtains are a necessary piece of furniture that serve as an excellent addition. Selected according to the style and current colors, it will add completeness and beauty to the overall decor of the room. How to hang a cornice? Despite the simplicity of the question, it is unlikely that any person will be able to answer it correctly and there are several reasons for this. In the first case, the owner of the premises counts on the help of a construction and repair team; in the other case, he is unfamiliar with such work. So, it’s time to lift the curtain of secrecy and tell you how the installation of cornices takes place.
MDF cornice for the corresponding kitchen is an excellent solution
Today we will talk about very beautiful decorative elements that are installed, as a rule, on sets whose facades are made of a frame profile.
The profile from which such decorative elements (cornices) are made can come in different decors and configurations (there is a large choice, so choosing suitable elements to match the color of the kitchen is never difficult).
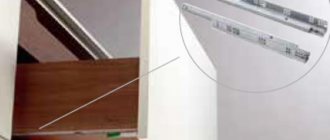
They are attached to the box using 4x30 (mm) self-tapping screws.
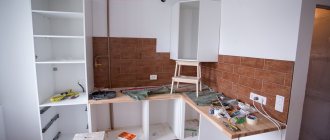
To make such a cornice for a kitchen set, you need to have the dimensions of the top of the kitchen along the perimeter with designated corners.
As an example, I will give a diagram of a cornice installed on a kitchen set, photographs of which are given in this article (according to this diagram, they cut a profile for me, which I installed on the kitchen set).
After the kitchen set has already been installed (at the end of installation), such a cornice is attached to the upper boxes.
It is better to fasten it with helpers, as it is not convenient to do it alone.
I attached it like this:
First, I laid out all the elements on the upper kitchen boxes the way they should be installed (I made sure the profile was cut correctly).
Then, in each element I made several holes (on top of the profile), through which they should be fixed to the boxes.
After that, I again laid out these elements on the upper boxes and began to fasten them.
The most important thing during installation is to arrange the elements so that there are no gaps at their joints during fastening. At the moment of fastening the profile, the assistant must firmly fix the corner joint, the elements of which are attached.
In this case, when attaching adjacent elements, there was a small gap in only one place, which was immediately covered with wax (when you are dealing with framed MDF, buy wax of the same color as it, sometimes it helps a lot).
One more point: If a profile cornice is to be installed on the kitchen set, the following things must be observed:
- When assembling the upper kitchen boxes, the upper horizons must be strictly flush with the sides (so that there are no “steps”).
- When installing such a kitchen, the entire upper base must be strictly vertical.
In this example, the upper corner frame was assembled in such a way that its upper horizon was slightly lower than the top edge of the sides (this very “step” was obtained), and during installation, the part of the profile that is attached to this corner frame turned out to be lower than the other parts. In order to “bring it” to the general level, I had to put what was at hand under this part of the cornice (and I had plain paper at hand).
These are the nuances that may occur during installation.
In general, a kitchen with such a cornice and MDF facades looks quite interesting. It would seem like such a small thing, but “it” changes the overall appearance of the kitchen for the better quite noticeably.
So, use the elements we are considering when making similar kitchen sets.
Yes, I forgot to add that profile cornices are installed either in straight kitchens or in corner ones, in the case when the corner modules of these kitchens have beveled ends (as in this case).
Naturally, such curtain rods will not work in kitchens with corner open shelves or with corner radius facades.
Taking measurements
Before choosing a curtain rod for kitchen curtains, you need to measure the width of the window opening and calculate the length of the curtain rod using the following formula:
- Standard length of the cornice (when mounted to the ceiling or wall) = width of the window opening + 30-50 cm.
- The length of the cornice when installed inside a window niche = the width between the two walls of the window niche - (minus) the thickness of the fasteners.
By the way, with the help of a longer or shorter cornice, you can level out the shortcomings of the window in the kitchen.
- A window that is too narrow will appear wider if you hang the curtain rod longer;
- A window that is too wide can be reduced by choosing a cornice exactly according to its width.
How to install a kitchen overhead cornice?
Dear forum users. I'm assembling the kitchen myself. I stopped at the stage of installing the upper cornices on the wall cabinets. I can’t figure out how to cut the cornices for installation on the corner cabinets. I ask for urgent help. I have it at the moment
Thanks in advance for your answer.
22.5 degrees on the crosscut.
C2p-OH If it’s not difficult, then please give more details. Do you cut both ends or just one and on which side? Preferably a drawing or photo.
both sides of each cornice are cut at 22.5 degrees. on the crosscut. The cornice should be on the end of the trim on the same side that will be on the kitchen cabinet. 22.5 is the bisector of the joining angle. It's hard to draw on the touchpad.
C2p-OH, Thank you very much for your answer, but it’s still not very clear (I’m slow). As I understand it, it can’t be done without trimming and a miter box won’t help. Maybe someone has a photo or drawing.
not in a miter box - worse, but possible. Also, set it to 22.5 degrees. and saw all mating sides
vera2010 wrote: If it’s not difficult, then please give more details. Do you cut both ends or just one and on which side? Preferably a drawing or photo.
If you have never sawed a cornice, then it is better not to start. Moreover, there is no trimming. Even with her it’s quite difficult. And it is important in your case not just to saw off the desired corner, but also to choose the location of the checkers (squares), otherwise it will not be beautiful.
For such a cut as in the bottom photo, they usually castrate and cut off not only the organs below the waist, but also the arms.
If it’s not long, bring it, I’ll cut it off.
Thank you all so much for your answers
C2p-OH, How can I contact you?
EV.SA wrote: For such a cut as in the bottom photo they usually castrate and cut off not only the organs below the waist, but also the arms.
C2p-OH wrote: if it’s not long, bring it, I’ll cut it off.
Quite risky. The cornice is quite large even if the angle is not 45. Usually such things are adjusted according to the location, including the overhang and length.
Tell me, please, how are these cornices attached? Only from above? Are there any mounting plates to make installation easier? Otherwise, we don’t have much space left between the edge of the upper cornice and the ceiling. And another question: do all the parts have to be secured separately? You can fit them, join the corners at the bottom, and then mount them all the way up. How, for example, are ceiling moldings made (several strips are glued together neatly at the bottom, and only mounted at the top).
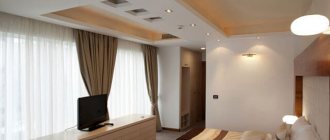
At what height from the ceiling is it correct to hang a curtain rod?
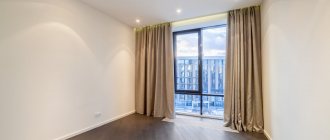
When all the walls are painted and the furniture is in place, the only thing left to do in the apartment is to hang the curtains and enjoy the warm stay inside.
But in order for expensive tulle with curtains to show off in the right place, you need to know how to properly hang curtain rods in relation to the window. There is nothing difficult here, but some nuances are still present. Read our review and learn all the features of installing curtains. The cornice is an indispensable element of the interior, without which it is impossible to hang curtains
Cornices for kitchen cabinets
Cornices for kitchen cabinets in Moscow
Cornices for kitchen cabinets and other products can be purchased at Leroy Merlin in Moscow at low prices. Select the product you are interested in on the website and buy it in our online store. The range of products presented in the catalog is extremely wide. Among them there will certainly be a position suitable in all respects.
All products presented in the section “Cornices for kitchen cabinets” are produced by well-known companies that have proven themselves to be of high quality for their products.
You can always place an order and pay for it online on the official website of Leroy Merlin in Russia. For residents of the Moscow region, we not only have low prices for products in the “Cornices for kitchen cabinets” category, but also fast delivery to cities such as Moscow, Balashikha, Podolsk, Khimki, Korolev, Mytishchi, Lyubertsy, Krasnogorsk, Elektrostal, Kolomna, Odintsovo , Domodedovo, Serpukhov, Shchelkovo, Orekhovo-Zuevo, Ramenskoye, Dolgoprudny, Pushkino, Reutov, Sergiev Posad, Voskresensk, Lobnya, Ivanteevka, Dubna, Yegoryevsk, Chekhov, Dmitrov, Vidnoye, Stupino, Pavlovsky Posad, Naro-Fominsk, Fryazino, Lytkarino , Dzerzhinsky, Solnechnogorsk, Istra and Zhukovsky.
Furniture assembly
Standard assembly (without additional work) is the assembly of all structures without changing their size and configuration: installation of lower cabinets and wall cabinets (without a canopy), their alignment and screed;
installation and fastening of the countertop and wall panel (without taking into account changes in their length); hanging facades, installing standard handles and plinths. Works not listed in the price list are paid for by agreement; claims regarding the cost of these works will not be accepted.
Contact number for assembly questions:
2.1. Standard furniture assembly without additional work in cities where they are located is carried out for a fee: for an order cost of up to 20,000 rubles (inclusive) - the assembly cost is 1,500 rubles (assembly of one module - 1,200 rubles, a three-door wardrobe - 2,250 rubles), in the case of the order cost from 20,001 rubles - assembly cost 7% of the order cost (excluding discounts and the cost of household appliances). Departure of collectors outside the city is paid additionally in the amount of 30 rubles per kilometer from the Moscow Ring Road or the administrative border of the city.
2.2. Departure of assemblers from 2 to 7 working days after delivery of the goods in full, and the Buyer submits an application for assembly. The specific date of assembly is agreed by the Buyer by calling the assembly department specified in this agreement, but no later than two months (at the Buyer’s request) from the date of sale. If the specified period is exceeded due to the fault of the Buyer, the application for assembly will not be accepted.
2.3. To assemble the furniture, the Buyer or his adult representative must be present at the address.
2.4. The assemblers assemble only the furniture assortment specified in this order form. If the Buyer purchases only individual components (countertops, wall panels, sinks, etc.), assembly is not carried out. Hanging furniture elements on the wall is not included in the assembly cost. Skirting boards and other elements of the apartment's interior that interfere with the assembly and installation of furniture are not dismantled by assemblers. Furniture packaging is not removed by assemblers. When assembling furniture with a height of more than 2 m, the Buyer must provide a stepladder or high stand.
2.5. Requirements for the room for furniture installation: Free space for assembly should not be less than the dimensions of the furniture + 1 meter. The room must have electric lighting and a working outlet. The room must be cleared of other furniture, sinks, electrical appliances and other things that interfere with assembly or that may be damaged during assembly. The premises must be completed with all communications (water supply, sewerage, electricity, gas). The walls for hanging shelves must be load-bearing, at least 10 cm thick, and do not require additional work when installing furniture. Hanging of furniture on walls that are not load-bearing is carried out at the request of the Buyer, under his responsibility. When installing hanging furniture, it is necessary to have a hidden wiring diagram for water and sewer pipes, electrical wiring, and low-current wiring at the place where the furniture is installed (otherwise the Client bears responsibility). The height of the ceilings must exceed the height of the furniture by at least 10 cm, otherwise the furniture will not be installed. When installing corner furniture, the adjacent angle should be 90 degrees. The floor covering must be smooth (deviation within 1 cm per length of 3 linear meters). During the installation of furniture, no other work should be carried out in the room.
2.6. If the assembly team was called to an unfinished premises, or the assembly did not take place due to another fault of the Buyer, then the re-entry of the assembly team must be paid by the Buyer in double amount.
2.7. In the event of unfinished self-assembly by the Buyer, assemblers will travel to complete the work for full payment for the assembly. In this case, no warranty is provided for the furniture.
2.8. Furniture is assembled strictly according to the project; changes to the project and furniture dimensions during the work at the request of the Buyer are made under his responsibility and are paid for separately. If the sold furniture does not fit into the dimensions of the room, then refurbishment of furniture by assemblers to new sizes (if possible) is carried out at the Buyer’s expense.
Kitchens with decorative cornices
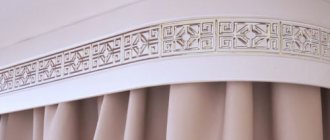
A decorative cornice for kitchen furniture (also called a baguette) emphasizes the overall style of the set, gives it a finished look and further reveals the overall color scheme. It should not be confused with a curtain rod. This is a decorative element that is a harmonious cut of the kitchen set. It carries not only the aesthetic function of decorating furniture. If it is placed correctly, you can hide the empty space at the top and bottom of the set, build in rods for storing utensils, etc. The designers of the Maria Kitchen Studio will offer you all possible options for using a cornice for a kitchen set when creating a free individual design project .
Advantages:
- Air
Thanks to the cornices, even massive furniture looks lighter and airier thanks to the “broken” top edge. - Height
Cornices in interiors and furniture visually raise the ceiling, making the room taller. - Acoustics
Cornices “dampen” unnecessary noise and improve the acoustics of the room, which is important in the kitchen: the sounds of a microwave operating, oil sizzling in a frying pan and water flowing from a tap will become much quieter. - Compatibility
Simple straight for minimalist kitchens, luxurious gilded for Empire style kitchens, ornate and massive for Baroque: no matter what interior style you choose, the cornice will always be appropriate.
Kitchens with cornices
- Style:
classic style - Material:
Solid and veneer - Coating:
enamel - Processing:
varnishing
- Style:
neoclassical style - Material:
MDF - Coating:
thermoplastic, enamel
- Style:
classic style - Material:
Solid and veneer - Coating:
enamel - Processing:
varnishing
- Style:
classic style - Material:
MDF - Covering:
thermoplastic - Processing:
varnishing
Completed projects in Moscow
- Style:
Neoclassical - Dimensions:
4.9m x 2.15m
- Style:
Classic - Dimensions:
4.1m x 2.43m
- Style:
Classic - Dimensions:
3.835m x 0.91m
- Style:
Neoclassical - Dimensions:
2.55m x 2.35m
- Style:
Neoclassical - Dimensions:
3.98m x 2.67m
- Style:
Neoclassical - Dimensions:
4.69m x 2.505m
- Style:
Neoclassical - Dimensions:
2.85m x 2.57m
- Style:
Classic - Dimensions:
2.4m x 2.19m
- Style:
Neoclassical - Dimensions:
3.438m x 2.455m
Choosing a baguette for the kitchen
The material and color of the curtain rod profile depend on the same characteristics of the kitchen unit itself. If the kitchen facade is made of MDF or solid wood, then the baguette must also be selected from similar materials. MDF cornices can be made of several layers that differ in width. Baguettes made from solid wood can be milled. Due to this processing, completely different designs can be applied to them - from straight lines to curved intricate patterns. These furniture accessories can be subjected to various finishes: patination, varnishing, painting in the required color, etc. If you decide to decorate your kitchen set with such a cut, you can be sure that it will be fully compatible with all other elements of the furniture.
Types and purpose
Its functionality depends on the size of the furniture cornice for the kitchen. Thus, wide models can play the role of shelves into which additional lighting can be built or hidden behind them are pipes and wires that spoil the appearance. Both wide and narrow models can cover the visible part of the wall above the upper cabinets. With their help, you can hide the wall partially or completely. When the ceiling is completely covered, a wide cornice is installed, and the distance between it and the upper boxes can be covered with a back wall made of the same material. The curved shape of the cornice can follow the shape of the kitchen bar counter and make the interior more holistic. The baguette can be installed directly above the kitchen “island” or bar counter. In this case, it is mounted on the rack column.
How to choose the right curtains for your curtains?
The installation of the cornice must necessarily coincide with the competent selection of curtains, so it is advisable to select them together. Before making a purchase, it is important to choose a model and color.
Attention! Metal models are completely unsuitable for a plastered ceiling: a piece of the covering will easily fall off along with the attached cornice.
The kitchen cornice allows the use of curtains:
- Roller blinds rolled into a roll.
- Japanese, with vertical folds.
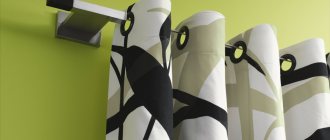
- Eyelet, draped with special devices (eyelets).
- Austrian, collected in a roll of canvas.
- Roman, folded into rings.
- French silk or thin fabrics gathered in scallops.
- Italian, draped with lace tiebacks.
It is advisable to install cornices in the kitchen according to this principle:
- Combine metal curtains with classic curtains and tulle.
- Japanese curtains will be perfectly set off by a forged cornice.
- Italian linens look perfect with a baguette.
- Roller blinds and profile cornices go well together.
Comments: 12
Architoria 3D
The designer you choose will help you. good luck.
- Like | 2
- Save
Related discussions
Kitchen, ventilation shaft, how to beat it?
Before and after the “School of Repair”: a kitchen for a football fan
A very unusual kitchen. What should I do?
Kitchen to the ceiling or not
HOUZZ-NL/UA
Some imaginary problems. Furniture is installed after the ceilings. Wall cabinets are designed with the same height and configuration. required for the selected design. The gap between the ceiling and the top edge of the furniture is covered with a regular ceiling plinth (you can even use foam plastic). Furniture makers, cat. you contacted - not in the subject. Write to me by email and I’ll make a project.
- Like | 6
- Save
Upiter Group
I agree, first the ceilings, when you paint the kitchen - everything can be calculated, so that there is more cornice to the ceiling and the distance of the working area is not 60 standard, but a little more. And the height of the upper cabinets is 85 cm - this is not enough, there is a maximum of 120 cm, but 90 is better and the cornice is 15 cm, so everything works out well.
- Like | 1
- Save
Natalia Puustinen
We also did a kitchen with a ceiling. They invited a master, he measured everything and made the upper wall cabinets of the required height so that there was no gap left.
Theoretically, you can make the area with the doors 7 cm smaller, make a blind area there and cover it with a plinth, as in your photo.
- Like
- Save
Product material
The material from which kitchen products for attaching curtains are made is very diverse.
| Material | Description | Photo example |
| Metal | Metal kitchen curtain rods can be made from different types of metal - aluminum, copper, brass, steel. They come in glossy, matte or coated with colored varnish. A separate group consists of forged products that can be made according to your own sketch. The price of such structures is one of the highest. | Forged product for lovers of the classics |
| Plastic | Frame structures made of plastic are one of the most affordable and practical. They are easy to use, and the finish imitating wood or metal allows them to fit perfectly into the kitchen interior. | Budget option - plastic baguette |
| Tree | Such baguettes are quite expensive, but their problem is that due to dampness and kitchen fat, their attractive appearance can quickly deteriorate. If the kitchen has a good hood and the window is not located above the stove, then such problems will not arise. | Stylish wooden construction |
Any type of baguettes for attaching curtains is often decorated with a variety of tips - of different shapes and materials. They give the design sophistication, individuality and charm.
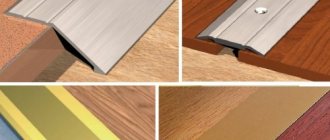
Mounting a baguette on the wall
The kitchen cornice looks beautiful and stylish, but in addition to the aesthetic side, it is also important to take into account the technical side - the quality of fastening of the structure.
Note! The more complex the structure, the heavier its weight - when fastening it is very important to take this point into account.
If you are installing a structure for fastening curtains with your own hands, then you will need the following tools:
- screwdriver;
- perforator;
- building level;
- pencil and tape measure;
- ladder;
- screws and dowels.
Kitchen cornice: fastening - diagram
Before you get started, there are a few things to consider:
- Make sure that the product will not interfere with the opening and closing of the window.
- The brackets that usually come with the kit should be larger than the protruding part of the window sill so that the curtains will not fall on it.
- Make sure that heating pipes and other communications do not pass through the location of the cornice.
After making sure that the work surface is ready for installation, you can begin the process.
The instructions for carrying out the work are as follows:
In the process of marking
- Make markings using a level and tape measure. The markings for the brackets should be at the same distance from the window opening.
- Plastic and wooden brackets are fastened with one screw, and metal ones with three.
- Having decided on the markings, start drilling holes. After this, insert the dowel into the hole, then attach the bracket to it and secure everything with a screw.
Creating holes using marks
Advice! To make the fastening of the structure more reliable, you can pour a little epoxy resin into the prepared holes for the screws and then insert the fasteners.
Subsequent installation is carried out after the additive has completely dried.
- Before attaching the second bracket, check the markings again.
- Having fixed the brackets, connect them to the rod and check the reliability of the entire structure. When installing, it is important to remember that the rings for attaching the curtains must be put on the rod in advance.
Installation of drywall and preparation for finishing
When cutting gypsum board fragments, it should be taken into account that one edge of the box, usually the bottom, should be slightly wider in order to cover the ends of the two side edges.
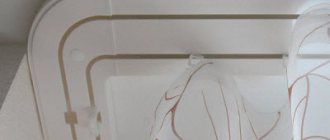
It is recommended to drill holes for spotlights in advance, before installing drywall. It is also better to make chamfers at the joints of the elements. They will be useful for subsequent processing of seams.
The sheathing process looks like this:
- The prepared pieces of drywall are fixed to the frame with self-tapping screws in increments of 25–30 cm. A special bit installed on a screwdriver will greatly facilitate the process: due to its shape, it will not allow the screw to be driven too far and crush the plasterboard.
- As mentioned earlier, it is more convenient to mount the wall of the box facing the window at the bottom. The small dimensions of the niche will not allow you to “crawl” with a screwdriver to the fastening points.
- After the installation of the gypsum board is completed, the seams are glued with reinforcing tape or serpyanka mesh and sealed with a special putty for drywall. It also processes the recesses formed by the heads of the self-tapping screws.
- After drying, the seams are rubbed with sandpaper, and then the entire surface of the box is primed. The primer is applied in two layers. After it has completely dried, you can proceed to finishing.
Thus, it is not at all difficult to assemble a niche for curtains by mounting a box made of plasterboard. This design will definitely contribute to creating a unique design for your room. The process is shown in more detail in the video. Ask questions in the comments!
Product material
The material from which kitchen products for attaching curtains are made is very diverse.
| Material | Description | Photo example |
| Metal | Metal kitchen curtain rods can be made from different types of metal - aluminum, copper, brass, steel. They come in glossy, matte or coated with colored varnish. A separate group consists of forged products that can be made according to your own sketch. The price of such structures is one of the highest. | Forged product for lovers of the classics |
| Plastic | Frame structures made of plastic are one of the most affordable and practical. They are easy to use, and the finish imitating wood or metal allows them to fit perfectly into the kitchen interior. | Budget option - plastic baguette |
| Tree | Such baguettes are quite expensive, but their problem is that due to dampness and kitchen fat, their attractive appearance can quickly deteriorate. If the kitchen has a good hood and the window is not located above the stove, then such problems will not arise. | Stylish wooden construction |
Any type of baguettes for attaching curtains is often decorated with a variety of tips - of different shapes and materials. They give the design sophistication, individuality and charm.
Mounting a baguette on the wall
The kitchen cornice looks beautiful and stylish, but in addition to the aesthetic side, it is also important to take into account the technical side - the quality of fastening of the structure.
Note! The more complex the structure, the heavier its weight - when fastening it is very important to take this point into account.
If you are installing a structure for fastening curtains with your own hands, then you will need the following tools:
- screwdriver;
- perforator;
- building level;
- pencil and tape measure;
- ladder;
- screws and dowels.
Kitchen cornice: fastening - diagram
Before you get started, there are a few things to consider:
- Make sure that the product will not interfere with the opening and closing of the window.
- The brackets that usually come with the kit should be larger than the protruding part of the window sill so that the curtains will not fall on it.
- Make sure that heating pipes and other communications do not pass through the location of the cornice.
After making sure that the work surface is ready for installation, you can begin the process.
The instructions for carrying out the work are as follows:
In the process of marking
- Make markings using a level and tape measure. The markings for the brackets should be at the same distance from the window opening.
- Plastic and wooden brackets are fastened with one screw, and metal ones with three.
- Having decided on the markings, start drilling holes. After this, insert the dowel into the hole, then attach the bracket to it and secure everything with a screw.
Creating holes using marks
Advice! To make the fastening of the structure more reliable, you can pour a little epoxy resin into the prepared holes for the screws and then insert the fasteners.
Subsequent installation is carried out after the additive has completely dried.
- Before attaching the second bracket, check the markings again.
- Having fixed the brackets, connect them to the rod and check the reliability of the entire structure. When installing, it is important to remember that the rings for attaching the curtains must be put on the rod in advance.