When the kitchen renovation comes to its logical conclusion, it’s time to start installing furniture. A wall storage system in a family home usually weighs quite a bit.
The safety of the fastening for household members is also important. We offer an overview of the simplest and most reliable options for hanging kitchen cabinets on the wall.
Height
Despite the generally accepted meanings, the main thing is the comfortable use of furniture, which is directly related to the growth of its owner.
The hostess or owner should easily reach the middle shelves of wall cabinets without the help of a chair or stool. You should know that the minimum distance from the tabletop to the bottom edge of the cabinet is 450 mm. This will allow you to comfortably use the work surface and place the necessary small household appliances there, such as a coffee maker, microwave, electric kettle, etc. But most kitchen furniture stores consider the optimal distance to be 600 mm.
To make it easier to determine the most convenient level for hanging cabinets, you should familiarize yourself with the calculations of the ratio of human height and the distance to the top shelf of the module:
- height from 1.55 to 1.6 meters – height to the top shelf 1.75 meters;
- from 1.6 to 1.7 m – distance to shelf 1.9 m;
- from 1.75 to 1.9 m – height 2 meters.
Taking into account your height, you can easily determine the optimal distance for yourself to the top shelf of the headset.
Installing the top of the furniture
The first priority is to fix the hooks in the middle position. For this, adjusting screws are used. After this, you need to fix them from the inside on the side walls so that the hook is on the outside by 2-3 mm and it is possible to fix them on the fastening bar.
The design of the hinge allows you to adjust the mount in height and depth.
The next stage is applying markings to the wall. But for this you must follow a number of rules.
This is done for clarity, so that you can see the number of centimeters that need to be taken into account when making the final marks.
The next step is to make holes in order to install the rail. Here are some useful tips that will come in handy:
- If the drill "jumps", make small notches using a nail or punch and hammer;
- If the wall crumbles during work, then first you should make a small hole, and then drill it out to an acceptable size;
- If you need to change the drilling depth, you need to use a prepared dowel;
- If you need to make a hole in a concrete wall, but there is no hammer drill, you can do it with a hammer and a punch.
Wiring locations require special attention.
Upon completion of all actions, the dowels are placed in the holes. Next, the mounting strip is installed on the fasteners. The cabinets are fixed to the mounting plate. To adjust their position, screws of mounted mechanisms are used.
To make the set look like a single “wall”, they need to be connected closely to each other.
The elements are fixed with clamps, starting from the corner, avoiding chipping (in accordance with the above instructions).
Thus, alignment of the overall ensemble of cabinets in one plane is achieved.
The next step is to drill holes between the tightly fitting parts of the headset to then fasten them with intersectional ties.
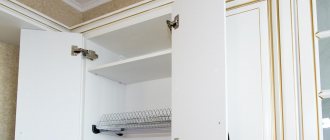
At the final stage, shelves are installed and doors are secured.
Types of fastenings and their features
After choosing the height for mounting the cabinets, you should decide on the type of fastening. It can be different: corners, pendants and tires.
Corners or pendants
Previously, special metal hangers were used when installing cabinets. They were attached to the rear ends of the module walls. Today, such devices are no longer used, as they have quite a few disadvantages. For example, the inability to adjust the position of cabinets after installation on the wall. And how evenly they will hang depends only on the accuracy of the markings on the wall.
Corners are almost the same as pendants, only they are attached to the roof of the cabinet. When using them, it is important to determine the upper limit at which they will be set. You must strictly adhere to one horizontal line, otherwise the wall cabinets will be installed unevenly.
Installation on corners or pendants is a rather labor-intensive process (compared to a tire) and requires perfect precision. If there is a mistake, you may need to make new holes in the wall.
If the walls were not leveled during the kitchen renovation, then fixing them to the corners will be the best option. An outdated method does not mean it is bad, you just have to spend a little more time on installation than when using other types of fasteners.
Tire (bar)
A mounting rail or strip for hanging cabinets is much more convenient and saves time. This kind of work can be done even alone, which cannot be said about installing it on corners.
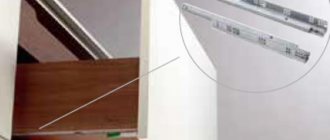
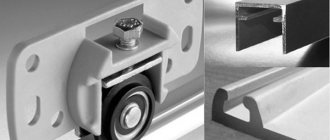
The fastening consists of two elements - adjustable canopies and a special strip. The canopy is installed inside the cabinet, in the back wall of which you need to make a hole. A rail is attached to the wall, onto which the module is subsequently hung.
This type of fastening has its advantages:
- Self-installation. You can handle the installation of wall cabinets yourself by first fixing a plank to the wall, and then installing modules on it.
- Possibility of adjusting the position of the cabinet. In this case, there is no need to remove furniture from the wall; all the work can be done under the canopy.
- Reliability. Unlike mounting on corners, the option with a bar is considered more reliable and capable of withstanding high loads. Even if a couple of screws in the structure become loose, the rest will hold the modules well.
To the corners
The modules are mounted on rigid metal corners and self-tapping screws screwed into the dowel.
This fastening method has the same features as the option with furniture hinges. Suitable for fastening not only kitchen units, but also any other furniture.
Although this option is more budget-friendly, it is very outdated and is therefore rarely used, as it is inferior to the more modern method of mounting on a rail.
Tools and preparatory work
In order to install wall cabinets with your own hands using canopies and a mounting strip, you should prepare the necessary tools in advance:
- Hammer or drill (depending on the wall material).
- Screwdriver and screwdriver.
- Construction level, tape measure.
- A hacksaw for metal.
Before you begin the process of installing wall cabinets, it is necessary to carry out some preparatory work. The most important thing is to make sure the walls are strong. If the set is installed on drywall, then a wooden beam should be secured under the front surface for strength. Otherwise, you may need butterfly dowels in large quantities.
With a corner set, the corner of the kitchen should be treated with special attention. If you lay it out carefully, there will be no gaps when installing the corner cabinet. It is better to lay the electrical wiring in advance so that you do not have to dismantle the furniture later, which is extra work and a waste of time.
For the hood, it is better to mount a socket under the ceiling directly above it. So, you can get rid of wires in the area of the stove and work surface. And in terms of safety, this is a big plus.
The final finishing of the wall with wallpaper, tiles or plaster must be completed before installing the kitchen. After hanging the modules, this will not be possible.
Drywall
A wall cabinet can be attached to surfaces covered with plasterboard using anchors of the appropriate length (through a load-bearing wall). It is better to fasten the sheathing in the places where the mounting strip or sheathing profile is attached. Hanging gypsum fiber boards (gypsum fiber boards) on walls is less problematic, especially if there are open connectors (umbrella, butterfly).
Sources
- https://mebel-expert.info/kak-povesit-kuhonnye-shkafy-na-stenu/
- https://mastack.ru/other/kak-povesit-shkafy-na-kuhne-sposoby-krepleniya-i-poshagovaya-ustanovka.html
- https://kakpravilnosdelat.ru/kak-povesit-kuhonnye-shkafy-sposoby-i-metody-krepleniya/
Installation process
First of all, you should install awnings on your kitchen cabinet. This process is not complicated. If the rear wall of the module is made of fiberboard, then it is necessary to cut two small holes in it for the mounting tabs. After this, press the canopy against the top panel of the cabinet and secure it with two self-tapping screws to the side wall.
If the back panel is made of laminated chipboard, then you will have to make a cutout directly under the canopy and fix it flush with the laminate. But this option is quite rare.
To mount a metal rail for hanging cabinets on the wall, you must perform the following calculations:
- Add up the height of the lower cabinets, the distance between the wall and floor modules, and the height of the upper cabinets. For example: 920+600+600 (pedestals, apron, top module).
- From the resulting result, 45 mm should be subtracted for the shrinkage of the canopy. The result will be a size that should be marked on the wall.
- Next, you need to mark a horizontal line along the level and attach a metal strip. It has holes for fastenings every 15-20 mm, but you don’t need to drill all of them, just fasten the screws in the corners of the mounted modules.
To make adjusting the cabinets easier, before installation, you should slightly loosen the fastening tab and allow it to move freely up and down. After this, you can begin hanging the cabinets, and then adjust them on the wall so that all modules hang evenly. The hanging elements can be fastened together with intersectional ties for strength and convenience.
Installing a kitchen yourself is not as difficult a process as it might seem. First of all, it is important to decide on the fastening, and if preference is given to canopies and planks, then installation can actually be carried out alone, without outside help. Before installation, it is necessary to complete all repair work and finish the walls in the kitchen, as well as prepare the necessary tools. It would be a good idea to familiarize yourself with the installation process in advance by watching video tutorials on the Internet.
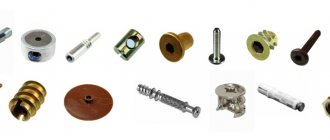
Selection of screws
Traditional fastening of shelves, cabinets, cornices, and decorative elements is done using self-tapping screws, which in their design have a head and a thread with sharp edges, which, when screwed, allows you to independently cut threads in the dowels into which they are screwed. They are selected according to the predicted load.
The material is steel - most often carbon, but stainless steel is also found, as well as brass. Carbon steel products have a protective coating. Self-tapping screws differ according to the thread pitch, which can be frequent, universal, rare. The first type is designed for working with iron surfaces. A rare step is suitable for wood, plastic and other soft materials. Universal varieties are used more often.
Preparing the wall surface
The preparatory stage is not necessary in every case, but sometimes the installation of fittings and high-quality hanging of cabinets is complicated by unfinished finishing or uneven walls.
Wall furniture hides minor defects, so sometimes they don’t put wallpaper under kitchen cabinets or do decorative painting. But in the case when the finishing work is not completed, it is necessary to level the walls. To level out crooked walls, the beacon plastering method is most often used.
The walls are cleaned of mortar build-up and several layers of primer are applied. Next, metal or plastic slats are installed, which play the role of “beacons”. Ropes are pulled through two longitudinal strips fixed with plaster.
Using the first section as a guide for the building level, the remaining planks are attached. Apply the solution over the beacons and level it. After a few hours, when the solution has dried a little, carefully pull out the metal strips. Plastic ones can be left in the plaster.
If there is already a layer of plaster on the walls, the surface is carefully leveled with mortar and a spatula. If you are not confident in your plasterer skills, use the wooden plank method. Two horizontal strips of wood are attached to the wall with screws, which act as tires. The fittings are hung on these strips, so the furniture does not come into contact with the walls.
Installing wall furniture on completely finished walls has several nuances. Some finishing materials require a special approach. Let's consider the difficulties that may arise when attaching fittings.
Features of wall materials
Walls covered with plasterboard look perfect - smooth, neat and beautiful. But even the strongest sheet will not withstand hanging furniture. For this reason, it is worth figuring out in advance how to properly hang kitchen cabinets on a thin wall.
If the plasterboard box is fixed on top of a load-bearing wall, then the fittings are mounted directly on the wall beams. The mounting strip is hung on fasteners 12-16 mm long, drilling through the drywall. The entire load falls on a strong supporting base - the thin box is not used.
The second case is more complicated. We are talking about a hollow plasterboard partition, which is installed on a metal frame and painted. Using a magnet, the internal metal structure is located and marked. Having drilled through the plasterboard box, a mounting rail is installed on the metal frame using special fasteners with spacers. Now the fittings are firmly mounted and you can hang the cabinet without fear for safety.
Important. Clay, adobe and wooden walls are drilled with a drill with a diameter of 8 mm and the fasteners are reinforced with wooden plugs or glue for self-tapping screws. A more modern option is “chemical” anchors.
The load-bearing capacity of aerated concrete is sufficient to support the weight of the kitchen unit. Specialized anchors and dowels are inserted into the drilled hole and secured until it stops. The spacer created by the opened anchor firmly fixes the furniture to the foam block wall.
Cinder block is the most durable of the materials listed , but hollow cells inside can create a problem. A multi-chamber cinder block is drilled so as to pass through one chamber and long metal anchors are installed as fastening.
A single-chamber cinder block is drilled through, a long pin is inserted and the fasteners are fixed on the back side.
Marking the wall and determining the height of the cabinets
To choose a comfortable height for wall cabinets, it is recommended to focus on the average height of the household.
A simple way is for the shortest member of the family (or the housewife who will use the kitchen furniture most often) to stand on tiptoes and extend their arm upward. The point that your fingers reach will be the main mark. It is used to determine the height of the top shelf of the kitchen unit. This simple method determines what arrangement of furniture will be convenient for the whole family.
There is also a standard chart that will help you figure out at what height to hang kitchen cabinets.
Verified and accurately calculated data on the relationship between height and height of the top shelf:
- height up to 160 cm - height 175 cm;
- height up to 175 cm - height 185 cm;
- height 175-190 cm - height 2 m.
Accurate and correct markings will ensure accurate installation of hanging furniture. All measurements are carefully checked by level and correlated with the position of the floor, ceiling and vertical wall. It is especially important to take accurate measurements when you plan to hang a row of upper cabinets. Unevenly secured cabinets violate safety regulations and spoil the interior.
Important. The hood above the gas stove, built into the panel of the upper block, is planned taking into account the safety requirements of the gas supply service. The central ventilation window must not be blocked by the air exhaust pipe. The rule is effective from January 1, 2019.
The technology for applying markings to the wall varies slightly for different mounts, but the general procedure is the same.
It is divided into several stages:
- First, determine the height of the furniture. Focusing on the height mark, the horizon is leveled, i.e. draw a straight line on the wall. For accurate marking you will need a construction hydraulic level and a tape measure.
- When installing a corner set, markings begin from the corner. The central cabinets are marked from the side wall of the outer one.
- All marks made using a level and tape measure are connected into an even line. Fittings for cabinets are installed according to the markings.
The height of the top shelves of the kitchen set above the kitchen apron
According to the manufacturers' standard, the minimum height from the tabletop to the top cabinet is 45 cm. The parameter varies up to 50-60 cm, because a narrow gap is often inconvenient. All sizes are adjusted to ensure comfort for household members.
To avoid difficulties when joining furniture with a kitchen apron, follow the useful recommendations of experts:
- Accurate measurements of the upper and lower cabinets, as well as the thickness of the countertop, will help to avoid inconsistencies with the kitchen apron. For example: the cabinet does not fit between the tiles on the backsplash and the ceiling. In this case, it is very difficult to fit all the furniture.
- Measuring the walls for furniture is done after installing the kitchen apron. Otherwise, there is a risk that the tiles will interfere with the correct placement of the cabinets.
- If the cabinets and countertop are hung end-to-end with the apron, then behind the hood it is made according to the size of the niche between the pieces of furniture.
- The “overlapping” option on the apron is less practical and is used forcedly. In this case, an overlap of 1 cm is made, including on the apron behind the hood. The margin will help to avoid distortion and place all cabinets strictly in the same plane.
- It is prudent to stretch the wires for sockets with a good margin. When moving a socket, difficulties may arise if the “tail” of the wire is too small.
Useful drilling tools
A jack of all trades always needs certain tools to work in a private house, on a summer cottage, in an apartment, or when building his own house. Many of them are not even worth purchasing if they do not require constant use. For example, for drilling, there are many different attachments that will greatly increase the functions of your drill and significantly expand them.
Let's look at some devices for auxiliary potential.
To obtain precise holes of significant diameter in different workpieces, a device such as a drilling and milling attachment will help to carry out individual milling work.
Make a milling machine out of a drill.
The next device worth mentioning is very expensive, but has the highest versatility. You will sharpen all the tools that you have on the farm, be it knives, shovels, axes, hoes, various drills, effortlessly with the universal sharpening device.
When purchasing drill attachments, be sure to check their compatibility.
Holder with clamp. With its help, you can fix the drill anywhere, use it with various kinds of devices, use it as a mini-lathe, sharpening, milling or grinding and polishing machine.
The drill holder allows you to quickly secure the drill.
All kinds of attachments are also designed for drills. These can be stops that limit the depth of drilling, platforms with which you can drill at a certain angle or perpendicularly. There are nozzles that are adapters and extensions of different designs: offset, angled, flexible.
The angle drill adapter is designed for hand and electric drills.
Metal cutting attachments turn your drill into a one-of-a-kind tool. Some resemble sheet metal shears, while others have a different feature, such as roller shears. The nozzle, called the “Cricket,” seems to cut through the metal.
The main advantage is that they do not damage the polymer coating of the metal.
There are also other attachments designed for monotype work.
- For installing aluminum rivets. There are types for both the same size and those with interchangeable bushings for different calibers.
- Tape-shaped attachment for self-tapping screws. With its help, you will significantly save time when working with plasterboard partitions or when you need to secure other materials with self-tapping screws.
- A belt sanding attachment will completely replace a sanding machine, and it will be much cheaper in cost.
- An attachment with which you can turn your drill into a hammer drill will not be superfluous.
- Using the corner pruner attachment, you can cut various cables, as well as tree branches.
- Using a variety of attachments, the drill will replace your jigsaw, circular saw, pump, and you can polish surfaces and sharpen drills.
- There are unusual attachments.
Whatever attachments we use, the main thing is that the work is enjoyable.
Methods for attaching kitchen cabinets to the wall
There are two main methods for hanging cabinets in the kitchen. They differ in the approach, the fittings used and the level of complexity. The first step in any of the chosen methods will be the installation of hanging fittings to the back wall of the cabinet. The second is the installation of wall mounts according to the markings.
How to secure the “hinge-mounting bar” mechanism
The most common method is to mount the cabinets onto a mounting rail. The method is universal, even beginners can do it. Mistakes rarely happen: this option is most often chosen by both amateurs and professionals.
The working diagram of the installation is as follows:
- Remove the back wall of the cabinet. The material for it is usually a sheet of chipboard nailed with small nails.
- Screw the canopies into the far corners with a tolerance of 5 mm. A bracket mounted flush with the wall will leave a gap between the mounting rail and the furniture. On heavy cabinets, through-studs are used, screwed onto bolts. For the weight of a small box, self-tapping screws are sufficient.
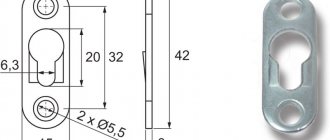
- After fixing the canopies, cut a hole for them in the rear wall of the cabinet measuring 32x55 mm. The wall is nailed to the closet. The canopies must exactly match the “windows”.
- The upper edge of the mounting rail is installed 30-35 mm below the top plane of the cabinet. Use a level to measure the horizontal and draw a line of the required length.
- The standard length of the mounting rail is 2 m. For convenience, the rail is equipped with notches for breaking, so it is easy to adjust the desired size to the set.
- Using a hammer drill, drill holes in the wall of the required depth through the mounting holes on the rail. On durable materials (concrete slab, brick), it is recommended to make a fastening step of 30-40 cm. For fixing in foam blocks and aerated concrete, the optimal step is 150 mm. For drywall - 100 mm.
- The strip for wall cabinets in the kitchen is screwed with anchors or powerful self-tapping screws under a plastic dowel.
- The last step is hanging the furniture, namely, hooking the hooks of the brackets to the edge of the mounting rail.
- The hanging brackets have an adjustment system. If necessary, adjust the cabinet frame in the desired direction using a Phillips screwdriver.
- Through holes are drilled in the side walls through which the modules are connected to each other.
When you need to make a hole in a ceramic tile, it is advisable to use a special drill and carefully remove the glaze at the drilling point.
Other types of fastenings for cabinets and shelves in the kitchen
For the second method, furniture hinges, corners and fittings from IKEA are used. At the first stage, markings are made on the wall. Fasteners are installed on cabinets - the method of installing corners and hinges differs only in location. The corner is screwed to the upper end of the side of the cabinet, and the loop is installed on the rear side.
Step-by-step instructions on how to secure cabinets to furniture hinges and corners:
- The fittings are placed on the edge of the cabinet and the points for the screws are marked.
- Holes with a diameter of up to 2 mm are drilled for self-tapping screws. For furniture corythmants you will need special corythmantic drills.
- The hinges are screwed to the cabinet wall.
- On the wall, measure the level of the space for mounting fasteners and mark the distance between the hinges.
- Heavy modules are hung on anchors with a cross section of 6-10 mm. A hole is drilled under them into which the anchor is inserted. The cabinet is hung on the mount and the anchor is tightened until it stops.
- Lightweight modules are mounted on hooks with a cross-section of up to 5 mm. A plastic dowel is inserted into the hole, a hook is screwed in and the cabinets are hung.
- The modules are connected to each other with bolts through side through holes. The facades are being hung.
- IKEA branded fasteners have their own characteristics. Special fasteners are fixed on the rear panel of the cabinet. A complex galvanized profile is cut in accordance with the distance at which the corners are located and mounted on the wall. Then the side corners are placed on the profile and secured with screws through the hole in the back wall.
What kind of dowels to hang kitchen cabinets on?
Screws and dowels suitable for hanging wall cabinets are differentiated according to their specialization for certain materials. Screws for wood and metal are considered standard, while specific screws are intended for concrete.
- A simple and quick option for attaching to a wooden beam will be provided by special self-tapping screws. Mounting to bricks and cinder blocks will securely fix the dowel provided for this purpose.
- Self-tapping screws for concrete have a noticeably larger diameter, which allows them to be securely fixed in a concrete wall. Having previously drilled a hole of the required diameter in the wall, tighten the self-tapping screw without a dowel.
The dowel consists of two parts - non-expandable and expansion. The non-spacer part performs the function of preserving the top layer of finishing materials. For example, to hang it on a stone wall covered with a 1 cm thick layer of plaster, you will need a dowel with a non-expanding part 15 mm long.
The diameter of the fastener that is screwed into the dowel depends on the hooks or screws used. Most often, self-tapping screws with a diameter of 4-5 mm are used to hang kitchen furniture. To firmly fix such fasteners, you will need a dowel with a diameter of 6-8 mm.
It is important not to forget about the length of the screws. Fittings screwed into a short dowel will not support the weight of the furniture, and fasteners that are too long will not be able to be screwed in completely.
Required Tools
The first step is to prepare the walls and assembled cabinets. Then the necessary materials are selected: nails, self-tapping screws, screws for attaching hinges, furniture hinges, a corner (or mounting rail), hinges.
They also assemble a set of tools for attaching wall kitchen cabinets:
- hacksaw for metal;
- pencil or marker;
- tape measure and ruler;
- hydraulic level or laser level;
- knife;
- hammer;
- screwdriver;
- Bulgarian;
- electric drill;
- open-end wrenches.
Classification of fastening structures
Although the cabinets are fixed directly to the hangers themselves, there are still special designs that are attached directly to the wall. With their help you can carry out this operation. Among them are some of the most popular products:
- Self-tapping screws. A relatively simple option, which is used to fix structures that are not susceptible to significant loads.
- A crutch is the same self-tapping screw, but it has an L-shaped end, which limits the sliding of the cabinet of such a loop.
- The mounting strip (mounting rail) is a special metal profile with several holes. The upper edge of this product lags slightly behind the wall and forms a kind of hook on which the cabinet is hung.
How to place it correctly?
There are a few simple rules:
- accessibility of food, dishes and other kitchen utensils stored in the closet - to ensure this possibility, it is recommended to place pieces of furniture at a given distance from the countertop, and not under the ceiling;
- cabinets should not interfere with air circulation, so they are installed next to the ventilation grille, and it is prohibited to close the entrance to the duct;
- pieces of furniture in the kitchen are placed so that they do not spoil the geometry of the room.
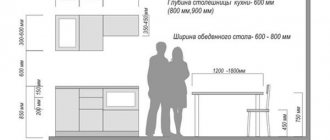
The distance is enough to place all kitchen appliances on the table. Moreover, more often they choose an option within 45-50 cm. A distance of 65 cm and above in most cases determines the position of the hood (from the countertop to its lower edge).
You should also focus on the growth of the residents of the house. Possible options:
- If a person's height is between 155-160 cm, the recommended height from the floor to the top shelf is 175 cm.
- If your height is 160-170 cm, the top shelf should be located at a height of 190 cm.
- For tall home owners (height 170-190 cm), a suitable option is when the top shelf is at a height of 200 cm.
If you do not follow these recommendations, it will be difficult to freely use dishes and kitchen utensils located in cabinets. You will have to use a stool for this purpose. In addition, you need to check at the installation stage that the hanging furniture is level. Any distortions can lead to the collapse of part of the kitchen equipment. In this case, the appearance of the interior also deteriorates. A building level should be used to check the position of the cabinets.
Almost always, wall-mounted and floor-standing pieces of furniture are placed so that they are on top of each other. Otherwise, the set will not look organic and symmetry will be lost. If necessary, cabinets are positioned higher or lower than existing standard values. However, before you finally drill holes in the wall, you should make sure that a person can easily reach the top shelf. Recommendations for calculating the installation height of cabinets:
determine the height of all residents of the apartment, take the average value - if you focus on only 1 family member (the tallest or shortest), then the rest will be uncomfortable using the furniture; take into account the dimensions of the upper cabinets; The most harmonious look is the set, which occupies most of the wall, for this reason, when choosing, you need to focus on the height of the ceilings of the room; sometimes it is important to make the apron high enough (for example, when installing specific decorative elements, the upper cabinets are raised additionally); The style direction in which the set is made is also taken into account (sometimes it is necessary to place cabinets at some distance from each other)
Method 3. Plastic and metal wrap-around dowels
This is the fastest option for hanging a cabinet from a plasterboard wall. The downside is a significant limitation on the maximum load. The video below demonstrates what load different types of dowels can withstand:
For fastening, special roll-up dowels for DRIVA plasterboards are used. They come in metal and plastic, with or without a drilling tip, and have large external threads and a cross slot for screwing into drywall with a screwdriver. In contrast to previous methods, these fasteners should not get into the metal frame profiles.
DRIVA is simply screwed into the plasterboard sheet in the right place, its end is flush with the plane of the wall. The force when screwing should be controlled so that the dowel does not “fall” through the gypsum board. To fasten hanging furniture, self-tapping screws or self-tapping screws are screwed into DRIVA.
The declared maximum load on DRIVA fasteners is 25 kg. At the same time, we should not forget about the additional dynamic loads that arise during operation. Craftsmen recommend using DRIVA for attaching small cabinets, shelves, plasma panels and paintings to drywall.
Another innovative solution is the use of the Fischer DuoTec self-aligning dowel. The principle of its operation and installation technique can be seen in the video:
Bolts, anchors or tires?
To ensure that the fastenings are reliable and the filled cabinet does not fall at the most unfortunate moment, you should take into account the material used to make the walls and furniture. Carefully consider the type of fastening.
How to fasten and what fittings are most optimal for a brick, concrete, wooden wall?
For a wooden wall of a country house, fastening with countersunk screws made of hardened alloy would be optimal. The most effective installation is with self-tapping screws with a large pitch and double-start thread.
It is better to attach shelves to a concrete and brick base using dowels, plugs, metal bolts, and plastic fasteners. You can strengthen the fittings in the holes after the drill with gypsum mortar.
Molly or butterfly screws will securely secure hanging furniture to a plasterboard wall.
For open shelves with light loads, decor, and lighting, you can use plastic butterfly dowels and drill dowels.
Hanging storage systems for dishes, food, and equipment should be mounted on classic metal fittings. For example, you can buy regular dowels made of durable alloy or molly (butterfly dowel in a metal version).
If it is impossible to reach the wall through the sheathing, you can use wooden bookmarks. The thickness of the embedded beam should be equal to the thickness of the transverse frame. If these numbers do not match, the structure may become deformed. The thickness of the timber is adjusted according to the profile sample. A metal butterfly screw is optimal for fastening hardware.
The attachment is attached directly to the bar made of bars. To enhance the load-bearing capacity, use the longest length of the plank: for example, along the width of the entire set of hanging furniture.
The two most proven types of fasteners are:
- mounting rail;
- classic bolts and screws.