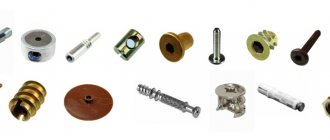
Small mechanisms called door hinges for their design are responsible for the proper operation of swing doors. Their fairly simple device ensures free movement of the door during the process of opening and closing. A fully functional mechanism makes it easy to use the door leaf, without any creaks or backlash accompanying its movement. At the moment, door hinges are used both in the construction of entrance openings in buildings and in furniture. In the latter case, smaller mechanisms are used, but with similar operating principles. Do-it-yourself installation of furniture hinges may be required when you are installing new doors in a kitchen cabinet or bedroom closet yourself. Despite their small size, hinges can cause a lot of inconvenience during installation due to the need for accurate calculations of their fixation locations. Also, some work will have to be carried out in weight, which in some cases may require additional hands to help with large furniture components.
Features and types
The simplicity and functionality of the door hinge mechanism has given rise to many of its varieties, designed for use in various types of products for the home interior. Now such devices are found in the following versions:
- Invoices. Used in wardrobes and cabinets with hinged doors;
- Deposits. For small cabinets with low weight doors;
- Heel. More often used in interior doors, they can serve well in cabinets with small fronts;
- Pianos. Found in folding tables with a book design;
- Adit. Suitable for doors of false panels and fixed panels of sliding wardrobes;
- Angular. Designed for the appropriate types of compartments installed in the corners of rooms and having limited space for opening doors;
- Semi-overhead. Used in cabinets with a large number of fronts;
- Mezzanine. They are also “horizontal” hinges used in hanging cabinets in the kitchen.
The use of a particular type of door hinge in a closet depends on many factors, including its style, dimensions, weight of the doors and the method of their fastening. In some cases, due to the physical placement of the door relative to the frame, the compartment requires the use of exclusively corner hinges, which have a greater range of movement compared to traditional overhead hinges. In products with a classic texture, only such mechanisms can be used that will correspond to this style.
Required materials and tools
Installing a door hinge will require disassembling the mechanism, so you will need tools to perform delicate, neat procedures. In addition, other manipulators will be required for general work with the door. A complete list of all tools for installing an overhead hinge model is as follows:
- Screwdriver with a Phillips bit.
- Set of screws.
- Building level.
- Ruler or tape measure.
- Screwdriver.
- Drill.
- Pencil or erasable marker.
- Cutter with a diameter of 35 mm.
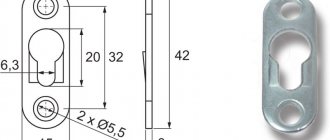
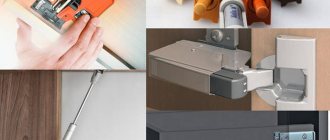
The standard layout of a door hinge involves its disassembly into three components:
- The base is in the form of a strip, which is responsible for attaching the hinge to the cabinet panel.
- Cup, which is mounted on the working door.
- The hinge body is a moving part that connects the door to the cabinet body.
The door hinge mechanism is installed using mounting screws screwed into the holes of the mounting plate and cup. The operating parameters of the device are determined by the adjusting screw in the housing. Thus, the hinge mechanism has up to six mandatory fasteners, which are best prepared in advance as spare ones.
Installation work
In order to eradicate all doubts about the merits of installing wall cabinets on adjustable mounts, we suggest you study this section. It will include four stages, which are described sequentially.
Purchasing a tool
- Drill or hammer drill. It all depends on what kind of wall you have.
- Screwdriver or screwdriver. It is better to use a power tool that will speed up the work process.
- Hacksaw for metal.
- Building level.
- Roulette.
For your information! A screwdriver can easily be replaced with a drill with a Phillips head, but it is better to have a screwdriver with you so that you can use it to adjust the awnings. High speeds can break the adjusting bolt, and the canopy will be unusable.
Preparatory work
Before hanging the kitchen cabinet, the following work must be done:
- If you have just completed a renovation and are installing a kitchen, then the most important thing is to make sure the walls are strong. This is perhaps the most important thing. If you have plasterboard walls, then you should definitely secure a wooden beam under the front surface. Otherwise, use as many butterfly dowels as possible.
- There is no particular need for leveling; it is better to pay special attention to the corner of the kitchen (if the kitchen is corner). It should be laid out thoroughly so that the corner cabinet hangs without unnecessary gaps.
- Also prepare all the wiring in advance so that you don’t have to remove the module twice later.
Advice! For cabinets with a built-in kitchen hood or just a separate hood, run the outlet to the ceiling. This is more practical and safer, no extra wires above the work surface.
Installation of awnings
Hanging kitchen cabinets is installed quite easily, without any tricks or special features.
The process can be carried out in two ways:
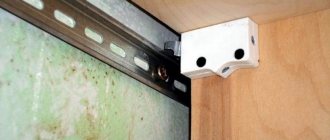
- If the back wall is DVPO, then in the upper corners it is necessary to cut small holes into which the mounting tabs will go. Then, pressing the suspension to the top shelf of the cabinet, screw it with two self-tapping screws to the side.
Study this drawing and everything will immediately become clear to you.
- If the back wall is laminated chipboard, then it is necessary to make a cutout directly under the canopy, thereby fixing it flush with the laminate.
Note! But since wall-hung kitchen cabinets with laminated chipboard back walls are rare, the second method is practically not used.
Metal guide fastener
To do this you need to make the following calculations:
- Add together the height of the lower cabinets, the distance between the wall and floor kitchen cabinets and the height of the upper module. For example, 920 mm base + 600 mm apron + 600 mm top module.
- Now from the resulting amount we subtract 45 mm for the shrinkage of the canopy and get the size that needs to be marked on the wall.
- Draw a line along the level and attach a metal strip. There are holes in it every 1.5-2 cm, you don’t need to drill that much, just place the screws in the corners of the wall cabinets.
This is what the guide installed on the wall looks like
Important! Just before hanging the kitchen cabinets, you need to loosen the fastening tab so that it can move up and down freely. This will allow you to make adjustments more easily.
Marking
Marking is an integral part of the cabinet layout for the correct installation of the door and the correct operation of its hinges. Mistakes made at this stage will, at a minimum, spoil the appearance of the product, and at maximum, make it impossible to correctly use the swing door mechanism. During the marking process, you will need a pencil or marker to mark the areas for creating holes for the cups of the mechanisms. Therefore, it’s worth starting with the main points of the markup instructions:
- Depending on the weight and size of the door leaf, the number of hinges installed can vary from two to five.
- You should not install the mechanism cup on the very edge of the door facade. It is recommended to maintain a margin of 2–2.2 cm.
- The average distance between hinges on a meter-long door leaf is at least 50 cm. In this case, you need to take into account its weight, which may require a larger number of fastening mechanisms.
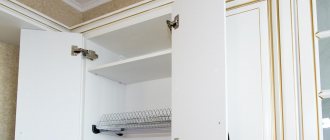
Make sure that the areas for installing hinged awnings on the façade are not opposite the cabinet shelves. Otherwise, there is a risk that the door will not close completely due to the fact that the body rests on the shelf platform.
Furniture canopies
Wall cabinets are used in the kitchen for drying dishes and storing food. Finding the necessary products and utensils in such cabinets is much more convenient than in floor cabinets, because everything is almost at eye level. However, their depth is on average less - about 30-40 cm.
Hole preparation
Holes are created using a drill based on the markings. An electric screwdriver with an appropriate attachment is also suitable as an alternative tool. In addition, the use of a cutter is a must, which ensures that the structural integrity of the door facade and cabinet panel is preserved. Otherwise, drilling a hole can lead to chipping and deformation of the wood panel. The insertion should be made with a depth of no more than 12 mm, which will be enough for a reliable hole for the loop cup platform. It is better to select the drilling speed yourself, based on the density of the material from which the facade and cabinet are made. While chipboard panels are fairly easy to process, natural walnut or ash are distinguished by high strength. For the same reason, you need to ensure that the drill works strictly at an angle of 90 degrees, from which it can easily deviate if you are dealing with hard natural wood.
Hinge Attachment
Due to the fact that the door leaf is a moving object, unlike the cabinet, you need to start attaching the hinge from there. This will make your work easier by eliminating the need to adjust the facade to the hinges when you have to hang it. Installation work with swing mechanisms can be carried out in accordance with the following instructions:
- At the stage of installing the door hinge, all the flaws in marking and work on the holes may appear if you first place it on the site of future installation. Try to carry out a similar check first, making sure that the platform of the overhead hinge cup fits tightly to the surface of the door leaf over its entire area. Even the slightest deviation can cause the door to warp in the future.
- Using a pencil and applying a loop, new markings are made for the screws so that they fit evenly into the grooves of the loop.
- After this, you can install the platform last by screwing in the fasteners using a screwdriver or screwdriver.
Hanging the facade
The complexity of this stage of work lies in the need to manually hang the door leaf with installed hinges so that their bodies fall under the platforms fixed to the cabinet panel. All installation work is carried out in the following sequence:
- If possible, it is worth turning the cabinet into a horizontal position. This will simplify the process of trying on the façade for further installation.
- Using a pencil, create markings for future mounting strips into which the hinge mechanisms will be installed.
- Place the planks exactly according to the markings and secure with self-tapping screws using a screwdriver.
- Install the door on the side of the cabinet, being careful not to deviate from the marked positions for the hinges.
- You can begin to fully assemble the hinges by connecting their front and base platforms using the housing. The result is finished swing mechanisms, ready for work.
- At the last stage, you will need to adjust the hinge using a screwdriver. The main role in this task will be played by the corresponding screw in the housing of the central component of the mechanism.
Conclusion
Furniture canopies allow you to fix their facades in the desired position and freely open them. There are many types of hinges with their own functional features, but the most practical today are considered to be four-hinged. Installation work is not difficult and can easily be carried out on your own.
Installed furniture hinges
The video in this article will provide you with additional information related to the materials presented for your study.
Source of the article: https://krovlyakryshi.ru/specialnye-vidy/mebelnye-navesy-676
Adjusting the hinges
Despite the fact that some users carry out the adjustment procedure “by eye” when the cabinet door leaf has not yet been installed on the furniture structure, this approach cannot be called correct. By starting the adjustment stage after hanging the facade, you will get a complete picture of how your manipulations with the hinge adjustment screw will affect both the appearance and ease of use of the door. Prepare in advance for the fact that you will need to unscrew and tighten the screw in the mechanism body several times before you achieve the ideal location of the door leaf. In the process, it is recommended to use a manual rather than an automatic tool, which is why it is better to give preference to a Phillips screwdriver. A screwdriver, although capable of manipulating a screw much faster, can put too much stress on the component and wear out its head. You will need to make adjustments based on three parameters of the facade location, which will be discussed in more detail below.
Adjustment for horizontal discrepancy
The position of the door leaf is adjusted by moving it to the left or right. Your ultimate goal is to eliminate too large gaps between the front and the cabinet panel. Please note that too narrow a gap will make it impossible for the door to move along the axis of its hinge. Also, adjustments are required in rooms with non-standard walls, where the cabinet may be located at some angle.
Vertical adjustment
Unlike horizontal adjustment, vertical adjustment in the up and down directions is made by manipulating the oval fasteners in the hinge mechanism. The next difference from the horizontal adjustment procedure is the fact that the vertical position of the facade may “sag” over time due to the constant influence of gravity. For this reason, vertical adjustments have to be made on a regular basis.
Door depth adjustment
Depth means adjusting the position of the door relative to the cabinet body, which also affects the gap between them. For most users, provided that the installation is correct and the markings are correct, this type of adjustment is almost not required. Most often, façade adjustments are made in rooms with uneven floors, which can cause difficult door movement.
Attaching hinges to glass doors
With the growing popularity of tempered glass furniture, the range of fittings that can work properly with this material has also expanded. Despite the increased strength indicators compared to traditional glass, tempered glass is still much more vulnerable to mechanical stress than wood and chipboard panels. Therefore, for doors made of this material, certain types of hinges with a fundamentally different type of fastening element are produced. The first difference between these mechanisms is their increased strength and load-carrying capacity due to the high weight of the glass. The following metals are used as the basis for glass door hinges:
- Bronze;
- Aluminum;
- Zinc alloy;
- Stainless steel alloy.
According to the principle of fastening, hinge mechanisms can be overhead or mortise. The latter traditionally require the creation of holes for fixing screws, when the former rely on holding the glass facade by applying high pressure to it. In this case, overhead hinges can work on the principle of clamping with platforms on both sides of the glass door or using fixing screws that press the facade inside the hinge mechanism.
Installation process
Let's figure out how to properly organize the workflow to get the perfect result. For simplicity and accessibility, the description is divided into four stages:
- Preparatory activities;
- Determining the height of the structure;
- Attaching canopies to furniture;
- Installation of steel profile and installation of cabinets.
Preparatory work
First of all, do the following:
- The walls must be ready for installation . Most often, furniture is hung after finishing, although you can hang elements this way. The main thing is that the surface is more or less flat; the difference over 1 meter of area should not be more than 10 mm. Pay special attention to the geometry of the corners; if you have a corner cabinet, this part must be level, otherwise you won’t be able to hang the furniture evenly;
It is advisable to remove the wiring in advance
- All necessary wiring is laid in advance . Figure out where the electrical equipment will be located and route the cable to the required places. When laying, you need to mark the approximate location of the mounting rail so that when installing it you do not get caught in the line and you do not have to redo the work;
- It is very important to choose the right fasteners for the walls . To do this, decide on the type of material and, based on this, choose a specific solution. There are several options, all of which are discussed below.