Good day to all! Installing wall cabinets correctly in the kitchen is very important. Otherwise, they may be positioned unevenly relative to each other, creating a not-so-pleasant visual effect, and interfering with normal operation. An adjustable canopy for a closet can be very helpful in this regard.
A similar canopy or suspension can be purchased by visiting almost any furniture store that sells fittings. At the same time, the fastener is rightly positioned as universal and practical.
When choosing, follow the key rule. It states that all internal elements must be made of high quality metal. Otherwise, you won't be able to get the full benefits of an adjustable awning.
Kitchen cabinet awnings: installation and adjustment
Modern kitchen sets include not only cabinets, but also wall cabinets, which are mounted on the wall using special fittings.
They are used to store dishes, food and other kitchen utensils. Since the mounted modules with the contents inside are quite heavy, their fastening must be reliable. When choosing canopies for kitchen cabinets, you should be guided not only by personal preferences, but also by the features of the wall, as well as its material and other nuances. Kitchen wall cabinets are usually installed at a certain height. If the set is made to order, then the installation is subsequently carried out by workers, but if desired, the furniture can be installed independently. There are certain standards for the location of lockers so that they can be conveniently used by a person of average height. People who are too tall or, conversely, short will have to adjust the furniture placement parameters and adjust them to suit themselves.
Height
Despite the generally accepted meanings, the main thing is the comfortable use of furniture, which is directly related to the growth of its owner. The hostess or owner should easily reach the middle shelves of wall cabinets without the help of a chair or stool.
You should know that the minimum distance from the tabletop to the bottom edge of the cabinet is 450 mm. This will allow you to comfortably use the work surface and place the necessary small household appliances there, such as a coffee maker, microwave, electric kettle, etc. But most kitchen furniture stores consider the optimal distance to be 600 mm.
To make it easier to determine the most convenient level for hanging cabinets, you should familiarize yourself with the calculations of the ratio of human height and the distance to the top shelf of the module:
- height from 1.55 to 1.6 meters – height to the top shelf 1.75 meters;
- from 1.6 to 1.7 m – distance to shelf 1.9 m;
- from 1.75 to 1.9 m – height 2 meters.
Taking into account your height, you can easily determine the optimal distance for yourself to the top shelf of the headset.
Types of fastenings and their features
After choosing the height for mounting the cabinets, you should decide on the type of fastening. It can be different: corners, pendants and tires.
Corners or pendants
Previously, special metal hangers were used when installing cabinets. They were attached to the rear ends of the module walls. Today, such devices are no longer used, as they have quite a few disadvantages. For example, the inability to adjust the position of cabinets after installation on the wall. And how evenly they will hang depends only on the accuracy of the markings on the wall.
Corners are almost the same as pendants, only they are attached to the roof of the cabinet. When using them, it is important to determine the upper limit at which they will be set. You must strictly adhere to one horizontal line, otherwise the wall cabinets will be installed unevenly.
Installation on corners or pendants is a rather labor-intensive process (compared to a tire) and requires perfect precision. If there is a mistake, you may need to make new holes in the wall.
If the walls were not leveled during the kitchen renovation, then fixing them to the corners will be the best option. An outdated method does not mean it is bad, you just have to spend a little more time on installation than when using other types of fasteners.
Tire (bar)
A mounting rail or strip for hanging cabinets is much more convenient and saves time. This kind of work can be done even alone, which cannot be said about installing it on corners.
The fastening consists of two elements - adjustable canopies and a special strip. The canopy is installed inside the cabinet, in the back wall of which you need to make a hole. A rail is attached to the wall, onto which the module is subsequently hung.
This type of fastening has its advantages:
- Self-installation. You can handle the installation of wall cabinets yourself by first fixing a plank to the wall, and then installing modules on it.
- Possibility of adjusting the position of the cabinet. In this case, there is no need to remove furniture from the wall; all the work can be done under the canopy.
- Reliability. Unlike mounting on corners, the option with a bar is considered more reliable and capable of withstanding high loads. Even if a couple of screws in the structure become loose, the rest will hold the modules well.
Tools and preparatory work
In order to install wall cabinets with your own hands using canopies and a mounting strip, you should prepare the necessary tools in advance:
- Hammer or drill (depending on the wall material).
- Screwdriver and screwdriver.
- Construction level, tape measure.
- A hacksaw for metal.
Before you begin the process of installing wall cabinets, it is necessary to carry out some preparatory work. The most important thing is to make sure the walls are strong. If the set is installed on drywall, then a wooden beam should be secured under the front surface for strength. Otherwise, you may need butterfly dowels in large quantities.
With a corner set, the corner of the kitchen should be treated with special attention. If you lay it out carefully, there will be no gaps when installing the corner cabinet. It is better to lay the electrical wiring in advance so that you do not have to dismantle the furniture later, which is extra work and a waste of time.
For the hood, it is better to mount a socket under the ceiling directly above it. So, you can get rid of wires in the area of the stove and work surface. And in terms of safety, this is a big plus.
The final finishing of the wall with wallpaper, tiles or plaster must be completed before installing the kitchen. After hanging the modules, this will not be possible.
Installation process
First of all, you should install awnings on your kitchen cabinet. This process is not complicated. If the rear wall of the module is made of fiberboard, then it is necessary to cut two small holes in it for the mounting tabs. After this, press the canopy against the top panel of the cabinet and secure it with two self-tapping screws to the side wall.
If the back panel is made of laminated chipboard, then you will have to make a cutout directly under the canopy and fix it flush with the laminate. But this option is quite rare.
To mount a metal rail for hanging cabinets on the wall, you must perform the following calculations:
- Add up the height of the lower cabinets, the distance between the wall and floor modules, and the height of the upper cabinets. For example: 920+600+600 (pedestals, apron, top module).
- From the resulting result, 45 mm should be subtracted for the shrinkage of the canopy. The result will be a size that should be marked on the wall.
- Next, you need to mark a horizontal line along the level and attach a metal strip. It has holes for fastenings every 15-20 mm, but you don’t need to drill all of them, just fasten the screws in the corners of the mounted modules.
Height
Despite the generally accepted meanings, the main thing is the comfortable use of furniture, which is directly related to the growth of its owner. The hostess or owner should easily reach the middle shelves of wall cabinets without the help of a chair or stool.
You should know that the minimum distance from the tabletop to the bottom edge of the cabinet is 450 mm. This will allow you to comfortably use the work surface and place the necessary small household appliances there, such as a coffee maker, microwave, electric kettle, etc. But most kitchen furniture stores consider the optimal distance to be 600 mm.
To make it easier to determine the most convenient level for hanging cabinets, you should familiarize yourself with the calculations of the ratio of human height and the distance to the top shelf of the module:
- height from 1.55 to 1.6 meters – height to the top shelf 1.75 meters;
- from 1.6 to 1.7 m – distance to shelf 1.9 m;
- from 1.75 to 1.9 m – height 2 meters.
Taking into account your height, you can easily determine the optimal distance for yourself to the top shelf of the headset.
Adjustable canopy for furniture and for the site: installation technologies
The term “adjustable canopies” usually refers to either a folding canopy for a summer house or a special kitchen bracket that makes it easy to align cabinets mounted on the wall vertically and horizontally.
To avoid confusion and you have no questions about this, below we will look at both varieties.
This part is most often called an adjustable canopy.
Mobile protection from rain and sun
An adjustable universal canopy can be found today on almost any equipped summer cottage. It is a movable structure that is mounted on the wall of the house (usually at the entrance or above the terrace). (See also the article Country canopies: features.)
Roller canopy over the terrace
As a rule, the main elements of such a product are:
- Roller shutter, inside of which the roofing sheet is placed . Most models are equipped with canvas or polymer fabric: the main thing is that the material is waterproof.
Please note! If possible, choose tarpaulins or models of jute fiber with moisture-proof impregnation. In terms of water resistance, they are not inferior to polymer ones, but in the heat they heat up much less.
The only drawback of such varieties is the fairly high price.
- Sliding frame, which is a steel or plastic frame on hinges . When folded, the frame is pressed against the top of the wall, and when unfolded, it forms the basis for a tensioned fabric that automatically unwinds from the roller shutter.
- Some models are also equipped with support posts . These pillars support the far edge of the frame, which protects the hinges from breaking under the weight of the structure, and the canvas from sagging.
The principle of operation of the design
The advantages of such products include compact size, ease of use and fairly easy installation. The instructions usually assume wall fixation with 4 to 8 anchors.
As for the disadvantages, these include the high cost of high-quality models. In principle, you can try to make such a product with your own hands, but the parts (roller shutters, hinges, fabric) will not be cheap, so you are unlikely to save money.
However, even though the cost is not the lowest, designs of this type are popular.
Design features
Bracket on the bus
And yet, when we mention adjustable canopies, we often mean a special bracket for a cabinet or other furniture.
Typically, such a system consists of two elements:
- Steel rail mounted on the wall. The upper edge of the tire is equipped with a specially shaped hook that ensures reliable fixation of the hanging hook.
- An adjustable hanging device with a hook, which is mounted inside the kitchen cabinet. Thanks to the screw system located in the plastic case, we can adjust the position of the hung object after it has been installed.
Note! Today, brackets are produced in a fairly wide range of colors, which allows you to choose a model that is almost invisible inside the cabinet.
Adjustable awnings for kitchen cabinets in different colors
Despite the rather complex design, the adjustable bracket provides very reliable fastening of even the heaviest object. Naturally, it is necessary to perform the installation correctly, and we will describe below how this can be done.
Installation technology
Before attaching the kitchen wall unit using adjustable brackets, you need to mark the wall. We do this in such a way that the bottom edge of the wall cabinets is no closer than 45 - 50 cm above the tabletop, otherwise it will be very inconvenient for us to work. (See also the article Lean canopy: features.)
Stainless steel tire
Next, we proceed directly to the installation:
- First, according to the applied markings, we attach a steel mounting rail to the wall. For fixation, we use anchors with a thickness of 8 mm, securing them at a distance of approximately 30 cm from each other.
Please note! The tire should only be attached to a permanent structure. If you covered the kitchen walls with plasterboard, then under the hanging furniture you need to install embedded parts made of thick wooden beams, rigidly fixed to the wall.
You cannot simply install a tire on a gypsum board: the material will not withstand the load and will collapse.
- When the tire is fixed, we proceed to installing the hangers. We attach the plastic cases to the cabinets from the inside using self-tapping screws. This operation must be performed as carefully as possible, since this unit, according to experts, is the weakest point of the entire system.
We fix the canopy in the cabinet as shown in the photo
- For fixing, it is best to use wood screws with a phosphated surface. The length of the self-tapping screw must ensure penetration into the cabinet wall by at least 8 mm.
- We put the hanging hooks into the holes on the back wall of the cabinet. It is most convenient to do them using a drill with a large drill bit, but it is fashionable to use a jigsaw, and even a mounting knife (if the wall is made of thin plywood or chipboard).
- After this, we hang the cabinet on the tire, making sure that both hooks engage with the mounting lug.
Screwdriver adjustment diagram
At the final stage of work, we make adjustments: by rotating the screws on the hangers with a screwdriver, we align the cabinets relative to each other so that the gaps between them are minimal.
Tip! To increase installation safety, you can connect adjacent kitchen modules with steel strip ties.
This way, the weight will be distributed more evenly, and the risk of any hook unraveling or falling out of the fastening will be minimal.
Conclusion
As you can see, you can install adjustable furniture canopies without the slightest effort. However, this largely applies to external canopies, which allow the frame with the canvas to be folded and opened only when necessary: their design also involves extremely simple installation. And yet, before starting any work, you need to carefully study its nuances, and the easiest way to do this is by watching the video in this article.
Source: https://krovlyakryshi.ru/specialnye-vidy/reguliruemyj-naves-637
Expert advice on choosing and installing hanging fasteners
To hang a kitchen yourself, you will need experience and attention to the recommendations of existing masters :
- Before installing the furniture, determine how the kitchen apron will look like - overlapping or butt. The markings and final appearance of the structure will depend on this.
- When using a mounting plate, secure the hooks in it with special screws.
- Please note that the mounting rail should be located 3–4 cm below the top edge of the back wall of the cabinet.
- When drilling into walls, make small holes with a punch first and then continue drilling.
- If the plaster cannot withstand drilling, drill a small hole first and then drill it out to the correct size.
The most important thing when choosing canopies for kitchen modules is to monitor the quality of materials. It is necessary to check the work done to avoid mistakes and delays.
How to Hang Kitchen Cabinets and More | Closet-INFO
When buying or ordering a kitchen set, you always have a choice - use the services of furniture assemblers and installers or do everything yourself. Choose the latter for many reasons. Most often - out of savings.
Less often - because of doubt that everything will be done efficiently and unwillingness to pay for something that you can do yourself. How to hang kitchen cabinets is one of the questions that arises when installing a set. Actually, it concerns hanging absolutely any cabinets and shelves with your own hands.
After all, the process itself will be absolutely similar, no matter what you install: a kitchen, a wall with hanging modules above the TV, or a schoolchild’s corner.
What kind of fasteners should I use to hang kitchen cabinets?
The choice of dowels, anchors and other fasteners is selected depending on the wall material. It may be different. For example, to hang kitchen cabinets on drywall, you will need special butterfly fasteners, umbrellas, and long anchors. You can read more details here.
Attaching the mounting rail
Before hanging cabinets on the mounting rail, you must install and secure it correctly.
The first thing you need to pay attention to is the mounting height. The standard height for attaching kitchen cabinets to the strip is considered to be within 50-60 cm from the countertop of the lower cabinet
A closer distance to the working surface of the tabletop will make it more difficult to work on it. Usually a woman spends more time in the kitchen and she is the mistress there, so the height should first of all be comfortable for her. In addition to the height of the shelves itself, take into account their depth, since in deep cabinets the height of the canopy will be slightly lower than in standard ones in depth. When all these values are taken into account, you can proceed directly to the installation of the rail.
On the wall, use a pencil or marker to mark the resulting mounting height. At this height, place the mounting rail for wall cabinets against the wall and mark all the holes that will need to be drilled.
It should be said that the standard length of the mounting rail is two meters. If you will hang cabinets at a distance from each other, then the rail must be cut into lengths according to the dimensions of these cabinets. There is no need to cut the strip to hang a row of cabinets.
Start making holes for the mounting rail for kitchen cabinets from the outermost one. After this, having slightly secured the rail, place a level on it and strictly follow it, make a hole from the other edge. Next, you need to drill a hole in the middle to secure it, and then do all the rest. Then you need to insert plastic dowels into these holes and secure the mounting rail for wall kitchen cabinets with screws or self-tapping screws. At the end of the work, check the level of the rail fastening again.
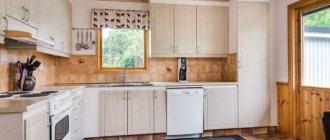
Furniture canopies
Wall cabinets are used in the kitchen for drying dishes and storing food. Finding the necessary products and utensils in such cabinets is much more convenient than in floor cabinets, because everything is almost at eye level. However, their depth is on average less - about 30-40 cm.
Selection of fittings for fastening and preparation of walls
Types of fasteners
When choosing fasteners, you need to consider several factors:
- The total mass that will be exerted on the box;
- Budget allowed for the purchase of fasteners;
- Requirements for fastening (possibility of adjustment along several axes, maximum permissible weight).
Furniture hinge
The most common and simplest fastening technology. Before installing wall cabinets in the kitchen, the walls are marked. Hinges are attached to the furniture, which are later mounted on a self-tapping screw.
Pros of the loop:
- Price. Hinges are cheap and can be found at any furniture hardware and tool store. One drawer can be equipped with several hinges for strengthening.
- Diversity. There are two types of loops: single-axis and adjustable. The first ones involve monolithic fastening, without the possibility of additional regulation. The latter can move along a horizontal axis, so it is possible to further customize the location of the furniture.
- Stealth. They are installed at the back so they are not visible.
- Easy to attach. All that is required for installation is to screw the hinges on the back. No additional cutting of grooves is required.
Minuses:
- Low load capacity. Due to their primitive structure and price, they can put pressure on the chipboard, which will lead to the box falling.
- Corrosion. Cheap hinges are made of galvanized steel. During installation, it is possible to damage the zinc layer, which will subsequently lead to corrosion.
- Minimal adjustment. Such settings cannot be further configured after installation.
- Installation duration. Each hinge requires a separate hole.
- Need for high precision. It is necessary to carry out jewelry work when drilling, since small indentations will lead to mismatched holes.
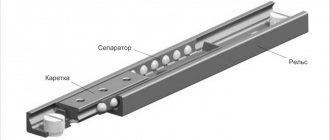
Plank
A simplified solution for installing top drawers.
Pros:
- Possibility of adjustment. Special roller mounts are installed on the bar; it is possible to adjust the furniture at your discretion along the horizontal axis.
- Aesthetics. The design is in a simple white style.
- Strength. The mount can withstand enormous loads, including from heavy ceramics and glass.
Minuses:
- Difficult to install. It is difficult to install the fasteners yourself, as you need a special tool, such as a jigsaw or milling cutter.
Ikea
This type of fastening is the most complex and this is its only drawback. Otherwise, it is a convenient mechanism that makes adjustments easy. Installation is performed according to the following algorithm:
- A stainless steel corner with a large hole is installed inside. It must have a ridge notch.
- An anchor is installed at the marked point on the wall.
- The cabinet is installed on an anchor and fixed from the inside.
Preparing the walls
This stage cannot be called mandatory. First of all, the furniture will be able to remove all the unevenness on its own. However, in some cases, when the walls are too crooked, the cabinets will not be able to be hung because they will not be able to relate to each other correctly. In this case, they will need to be pre-processed and leveled. And the fastening forms, like a mounting strip, will not be able to press tightly against the wall.
First of all, it is important to pay attention to whether it makes sense to prepare the walls when they are bare. Since furnishing is done at the final stage of arranging the room
Action plan:
- The walls need to be cleaned of previous layers of plaster and putty. We need to achieve bare concrete. Before further work, it must be dust-free.
- With a drying break, apply two coats of primer. It is better to use purchased compounds for this coating. You can make it yourself by mixing water and wallpaper glue or PVA in a ratio of 1 to 2.
- We need to install beacons. Regular aluminum profiles are best suited. They are installed vertically and to achieve a right angle, you need to use a weight or a plumb line.
- A primary plaster solution is applied to the walls. To do this, prepare a large amount of the composition and quickly throw it in with a spatula. After this, you need to quickly align them with an even bar according to the thickness of the beacon.
- After it hardens, it is coated with finishing putty for concrete.
Modern kitchen cabinet hangers
There have always been problems with hanging kitchen cabinets. In particular, this concerned the horizontal level, which was difficult to maintain using conventional hinges. But more recently, a solution has emerged that can save us from all the existing problems with hanging cabinets - adjustable canopies.
A simple and at the same time effective method will facilitate the installation process.
Agree that the modern mount looks much nicer and neater
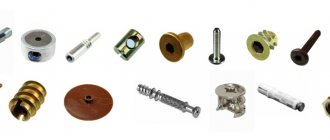
What does the canopy look like?
A hanger for kitchen cabinets is a small plastic (metal) box that has several holes:
- Two through ones for fixing the canopy with self-tapping screws to the side of the cabinet.
- Two adjusters with large bolts. Screwing in and out of these bolts allows you to lower and raise and press and move the cabinet away from the wall.
There is also a metal paw that clings to the mounting rail, fixed to the wall through a dowel and self-tapping screws.
In the photo you can see what the structure looks like as a whole and separately.
Universal (on both sides) plastic canopies and metal guide
Sectional view of the canopy: as you can see, one bolt attracts the paw, the second “fetters” its movements
Advantage of fastening
- Possibility to install cabinets without assistants. All work is carried out in two stages: installing a metal strip on the wall and hanging the module on it. You don't have to feel around for screws in the wall to get the loop onto the head.
- Possibility to adjust any position of the cabinet, an error of 15 mm is allowed on each side. In this case, you do not need to support or remove the module; the entire adjustment process is carried out overhead.
It all depends on the reliable fastening of the guide; the plastic adjustable canopy can withstand a load of up to 30 kg
- The hanging cabinet for the kitchen becomes more reliable. The fastening allows you to fix a single fastening strip on the wall, so that even if 2-3 screws become loose, the rest will hold the structure.
- The hanging kitchen cabinet can be installed directly on the wall on the kitchen apron. This is possible due to the retractable mounting bracket, which allows you to hang the module at a distance of 2-2.5 cm from the wall.
Note! Even an inexperienced specialist can do all the work with his own hands in a few hours.
The only disadvantage can be called the price, which is slightly, but higher than the usual metal plates. But, in fact, it is worth forgetting about saving when there are so many advantages.
Installation work
In order to eradicate all doubts about the merits of installing wall cabinets on adjustable mounts, we suggest you study this section. It will include four stages, which are described sequentially.
Purchasing a tool
- Drill or hammer drill. It all depends on what kind of wall you have.
- Screwdriver or screwdriver. It is better to use a power tool that will speed up the work process.
- Hacksaw for metal.
- Building level.
- Roulette.
Please note! A screwdriver can easily be replaced with a drill with a Phillips head, but it is better to have a screwdriver with you so that you can use it to adjust the awnings.
High speeds can break the adjusting bolt, and the canopy will be unusable.
Preparatory work
Before hanging the kitchen cabinet, the following work must be done:
- If you have just completed a renovation and are installing a kitchen, then the most important thing is to make sure the walls are strong. This is perhaps the most important thing. If you have plasterboard walls, then you should definitely secure a wooden beam under the front surface. Otherwise, use as many butterfly dowels as possible.
- There is no particular need for leveling; it is better to pay special attention to the corner of the kitchen (if the kitchen is corner). It should be laid out thoroughly so that the corner cabinet hangs without unnecessary gaps.
- Also prepare all the wiring in advance so that you don’t have to remove the module twice later.
Advice! For cabinets with a built-in kitchen hood or just a separate hood, run the outlet to the ceiling. This is more practical and safer, no extra wires above the work surface.
Installation of awnings
Hanging kitchen cabinets is installed quite easily, without any tricks or special features.
The process can be carried out in two ways:
- If the back wall is DVPO, then in the upper corners it is necessary to cut small holes into which the mounting tabs will go. Then, pressing the suspension to the top shelf of the cabinet, screw it with two self-tapping screws to the side.
Study this drawing and everything will immediately become clear to you.
- If the back wall is laminated chipboard, then it is necessary to make a cutout directly under the canopy, thereby fixing it flush with the laminate.
Note! But since wall-hung kitchen cabinets with laminated chipboard back walls are rare, the second method is practically not used.
Metal guide fastener
To do this you need to make the following calculations:
- Add together the height of the lower cabinets, the distance between the wall and floor kitchen cabinets and the height of the upper module. For example, 920 mm base + 600 mm apron + 600 mm top module.
- Now from the resulting amount we subtract 45 mm for the shrinkage of the canopy and get the size that needs to be marked on the wall.
- Draw a line along the level and attach a metal strip. There are holes in it every 1.5-2 cm, you don’t need to drill that much, just place the screws in the corners of the wall cabinets.
This is what the guide installed on the wall looks like
Important! Just before hanging the kitchen cabinets, you need to loosen the fastening tab so that it can move up and down freely. This will allow you to make adjustments more easily.
Secrets of fastening heavy furniture
- If during the renovation it is known in advance that heavy wall cabinets will be mounted on the wall, the frame must be built reinforced, which means the number and frequency of vertical guides will be increased. You shouldn’t skimp on the quality of metal profiles either; they must be strong, rigid and reliable.
- Dowels screwed directly into the sheet can hang and hold light shelves. Heavier products require the use of long screws or self-tapping screws, which, when fastened, pass through the sheet and plunge deep into a closed wall or metal profile. To quickly find a profile covered with a sheet, you can use a magnet. If a wall cabinet weighs more than 20 kg, for example kitchen cabinets, only long anchor bolts can securely hold it. To use an anchor, you need to cut a small window in the sheet, drill into the concrete wall, insert a dowel and use an anchor bolt to secure the furniture. After installation, the hole must be covered with plasterboard and thoroughly puttied.
- When it is not possible to reach the wall through the frame, you can use wooden mortgages. The thickness of the bar must be exactly equal to the thickness of the transverse frame. In case of discrepancies, cracking of the erected structure is possible. To adjust the thickness, it is convenient to use the remains of the profiles. To connect these parts, preference should be given to a butterfly screw. The cabinet is mounted directly on reinforced wooden blocks. The plank behind the hanging furniture will be invisible. To enhance its load-bearing capabilities, the maximum possible length should be used.
Fastening with anchors
It often happens that when renovating a kitchen, it turns out that the wall was actually built from plasterboard. You need to hang furniture, there is a way out in this situation. This fastening method is called through. Only long anchor bolts are suitable for fastening. First of all, you need to mark the wall and mark the places where hanging products are attached. Then, using a fairly wide drill, about 10 mm in diameter, holes are drilled. The drill takes the place of the drill, we prepare funnels for the external dowel element of the anchor. The hole should not be too large. The anchor should fit freely, but not fall out of the cell. We insert anchors into the prepared recesses; their length should be at least 10 cm, it is better if they are 15 cm long and made of hardened steel.
By screwing in the bolt, the base of the anchor expands, securely fixing into the thickness of the wall. An additional guarantee of fastening reliability will be if you pass the anchor through a metal profile. When using anchors as fasteners, it is necessary to take into account one aspect of the structural features of the wall. Vertical profiles must be spaced at least 60 cm apart, otherwise over time the structure will undergo deformation and, as a result, the collapse of the wall-mounted furniture will inevitably occur.
Mortgages
Experienced builders recommend planning the location of the furniture before starting the renovation, and if it is known in advance that a heavy kitchen module will be hung on the wall, it is recommended to install the mortgages during the installation of the plasterboard structure, so their strength and reliability will increase. And from the very beginning, everything needs to be done more simply than redoing a finished structure. Dried timber is best suited for mortgages. Its size depends on the weight of the future hinged structure. The beam is securely attached to the wall. The beam is attached in the place where the cabinets are supposed to be hung in the future. After completing the fastening of the embedded lath, the installation of the wall is completed, and it is covered with plasterboard and plastered. In order not to forget where the beam is located, it is necessary to measure the distance from the ceiling and floor, and from the corner of the room, if the beam does not run along the entire wall. Subsequently, it is easy to mark the dimensions on the drywall and then the fastening will go directly into the mortgage. Only long, reliable fasteners are suitable for fastening. Their length should be calculated taking into account the thickness of the sheet and the embedded beam. Having summed up the thickness of these elements, the fastener must have sufficient reserve so that it is securely fixed in the main wall.
This fastening method is considered the most reliable. At first glance, it may seem that additional work will significantly increase the cost of repairs, but this is not the case. This type of construction work can be classified as low-cost, especially since all the work is simple to perform, and you can do without hiring hired workers.
Computer table for a small room
This option is designed for a small room; for example, this computer table is generally located in a built-in wardrobe. The step-by-step photos show the dimensions, but you can change them so that the system unit fits into the “leg” of the table. In general, they can be made quite spacious so that nothing unnecessary is stored on the table. In this case, the tabletop for the keyboard is not retractable, but this is also a matter of taste; if you slightly reduce the working area of the lower tabletop and install a retractable shelf on runners, it will be retractable.
Photo source www.ana-white.com
Large computer desk with bureau
This table is well suited for a work office, especially if you store documents at home. Of course, there are no bells and whistles here, not even a retractable table top for the keyboard, but it is simple and reliable. The design is simple, step-by-step photos show how to make a tabletop; in this case, the bureau drawers were purchased separately, although you can do it yourself.
Photo source overthebigmoon.com/diy-file-cabinet-desk-blendtec-giveaway/
Large, beautiful and inexpensive computer desk
It’s hard to buy a computer desk at a reasonable price and one that satisfies all your needs, the author of this photo offers an excellent alternative - to make a beautiful and inexpensive computer desk with your own hands. The design consists of four parts.
- table top
- 3 cabinet drawers (for miscellaneous accessories, computer cables, etc.)
- filing cabinet for 2 drawers (boxes the size of folder files)
- printer cabinet.
The idea is to do just that, because the table can be transported and can easily be installed in a new place; repairs and rearrangements are unpredictable. The author chose a fairly simple design, the manufacture of which does not require any special tools or expensive materials, except that you will have to turn to a neighbor or a workshop to cut the wood. Here below are the tools that the author used.
Materials:
- 3 sheets of MDF (you can use maple veneer plywood, but it is 3 times more expensive)
- 2 sheets of 1/8 MDF or fiberboard - wood glue
- hole filler
- 5 pairs of drawer roller slides
- 7 drawer handles - 1 pair of cabinet door hinges
- 4 liters of primer
- 4 liters of paint
- brushes and rollers.
For the assembly procedure, see the step-by-step photos; if you are interested in the nuances, you can read in detail on the source website, link under the gallery.
Photo source www.instructables.com/id/great-looking-inexpensive-computer-desk
Working computer desk studio
The desk is a little bulky, but if your work involves a computer, almost everything is provided here. It is unlikely that you will be able to buy such a model in a store, and making a computer desk with your own hands will cost five times less. In addition to boards and plywood, you will need tie screws, nails and wood glue. Special tools include a circular saw and a grinder.
Photo source: jackdanielsrecordings.com/my-diy-studio-desk-build/
Adjustable computer desk
An interesting idea for a computer desk; in a store you are unlikely to find a model with an adjustable tabletop height. There are some, but basically you have to disassemble the structure in order to adjust the desired height, but here the whole trick is in the chain drive. That is, they simply used bicycle sprockets with a chain. Well, of course, it’s not easy, you need welding and other serious tools, but you’ll get a very comfortable table in an industrial style. How to make it, look at the step-by-step photos.
Photo source kevinjantzer.com/diy-adjustable-standing-desk/
Simple DIY computer desk
You can make such a simple computer desk with your own hands, say, for a summer house. Of course, it’s not exactly computer-based, but rather universal. You can call it a written one, even a kitchen one; in my opinion, it’s quite a suitable option for a dacha. There is a drawer under the tabletop that can be used as a regular drawer or converted into a keyboard. It’s quite simple to make; all the steps are indicated in the diagrams with step-by-step photos.
Photo source www.thedesignconfidential.com/2012/08/free-diy-furniture-plans-build-pottery-barn-inspired-hendrix-large-desk