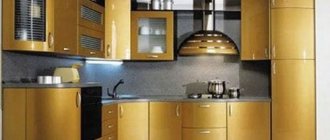
Having a beautiful interior for your living and living space is a natural desire of any modern person. Creating comfortable conditions in the kitchen is the first goal that the housewife sets for herself and all family members, immediately after the housewarming.
The main formative role in the formation of interior design is played by furniture, especially its main elements - tables, cabinets and the most functionally significant cabinets. The appearance of this household space as a whole depends on the architecture, construction and design of these products.
The more ergonomic, functional and aesthetic the kitchen room is, the more pleasant it will be to spend time on it not only cooking, but also using it for leisure time. In search of the most optimal solution in terms of aesthetics, the designers paid attention to such a seemingly forgotten element as radius (rounded, curved) facades.
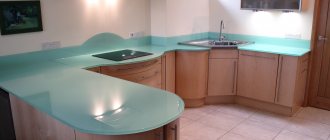
Tour of a modern kitchen interior
Bent and rounded facades are not only an original, but also to a certain extent a creative solution in the interior design of a modern kitchen. Thanks to the installation of inexpensive radius front elements, together with an unusual color scheme, it is possible to create unique kitchen furniture, the design and shape of which are quite rigid and quite difficult to design. At the same time, the furniture does not lose its functionality, but becomes an excellent solution for installing and disguising any type of modern household appliances.
According to many furniture designers, the undoubted advantage of any type of rounded facades is their versatility in terms of placement. They will fit perfectly into the interior of a kitchen combined with a living room in a studio apartment and will look no less colorful in the open spaces of a large dining kitchen space. The most common in kitchen furniture are the front parts of cabinets, floor cabinets, drawers and cabinets, which have the following cross-sectional shape:
- standard, in the form of part of a circular arc or part of an ellipse;
- wavy with vertical and horizontal waves;
- products with asymmetric radius;
- concave.
However, as the furniture developer emphasizes, the advantage of any product should be emphasized by the correctly chosen color and texture solution. In addition to the attractive appearance, the outwardly curved doors of cabinets and cabinets allow you to slightly increase the usable space of a piece of furniture.
Standard curved glass radius
More affordable radii are: 250, 300, 350 and 400 millimeters with sheet thicknesses of 4.5 and 6 mm, less often they take glass sheets with a thickness of 3 or 8 mm.
- In this case, chemical tempering of glass is suitable, but it is not always relevant.
- Specialists check the quality of the received product, since any deviation from the standard can cause glass destruction due to internal damage.
Main types of curved glass for furniture:
- Transparent. An ideal option for radius display cases, as well as cabinets and sideboards, on the shelves of which there are beautiful tableware, souvenirs, books and other items.
- Matte. The matte opaque surface does not leave fingerprints, which is very convenient. An indispensable solution for shower enclosures.
- Grooved. Pleasant to the touch, beautiful round glass with a geometric pattern. Most often chosen for kitchen fronts or large cabinets. Curved stained glass (composite glass) is another very popular option for furniture design.
- Bent glass with sandblasted pattern.
You can apply any image to a transparent sheet by treating the material with sand or other abrasive in the desired areas. As a result, a detailed matte pattern appears on the canvas, be it a beautiful landscape, ornament or inscription.
The design or engraving is applied before bending occurs.
This also applies to the creation of bevels - special beveled edges on the glass, thanks to which a rainbow play of light occurs. For more information on calculating radius glass for furniture, see the page: https://gnutoe-steklo.com/radius-gnutogo-stekla.html.
Features of the production of bent front parts
For those who want to create an exclusive, individual interior design in the kitchen of their apartment, radius facades are the ideal solution. The manufacturing technology itself implies the individuality of these products:
- rounded parts are mainly made to order, and their originality, aesthetics and ergonomics depend only on the client;
- Thanks to the individuality of the order, kitchen owners have a unique opportunity to realize their most secret dreams of furnishing a kitchen space, which is quite difficult to achieve when choosing pieces of furniture from a catalog.
For example, using curved facades, you can perfectly divide a studio apartment into living and kitchen areas, using a double-sided wall or a rack with drawers and compartments, the doors of which have a radius shape. In recent years, when arranging a kitchen space and furnishing it, wall-mounted pencil cases, which have radius doors and front front parts for drawers, have become quite popular.
Individualization and rather complex manufacturing technology predetermined the material for these items. Initially, curved parts were formed in two ways:
- by bending natural solid wood (boards), which often led to cracking of bent parts if operating conditions were not met;
- by cutting rounded parts from thick timber, which led to additional, unproductive wood consumption.
Both of these technologies are quite expensive and complex, and today they are used only in the production of exclusive “VIP” furniture products - a category where production costs take second place, and decorativeness, uniqueness and prestige prevail. Today, the vast majority of parts and elements of furniture structures curved in longitudinal or cross section are made of thick multi-layer plywood with subsequent decorative finishing.
In individual (handicraft) production, flexible MDF panels are often used. The use of this type significantly reduces the cost of the finished product, but its quality depends on the characteristics of the material itself. Therefore, when ordering a radius facade made of MDF board, you need to find out about its properties, characteristics and manufacturer (brand).
However, for premium products and furniture of a minimalist style, other materials can be used, which will be discussed separately below.
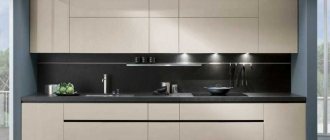
Bent facades
Drawing of curved facade K41 (radius 1000)
Drawings of curved facades in PDF form
Deviations in the dimensions of curved facades
Curved facades are manufactured in types: 1,4,5,11,12,15,18,21,24,27,28,29,31,35,36,51,52,54,56,60,BO!
Bent display cases are made in the following types: BO, 4, 11, 24, 27, 29, 31, 36, 56!
| type 60 (white textured patina gold) | type 58 (M241WC patina walnut) | type 58 (M241WC patina walnut) |
| type 60 (pearl textured patina bronze) | type 29 G060 paint | type 29 G060 paint |
| Bent milled facades laminated with PVC film: | |||
| Plastic HPL edge 3D | type 4 (Sokal oak) | type 53 (maple yellow patina) | type 36 (maple light patina) |
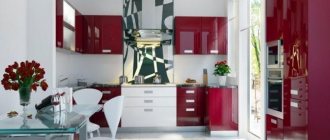
Progress does not stand still, this also applies to the furniture industry, which is developing exponentially. Modern furniture manufacturing technologies allow you to create unique design projects in your own home. Standard ready-made furniture is becoming less and less in demand. Standard kitchens, wardrobes, tables, furniture for living rooms and bathrooms rarely fit perfectly into the space allocated for it without “adjustment”. Traditional rectangular furniture shapes no longer meet modern requirements for convenience and comfort, and sharp corners often cause inconvenience and danger for the whole family. In modern interiors, individuality, harmony and a design approach are increasingly valued. Therefore, today, the most popular are radius or curved facades, which allow you to create a bright, unusually shaped interior that will meet all the wishes of the most sophisticated consumers. Rounded shapes allow you to realize the most incredible design solutions and create an atmosphere of grace, lightness and airiness. Curved facades are an ideal solution for those who want to radically change the appearance of their home. Radius elements in the interior are perfect for people with taste who value comfort, coziness and lightness.
The use of curved facades in the creation of designer kitchen and cabinet furniture is increasing every year. The latest technologies in production allow designers to bring the most daring projects to life.
Today, kitchens with curved facades are the highest class kitchens, since furniture of this shape is created to order using expensive technology.
Furniture manufacturers who follow the latest trends in production and focus on the desires of consumers are always in search of optimal technologies for the production of original furniture parts and the implementation of the most daring design projects that will make each interior unique.
Our company produces facades of any complexity for kitchens, bathrooms, and living rooms. We are always aware of the latest trends and therefore offer our customers only high-quality and current options. We produce radius facades in curved and concave shapes, according to the customer’s wishes. Our production accepts orders for the production of curved facades with radii: R240, R450, R1000 and a maximum height of 2080. A large selection of millings, a rich range of colors and textures allow us to turn any consumer wishes into reality.
Bent MDF facades are made on a 19 mm thick plate, and depending on the coating they are:
– painted;
– covered with PVC film (also patinated);
– plastic.
The most popular are curved facades covered with PVC film. The relatively low price and originality of forms allow the facades to look stylish and sophisticated.
Patinated curved facades are ideal for connoisseurs of luxury and classics. The “aging” effect will turn your kitchen into a work of art.
Painted facades attract attention due to the widest choice of colors and the use of various special effects (pearl, mother of pearl, gloss, starry sky and chameleon), which allows you to create exactly the color option that was originally conceived.
The main advantage of curved facades is undoubtedly the original shape; it allows you to take a fresh look at the design of kitchen cabinets, shelves, etc. Also, smooth shapes undoubtedly stand out and are memorable among traditional facades. For small spaces and delineation of functional space, curved facades will be a real salvation, as they will allow you to separate zones without violating the unified interior concept and hide shortcomings.
Bent facades still have disadvantages compared to straight facades. One of the main disadvantages is the higher price compared to straight facades, since expensive technologies are used for the production of curved facades. You will also have to pay extra for individuality. The second disadvantage is that in some cases curved facades take up more space than traditional facades. However, this minus, if placed correctly, can be turned into a plus. Since curved facades are created to order, you will have to wait some time until the facades are manufactured.
It should be noted that a kitchen with curved facades, made using the right technology, will retain its appearance for a long time and will delight its owner.
Color: G004
Color:G071
Color: G072
Color:G071
Color:G071
return
Functionality and style features
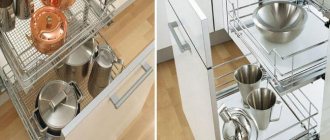
In addition to aesthetics and originality, curved furniture elements have other advantages. Smooth transitions of external surfaces make the design of any item more stylish and modern. Rounded elements can be used in any style of furniture, from massive “classics” to lightweight, modern “minimalism”. In addition, the advantages of radius (with rounded, curved shapes) furniture include:
- reliability of the products, which is guaranteed by greater stability and the absence of sharp corners, which are not so difficult to catch;
- increased capacity, which is provided by the very shape of the curved parts;
- ergonomics, expressed in the ability to fit a single piece of furniture into any already installed set;
- a wide range of products with different names and purposes, which is guaranteed by individual manufacturing technology for a specific part;
- a huge range of colors and textures of products, ensured by the simplicity of decoration and cladding of the part.
Step-by-step facade production
Without taking into account minor nuances, the production of facades using the second method is presented in the following sequence:
- Sheets of wood veneer, plywood or MDF are divided into blanks of suitable size;
- Then they are fixed on glue rollers and generously lubricated with glue;
- The finished stack is clamped with a hydraulic press;
- After drying is completed, the curved modules are leveled on a machine until the exact size is achieved;
- The next stage is checking the compliance of the parameters with the furniture structure and making holes for fastenings;
- Next - sanding, painting, applying PVC or plastic film. After which, the curved facades are completely ready for transportation and installation.
The creation of curved facades involves the use of a template frame. The value of its radius should be 3% less than required. The difference is due to the fact that the ready-made curvilinear module bends slightly over the next two weeks. Chipboard residues are mainly used to make the template.
As the experience of many enterprises shows, it is much cheaper to develop your own production of curved facades than to order them from third-party companies. Curvilinear modules create a special design, adding originality and harmony to the finished product. Due to their functionality, they have always been and will be in demand.
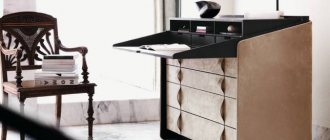
Selecting a Specific Design
Front furniture elements of bent or radius type, in addition to aesthetics and originality, are quite practical. For example, the rounded part of the interface between the side (end) and front walls of the set will help to avoid injuries, and the complete absence of sharp corners in kitchen furniture makes them more ergonomic. In order to increase the aesthetics of interior kitchen design and not increase the cost of furniture, it is recommended to use special types of finishes that will significantly increase the attractiveness and artistic perfection of the product as a whole.
Today, depending on the base material from which the curved or radius part is made, you can choose one of the following decoration methods:
- The most budget-friendly option is considered to be covering the surface with polyvinyl chloride (PVC) film, which, due to the variety of color and texture solutions, will allow you to turn an ordinary product into a true work of art;
- painted radius facades have increased resistance and durability, and the technology of multi-layer painting with modern, high-strength enamels will increase the surface strength of furniture made from MDF boards, reliably protecting it from scratches and abrasion;
- veneer coating is a traditional cladding and decoration technology, which, when using modern dyes, allows you to turn ordinary birch veneer into products made from mahogany, wenge wood and even ebony;
- radius inserts of their decorative glass are a common attribute of furniture designs made in a modern minimalist style.
It is worth mentioning separately the use of radius facades when zoning a separate room. An example of a studio apartment was given above, but the use of bent parts does not end there. They can be used in any furniture structures that separate the kitchen space from the corridor, hallway, dining room or living room, both in single-sided and double-sided versions.
Selection of curved facades
Despite the practicality and functionality of radius facades, they cannot be considered universal objects. When deciding to use this element in their kitchen, owners should consider the following nuances:
- a set with curved facades is always individual and requires adjustment not only to the formed interior, but also to the existing size of the room;
- when choosing a set for a small-sized kitchen, you should not pay attention to “multi-wave” facade elements; preference should be given either to simply radius parts or products with one or two waves;
- modern products offer a fairly limited choice of materials - in most cases, ordinary residents of Russia can afford either bent plywood products or facades made of bent MDF boards;
- when choosing a color, you should use the truism - “... the complexity of the form should be compensated by a restrained color and texture solution.”
Radius facade
The radius facade is a rather difficult element of furniture to manufacture. There are a huge number of articles and videos on making radius facades on the Internet, and as usual, there are also a great many ways to make radius facades. In this article I will try to describe several of the simplest methods for making radius facades. I don’t have to do this kind of work very often, but a good moment came up - the designers decided to make the corner elements of the chest of drawers radius.
For clarity, here is the corner segment of the chest of drawers. The base of the chest of drawers has a radius cover made of solid walnut, the front frame made of solid walnut has a radius, the inset panel will also be radius, but the panel will be made of MDF and veneered on both sides with natural walnut veneer and on the front side with walnut root veneer. The carved glazing bead that secures the panel in the quarter is also made of solid walnut and also has radius elements. We won’t touch the tabletop of the chest of drawers for now, so as not to confuse the reader at all.
Radius façade. Basement. Bend glue.
The base of the chest of drawers is the base, made of plywood. The perimeter of the base is made of solid walnut, and I made the radius segment using the bending glue method. This is one of the easiest ways to make such elements. First, the board is dissolved (sawed) into thin slats (lamellas). The thinner the slats, the easier it is to bend them to the desired radius. As you can see from the end of the blanks, in my case there were eight of these slats. For cutting into slats, I chose a fairly wide and thick board. Considering that the edge of the workpiece is milled and has a profile, in my work I wanted to use only “original lamellas” (that is, from one board), and in the same order, without mixing. This way, the gluing of the slats will be less noticeable and there will be almost no differences in color. In my case, bending glue turned out to be not entirely simple. The fact is that the bending radius turned out to be very small. The internal radius of 135-140mm is not enough for a rail thickness of almost a millimeter.The slats, of course, must be almost perfect. The lamellas from under the saw will not fit under gluing - the seam of gluing the lamellas will be noticeable. After I loosened the workpiece into lamellas, they had to be run through a thickness planer. The thickness of the lamella, a millimeter, is too small for a surface planer; some of the lamellas were broken, but there was a very good reserve. You need to run the lamellas in a thicknesser taking into account the cross-layer. Drive so that the thicknesser knives do not undermine the fibers but cut along the fibers. I would advise using a calibrating grinding machine for such work, but not everyone has such equipment.
I made the mold with a radius of approximately 5mm smaller than needed - after removal from the mold, the workpiece recoils a little, it’s difficult to say exactly how much, you have to guess. Thank God everything turned out fine. It would be much more difficult to bend an oak workpiece; in this regard, walnut is much more convenient to work with. Having marked the sequence of the slats, exactly as they were originally in the board, I applied glue to one side of all the slats at once with a roller and folded them into a bag, quickly tightening them with a belt clamp. I glued it with PVA. I think that it can be kept under the clamps for one and a half to two hours, but just in case, I usually leave such blanks overnight. As I expected, the preparation came back a little, but not much at all. This difference can be eliminated with abrasive on an oscillating spindle machine or any home-made grinder. You can simply press it with clamps if the workpiece is subsequently glued to some kind of solid base, as in my case.
Radius façade. Facade frame. Solid milling.
A radius façade can be made in another, not at all complicated, way. Considering the fairly decent thickness of the front frame - 23 millimeters, and the rather small internal radius - 104 millimeters, I decided that the surest way would be to simply mill the radius. In a word, I was scared. )) I re-glued two boards, 35-40mm thick, and trimmed them into bars. The bars must be absolutely identical, for convenience in further work.
I made a very simple device with markings and milled in several passes, gradually increasing the overhang of the cutter. Please note that the entire structure is installed on an MDF platform. It can be moved and fixed on a workbench or table with clamps at a convenient height. This MDF platform is also needed in order to fix the walnut bars with screws from the bottom, from the outside, in those places where the cutter will not pass. The workpiece is not completely milled. I left a little solid so that the workpiece remained motionless at the time of milling. The remainder was cut on a band saw, with a small allowance, and then knocked down with abrasive.
When making a radius facade in this way, you will certainly encounter one unpleasant moment. You have probably already noticed that the junction of these two bars extends onto both the front and back sides of the façade frame. This is especially noticeable in the first two photographs of the section “Radial facade. Facade frame. Massif milling." The end joint on the front side of the façade frame was avoided; it simply extended beyond the size of the element (width of the façade frame). I veneered the back side of the radius part with veneer. In order not to increase the thickness of the part, I first carefully reduced it during stitching. Of course, I veneered it before gluing the façade frame.
The plywood frame of the radius façade will require special attention. I would even suggest that it is more difficult than milling, and significantly more so. I calculated the required dimensions for the grooves in the MDF base, which I must admit did not work out right away. The device itself is not complicated, but there is no way to make a mistake in the size. The radius façade was attached and assembled onto a tenon (domino df-500), using PVA glue. Separately, I note that a transverse groove in the MDF base is also needed, it allows you to avoid distortion of the facade frame when gluing. After gluing, I checked the facade on a pre-prepared dimensional template.
The design of the facade does not imply its subsequent longitudinal filing - it was done to final size. The height of the frame was cleaned a little on a cutting machine. Not really trusting my markings, I, of course, preferred to conduct reconnaissance in force, and installed the front frames on the body of the chest of drawers without panels. The hinges for such facades are a little non-standard, but choosing from catalogs is not very difficult. Quarters on straight sections of a radius façade can be slightly corrected by hand, using a plane.
Radius façade. Panel. Bend tambourate.
Frankly, I hope that the kind reader will forgive me my ignorance, but I haven’t come up with a more accurate name for this section. I decided to make the panel from MDF. More precisely, from two pieces of thin, slab material, reminiscent of MDF. Maybe it was cardboard, I don’t know for sure. The thickness of the material is 1.5 mm and it was not going to bend within the required radius, namely within the radius of 104 mm. I had to soak it a little. But it's better in order.
I cut 6x6mm strips from a 6mm MDF sheet. And he made a shield out of them, without gluing, simply pressing them tightly together. The resulting shield was thoroughly sealed on one side with simple transparent tape. Before applying the adhesive tape, it is better to remove dust using pneumatics (blowing). Turning the shield over with tape downwards, I carefully removed every second rail, thus obtaining rare slats taped on one side. I pasted the resulting blank onto 1.5mm cardboard. You can glue it with a weight, but I played it safe and pressed the glue between two pieces of MDF.
For further work I had to make a form. This is not a clever device. For these panels, I made 4 squares from 16mm MDF, then cut them to the desired radius. On the back side I screwed two strips of MDF, and on the side with a radius I curved ceiba (special plywood, often used for bending). I made a slight mistake with the radius, completely forgetting that in the future I would have to veneer the panel. I did not take into account the thickness of the linoleum, but it is quite decent. Well, now I'm getting ahead of myself again.As I already mentioned, my cardboard is 1.5mm (or MDF) and didn’t even think about bending to the radius I needed. I had to soak it. This is done with a brush, in several passes, gradually bending the workpiece and leaving it in a bent state for a short time. In 2-3 passes the workpieces were bent without any risk. I thoroughly coated the already bent blanks with glue and placed them on the mold and pressed them with belt clamps. I only have two of these clamps, so I increased the pressure with simple transparent tape, with tension. The second piece of ceiba (on the outside of the plywood) was needed to distribute pressure evenly across the entire plane of the radius façade panel. Pay attention to the sticks along the edges of the plywood, longitudinally under the belts. They are needed too. In order for the workpiece to press normally against the mold. These sticks can be glued to the outer ceiba in advance for ease of use.
I checked the blanks on the markings and, just in case, tried them on with the finished façade frames. The panels turned out perfect. If it weren’t for my mistake in taking into account the linoleum in the further veneering, then everything would have been completely cool.
If you make your radius facade in this way, then you should know that this method has its advantages and disadvantages. One of the advantages I would consider is that after re-gluing and complete drying, the facade does not change in any way. If you bent the workpiece, soaked it, and placed it in a mold already bent, then whatever you do with it, it will not go anywhere, and will remain within the radius. One of the disadvantages is that the edge having holes does not allow making a radius facade; this way you can make any “locked” shape. That is, elements that will later have a perimeter surround. You can, of course, cover up the holey edge with automotive putty, but in my opinion then it will be bullshit and not furniture.
I filed the panels somehow, by eye. On a format cutting machine. Here, too, you will need a full hand. The result is difficult to predict, and you can make a mistake. Therefore, there is no shame in making a couple of panels for use and simply throwing away the extra blanks if they are not needed.
Radius façade. Panel veneering.
When I finally decided to veneer the inner side of the panel of the radius facade, the same mistake I mentioned earlier surfaced. My mold was made without taking into account the thickness of the linoleum. I didn’t want to make a new form - after all, there was time... I used the same form, stuffing linoleum on top. Plus about 2.5-3mm to the desired radius. In the end, the panel still pressed against the front frame, although it lost its shape a little. So don't repeat the mistakes))
The veneer sticks very well this way. With linoleum it is pressed without siskins. The entire filling actually completely repeats the previous one. Apply glue with a roller, without much delay, place it in the mold, and press it with belt clamps. It is better to use wide veneer, without splicing, but if there is no wide veneer, there will be no big trouble.
Veneering the outside of the panel required a little more care. This is due to the natural walnut root veneer. It's quite fragile. But otherwise I did everything exactly the same as when veneering the inside. Only this time I also needed linoleum on the outside. Before veneering, the veneer should of course be slightly larger than the blanks. Excess veneer (overhangs), “knocked down” with a file, slipped.
The topic of cladding products with deck or thin veneer is discussed in more detail in the article - “Veneering (working with veneer)” .
Radius façade. Embedding and assembling carved glazing beads.
For convenience in further work, I glued the panel into the façade frame tightly. I usually don’t glue panels, but these panels are not solid wood, and I thought that it wouldn’t be a big problem. The glazing bead for facades was made on a CNC machine. For such products in our office, a machine usually makes the rough (rough) shape of the thread, then I assemble the glazing bead on the façade frame and the carver cuts out the small thread elements by hand.
To fit the straight bead to the radius base, I made a simple device. Essentially, this is a clamp that secures the glazing bead, back side up. My miter saw has smooth adjustment of the depth of cut. The radius of the saw blade matched the outer radius of the panel quite well. Therefore, to obtain a concave plane on straight bead segments, I decided to use a miter saw.
Gradually immersing the disk, I pulled the workpieces under it, just as is usually done when making fillets on a circular saw. The operation is quite traumatic, but this is definitely the fastest way to get the desired shape of the workpiece, especially if there are not a lot of workpieces at all. I manually knocked down the marks from the miter saw blade with an abrasive. I left the very careful fitting for later, anyway, after fitting the glazing bead and selecting the quarter, a long adjustment by hand cannot be avoided.
Embedding and fitting the glazing bead to the radius façade turned out to be a rather complex topic. The quarter on straight segments was selected with a quarter cutter and cleaned by hand with a plane. On the radius segments of the glazing bead - with the same cutter, only with a stop. As usual, the required bearing diameter was not at hand.
I placed the glazing bead on a miter saw, first straight segments, then, following the markings, radius segments. He put it in slowly. I waited a long time for the carved glazing bead; screwing it up would not have been an option at all. Overall it came together quite well; of course, the glazing bead was later cut by hand by a carver. Initially, the CNC machine made the radius segments a little thicker than the straight ones and, in general, we had to tinker.
I glued the glazing bead along the edge, pressed it tightly to the panels and left it to dry. Then he pulled out the glued glazing bead, carefully countersinked it and tightened it with small screws at the mating points. The glazing bead was cut in this already glued form. Definitely, fitting the glazing bead in all these works was the hardest for me.
The glazing bead was glued into the facades after painting. Unfortunately, this is a feature of almost all workshops of the same type as ours. It’s more convenient for painters to work this way. In principle, I have nothing against it, although of course it would be more convenient for me to hand over a fully assembled facade to a paint shop. Well, one way or another the facades turned out great.
Well, I guess I’ll finish my article here. I hope you learned something new for yourself, the article turned out to be useful and now you can safely try to make your own radius facade .
Pros and cons of rounded structures
The expediency of choosing a curved or radius front element is mainly determined not by saving space or increasing capacity, but by the desire of the housewife to create a non-trivial and exclusive interior design in her workspace or kitchen. Designers classify most furniture of this type into the “luxury” category. The high cost or prestige of the product is not important here, but status and originality prevail.
The manufacturing technology of curved facades initially determines the high cost of products. Even parts made from bent budget MDF boards are priced significantly higher than their “brothers” with flat front elements. The manufacturing method also plays an equally important role in increasing the cost. An individual order has always been more expensive than purchasing ready-made furniture.
However, the high price is the only significant drawback of this type of construction, which is fully compensated by the uniqueness, originality, and sometimes uniqueness of the items. An important advantage is their ergonomics and safety.
Radius sizes
To avoid discrepancies in the parameters of individual elements, standard radius sizes have been developed that are used by most factories. Curved or external facades can have 4 different radii, each of which is characterized by individual dimensions:
- R300. Taking into account the thickness of the MDF board, the internal radius will be equal to 2.84 cm, the internal chord - 4 cm, the external chord - 4.22 cm, arc length - 5.15 cm. The height can be adjusted to the desired size or be standard - 0.98 cm. Inwardly concave facades are produced as standard with the same radius.
- R400. Its dimensions: internal R - 3.84 cm, arc length - 6.5 cm, average chord value - 5.6 cm, arbitrary height is allowed;
- R700. Internal radius - 6.84 cm, arc size - 4.65 cm, internal chord - 5.18 cm, external chord - 5.3 cm, standard height 0.67 cm;
- R1000. With an internal radius of 9.84 cm, the arc length is 7.4 cm, the chord is 7.13 and 7.25 cm, and the height is 0.83 cm.
Lesson 19 — How to calculate the dimensions of facades in cabinet furniture
Calculation of facades is a fairly important procedure, because they are the face of the finished product and in some cases (for example, MDF facades) it will not be possible to change anything if there is an error.
In this article I will try to explain how calculations are made for all the main types of furniture facades (with the exception of sliding doors and radius doors). We will disassemble it on the basis of a box with external dimensions of 600 x 300 mm.
So, let's start with swing facades. In order for the doors to open, it is necessary that they do not rub against each other and against the body; technological gaps are provided for this.
They are 2-4 mm (more - they look ugly, less - they rub).
Personally, I prefer to make gaps of 2 mm.
Separately, I note that the dimensions must be calculated for each module separately, that is, if you are assembling a kitchen in which there are 3 floor drawers and 3 wall drawers, then the dimensions must be calculated for each drawer separately, that is, 6 times - this way you will insure yourself against a number of possible mistakes.
The width of the facade is calculated using the formula:
w = (W/n)-3 mm
where w is the width of the facade, W is the width of the box, n is the number of facades (by width)
Some furniture makers subtract 4 mm, but in my opinion the gaps are too large.
Height of facades. When calculating height, there are no clearly defined formulas - you should be guided by common sense and some simple subtleties.
For example, let's calculate the dimensions of the facades for several kitchen modules.
in red , the gaps in blue in orange .
So, the dimensions of the box are 730×450 mm
We calculate the width using the formula (450/1)-3 and get 447 mm. (there are 1.5 mm gaps on the sides, which will allow you not to cling to adjacent cabinets, which will have the same allowances).
In terms of height, we decide to make 3 facades, of which 2 are large, 300 mm each. We take into account that the optimal distance between adjacent drawers is 2-3 mm , and between the tabletop and the upper facade 5 mm (so that the facade does not cling to the drip tray, which is found on kitchen countertops). As a result, subtracting these values from the height of the box, we obtain the height of the small facade 121 mm
730mm - 300mm - 2mm - 300mm - 2mm - 5mm=121 mm
Let's move on to another example: calculation of facades for a hanging cabinet. Its peculiarity is the presence of two hinged facades, as well as an overhang of the upper horizon, which seems to cover the doors, giving the entire cabinet a finished look.
Based on the overall dimensions of the cabinet: 636 x 600 mm, we calculate the width of the facades. (600/2)-3 = 297.
Knowing that the thickness of the upper horizon is 16 mm, and making a 3 mm gap between it and the facade, we get the height of the facade (636-16-3) = 617
Now let's move on to the individual subtleties of the calculation.
1. When calculating the dimensions of facades made of laminated chipboard edged with 2 mm PVC edges, do not forget to subtract another 4 mm from the dimensions, both in height and width (edge thickness on both sides)
2. When calculating the dimensions of hinged facades
for corner cabinets, it is necessary to take into account that there are two types of corner hinges (+45, +30 g).
Visually they do not differ from each other; the difference is noticeable only on the assembled body with a hung facade. Therefore, the installation diagram for the corner hinges that you purchase should be checked with the seller. Let us analyze the calculation for each using the example of a corner cabinet with a distance between the walls (in the façade opening) of 300 mm.
So, option 1, the facade turns out to be inset; its size should be 1 mm less than the width of the niche, that is, equal to 299 mm.
Option 2, on the contrary, provides for the overhead nature of the facade. In this case, the facade is 5 mm wider than the niche (305 mm)
Let us separately dwell on such a topic as the calculation of sliding doors in various variations