Interior doors are one of the most important elements of finishing a residential or office space. Not only the appearance of the room, but also properties such as noise insulation or air exchange rate depend on the correct selection and high-quality installation of these interior items. As a rule, most owners of apartments or private houses turn to professional installers for help when installing doors. However, this service is not cheap, and, with minimal experience, every home craftsman has the opportunity to install interior doors with his own hands.
Rice. 1. Assortment of interior doors at the point of sale
Dimensions and sets of interior doors
There is a wide range of doors of different sizes and designs on the market. If the owner of an apartment or private residential building carries out finishing according to an individual design project, he can order interior doors from the factory with any geometric characteristics. In other cases, when filling standard openings, the dimensions of doors and their components are regulated by GOST 6629-88. All geometric characteristics of these products are given in detail below.
Rice. 2. Typical dimensions
Standard interior door set
All doors installed in wall openings between adjacent rooms within one apartment consist of the following structural and functional elements:
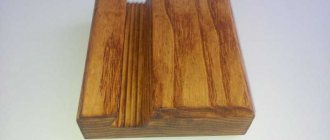
- The canvas is the main structural element designed to separate rooms. It can be panel, paneled, perforated, solid or have a glass insert. Depending on the design decision and price, the interior door leaf can be made of natural wood, veneer, chipboard, MDF, aluminum, plastic, glass and other elements.
Rice. 3. Canvas design
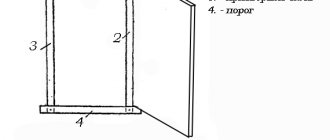
- The door frame is the main load-bearing element of the structure, designed for its reliable fastening in the wall opening. As a rule, it consists of 3 parts - 2 vertical posts and a horizontal jumper. Hinges for hanging the canvas are mounted on the box.
Rice. 4. Appearance of the box
- Hinges (canopies) are metal load-bearing elements mounted in the vertical part of the door frame. Designed for installation of the canvas and its free opening. Depending on the weight of the door, 2, 3 or more hinges can be installed along the height of one post. If the product is made in the form of a double-floor structure, the hinges are mounted on both sides of the box.
Fig 5. Appearance of loops
- The handle and lock are a locking mechanism that allows you to hold the door leaf in the closed position. The handle can be push-button, rotary or have a special design. As a rule, it is made of metal, if necessary, equipped with a locking mechanism for locking with a key.
Rice. 6. Standard handle with lock
- Anchors are elements for fastening the door frame to the wall. Depending on the design, dimensions, weight and material of the products, they may vary in quantity, length, thickness, and load-bearing capacity.
Rice. 7. Fastening elements
- Extensions and trims are decorative strips designed for finishing the end of an opening built in a thick wall, as well as for framing the set around the perimeter, as well as giving it expressiveness and masking defects.
Rice. 8. Extras
Rice. 9. Platbands
Rice. 10. Complete set of interior doors
Both ready-made door sets and their individual components are widely available, and each consumer has the opportunity to choose exactly the product that suits his requirements.
Dimensions of the interior door leaf
According to state standards, when finishing standard apartments, the following standardized dimensions of interior doors are used:
- For auxiliary rooms, storage rooms and bathrooms, products with dimensions of 600 x 2000 mm are used.
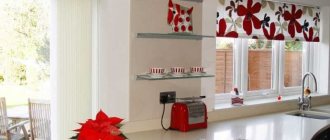
- When equipping the kitchen space, doors with dimensions of 700 x 2000 mm are used.
Rice. 12. Product with dimensions 700 x 2000 mm
- To fill the openings between living spaces - bedrooms, living rooms, offices, doors with parameters of 800 x 2000 mm are installed.
Rice. 13. Product with dimensions 800 x 2000 mm
- If it is necessary to install a door to a large hall intended to accommodate a large number of people, or if there is an appropriate design solution, double-floor structures with dimensions of 600 + 600 x 2000 mm are used.
Rice. 14. Product with dimensions 600 + 600 x 2000 mm
Figure 15. Installation clearances
The size of the doorway should ensure free straightening of the door during installation, and also requires installation of the door leaf together with the frame. Thus, each doorway must have a margin of at least 40 - 50 mm on all sides, relative to the dimensions of the door leaf. If there are voids in the opening after installing the door kit, they should be filled with polyurethane foam and then covered with platbands.
Door frame dimensions
When choosing or independently manufacturing a U-shaped supporting structure for a door leaf, it is necessary to take into account the typical dimensions of these products and the following nuances:
- When installing the door leaf into the frame, the overall dimensions of the entire structure increase by 120 - 150 mm on each side.
- When choosing a frame, you need to take into account the thickness of the door leaf and purchase a supporting frame that is no thinner than the door itself.
- Standard frames for typical interior doors are made of wooden blocks with cross-sectional dimensions ranging from 30 to 35 mm. However, with a non-standard design or the use of other materials, these parameters may vary relative to GOST recommendations - from 15 to 55 - 60 mm.
Rice. 16. Making a box
- When choosing a box, you should also take into account the thickness of the wall or partition in which the opening is located - the design must match or be less than this parameter.
If the load-bearing door frame is made by hand, when cutting wood, special attention should be paid to the length of the vertical posts relative to the height of the door leaf. These elements must be cut taking into account the level of the finished floor, the thickness of the horizontal impost, as well as the required gap of 10 - 20 mm from the bottom of the canvas intended for ventilation.
Opening dimensions
In order for an interior door to be used without any problems for a long time, it is necessary to ensure its high-quality installation. The implementation of this procedure and the installation result largely depend on the assignment of the correct dimensions of the opening intended for installation. When expanding, narrowing or creating an opening in the wall, the following conditions must be met:
- Before assigning the final dimensions of the opening, you should decide on the design and parameters of the product itself - the canvas and the frame.
Rice. 17. Prepared opening in the wall
- The gap between the vertical posts of the box to the end of the opening should be at least 15 - 20 mm.
- The height of the opening should take into account the total thickness of the floor pie - screed, soundproofing layers, self-leveling composition, substrate and finishing coating.
- It is necessary to take into account the gaps - from the bottom of the canvas to the floor - 15 - 20 mm and from the horizontal impost of the box to the top of the opening - at least 30 - 40 mm.
Rice. 18. Installed box
Thus, the opening that is installed in the living room of a typical apartment, intended for installing a canvas with dimensions of 800 x 2000 mm, must be at least 910 - 920 x 2150 - 2200 mm, depending on the design of the floor and the thickness of the box.
Owner reviews
Interior doors made from MDF have received conflicting reviews. Most of the negative characteristics are associated with unscrupulous manufacturers or sellers. After all, under the beautiful façade it is impossible to see the inner content. So, after the purchase, it turned out that the thickness of the slab was only 2 mm. Which is not enough for a door leaf that is under constant load.
Sometimes thick cardboard is used instead of MDF. The service life of such structures is minimal and the quality is low. A manufacturer who has saved at all stages of production can offer a very attractive price. However, it is precisely because of non-compliance with manufacturing technology that MDF doors have a bad reputation. Owners write that they swell, get very scratched, peel off, etc.
However, doors produced in accordance with the rules and standards have earned flattering reviews. They were purchased from reputable sellers. Owners describe them as easy to care for, durable and truly resistant to high humidity. But their price is no longer as low as most consumers hope.
By approaching the choice of MDF doors wisely and carefully, you can purchase a durable and beautiful thing. Caring for a quality product comes down to removing dirt from the surface. Installing such a block will not be difficult. MDF is light in weight and easy to work with.
DIY tools for installing interior doors
Installing interior doors with your own hands is a difficult technological process that requires high-quality installation products, experience in finishing work, as well as a certain set of tools:
- Electric tools are needed for quick and high-quality cutting, sampling and making holes in structures:
- Drill with the ability to switch to impact mode. It will be required if it is necessary to expand the opening in a load-bearing wall or when installing holes for anchors to secure the box. When you select the standard drilling mode, using this tool you can make any hole in the wooden door leaf.
Rice. 19. Electric drill
- A screwdriver with the function of limiting the tightening force of a self-tapping screw in the body of a wooden element.
Rice. 20. Screwdriver
- Electric jigsaw, circular saw or miter saw (optional). This tool will allow you to quickly accurately cut the elements of the box, extensions or trim for the purpose of subsequent high-quality installation.
Rice. 21. Electric jigsaw
- An electric milling cutter is a necessary but expensive tool, without which it is impossible to make high-quality cuts in the body of the door leaf for installing the bolt and locking elements. Also, this tool is used when installing hinged awnings both on the canvas and on the vertical post of the box.
Rice. 22. Hand router
- Hand tools – necessary for finishing the surfaces of elements to be installed:
- Tool for marking cutting areas, arranging locks, handles, hinges, fasteners. The kit includes a tape measure, ruler, metal square, building level, marker or pencil. Using a level, you can also check whether the box is installed vertically and whether the framing elements are trimmed accurately at an angle of 45 degrees.
Rice. 23. Measuring tool
- The depth of recess in the canvas under the bolt of the locking mechanism is best determined using a caliper.
- To refine the sample after the router has worked, chisels with different cutting edge widths are used.
Fig 24. Set of chisels
- The work of a chisel is impossible without the use of a steel or wooden hammer.
- To control the tightening of self-tapping screws, you should stock up on a set of flat and Phillips screwdrivers.
- To manually cut platbands at the desired angle, it is recommended to use a special hacksaw with a fine tooth, which comes in one set with a miter box.
Rice. 25. Hacksaw and miter box in one set
- When filling the gaps between the frame, extensions and platbands with the wall with polyurethane foam, a special pressure gun is used.
- Consumables - during the installation process, some parts of the tool inevitably become unusable due to physical wear:
- Depending on the material, thickness and strength of the wall, you need to purchase hammer drills.
Rice. 26. Set of drills
- The screws for fixing the structural elements are tightened using a set of bits for a screwdriver.
- When cutting board elements with an electric jigsaw, the blades often break, and it is necessary to have several spare files on hand.
- To install each interior door, you will need 1 - 2 cans of polyurethane foam.
Rice. 27. Cylinder with polyurethane foam
- Fixing the frame parts of the door structure for the installation period, before the foam hardens, is carried out using masking tape.
All tools must be of high quality, in good working order and sharpened. When using old or dull files, bits and drilling tools, chips, burrs and other defects may form at the processing sites.
Final stages of installation
Instructions on how to properly install an interior door may indicate different procedures.
If the door has a built-in lock, then the fittings are installed first, and then the trim is installed. But another course of action is also possible.
The handle is located approximately in the middle of the door, i.e. with a canvas height of 2 meters, the fittings are mounted at a distance of 1 meter from the bottom edge. With this arrangement, it is easiest to open the door, since there are no distortions. If the door is a hollow structure, or has loose filling inside, then you need to find the place where the frame beam passes. You can detect it by tapping. In most cases, such a beam is located at a height of 90 cm.
Handles on interior doors can be:
- overhead ones, which simply cut in at a convenient height. Typically, such handles are connected by a pin, for which a hole is drilled in the canvas. In recent years, such pens have been used less and less. They are often installed on the doors of children or people with poor coordination of movements, since they do not require any effort to open.
- rotary, with a locking mechanism that prevents the door from opening spontaneously due to a draft.
Installation of fittings Source rusvrnty.beget.tech
Removing an old interior door
If the interior door is not installed in a new apartment, before starting work it is necessary to dismantle the old interior part. Most often, owners prefer to keep the previous product for reuse in another place, for example, in the country. To dismantle the old door leaf along with the frame, maintaining the integrity of the structure, you must follow a certain algorithm:
- Dismantling begins with removing the door leaf from the hinges and then unscrewing the canopies themselves from the frame.
- Using a dismantling crowbar with a sharp working edge, the cashing parts are carefully separated. In order not to break the fragile thin product, before it is completely separated from the wall, it is necessary to increase the gap in several places along the length of the rail.
Rice. 28. Cash withdrawal
- When access to the polyurethane foam that secures the finishing parts is opened, it must be cut through the entire height with a construction knife with a retractable blade, after which the boards are easily separated from the end of the opening.
- If the door frame is fixed with screws or anchors, before dismantling the fasteners are unscrewed with a screwdriver or screwdriver.
- Dismantling the box begins from the bottom, since there it has fewer attachment points. Before disturbing the verticality of the rack, it is necessary to ensure that the structure of the finished floor does not hold it in the designed position.
Rice. 29. Dismantling the box
- When both vertical elements of the frame are separated from the opening in the lower parts, the jumper is dismantled, and the entire frame is carefully lowered onto a horizontal surface for disassembly into its components.
- When all elements of the door structure have been removed, the opening is cleaned and, if necessary, finished with plaster until a smooth surface of its end part is achieved.
Rice. 30. Finalization of the opening
In some cases, before installing a new door, the opening needs to be widened or narrowed, and this work is carried out in accordance with a separate technological map.
How to take measurements correctly
To do this you will need a tape measure with a retractable mechanism.
If the old door is being replaced, measurements can be taken in two ways:
- measure the removed canvas (height and width), and then buy according to ready-made data;
- start taking measurements after removing the old box.
Doorway measurements Source evimso.com
In a new house, openings usually initially have standard dimensions, which are indicated on the plan. But just in case, it is better to measure the height and width of the opening. To determine the required horizontal parameters of the canvas, you need from the obtained numbers:
- subtract the width of the box x 2
- add 5 mm for installing hinges and free opening.
When calculating the height, the vertical of the opening is measured, from it you need to subtract the height of the threshold (if there is one) and the opening gap from 2.5 to 4 cm.
Measurement parameters Source goodlinez.ru
The data obtained is compared with standard door sizes. If the difference is small, the width and height of the opening can be reduced with additional additions. If the results differ significantly from standard norms, then you can do different things:
- narrow or widen the doorway;
- order the production of doors according to existing standards.
Before deciding on such drastic measures, it is better to invite a specialist to take measurements and voice his conclusions.
Step-by-step instructions for installing a new interior door
Installing a new interior door is a responsible process that requires strict adherence to step-by-step instructions:
- Before starting work, you need to measure the opening and make sure that it does not require modification. The dimensions should be 20 - 30 mm larger than the external dimensions of the door frame to allow foam installation and straightening of the structure during installation.
Rice. 31. Taking measurements
- All 3 elements of the box are laid out on a horizontal surface, which are cut in accordance with the dimensions of the opening.
- 2 vertical posts are sequentially fixed to the jumper, which can be attached to wooden dowels and glue or using a pre-cut tongue-and-groove interface. When assembling the box, it is necessary to take into account the direction of the profile, which depends on the external or internal opening of the door.
Rice. 32. Installation of the box
- In one of the vertical posts, using a router or chisel, the mounting recesses for the hinges are selected after preliminary marking. Suspension elements are installed in these grooves, which are fixed using a screwdriver and self-tapping screws.
The upper and lower hinges are installed at the same distance from the end of the rack, which should not exceed 200 - 250 mm. If it is necessary to install a 3rd suspension, its position should be 200 - 300 mm above the center of the height of the box post for better perception of the pulling force.
- The assembled box is fixed in the opening, after which it is aligned using a level in 3 directions. Vertical posts must be strictly orthogonal to the horizontal impost. To prevent the box from losing its geometric parameters, at the time of its installation it is allowed to use a second horizontal impost at the bottom of the racks.
- When the frame is fixed to the fasteners and does not change position when force is applied, you can begin hanging the door leaf to check compliance with the frame geometry.
Rice. 33. Lock mortise
- Using a router and chisels, a bolt with a locking mechanism is cut into the end of the door, and a handle is installed on the surface of the door leaf.
- After installing the door, it is necessary to mark the location of the groove for fixing the lock tongue in the corresponding vertical element of the frame.
- When the installation work of the main structure is completed, the geometry is checked and the structure is not subject to adjustment, it is necessary to cut out and install the extensions that cover the remaining part of the end of the doorway after installation. These elements are usually secured using polyurethane foam.
Rice. 34. Installation of extensions
Rice. 35. Installation of cash
Rice. 36. Installation of Handles
- At the final stage, the frame structure is installed - platbands, which are cut at an angle of 45 degrees using a hacksaw and miter box, or on a cross-cutting machine.
Rice. 37. Platbands
Rice. 38. Cut out the platbands
Rice. 39. Docking of platbands
Rice. 40. Fixing platbands
Rice. 41. Finished frame
Rice. 42. Sealing
Installation of interior doors is one of the most important work on finishing the premises. If a mistake is made, it is almost impossible to correct the situation and restore the structure to its original form. In this regard, the best solution would be to turn to professionals who have extensive experience in performing this type of work and also have the necessary equipment.
Video description
You can see how to assemble a door frame in the video:
See also: Catalog of companies that specialize in the manufacture and installation of doors and windows
The design can be U-shaped or a closed rectangle of 4 parts.
Before starting assembly, all parts are measured again and checked against the opening parameters. The excess length of the side parts is cut off so as to provide for the thickness of the future floor covering. The horizontal strip should be 7 mm longer than the width of the canvas.
- Space is cleared on the floor and the parts are placed next to each other.
- The cutting areas are marked at an angle of 45° so that the vertical and horizontal elements coincide.
- In a U-shaped structure, if a threshold is planned, then the lower parts are cut at a right angle.
- Holes for connection are drilled using self-tapping screws;
- The parts are assembled into a single structure.
Then there are two possible options.
In the first case , assembling the door frame involves the following sequence of actions:
- The box is installed in the opening;
- Using wedges, secure the upper part;
Securing the door with wedges Source rabotai-sam.ru
- The level checks compliance with horizontal and vertical directions;
- Drive the wedges at the bottom;
- The openings are carefully filled with foam, having previously sealed the adjacent parts of the box with masking tape;
- Fastening is done with self-tapping screws or dowels.
The second method is to first attach hinges and fabric to the box, and then install the entire block at once. In this case, spacers will be needed to hold the door until installation is completed.
Briefly about the main thing
Do-it-yourself installation of interior doors must be carried out in strict accordance with the step-by-step installation instructions. Before starting work, it is necessary to prepare the appropriate tool and select structural elements. During installation, you should measure the opening, cut and assemble the supporting frame. The frame must be installed in the opening in such a way that in a free state, without applying a load, the door leaf remains motionless, both open and closed. After installing the main elements, it is necessary to finalize the structure by installing extensions and platbands.
Owner reviews
Interior doors made from MDF have received conflicting reviews. Most of the negative characteristics are associated with unscrupulous manufacturers or sellers. After all, under the beautiful façade it is impossible to see the inner content. So, after the purchase, it turned out that the thickness of the slab was only 2 mm. Which is not enough for a door leaf that is under constant load.
Sometimes thick cardboard is used instead of MDF. The service life of such structures is minimal and the quality is low. A manufacturer who has saved at all stages of production can offer a very attractive price. However, it is precisely because of non-compliance with manufacturing technology that MDF doors have a bad reputation. Owners write that they swell, get very scratched, peel off, etc.
However, doors produced in accordance with the rules and standards have earned flattering reviews. They were purchased from reputable sellers. Owners describe them as easy to care for, durable and truly resistant to high humidity. But their price is no longer as low as most consumers hope.
By approaching the choice of MDF doors wisely and carefully, you can purchase a durable and beautiful thing. Caring for a quality product comes down to removing dirt from the surface. Installing such a block will not be difficult. MDF is light in weight and easy to work with.
Final finishing
- If finishing work continues in the room, it is better to remove the door panels and cover the frames with film. Do not secure the film with tape: it will leave traces. You can use masking tape.
- After finishing the finishing work, we will close the gap between the frame and the wall with platbands.
- We close the screw heads with plastic furniture plugs in the color of the box.
- We install handles, locks, latches, and bolts.
- Don't forget to install stops for the door leaves. They allow you to limit the range of rotation of doors, protect furniture and the doors themselves from damage.
You can be creative in the design of the space above the door
- Apartment
How to decorate a doorway: 35 interesting ideas