Scraps and remnants of various fabrics are not garbage, but a real treasure in the hands of a needlewoman, which can be turned into amazingly beautiful and useful things, for example, rugs for a nursery, hallway or bathroom. There are so many ways to make rugs and rugs that you don’t even need to know how to sew and knit, you just need to choose the most convenient option for yourself.
DIY rugs made from scraps of fabric
After getting acquainted with the methods of making chair covers and sewing rugs, think about whether it is worth throwing away old T-shirts, jeans, towels, woolen sweaters and scarves. After all, all these things, even if they are shabby, with holes, faded in the sun, can be given a second life.
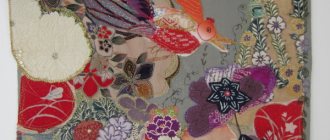
Patchwork fantasies
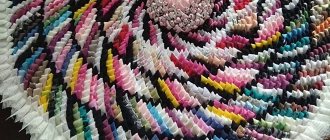
Bright rainbow rug
Preparation of flaps
Depending on the chosen technique for making the rug, scraps of fabric of different sizes and shapes may be required. It is better to select and cut the required amount in advance so as not to be distracted while working.
Preparing long strips of fabric for knitting or weaving a product can cause some difficulties: sewing them together is a long and tedious job. And if you tie them in knots, the rug will turn out rough and sloppy. But there are ways to avoid this.
Cutting continuous tape
This method is used when preparing fabric strips from old clothes: T-shirts, turtlenecks, T-shirts and even tights.
Step 1.
We cut off the rough bottom seam, the cuff of the sleeve or the toe part of the tights. For a T-shirt or turtleneck, cut off the top part right below the armholes.
Trimming seams
Step 2.
Place the product on a flat surface with the side seam facing you and cut it into strips of the required width, without cutting a couple of centimeters to the opposite seam.
Cutting strips
Step 3.
Thus, we cut the entire workpiece into fringe.
Cutting the workpiece
Step 4.
We straighten the workpiece so that we can see the entire uncut part, and cut it not in a straight line, but at an angle, directing the scissors from one slot to the adjacent one on the other side of the product.
Cutting through the fabric
As a result, we get a closed ring, which to obtain a tape you just need to cut across one of the seams.
Blank for making a rug Blanks can be wound into balls
Connection without node
If the length of the tape is not enough or you need to connect many short pieces with each other, the simple technique shown below will help you do this.
| Image | Description |
| Step 1 | We cut small holes at the ends of adjacent strips that need to be connected. |
| Step 2 | Place the strips on top of each other, aligning the slots. |
| Step 3 | Pass the second end of the top strip through the slot from below and pull the entire strip through it. |
| Tighten the connection. If necessary, repeat these steps to further lengthen the tape. |
Advice. If scraps of fabrics of different thicknesses and densities are used, then thinner ones should be cut into strips of greater width to even out the thickness of the weaving.
How to make a massage mat with your own hands from pebbles, chestnuts, or buttons?
Foot massage has a relaxing effect, relieves fatigue, and helps improve sleep. In addition, it has a general strengthening effect on the entire body. Since a large number of biologically active points are concentrated in the feet.
You can easily make massage mats with your own hands using available materials.
One of the available materials is sea or river pebbles. While walking along the river or seashore, collect several dozen small stones of approximately the same size.
Important: Choose rounded stones without sharp corners so as not to injure your limbs in the future.
When the stones are collected, wash them with water and laundry soap. It is also advisable to soak the stones for a couple of hours in a solution of water with potassium permanganate or in a soap solution.
Prepare a base for the mat: it can be a tarpaulin or other thick fabric. You will also need glue. Immediately take a good reliable glue, for example, moment. Hot silicone glue is not suitable for this purpose.
When the stones are dry, start gluing them onto the base. You can lay them out randomly or make some kind of pattern. There are two ways to glue stones:
- First apply glue to the base and then stick the stones on it.
- Apply glue to each individual stone and attach it to the base.
The second method will take longer, but it is more reliable. The stones will be firmly glued and will not fall off after a while. When all the stones are glued to the base, the rug should sit for about 24 hours. This way the glue will dry completely and the mat will be reliable and durable.
A rug made of stones can be placed in the bathroom or used only for massage. It is useful for adults and children to walk on stones. And if you preheat the stones, there will be double benefits for the body.
Massage mat made of stones
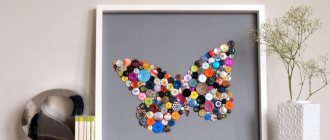
You can also make a rug from buttons of various sizes and shapes. It is very easy to do: sew many different buttons onto a fabric base. Any size rug is possible, but it is better to make it small. It can be easily rolled up and put away; after all, such a rug is not intended for constant walking on it. It is enough to walk on a massage mat for 5 to 15 minutes a day to engage active points.
DIY massage mat made from buttons
Another way to make a massage mat is to sew caps from felt-tip pens, plastic plugs onto a thick fabric base, stick chestnuts and other improvised materials of various shapes and textures. The result is a budget-friendly, and most importantly, useful massage mat.
DIY chestnut massage mat
Knitted rugs from patches
From scraps joined into long ribbons, a rug can be crocheted, just as napkins are crocheted from ordinary yarn. True, for such work you need a large hook, 6-10 mm thick.
Begin work by tying a braid of 5-6 air loops, which are closed into a ring. Then the fabric is knitted in a spiral with double crochets, periodically knitting two stitches from one loop to increase the diameter. After each row, the work must be laid out on a flat surface to control the plane.
Crochet
Crocheting a rug
Video - Crocheting a round rug from cut fabric strips
Such a simple round rug does not require any special skill; even those who have picked up a crochet hook for the first time can knit it. If you have experience, you can create real masterpieces of any form.
Crochet rug
Handmade children's rug
Bright knitted rug Multi-colored rug
Weaving technique for floor mats
What kind of homemade rugs have people come up with!
However, according to the technical side of execution, they are divided into a relatively small number of types: Sewn - the most elementary in execution technique, but requiring additional equipment: threads and a sewing machine. Using an ordinary machine there is every chance of sewing an absolutely original and attractive carpet.
Woven - made virtually without unnecessary additional materials. Very practical, wear-resistant, the appearance is quite the same, but despite this it is luxurious.
Woven from scraps of fabric are quite labor-intensive products, but simple in technique, and even defective fabric will work as the material used. In order to produce them, you need a simple handmade carpet weaving power loom - kromy. You can even make edges for making small rugs yourself in an hour using scrap materials.
When it comes to the most popular man-made carpet products, crocheted rugs are likely to be the most common. As a rule, to make this product, a huge size ten hook and thick threads are used. The shape of such a rug can be any, but the most popular is round.
Braided rugs
You can weave a rug in different ways, and to do this, the scraps again need to be joined into long strips.
Braid rug
This method is very simple, it does not require any tools or equipment other than a needle and thread.
Step 1.
Sew three patchwork strips together.
Sew three patchwork strips together
Step 2.
We braid them into a regular braid.
It should turn out to be quite long, so the strips will have to be extended as you work. Braiding
Step 3.
We secure the end of the braid with a pin and begin to roll it in a spiral on a flat surface.
Twisting the braid
Step 4.
We fasten each turn to the previous one on the reverse side, sewing it with threads.
Sewing the braids
Step 5.
You can do it differently: first twist the entire braid, and then carefully sew the turns in a spiral.
Making a rug
An oval rug is made in the same way.
Braided rug
Terry rug-braid Rug figured from braids
Rug made of towels
But if you need a rectangular shape, it is better to weave several braids of the same length, lay them close to each other and sew them in a straight line. And weave the ends with cord or sew on a typewriter.
Scheme for making a rectangular rug Rectangular woven rug
Advice. Such a rug will hold its shape better if you add a lining to it on the back side.
The lining can be an old towel
Braided rug
To make such a rug you need to make a frame for weaving. Its size should be slightly larger than the desired size of the canvas. Nails with small heads are placed on two opposite sides or wooden pins are installed to secure the base. The distance between them is 2-2.5 cm.
Weaving frame
Advice. If you add another intermediate crossbar to the frame, which can be attached at different levels, you can make rugs of different sizes.
Step 1.
We begin work by securing the warp threads. This can be cord, twine, thick yarn, or scraps tied into a long ribbon. The end of the tape is tied to the upper corner stud, after which it is snaked around all the pins of the upper and lower crossbars in turn. You need to stretch the base well, but not too tightly.
Attaching the warp threads
Step 2.
Preparing working threads.
They should not be too long so as not to make weaving difficult. It is better to attach the next strip as you shorten the previous one. Preparing working threads
Step 3.
We begin weaving by alternately passing a strip of working thread over and under the stretched warp threads.
Let's start weaving
Step 4.
Having reached the end of the row, we wrap the working thread around the outer warp thread and continue weaving in the other direction.
Weaving from the edge
Step 5.
Every few rows, compact the fabric by pulling the woven rows up. To do this, you can use a special device in the form of a wooden fork or simply use your hands. The denser the weaving itself and the smaller the distance between the rows, the less noticeable the warp threads will be.
Device for compacting threads
Step 6.
We make the required number of rows, periodically increasing the working thread or changing it to a strip of a different color.
Weaving a rug
Step 7.
If the color of the working thread needs to be changed at the edge of the rug, it is cut close to it and hemmed, or the next strip is tied to the cut end, and the knot is left on the wrong side. But you can do it differently: tie the strips on the edge, leaving long tails. In this case, the edges of the rug will be fringed.
Weaving a rug with fringe
For reference. The fringe on the other two sides can also be done at once, if you do not wind the warp threads around the pins, but tie them to each pair with separate strips.
Cape with fringe for a chair.
When finished, the fabric is carefully removed from the nails.
You can complicate the weaving by taking two working threads instead of one at once, and interweaving them both with each other and with the warp threads.
How to weave a rug without a loom
Video - Rug made of shreds on a frame
You can also weave a round rug in a similar way. A hoop can serve as a frame for it.
Round woven rug The process of weaving a rug on a hoop
How to make a rug with your own hands using a hoop: master class
If you have a hula hoop or hula hoop, you can easily make a round mat. The hoop will act as a base. It is very convenient to work with it because of its stability.
Bright T-shirts will be the main material, as faded and gray ones will look boring. Be sure to wash your T-shirts before work.
Step-by-step making of a rug using a hoop:
- Cut the t-shirts into strips parallel to the bottom edge. You should have closed rings.
- Place one strip on the hoop, then pull the second strip perpendicularly.
- Continue stretching the T-shirt strips onto the hoop until the hoop ends up looking like a bicycle wheel. There should be an odd number of stripes on the base.
- Start weaving the rug from the center, as in the previous method. Snake the thread above and below the warp lines. Make sure the weave is tight and even.
- In the middle of the weave, divide the warp threads into two parts so that the weave doubles and is dense.
- At the end of weaving, tie all the free edges of the threads into strong knots.
- Cut the threads from the hoop and also tie them into knots.
Making a rug on a hoop How to weave a rug on a hoop: master class
Knotted rug
To make such a shaggy rug, you don’t need to sew the scraps into ribbons. They just need to be cut into strips 8-12 cm long, depending on how long the “pile” you want to get.
In addition to them, the work will require a crochet hook and a special mesh for carpets, which can easily be replaced with a synthetic construction mesh. The base of the desired shape and size is cut out of it.
Carpet mesh
Then the strips folded in half are slipped under the mesh, and their ends are pulled out to the front side on both sides of the cell wall using a hook. All that remains is to tie them with a strong knot.
Blanks from an old T-shirt Stripes are tied into knots The longer the ropes, the fluffier the rug turns out
All grid cells are filled in the same way.
Using scraps of different colors, you can create patterns and ornaments from them according to a pre-designed scheme.
Soft patch rug
Heart shaped rug
Entrance door mat made of plastic bags: description, photo, diagram
The mat located at the front door should be made of washable materials. Every time you or your guests will wipe their feet on this rug, so you will have to wash it very often.
It is logical that the material for such a rug should be selected for practical reasons. Knitted or fabric rugs certainly look very beautiful, but they are completely unsuitable for these purposes.
One of the most suitable materials for making a door mat is plastic bags. This material has a number of advantages:
- A rug made from plastic bags is easy to care for. It is enough to rinse it in running water, after washing it with a brush and powder or soap.
- Plastic bags are inexpensive.
- In almost all houses there is an abundance of such material, and housewives simply do not know how to get rid of the accumulated bags.
- By making a rug, you will still save the environment, at least a little. After all, we know about the problem of environmental pollution with bags.
You can make a rug from plastic bags using a hook. First you need to make ribbons from plastic bags and wind them into balls. To do this, cut the plastic bags along the seams, roll them into ribbons about 1-1.5 cm wide. Then, using a thick hook, knit the rug according to the pattern you will see below.
Rug knitting pattern
Options for rugs made from crocheted bags can be seen below. In essence, these rugs are the same as those made from yarn. However, they are better suited for placement at the front door and are more wear-resistant.
DIY rug made from bags Rugs made from plastic bags
If you don't know how to crochet, you can make pom poms from plastic bags. This rug will be less practical than the previous one. But it will look beautiful. If you take bags of different colors, you can make a rug with patterns.
make a pompom like this:
- Cut the bags into long strips of the same size and width.
- Wrap many strips onto a paper base.
- Use scissors to cut from opposite edges.
- Tie the strips in the center with strong thread.
- Fluff the pompom.
Then glue the pompoms onto the base. Polyethylene pompoms can be used to form flowers and other designs.
Rug made from garbage bags
We invite you to watch a master class on making a rug from plastic bags.
Patchwork pompom rugs
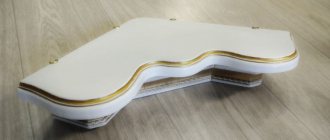
Very soft and cozy rugs are made from patchwork pompoms filled with holofiber, padding polyester or foam rubber. You don’t have to buy filler either - you can “get it” from old jackets, blankets and stray pillows.
The choice of patches depends on the purpose of the rug. For children, old knitted T-shirts and T-shirts in bright colors are best suited.
To work you need to prepare:
- a large number of scraps or old unnecessary knitwear;
- needle and thread;
- scissors;
- filler;
- thick fabric for the base;
- glue gun
Step 1.
We cut out circles of the same size from the knitwear according to the template. Their diameter should be approximately twice the intended diameter of the pom poms.
Cut out circles
Step 2.
Using a simple stitch, we quilt the blanks in a circle, stepping back a little from the edge.
Quilting the workpiece around the circumference
Step 3.
Place filler in the middle and tighten the thread.
We get a soft ball. Filler included inside
Step 4.
We make such balls from all the blanks.
Preparing pompoms
Step 5.
We cut out the base for the rug from the fabric and, using a glue gun, sequentially glue patchwork pompoms to it.
They can also be sewn on. Attaching pompoms to the base
To make a similar rug for the bedroom, you can take a coarser and more wear-resistant fabric, and for the bathroom - old terry towels.
Rug made of pompoms
Old rugs and bedspreads of strict monochromatic colors will make an interesting rug in the shape of flowers or a clearing. If the fabric is thick and dense enough, you can even do without filler or use very little of it.
Rug "Polyanka"
Rug made of pompoms in the shape of a leopard skin
The manufacturing algorithm is the same, with minor nuances.
| Step, no. | Description |
| 1 | We cut out a base from the fabric in the shape of the future rug. From working fabric and scraps we cut out rounded oval and round shapes to create “stones”. We make them quite large. |
| We bend the edges of the blanks inward and sew them on the wrong side. If they are not voluminous enough, put a little synthetic padding inside. |
| 3 | We prepare the required number of parts so that they fill the entire area of the cut base. It is advisable to make “pebbles” of different textures, shapes and sizes to make the rug look more natural. |
| 4 | We lay out the blanks on the base in the required order and sew the adjacent ones together. |
| Sew the “pebbles” to the base fabric. |
| We especially carefully fasten all the parts around the perimeter of the rug together. |
| We cut out the backing from thick fabric according to the size of the resulting product, making small allowances for the hem. And we sew them together along the edge. |
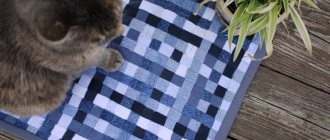
How to make a rug with your own hands from threads without a hook, without knitting needles?
Knitted rugs look cute. You can knit square, round or oval rugs. Options in the form of owls or the faces of various animals are also possible. These rugs are suitable for a child's room, the baby should like them. Some people like delicate openwork rugs.
However, if you do not know how to knit, you can make a rug from threads without a hook and without knitting needles. To do this you will need:
- Yarn of various colors and thicknesses
- Scissors
- Large sheet of cardboard
- Scissors
- Felt pen
- Ruler
Thread rug master class:
- Draw a circle of any diameter on cardboard. In the future, your mat will be the same size as this circle.
- Using a long ruler and marker, break the circle into sections. There should be 60 sections in total.
- Make a 2cm cut on each line.
- Fix the thread in the center of the circle. Then pull the thread through and insert it into the cut.
- The next time you pull the thread on the opposite side. So stretch the thread along the entire marking.
- At the end, secure the thread.
- Then start cross weaving according to the 2x2 pattern; in the photo you can see how to pull the thread. There should be a thin yarn in the center, since the carcass threads are placed very tightly here.
- Continue weaving until the end. In the middle of the weave, switch to a 2x1 pattern, at the end of the weave - 1x1. Since the distance between the frame lines will expand, you can use thick yarn.
How to make a rug from threads without a hook: step 1-4 How to make a rug from threads without a hook: step 5 How to make a rug from threads without a hook: step 6-9 How to make a rug with your own hands from threads without a hook and without knitting needles
Rugs made from patchwork corners
This method is suitable only for craftswomen who are good at machine sewing.
Rug made of triangles
To make such unusual and very beautiful rugs you will need scraps of fabric of the same density.
| Step, no. | Description |
| 1 | We cut identical squares from the fabric with a side of about 10 cm and fold them twice diagonally. |
| We pin the resulting corners to the fabric, forming the middle of the rug. And we attach them along the edge using a typewriter. |
| We lay the next row so as to close the seam, shifting the corners relative to the ones already hemmed. |
| 4 | Having sewn the second row, we form the third and subsequent ones in the same way, gradually expanding the circle. |
| We attach the last row close to the edge and finish it with bias tape. |
In the example described, the corners of the patches look into the middle of the rug. But you can do the opposite: start sewing the triangles not from the center, but from the edge of the product, turning them outward. In this case, you will have to decorate the middle with a round patch.
From the scraps you can make not only corners, but also other shapes - petals, scales, beaks, etc.
Beautiful rug in the shape of a flower
Such different rugs are made from scraps of fabric and old things that no one wears anymore. Instead of adding to the amount of waste on the planet, you can put old things to good use, while decorating your home and saving money on buying rugs, pet bedding and kitchen stool covers.
Denim rug Rugs made from old jeans
DIY rug made from wine corks: step-by-step production
Cork corks are an affordable material and very suitable for making floor mats. Cork bark absorbs moisture poorly, so various bacteria will not multiply there over time. It is for this reason that such rugs will fit well into the interior of the bathroom. Also, thanks to the texture of wine corks, it has a massage effect on the feet.
In order to make a small rug from wine corks, you should prepare at least 200 wine corks. If you don't have that many cork stoppers, you can buy them at home improvement stores and craft stores. The price of cork plugs is low, so making a rug will cost you less than buying a ready-made one.
In addition to cork plugs, you will need other tools:
- Rubber or silicone mat;
- Sharp knife;
- Glue;
- Sandpaper.
Step-by-step production:
- Cut each cork into two pieces.
- Sand the part of the cork that will be adjacent to the base with sandpaper.
- Place all the corks as they will be placed on the mat. This way you can determine the required dimensions of the base.
- If necessary, cut the rubber or silicone mat to the desired size.
- Start gluing the corks to the base from the outer edges of the rug to the center.
- If drops of glue protrude, immediately remove them with a napkin. This way your rug will be finished neatly.
- When all the plugs are glued, leave the mat to dry completely.
Important: To make the mat waterproof, treat it with additional sealant. In the future, you will need to periodically dry the rug in the sun if you place it in the bathroom.
In the process of gluing the corks, you can lay out a checkerboard, transverse pattern or stick the corks in the same position.
Do-it-yourself rug made from wine corks: step-by-step production Do-it-yourself bathroom rug
If you don't want to waste time gluing each cork, there is an easier way. To implement it, you will need a container or box with the height of the sides similar to the height of the cork. This container must be filled with plugs, placing them vertically. The plugs must be placed very tightly to each other, only in this way will the rug be functional. The number of plugs is difficult to unambiguously calculate; it depends on the size of the container.
How to quickly and easily make a rug from wine corks
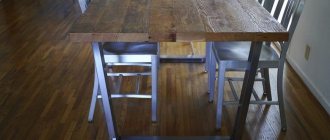
Carpet in the interior: classic or modern solution?
If you still doubt whether the carpet will suit your interior, we recommend looking at a selection of photos.
Materials and their properties for a homemade rug
The materials used depend solely on the imagination and practical skills of the master, for example:
- multi-colored yarn;
- polymer twine, sisal;
- rope made of jute or hemp;
- belts made of leather, faux leather, textiles;
- pieces of towels, jeans;
- nylon tights;
- knitted T-shirts, cut into strips;
- clothing labels;
- remnants of artificial fur;
- champagne and wine corks;
- plastic bottle caps;
- sea, river pebbles;
- beer can caps;
- LED Strip Light;
- colored shreds;
- plastic bags;
- plastic bottles, also cut into strips;
- wood cuts coated with varnish;
- real moss.
Each of the materials has its own advantages:
- remnants of all kinds of textiles from old T-shirts, pants, tights are found in abundance in every home - they are usually thrown away, and weaving a rug will give such waste a new life;
- knitting threads, small balls of which inevitably remain when making various products, are also unlikely to be suitable for anything - if only for a small rug;
- from caps that can only be returned for meager pennies to a plastic collection point or made into an original product for the bathroom or hallway;
- smooth pebbles, approximately the same size, are also suitable for bedding in the shower, an original door mat for an apartment, a private mansion;
- products knitted from colored threads are placed on the floor in the nursery - it is convenient for children to play on them;
- Wine corks do not absorb moisture, mold and mildew do not grow on them, the material is pleasant to the touch.
Bottle cap rug
Cork rugs are very popular today, in particular, due to their good environmental performance. In addition, this accessory is lightweight and can be easily disinfected if necessary.
To create an original rug you will need several dozen corks, strong glue, a silicone mat as a moisture-resistant base, and a knife. Instructions on how to make an original rug with your own hands:
- All collected plugs must first be washed in warm water and soap (disinfection of the material).
- Each cork is cut in half along the long axis.
- All irregularities should be carefully sanded, for example, with sandpaper.
A layer of glue is applied to the silicone mat, and then the cut corks are laid cut side down.
If you have a sufficient amount of consumables and the proper creative approach, you can even form an original design on the surface of the rug. After the accessory has completely dried, you can apply 1-2 layers of sealant, which will prevent moisture from entering and destroying the rug.