Hi all! The question of faith is individual. It cannot be forced on anyone. But prohibiting faith is also wrong. One of the attributes of faith are divine icons. Since many people pray at home, a do-it-yourself corner shelf for icons will be an excellent solution.
Your own icon cabinet will fully meet your requirements, as well as satisfy requests for appearance, capacity and other parameters.
Yes, it will not be possible to assemble an iconostasis into a house or apartment. But making a shelf is quite possible. I propose to talk about how to make a shrine, and what is required for this.
You can take ideas from the photo. Or collect something of your own, unique, and also original. And then your idea will be copied and repeated in practice.
Location
A do-it-yourself corner shelf for icons must meet certain requirements, as well as Orthodox traditions. Today we are talking about them.
According to Orthodox canons, icons should be placed on the eastern wall. But it is also allowed to install them in a corner. But so that the iconostasis, and in our case the shelf, is directed to the east.
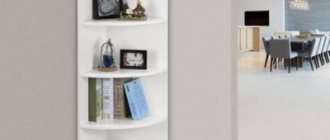
The corner design is small in size. To accommodate all the icons, it should be multi-tiered.
You can complement the product with a back wall, as well as threaded design on it. Usually, tiles, plants, and the outlines of saints are carved there. Some even make shelves with domes. But this is a question of individual skill.
When you have chosen the appropriate shape and size, you can move on to materials, as well as the selection of components for assembly.
Decoration
Depending on the complexity of the elements of decorating shelves for icons, you can make them yourself or purchase them ready-made
The most common way to decorate a home icon case is wood carving. You can do it yourself using a jigsaw. If you do not have the necessary experience, carved elements can be bought at a hardware store or ordered in a workshop. The finished carved plates are attached to the shelf with wood glue.
Soft wood is selected for carving: birch, spruce, pine, aspen or juniper
Another way to decorate is to burn out the ornament using a special device - for this, you first apply a drawing of the pattern to the wood with a pencil. The shelf can also be painted - special wood paints are sold in construction departments. An alternative to strict monochromatic painting is to apply a pattern to the enamel with paint of a different color.
You can burn out the ornament and then open individual fragments of the image on the shelf with enamel
To further strengthen and decorate the shelf, its back walls are covered with a wooden panel. It can also be decorated with carvings, painted with varnish and enamel.
Shelf for icons with a beautiful back wall
To decorate the upper part of the shelf for icons, you can choose the outline of an Orthodox church
When using a plywood board, these methods will not work - but painting with acrylic paint with the addition of gilding will look impressive on such a panel.
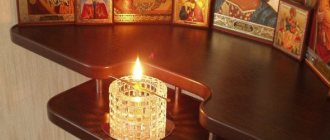
A small figured shelf for icons with candlesticks and a lamp
What is needed for assembly
Traditionally, shelves for icons are made of wood and also of boards.
But in modern conditions, wood materials may be preferred. These are laminated chipboard, MDF, chipboard, plywood, etc. Plywood makes excellent shelves that can be decorated to your taste. Plus the material is easy to work with. It is not difficult to shape plywood to any size using ordinary tools.
Your build kit will consist of:
- any board 1.5-3 cm thick;
- a small sheet of plywood, chipboard or MDF to fit the size of the shelf;
- wood glue for wooden elements;
- sandpaper;
- varnish and paints;
- cutters with jigsaw;
- drills;
- lathe (preferably, but not required);
- hacksaws for cutting wood;
- pencil;
- rulers;
- hinges, dowels, and brackets.
You can decorate a shelf by carving or by imitation. Wood carving is a complex procedure and not accessible to everyone.
Burning out ornaments is much easier. You can use special templates. After burning, individual fragments are covered with enamel. This achieves the desired visual effect.
These are not racks for toys, and therefore the decor should be restrained, and also made according to the canons of Christianity.
Varieties
Shelf for icons “Home mini-iconostasis corner”
In workshops you can order a stand for home icons of any size and configuration, but this is quite an expensive job.
Corner shelf made of fiberboard, made in three tiers
An easier option is to use a regular corner shelf from a hardware store, but this may cause sizing issues. In addition, you will have to look for a model that will “fit” better into the interior. All these difficulties can be avoided if you make a shelf for icons yourself - this is quite feasible even with little experience in carpentry.
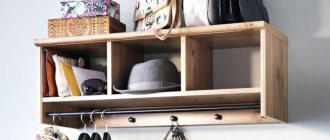
Wall-mounted corner shelf for wooden icons
A do-it-yourself icon shelf can have any convenient design. Corner shelves are made single-level or in several tiers. To connect several levels, supports carved from wood are usually used. The finished shelf is often decorated with carvings, openwork overlays, and covered with special carpentry varnish and wax.
Small corner shelf for icons, two tiers
DIY home iconostasis
Making elements of the future shelf
The future do-it-yourself corner shelf for icons consists of several elements. Namely from:
- side panels;
- shelves;
- racks;
- sides.
Determine the dimensions based on what shape you have, as well as where the structure will be located.
It can be straight or angular. Today we are interested in the second option. Although straight shelves are easier to make. As is the case with wall flower shelves.
Manufacturing stages
Carved corner shelf for handmade icons with a drawing
Before starting work, you should make a drawing of the project. The size and number of shelves depend on the type of icons that will be placed on the finished home iconostasis. To make a simple two-tier shelf, you will need two 1.5 cm thick pine boards, as well as four supports.
- Using a marker or pencil, the drawing is transferred from paper to wood. The sides adjacent to the wall should be at right angles to each other. The outer edge can be straight, semicircular or curly.
- Using a saw and jigsaw, parts of the future product are cut out according to the drawing.
Let's start assembling
See also
Standard sofa sizes: which one will suit you
Experience has shown that assembling an icon rack is somewhat more difficult than making a book holder. But anything is possible if you put in the effort.
The homemade shelf considered as an example will be based on fiberboard. Affordable and easy to process material. At the same time, it is quite reliable and durable.
The sequence of work will be as follows:
- Using a pencil and ruler, transfer the dimensions of the figure in the form of a right triangle onto a sheet of fiberboard. Use ready-made or your own drawings as a basis. It will be easier. I don’t recommend assembling and cutting by eye. Nothing good will come of it;
- The approximate dimensions of the figure will be 280x280x380 mm. You can use other dimensions;
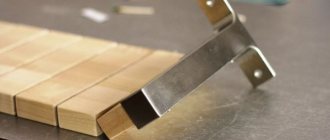
- Using a jigsaw, preferably an electric one, cut out the shape along the drawn contour, and carefully sand the cut areas with sandpaper;
- Now you will need a sheet of veneer. It is better to take veneer with an adhesive layer and decorative film. Or additionally buy hot melt glue;
- On a sheet of veneer, draw a triangle of a similar shape. You can also cut with a regular sharp knife;
- Remove the protective film from the veneer sheet and glue the element to the chipboard triangle. For this you will need a hot iron;
- By analogy, make the required number of shelves. They will fit into the corner of the wall, and thereby repeat its shape;
- To connect the shelves together, use jumpers. They can be part of the connection elements, as well as additional decor;
- It is also advisable to provide sides on the icon panel. This will protect the icons from possible falling.
Decoration is at your discretion.
You can simply coat it with varnish or paint. Some apply patterns, draw or burn something, and also open it with colorless varnish. There are many options.
I think you won’t have any problems installing it on a wall in a corner of the room. It is enough to fasten a couple of hinges on the side parts of the shelf, then make holes in the walls, insert dowels, and tighten the screws. But this installation is completed.
Required materials and tools
To make a corner shelf, wood of various decorative species is used - for example, oak or cherry. A less expensive material would be pine board. In addition to wood, you can also use plywood or chipboard. The thickness of the board can vary from 1.5cm to 2.5cm. You will also need boards of small width in order to carve the supports.
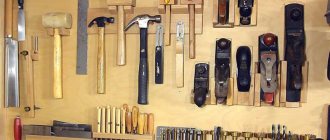
To work you will need the following tools:
- tape measure or ruler;
- hacksaw;
- sandpaper for wood;
- electric jigsaw;
- electric drill;
- self-tapping screws;
- wood glue;
- wood varnish.
Required Tools
To attach the finished shelf to the wall, you will also need masonry drills, metal corners or hinges, and self-tapping screws with dowels.
What to put where
See also
Furniture mortise lock: which one to choose, how to install it yourself
The question is purely religious. But I understand a little about it. That’s why I want to give you some advice.
If we proceed from the traditions of the Orthodox Church, then the corner icon stand should have 3 shelves. These are 3 rows, each of which has its own meaning.
There is a sequence in which the icons are arranged on these tiers:
- An icon of Jesus is always placed on the top tier. To her left should be the Mother of God, and to her right John the Baptist. If there is enough space, then on the left there will be an icon depicting Michael, and on the right, accordingly, Gabriel;
- Space on the middle shelf is reserved for holiday icons. Here they place images of the most significant holidays in the life of Orthodox Christians. In theory, there should be as many as 12 of them. But if there is not enough space for everyone, then choose at your own discretion;
- The lowest tier is reserved for holy faces associated with the residents of this house or apartment. That’s why the bottom shelf is called local.
What is most interesting is that it is the corner structures that are more consistent with the canons and traditions of the Orthodox Church. After all, the icon is located in the so-called red corner.