Recently, in the interior design of apartments, special attention has been paid not only to beauty, but also to functionality, and the ability to properly use space. A corner shelf in a room is an excellent solution that will not allow a single centimeter of free space to go unused.
This detail can easily be used in every room. A wide selection of materials and various design variations allow everyone to choose a practical option for a modern interior.
Corner shelf in the room
Tools and materials
At different stages of the work you will need materials and tools for drywall. The raw materials must be carefully prepared so that the process can proceed without interruption.
| Work stage | Tools and materials |
| Drawing up a drawing diagram | Paper. Pencil or pen. Ruler or tape measure. |
| Surface marking | Plumb or level. Laser pointer for measuring differences. Corner for marking profile joints. Pencil or marker. |
| Assembly and installation of the frame | Profiles (guides) for complex structures that carry a large load, rack-type profiles will also be required. Self-tapping screws for drywall of the selected diameter. Screws and screwdriver. You need to buy a knife or metal scissors. |
| GKL sheathing | Plasterboard sheets of selected diameter. Drywall knife. Screwdriver and screws (self-tapping screws) for fastening profiles. |
| Sealing joints between sheets | Putty (dry, which needs to be dissolved or a ready-made mixture). Special reinforcing tape for sealing joints. Putty knife. Sandpaper for smoothing out uneven surfaces. |
| Finishing | Paint. Wallpaper for gypsum boards. Primer mixture. Putty knife. Glue. |
Having acquired all the above materials and tools, the process of creating corner shelves will be easy and quick.
Materials for making a corner shelf
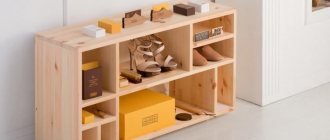
Such shelves can be made from different materials, and here you need to take into account the interior of a particular room. Somewhere shelves made of fiberboard look great, in another place homemade solid wood with antique processing will fit well into the style of the room, but our MAKE company offers a shelf made of a window sill profile (18-25 mm thick). This material will not create problems in operation, it is easy to clean, does not fade under the sun and is not susceptible to rotting.
To do the work yourself you will need:
- — Window sill profile (inexpensive, easy to buy),
- — Drill, screwdriver, level and hacksaw,
- - Several self-tapping screws,
- — A wooden strip and glue for fixing it with plastic.
Why is it better to make shelves yourself?
When choosing the most original or classic design for a future product, many are faced with the problem of realizing their idea. Of course, you can buy a shelf you like or a whole set, but you should appreciate all the advantages of creating them yourself:
- saving your own time, to find the desired shape and design, just select a sketch and get to work;
- the possibility of using inexpensive and high-quality materials, remaking old furniture from durable or treated wood;
- creation and implementation of exclusive projects, while the cost of making them to order can be very high.
The creative process does not require special tools or the unique skills of a carpenter with extensive experience.
Stylish shelves created with your own hands carry a piece of the master’s soul and, with the right choice of ideas, will excite the imagination of guests at home for a long time.
The best way to decorate your home and increase the functionality of the interior is to use small furniture forms.
To create simple shelves with your own hands, you will not need instructions, and after completing simple projects, you can begin to create complex furniture masterpieces.
Wall-mounted corner shelves.
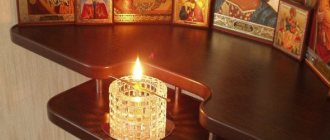
We will make corner shelves with our own hands for all corners of the room at once. They can be used as corner shelves for speakers, candle holders, flower vases or anything else.
If you have already made a wall shelf for your equipment or hung your TV on the wall, then corner shelves will be an excellent addition to your interior.
In my case, decorative candlesticks are located on two shelves, and the rear speakers of the audio system are on the second.
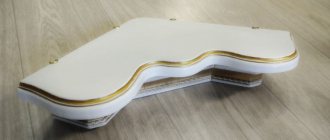
To make corner shelves, we will need a piece of laminated chipboard to match the color of the interior, preferably to match the color of the interior doors. If you decide to make four corner shelves, you will need a square of approximately 680x680mm or another size at your discretion. In addition, you will need an edge, preferably vinyl rather than melamine. Tools – jigsaw. First, one secret - do not trust builders and do not believe that the corners of your room are 90 degrees each. It may turn out that one pair of diagonally opposite angles is acute, and the other is obtuse. This is what happened in my apartment. This should be taken into account when marking the sheet.
After the sheet is marked, it must be cut into 4 parts. Then carefully cut out the rounded edges with a jigsaw. We use a saw with a fine tooth so as not to crumble the laminate.
Please note that we will not have any waste. The part that is cut off from the outside will be the stand at the bottom. After cutting out the blanks, use a low-heated iron to glue the edge. After this, using screws, we assemble the upper and lower parts, having previously made and attached fasteners to the shelf.
The fasteners are plates with slots. They are screwed to the ends of the shelf with screws. Opposite the slots in the shelf itself, we make recesses for the heads of the screws on which the shelf will be attached.
We hang the shelf on two screws screwed into the plugs in the walls. We mark the places for the screws by laying the shelf in the corner. That's all - the shelf is ready. When hanging a shelf with screws, remember the main rule of a new home - “A screw driven into a wall with a hammer holds better than a nail screwed with a screwdriver” (joke). Such corner shelves are very easy and quick to make. They look quite nice and neat. At the same time, they complement the interior of the room and carry a functional load. If you liked the article, leave the link on your social network. Also see how to make: Shelf for equipment
Leave a comment
Features of a computer desk-rack
When choosing a corner desk rack on which the computer will be located, it should have some features:
- The dimensions of the tabletop should be such that after installing the computer, the distance from the eyes to the computer screen is at least one meter, especially if there is a widescreen monitor. In this case, the gaze should concentrate in the center of the screen.
- If you are using a small monitor, it is advisable to install stands, and for large models - to arrange special niches.
- The correct seating position at the table must be maintained. A shelving table is often used for schoolchildren’s classes, and his posture is still at the stage of formation. The legs should be placed comfortably under the table; for this purpose, it comes with a special crossbar.
- For comfortable work, do not make the product too deep. It’s convenient for all objects to be no more than an arm’s length away, then you won’t need to get up for every little thing every time.
- Modern tables have roll-out bedside tables and various add-ons where you can place speakers, a system unit, or a printer, which will streamline the environment and make work more productive.
Corner computer desk
Interesting wooden shelf. Master Class
You will need:
- Rope;
- Board at least 2 cm thick;
- 2 corners (mounts) for shelves;
- Steel washers;
- Lighter;
- Drill;
- Saw.
Today, even the most modern and fashionable designer does not take advantage of the opportunity to use practical and stylish shelves when decorating the interior. They will not only become an integral part of the future decor, but will also serve as an excellent stand for books (mount for bookshelves), for photos and decorative items.
There are two types of shelf mounting available:
- standard method (using hinged brackets, corners, etc.);
- fastening shelves to the wall without visible fasteners.
We will look at the first method in more detail, since with the standard design it is difficult to achieve a combination of the future interior with the target design.
- Preparation for fastening
- Detailed mounting instructions with photos
Let's consider the process of preparing the fastening
- First of all, you will need to assess how reliable the wall is where our shelf will be mounted. If it is a brick wall, then it should be at least 25 cm thick, and if you have a concrete wall, then from 10 cm, which will allow you to place not only decorative elements on the shelves.
1 – fastening element;
2 – holes for installation;
3 – metal rod;
4 – hinged bracket;
5 – shelf.
2. After this, we move on to determining the thickness of the future shelf.
To do this, you must know exactly what will be placed on the shelf so that there is no deflection or deformation. You can check this simply by taking a board of approximate thickness and placing a weight on it.
- If the interior concept requires thicker boards, then in this case everything should be used according to the recommendations of your designer or the chosen style.
- You will need to take into account the mounting features, since the thickness of the shelf cannot be less than 3 cm. If books are placed, it is better to use a thickness of 4.5 to 6 cm.
- The future shelf will need to be thoroughly dried and soaked before processing.
How to install shelves to a wall without visible fasteners
Step 1. Measure the distance between the holes.
Step 3. After this, we apply our fastening element to the resulting axis and mark holes for it, which should be located on a horizontal line.
Step 5. After this, we clean all the holes from any remaining shavings and dust and drive wooden pegs or plugs under the dowels.
Step 6. After this, take dowels or screws and screw the fastening element to the plugs or pegs.
Step 7. After this, we proceed to installing the shelf itself on the fasteners. If the shelf does not fit very tightly, you can tap it with your palm or a rubber hammer to securely fix it. It should be noted that you need to knock alternately on the left and right, this way you will prevent the shelf from skewing and it will sit evenly on the fastening element.
The problem of free space is always relevant, especially for small apartments. What to do if you want to place your favorite books or children's crafts? Corner shelves will help out.
Almost always in the apartment there is an unoccupied free corner in which a rack or small shelf would be perfectly located. This will free up some space and also add a new decorative element.
Stylish corner shelves photo
The kitchen, bathroom and hallway are the most problematic rooms in the house in terms of the need to store a large number of small items. Thick floating shelves are already a fashion trend, but open corner shelves are also a huge space saver and make the room look freer.
In the hallway, corner shelves can simultaneously serve as a stylish clothes hanger or a stand for bags and shoes.
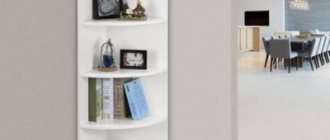
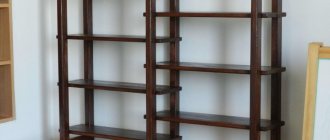
Tall and narrow floor-mounted corner shelves can look very elegant even with the simplest decor.
Also read:
At the same time, some corner shelves can have a very stylish and original design that will catch your eye and transform the entire shape of the space.
Also read:
In the last photo you can see how corner shelves can act as a home office (left) or a simple decoration for the living room. And the following images show you some truly amazing corner shelves that line the corners between walls in hallways and other spaces.
We hope that after these photos you no longer doubt that corner shelves can help make your interior design more functional and interesting. It remains only to note that beautiful corner shelves, like any piece of furniture, can be made by you yourself (see photo below). Thank you for reading Dekorin!
Corner shelves in the interior allow you to optimize the use of space in the room, expand its functionality and increase ergonomics. The space gets rid of massive furniture, which adds more volume and functional practicality to the structure of the room.
Home design using corner furniture designs looks aesthetically pleasing and adds style to the decor of the room.
On the corner shelves it is possible to successfully place non-bulky household appliances, dishes, books, souvenirs, paintings, photographs and other small items. Thus, corner shelves effectively solve the problem of placing things in a limited space of the home.
Creative idea - semicircular product
Racks come in various configurations and designs. They also have a complex or simple design scheme, it depends on the purpose and place of use. Designers often use it to create a minimalist style. A semicircular shelving unit with a corner design is not difficult to assemble. Installation of a semicircular rack requires a certain number of identical blanks with rounding - parts of a radius rack.
Step-by-step instruction
- An ordinary board left over from the renovation will be suitable as the main material. The width should be selected individually, based on the items that will be placed on it and the place where it will be installed.
- In addition, for fastening you will need glue with a dispenser and screws (3.0x25 mm). Semicircular slats can be used as decoration.
- We mark the board at a 45° angle to the required length and use a hacksaw to cut it at an angle of 45°. As a result, we get 4 shelves.
- From the remains of the board you need to cut out racks of the same size (for example, 5x20 cm) in the amount of 6 pieces.
- All elements should be sanded until perfectly smooth.
- Let's start assembling the structure. Each shelf, except the top one, must be secured with two racks. The markings are applied in the middle, then the elements are fastened with screws. To strengthen the fasteners, use PVA glue.
- For ease of fastening, the middle shelf posts are placed along the edges.
- The remaining parts of the corner shelf are assembled in the same way.
- If you wish and have free time, you can decorate the shelves using semicircular slats. So, with their help you can make low handrails so that small or round accessories do not fall out. At the final stage, the shelf is painted.
Book shelf
On the Internet you can find a huge number of photographs of book shelves. But the execution algorithm is more or less the same for everyone, it only differs in the addition of new modules.
Take, for example, the type of labyrinth. We take standard tools. The marking is done exactly as described earlier. Trimming headers is a bit more complicated. All boards are cut at a 90 or 45 degree angle, whichever you prefer.
If you decide to do the second option, then be sure to use a miter box to make symmetrical cuts, otherwise you will not achieve the desired result.
Place corner shelves in different rooms
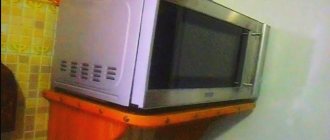
You can install a corner shelf in any room, but in most cases it is great for the kitchen or bathroom. Any housewife will quickly place on it a variety of jars with seasonings, cereals and other kitchen utensils, and in the bathroom such a shelf near the mirror will allow you to accommodate all hygiene products and free up the necessary drawers. It is worth noting that these rooms have a fairly high level of humidity, which means that the wood will need to be additionally treated with antiseptics and at least two layers of paint applied. The best option would be plastic or glass, as they have more advantages:
- resistant to moisture and temperature changes;
- mold and fungi do not appear on surfaces;
- withstand heavy weight;
- easy to clean;
- A variety of colors will allow the design to fit into any interior.
Also, corner shelves on the wall are a rational option that is suitable for bedrooms, children's rooms and living rooms. Any other furniture can be placed under the shelf, for example:
- nightstand;
- computer desk;
- armchair.
Regardless of what material was used, the design will look impressive and presentable. The corner shelf will conveniently accommodate all sorts of little things: books, photographs, dishes, candles, toys and much more.
Corner shelves in the interior
Shelves with corner mounting to the wall are installed in all types of residential and office areas. In the dining room mezzanine, it is advisable to install it directly near the working area and use it to protect kitchen utensils: dish sets, containers for bulk substances and seasonings.
The lightness and convenience of the design of corner shelves makes them a good alternative to corner cabinets. On the one hand, room space is saved, on the other hand, beautiful dishes, souvenirs and other interesting items are located in an accessible and open place for viewing.
Corner shelves are indispensable for decorating a workspace in a home office or office. The shelf of this model will successfully fit into the business interior of the room, filling the free corner space. This allows you to concentrate the things necessary for work in a limited area.
In places with limited space, this furniture layout is an ideal solution. The design of the room, complemented by a corner shelf, creates an excellent environment for relaxation and intellectual time spent reading books. The furniture corner can be decorated with flowers, which are best placed on the top floors of the structure. This greatly refreshes the room and adds coziness and sophistication to the atmosphere. Shelves placed in the corners are relevant in the design of book depositories in homes.
Corner shelves are not only compact and practical, but can also amaze with their stylish and aesthetic appearance.
Beautiful and original bookshelves will create coziness and comfort in the family library, demonstrating the sophistication of your taste and creative imagination. Unusual corner bookshelves, in addition to storing books, can be a wonderful decoration for the interior of a library.
Benefits and Features
- The corner shelving unit has a very important quality; it fits perfectly into a small space without overloading the interior.
- For a large room, the structure of the corner shelving will add the necessary originality.
- The simple structure of the design in combination with many different shelves makes the product special.
- Basically, designers use shelves with racks in “minimalism”. Use in modern and high-tech styles is also no exception.
- You can place shelving structures in all rooms of the house. In kitchens, structures are used as food storage areas.
Manufacturing process
The wall-mounted corner shelf will serve for all small accessories that constantly fall: keys, lipsticks.
You can consider the option, if, of course, space allows, to make several shelves on top of each other. This will more compactly distribute the location of various small things. At an angle of 45°, measure the distance on a wooden board, which will be equal to the length of the corner of the wall where the wall-mounted corner shelf will be installed.
Using a hacksaw you need to cut out the body of the future design. You can also use an electric jigsaw. After cutting, the edges of the shelf need to be cleaned using sandpaper. Cleaning is carried out until roughness is completely eliminated.
The next step is cutting the racks for the corner wall shelf. If it is one shelf, then two slats need to be cut. The slats should be small, the width and length should match the length of the shelf. In order to prevent anything from falling from it, you need to make sides out of slats. They may look like balcony railings.
Tools needed for work: hammer, hacksaw, sandpaper, universal screws for fastening.
The next process is installation on the wall. Two thin slats need to be nailed to the wall. If the wall is tiled, then you need to use a drill and dowels. The slats are the basis or fasteners for the corner structure. You need to connect the body of the structure with the slats with glue. After coating the top edges of the slats with PVA, place the shelf on them. You need to wait a day for the structure to dry, or use liquid nails for a quick connection.
To give an aesthetic appearance to the wall corner structure, you can paint it with gold paint. If you plan to create several (standing on top of each other) shelves, then this process will require additional cut racks. That is, the arrangement of wall-mounted corner shelves is as follows: the base of the shelf, and two racks on each side. The next base is placed on four posts. The next level requires only two racks. And so on. The number of racks for stability needs to be changed each level. The wooden components must be connected to each other using glue and nails.
https://youtube.com/watch?v=7iL8HE0ZMSg
This corner wall design will serve as a home for all the small items that constantly fall: keys, lipsticks; in the bathroom - shampoos and toothbrushes.
Another type of corner wall structure can be made with your own hands. To do this you will need to use an MDF sheet, a milling machine, a jigsaw, a drill and drill bits, and self-tapping screws. You need to cut a circle from an MDF sheet, having decided on the size in advance and dividing it into equal 4 parts. After the circle is cut out, it is cut into equal parts. That is, it will turn out that two sections of half a semicircle will be adjacent to the wall. The third section is the base. The fourth is a mini-shelf in this structure.
The size of the mini-shelf must be calculated when the structure is already assembled. Then you need to connect the built-in mini-shelf to the base using nails or screws. It is also possible to use liquid nails, but in this case you will need to wait until the structure dries. After all work is completed, the product must be painted for aesthetics. It is attached to the wall using dowels and screws. It turns out a beautiful and stylish corner shelf, made by yourself.
Marking
To correctly calculate the size you need, you will simply need to measure the depth from the corner and along strictly along the wall. This indicator should then be multiplied by 2, and only then add 5 cm. The last indicator of 5 cm is done so that there is a good margin for processing, that is, for the actual trimming of the product. A simple example is given, from which it will be easy to understand how to correctly calculate such important and such simple dimensions of a future product. Let’s say measurement number one turns out to be 20 cm. These 20 cm must first be multiplied by 2. After multiplying, you get 40 cm. Now, to the data of 40 cm, add 5 cm. The result is a measurement of 45 cm. This is the sheet you will need to create a shelf.
Now how to get such a leaf. You can cut it yourself or simply order it from a special store.
How to choose a corner shelf
The choice of corner shelf depends on the size of the room. If there is enough free space, the shelves can be installed anywhere in the room, without particularly thinking about the method of fastening. If there is a shortage of space in the room, it is advisable to use corner structures for attaching racks and shelves. They can be placed in any suitable place, even placed above the furniture standing in the same corner.
Corner shelves with lighting elements will look great in the living room
This constructive solution visually divides the space and focuses attention on certain areas of the room.
Shelves arranged in a chaotic manner look good, but this option requires a thoughtful design.
In a children's room, a corner furniture structure in the form of a shelf will effectively solve the problem of optimizing the play space for a child. Decorate your baby's room with educational details and visually expand the space, making it more comfortable.
Corner shelves are also appropriate in the bedroom. They have a decorative purpose and reflect the individual taste of the owner of the home. Wooden shelves are better suited for a bedroom.
Main varieties
If you decide to functionally use the corner area by choosing a corner shelf for it, you should carefully study the types of structures. There are a large number of them. The simplest ones consist of 2 supporting parts and a board screwed to them on top. Even a novice craftsman can create such furniture with a set of simple tools at hand.
Table 1. Types of corner shelves
| Variety | Description |
| It is distinguished by the presence of three supports on which horizontal parts are firmly fixed. Externally, the bookcase looks light and elegant. Can be complemented with openwork carving. |
| Niche | It is advisable to install it in internal corners. When designed correctly, it becomes a harmonious recess in the wall. Most often, plasterboard sheets are used to create niches. The material attracts:
|
| Many people choose this type of design because it is easy to install on the outer and inner corner of the wall. The shelf is distinguished by the absence of vertical posts; each tier is separately attached to the wall. This creates the effect of lightness and airiness. |
| Decorative | It differs from other species by the presence of its own walls on the sides. They not only represent an attractive decor, but are also load-bearing elements. |
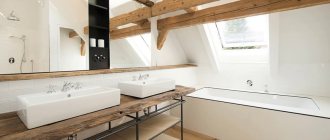
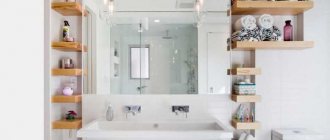
Corner shelves for bathroom
It's no secret that most bathrooms are small in size, and the issue of saving space is very acute. But in this room you should conveniently place bath accessories, shampoos and shower gels, cosmetics and perfumes, as well as all kinds of detergents for washing and cleaning.
That is why various hanging structures are simply irreplaceable here. The best option is to hang the corner ones on the wall. They go well with mirrors, look elegant and suit almost any bathroom decor. And if you consider that the humidity in this room is always high, then you cannot find a better material for shelves.
Although plastic shelves would be no less appropriate here. Their design consists of a stand, which is installed in the spacer between the edge of the bathtub and the ceiling, and four shelves with perforations (for water drainage). For convenience, the shelves are equipped with hanging soap dishes and hooks for washcloths.
Also in the bathroom you can hang corner shelves on a metal wall. Such structures are usually made of stainless or chrome-plated steel.
Location and purpose of the structure
When choosing the size of the shelf and its type, consider in which room it will be located in the future. It is important to create a complete interior with a functional detail.
The main purpose of the shelf is to optimize space in the house
Kitchen
For the kitchen, it is important that all the necessary items are always at hand, and not hidden in numerous drawers. It is best to use a compact, yet spacious wall design. Wooden models are most suitable for the kitchen, as they create a cozy atmosphere. A variety of designs allows you to choose an option that harmoniously complements the interior of the room.
Not the most practical solution for the kitchen would be models from:
- plastic;
- glass;
- metal
A good alternative to wood is decorated gypsum fiber sheet.
In a small kitchen, the shelf has a practical purpose, helping to keep necessary utensils in order.
Hallway
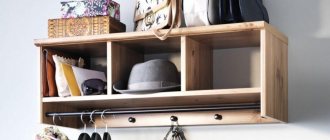
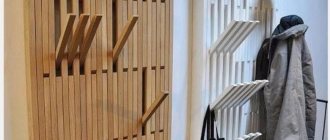
By using an original hanging shelf, you can easily decorate your hallway. Such furniture can easily perform several functions.
- A small shelf is suitable for storing keys and small items.
- The larger design allows you to easily accommodate all your bags.
- The tall design, complemented by figurines, will add sophistication to the hallway.
- The shelf with hooks is easy to use as a hanger.
For the hallway you should choose wooden furniture. Glass, metal and plastic cannot be called practical or universal. Take this into account when arranging the room.
A corner shoe stand will be a functional addition to the hallway
Bathroom
It's hard to imagine a bathroom without a convenient corner shelf on which all hygiene products are stored. Of course, numerous jars can be neatly stacked in a closet, but getting them out of it every time is not entirely convenient. It is better to have them at hand at all times.
For the bathroom they most often choose:
- glass structures with chrome stands;
- plastic shelves with metal racks.
It is important that such an interior detail is distinguished by its laconic execution. This makes it easy to care for, since high humidity in the bathroom causes rapid contamination of surfaces.
Manufacturers make the design as functional as possible by adding hooks, soap dishes
Living room
The living room is an ideal place where you can install a functional corner structure. Reading lovers will use shelving to store their home library. On the shelves you can easily place:
- family photos;
- decorative items.
During installation of the structure, you should definitely consider what load is planned on it. Fastenings must be as reliable as possible. Its size directly depends on the future purpose of the selected shelf. Decorative elements look good on compact models, and for a large library or collection, choose a spacious shelving unit.
Small corner shelves with carvings and shaped wooden details are often used as stands for icons
In many living rooms, wooden or metal corner shelves are used as flower stands. Glass specimens are much less common in living rooms. Designers advise not to clutter the shelves with numerous flowerpots and figurines. This eliminates the feeling of lightness that such a design is intended to add to the room.
In a spacious interior, options installed on external corners look harmonious. More often they are made of plasterboard or chipboard. You can design such an addition to the room yourself, taking into account the characteristics of the place chosen for the shelf.
For a small room it is better to purchase a compact design
Corner shelf materials
Corner shelves made of plastic, organic glass or chromed metal are ideal for the bathroom. The choice of material for making shelves is influenced by the overall design concept of the room. The texture of the material must correspond to the functional purpose of the room.
This makes it possible to individually design a room and decorate certain areas of the home in an individual style. Corner shelves can be decorated with LED lighting built into the structure or small spotlights.
Shelves are fixed to the wall in different ways - hidden and decorative. To decorate corner furniture structures, cables, stones, chains, and textile materials are used.
Despite the fact that corner wall shelves are the simplest furniture design, the role of these pieces of furniture in organizing human life inside the home is great. In addition, they perfectly solve the issue of saving space, increasing its functionality and practicality.
The possibilities of this piece of furniture in decorating a residential or office space are unlimited. For almost any interior, a wall shelf is universal and will organically fit into the space, turning an apartment, office, room with any purpose into a stylish and ultra-modern place.
Shelves in the house are one of the most optimal rational ways to use free space. They can act as a separate design feature and at the same time successfully accommodate many necessary things.
Corner shelves on the wall are especially popular among owners of small living spaces, where you need to place a lot, but there is not enough space. The modern market offers many variations of them, ranging from plastic corner shelves for the bathroom to real works of art in the form of wooden or glass structures. We will now tell you how to use such comfortable and practical furniture in your home.
Corner shelves for the kitchen
We spend a lot of time in the kitchen, so an atmosphere of comfort and warmth should reign here. However, it can be difficult to complement the interior with some decorative items because in the room where food is prepared there is always a lot of kitchen utensils that should be placed in the most convenient way. This is exactly what corner kitchen shelves are for. They help turn wasted space into a very useful department.
In order not to place a hodgepodge, a sugar bowl, a pepper shaker, a set of jars for seasonings, spices, cereals, a vase with fruits or sweets, and much more all over the desktop, it is enough to install a multi-tiered wooden corner shelf for the kitchen on the wall, and all this will be collected in one secluded place. You can also store large vases, bowls, flower pots on it, it looks very original and modern. It is very convenient to use corner shelves made of plasterboard. They need to be “built” manually, but the result is pleasantly pleasing because such a design can serve as a corner shelf for a TV in the kitchen, and just a place to place kitchen figurines, candles, paintings, children’s crafts or favorite photos.
Corner shelves on the wall for the living room
When choosing shelves for the most important room in the house, it is very important to take into account the overall style of the interior. Made from wood or chipboard in a trendy dark brown wenge color, corner shelves will give the room a feeling of luxury.
They blend harmoniously with furniture of the same color in the living room or study. A multi-tiered white corner shelf can also become a light, unobtrusive decorative element in the living room. Both options are suitable for storing family photos, lamps, awards, decorative items, books, magazines, etc.
Corner shelves for flowers
This piece of furniture is very popular among all home “amateur gardeners”. Corner shelves for flowers are made mainly of metal, wood or chipboard. Forged shelves attract with their flexible lines, original shapes and are able to support the largest pots of greenery. Wooden
103583
Characteristics of materials used
Furniture departments offer a wide range of shelves, which are made from a variety of materials. When choosing a specific name, it is worth starting from the three most important factors.
- Operating conditions for the presented design.
- Stylistics of the room.
- Future load on the shelf (the design may have a decorative or functional purpose).
Be sure to analyze these factors, and then make your final decision.
It is easy to place indoor plants and decorative items on a multi-level structure
Table 2. The most common materials from which corner shelves are made
| Material | Description |
| Natural wood | Instances made of wood always look expensive. The use of rare breeds is not widespread due to the high cost of the product produced. Such a shelf should completely match the style of the room. The designs look elegant:
|
| MDF and chipboard | The presented material has a number of advantages, which include:
|
| Plywood | An affordable sheet material consisting of layers of wood veneer that are glued together. Advantages of plywood:
|
| Plasterboard and gypsum fiber sheets | Many people prefer to make their own shelves from plasterboard. This allows you to create a design that matches the interior of your home. It should be remembered that the material used does not withstand high loads. Therefore, heavy objects cannot be placed on it. If the design is being developed for the kitchen, it is necessary to use a moisture-resistant gypsum fiber sheet. |
| Plastic | The presented material is in most cases used for bathroom shelves. It has undeniable advantages, including:
|
| Glass | Glass options are highly valued in interiors where there are no clutter. The material creates an airy effect. The proposed designs fit harmoniously into the interior:
|
| Metal | Few people use metal shelves for home design. Its main advantage is strength, but heavy weights are rarely stored on such structures in the house. They are more suitable for:
|
DIY shelves, varieties of designs and interesting ideas for use 115 photos
Light, neat, interesting wall shelves, which are an excellent alternative to bulky cabinet furniture, will be an excellent decoration for any interior. Assembled from specially purchased ready-made blocks, or made from scrap materials available in every home, these products will bring comfort and originality to any room.
Beautiful shelves will find their application in any room of the apartment, be it the kitchen, living room, bedroom, hallway or bathroom. With their help, the room will look more lived-in, interesting, and there will be additional space for storing any useful items.
A shelf for heavy objects, for example, books, an aquarium, collectible dishes, potted plants, should be as reliable as possible, made of solid materials.
Therefore, before starting the process of designing a shelf, be sure to consider the following details:
- full load on the structure;
- fastening method;
- compliance of the materials used with the purpose of the room in which installation is planned;
- product style and design;
- functional.
When wondering how to make a wall shelf with your own hands, first decide which type of future design will be more suitable for the chosen room and will fully correspond to the assigned functions and your preferences.
Based on design features, shelves are:
- closing and fully open;
- linear and L-shaped;
- with or without side fencing elements;
- through, or with a rear limiter;
- single-tier or having several levels;
- round and rectangular;
- unusual shape, steeply inclined, diamond-shaped;
- limited on all sides or consisting of one base, etc.
If you pay attention to the materials used for manufacturing, then wall shelves can be:
- glass;
- with mirror surface elements;
- wooden;
- made of MDF, chipboard, plywood;
- polymer and plastic;
- combined - using several types of raw materials.
Think about which materials will be most preferable for constructing a shelf yourself, more wear-resistant and reliable, and choose an option that suits you with all its characteristics.
After studying numerous photos of shelves made by yourself, you can choose the option that best suits your taste and take it as a sample, try to make the most similar design, adapted specifically to your apartment.
It is best to adhere to the following algorithm of actions:
Draw a rough sketch on paper, indicating the planned dimensions of the shelf, or even better, a full-fledged sketch of how the future shelf will look on the wall, indicating its dimensions.
Decide on the type of fastening, whether it will be construction dowels, anchors, brackets that can withstand heavy loads, or whether the shelf will be attached to a flexible base, for example, flagella, braided ropes, belts - these fasteners are only suitable for lightweight ones used primarily as a decorative element , shelves
Cut the materials to the required sizes, or, if using store-bought blanks, prepare them for assembly. Proceed with the immediate assembly of all parts and components, attach brackets, hinges or other prepared fasteners to the shelf.
Make horizontal markings on the wall surface to ensure even mounting to the wall. Attach the finished structure to the place allocated to it, check the strength of the structure.
The process of making a shelf with your own hands has come to an end, now all you have to do is display your favorite collection on it, lay out a set of books or any other items for which the shelf was intended.
Shelf with straps - to assemble it you will need two flat boards and two strong leather straps.
An invisible bookshelf - you will need several steel brackets on which the books are placed. Looking at this design, it seems that the books are simply floating in the air.
A wall shelf made of water pipes will be an excellent decoration for interiors of special styles.
Floor shelf made using glass bottles and base boards.
There are a huge number of variations in the design of wall shelves, because such a piece of furniture can be made from almost any material at hand. Turn on your imagination and begin the creative process of creating an unusual, aesthetic and functional piece of furniture.
Final decor of the rack
The finished structure must be painted. Of the various options, the simplest are coating with water-based acrylic paint or varnishing the product.
The advantage of acrylic paint is that it dries quickly and has virtually no odor. It can even be used indoors, although the room will still need to be ventilated. Varnishing is preferable if you want to preserve the structure or slightly tint the surface of the wood. Clear or tinted varnish to resemble oak, walnut, ash and other wood species should be applied two to three times. Each new layer is applied after the previous one has dried.
Before painting the rack, it is necessary to prime the surfaces to be painted, unless two-in-one paint is used. Priming the surface will ensure a good result and will ensure that the paint does not peel or crack over time. If you intend to paint with oil paints, it is recommended to do this in advance outside the living space. We bring all painted parts into the house for subsequent assembly only after complete drying.
So, once the shelving unit is assembled and painted, you can stand back and admire your work. However, your furniture will look more presentable when books, figurines, framed photographs and other household items for which it was made appear on the shelves.
Source
Original do-it-yourself shelves, how to make book shelves, hanging shelves, kitchen shelves 90 photo video
Shelves are often used not only to complement and decorate the overall interior of the room, but also for a clearer and more expedient organization of space. Thanks to their use, the apartment owner has the opportunity to conveniently arrange a huge number of small things that would simply get lost in closets.
Today, there are a lot of different models on the market that are made of different materials. They also differ in design.
You can choose not only products with classic designs, but also ultra-modern designs.
But more and more often people prefer to make such interior details themselves. Wondering how to make a shelf with their own hands, they re-read a lot of literature and look through many catalogs.
However, this does not mean that making a shelf yourself is difficult and is beyond the capabilities of a person who does not have special skills. No, that's not true at all.
In this case, familiarization with the literature is necessary in order to create a product with a beautiful design that will fit into the overall interior. Let's take a closer look at what kind of shelves there are.
The most popular and widely known subtype of shelves is the classic shelf. This is due to the fact that it is quite easy to install, and the appearance, thanks to its simplicity, seems refined and sophisticated.
Both open and closed shelves are used successfully. Closed products are most often used for decoration and installation in rooms decorated in more modern styles. Glass and sometimes plastic are used to construct them.
Open structures can be used both in modernly decorated houses and in apartments with a classic design. Over the past few years, this particular type of shelf has gained enormous popularity and is therefore gradually replacing the classic options.
In small rooms, you can often see corner shelves that have a special method of fastening. They are mounted on adjacent walls that are adjacent to each other. They are most often used in bathrooms, kitchens and utility rooms.
They are installed using cables and vertical posts, and attached directly to the ceiling. This mount looks quite unusual and original.
Floor structures are most often used in hallways. After all, hand-made floor shelves for shoes not only look beautiful, but also help you organize the space of a small hallway. At the same time, making them is quite simple.
To create the claimed product, you should purchase or prepare some tools and materials in advance. As connecting elements, you can use whatever suits you best. But the most popular are ordinary screws, brackets and dowels.
For example, let's take a photo of the shelves with our own hands, which is presented below. It shows a product with the following parameters: width 250 mm, height 300 mm, length 1100 mm. For convenience, the manufacturing process will be divided into stages.
This marking is optimal because the side walls will be located between the two parts.
At the third stage, you can begin processing the resulting workpieces. The resulting sections should be coated with a special protective varnish or stain, having previously sanded them.
If you only plan to paint the shelf, you can get by with treating it with a regular antiseptic primer. This way you will not only increase the service life, but also achieve a more uniform distribution of paint.
At the fourth stage of making a wooden shelf with your own hands, you begin to directly assemble it. The bottom board should be laid on a flat surface. Step back 8 mm from the ends of the workpiece and draw two lines parallel to the cuts.
After this, you should install the side blanks on the lower section of the board and secure them. Once you are done with attaching the side panels, proceed to install the top panel and secure it.
At the fifth stage, you should attach the brackets to the ends of the side panels, and make several holes in the wall for the dowels. After this, screw in the screws so that they protrude by 5 mm. And now your shelf is ready.
Construction tricks: hidden fasteners ↑
All kinds of metal corners for shelves on the wall, convenient brackets, building profiles are appropriate only if they are correctly selected and fully meet the stylistic features of the room. But sometimes technical details do not fit in with the surrounding environment and you have to resort to a trick - use one of the methods of hidden fastening.
Decorative composition without unnecessary details
There are several generally accepted options by which invisible elements provide a tight fit and rigid fixation. Let's look at the three most popular:
The first method is the most popular. Hinged flat hinges are attached to the back side of the shelf, then the structure is suspended on pre-screwed screws. The main thing is to accurately measure the distance between the loops, otherwise the extra holes will “give away” the technical trick and spoil the idea. To level the horizontal, we recommend using a building level.
Modern, formal style
The second method is to string the base of the product onto strong metal pins embedded in a concrete slab or brickwork. The role of pins can be played by pieces of reinforcement or steel threaded rods of the required diameter provided for this purpose. The heavier the product (including potential filling), the more studs will have to be screwed into the wall. To guarantee stability, the cross-section of fasteners for wooden shelves should not be less than 12 mm, the length depends on the conditions.
The third option is to install a block with a square or rectangular cross-section, which subsequently serves as a base. Masking will take place if the thickness of the bar and the thickness of the shelf hung on it match perfectly. The connecting parts between the two surfaces are dowels - wooden pins. To enhance strength, before joining the parts, they are lubricated with glue.
Wall set of three different designs
If your interior design did not include the use of additional visible elements, hidden fittings will help out.
Hanging shelf with straps
If you need a decorative shelf for small items, the following option is perfect - a board suspended on straps.
To make a shelf you will need:
- 2 edged boards 300x750 mm, 30 mm thick;
- 4 leather belts, 75 cm long;
- 4 long screws with plastic dowels;
- 4 short screws;
- building level;
- ruler;
- sharp knife;
- drill.
Step 1: Preparing the belts
The cuts of the belts must be perfectly even, so if necessary they are trimmed with a knife. Fold each belt in half, press the ends to the table, step back 2 cm from the edge and drill a neat through hole with a drill. The same is done with the remaining three.
Step 2. Attaching the straps to the wall
Using a level, two points are determined on the wall at a distance of 60 cm. Holes are drilled and plastic dowels are inserted. The belt folded in half is applied to one of the holes and secured with a long screw - you get a large loop on the wall. Another such loop is attached nearby.
Step 3. Installing the shelf
A sanded board is inserted into the loops and aligned horizontally. To prevent the shelf from moving, the parts of the belts adjacent to the wall near the board itself are screwed with short self-tapping screws. Now another shelf is hung under this shelf, exactly repeating the steps described above. The result is a light and neat two-tier shelf. If desired, you can add another 1-2 tiers.
To make the shelves described above, you can use not only wood, but also plywood, as well as laminated chipboard sheets. The last option is used most often, since laminated chipboard is lightweight, high strength, practicality and durability. When assembling shelves from this material, all sections must be covered with a melamine edge to match the color of the sheet.
Shelf with additional elements
In cases where simple shelves aren't your thing, you can easily make the job a little more complicated. Also, already prepared elements will be useful in the work. The first part remains in its size and it is 20 cm. But the subsequent ones should be slightly reduced in size, and for each subsequent upward part the size will be reduced by several cm. Place the shelves above each other by about 10 cm.
Tip: you can reduce the size of the shelf by using the same pencil and a homemade compass (rope, pencil), just with each new reduction you need to cut the rope by the required number of cm. You can reduce each higher shelf by 3, 5 cm, but it is important to reduce them by the same amount strictly an indicator.