Hello readers of my blog! Today we will talk about how to make a microwave on the wall with your own hands. It would seem that the matter is not tricky, but when you are faced with this problem, you have to think about how to do it correctly, what preparation to do, what materials to choose. Thus, I decided that this article would be useful to someone, and I am devoting my efforts to this subject. In it, I will answer a number of questions that will arise immediately before How to make a microwave oven on the wall with your own hands, and some even after that. This topic is quite broad, because before work, thorough preparation is necessary, but how to do this? And this is a separate topic. You can learn about all this in great detail in the article below.
How to hang a microwave on a wall bracket
Kitchens in small-sized standard apartments do not always allow convenient placement of all the household appliances necessary for housewives. One of the options for a rational solution to the problem would be, for example, a microwave oven located in a suitable place on a hanging shelf. we will tell you how to hang it correctly and aesthetically.
Microwave oven: purpose and dimensions
The electric microwave oven is designed for quick heating, cooking and defrosting of food.
Its size and volume determine functionality and price. Pay attention to the type of heating element - quartz will save energy. In addition, it will ensure the formation of an appetizing crust on the meat.
The dimensions of microwave ovens are different. Therefore, immediately decide on the location of its installation.
If the depth of the device is 30 cm, it will fit in the kitchen cabinet. It is better to place the larger one on the countertop. The most popular model, with a volume of about 15 liters, has a width of up to 50 cm, a length and height of about 30 cm, and a depth of up to 40 cm.
Posting rules
When deciding on the location of the device, you should remember not to block the ventilation openings. If you attach it flush with a kitchen cabinet or other kitchen appliances, dust will accumulate behind them. This poses a risk of fire.
The microwave must be in a stable position.
Place it next to the outlet at a distance of at least 10 cm from the wall. You cannot place any objects on it, since there is often a ventilation outlet on the top panel. If water or small debris gets into the holes, the equipment may “burn out.”
Please note that a magnetic field is created during operation of the device. It can affect the SIM card of a mobile phone, laptop or their charge level.
It is also unfavorable if there are heating radiators or devices that produce steam nearby. It is better to remove electronically controlled equipment at a distance of at least 2 m.
Refrigerators and freezers are also not the best neighbors for her. High temperature will adversely affect their body and disrupt normal operation.
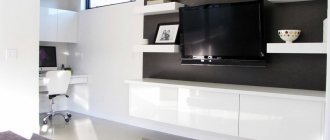
Microwave on the wall: how best to hang it
Such fasteners will immediately solve the issue of unfavorable proximity to the hob surface and other household appliances. A hanging shelf will protect you from small children and save space in the kitchen. Installation on it will provide more convenient access for loading, managing and monitoring the stove timer.
There are different ways to hang the device on the wall.
It all depends on imagination, desire, skill, availability of funds and necessary tools. You can mount it on brackets, on a shelf, above a dining table or work table, or in a corner of the room. You can make all this yourself or purchase it in a store.
These hangers are available in a variety of colors; it’s easy to choose to match the color of your microwave.
These are two steel holders; they are supplied with adhesive-backed rubber linings and plugs. When selecting them, do not forget about the dimensions of the device. The shelf on which the device is installed must support a weight of up to 75 kg.
First, make markings with a pencil along the horizontal line verified using a plumb line. Drive plastic plugs into the drilled holes into which screws are screwed.
Can also be hung on TV mounts. They are sold at any hardware store.
When purchasing in a store, carefully inspect all parts for damage. If you purchase a corner pendant, you should immediately assemble it and then hang it. Use a level when doing this.
DIY microwave shelf
You can make a shelf yourself. This will ensure good ventilation for the microwave, moving it to any place and not “tying it” to the kitchen furniture.
Choose plywood, board or hard plastic in a matching color. You will also need tubes 2.2 cm in diameter and 2.2 m long, 16 metal connectors.
On the horizontal, mark the fastenings of the 3x3 cm flange connectors at the corners. The holes to be drilled are equal to the diameter of the posts.
Rods are attached to them, to which flanges are screwed with self-tapping screws. A clamping screw is used for fixation. It is best to place it facing the wall, otherwise it will be conspicuous.
To maintain the exact shape, four identical pieces of 60–70 cm should be sawn off from the main rod. Then insert the rods into the base and connect the entire structure. Place a hanging mount on the back side.
Skill and imagination will help you make a stand, including a corner one.
Before hanging, it is worth painting your product with three layers of varnish, as it will constantly be exposed to temperature and moisture.
We think that the tips given in this article will convince you of the advantages of wall-mounting a microwave oven and will help you decide on the options for mounting it.
All the work can be done by an invited master. The choice depends on your skills and ability to pay.
How to hang a microwave on the wall
A microwave oven is an almost integral part of every kitchen, but not everyone knows the specifics of its installation. We’ll talk about the types of microwave mounts and the features of this process further.
Making a shelf for a microwave oven
You don’t have to spend money on buying a ready-made shelf, because you can make it yourself. To do this, you need to prepare all the necessary materials and tools. The main material can be either a wooden board or a thick plywood sheet. If desired, these materials can be combined. Next, everything is done according to a pre-prepared drawing of the future product.
How to hang a microwave?
Tools and materials
To make a wooden shelf you need the following tools:
- electric jigsaw or regular hand saw;
- plane;
- ruler, tape measure or other measuring device;
- a simple pencil;
- template for making a workpiece;
- electric drill;
- a special device for drilling material at certain angles;
- carpenter's clamp;
- safety glasses and work gloves.
What Tools You May Need
Most tools can be found in the garage, with the possible exception of a bevel drill. But many masters manage without it. You also need to prepare some materials for work:
- boards or sheets of plywood;
Plywood
- small nails, self-tapping screws;
- wood glue;
- sandpaper with different grain sizes;
- varnish;
- a means for darkening the surface of wood (for example, stain).
Wood glue
Once everything you need is at hand, you can get to work. The process of making a shelf is simple if you strictly follow the recommendations and follow all the rules. Below are step-by-step instructions, following which anyone can do the job.
Instructions
Step 1. Decide on the dimensions of the future product. To do this, you need to take measurements of the microwave and the place on the wall where the shelf will be installed. After this, cut the blanks with a jigsaw to get the details as in the photo.
Diagram of necessary parts for the shelf
Step 2 . Drill holes in the left wall at an angle using a special tool. Corner holes are hidden because they disguise fasteners, giving the wooden structure a more aesthetic appearance.
Holes in the left wall
Step 3. Repeat all manipulations with the other sides of the shelf. All holes must also be angled. When working with an electric drill, be sure to wear safety glasses.
The base of the future shelf
Step 4 . Once all the holes are ready, connect the bottom of the wooden structure to the side walls, after pre-treating the tangent surfaces with wood glue. Then carefully press the pieces of wood using a special clamp.
Side panel
Step 5 . Place the top panel of the shelf on the glue and press it to the main structure with the same clamp. After the wood glue has completely dried, additionally attach the parts using self-tapping screws, carefully screwing them into the corner holes. This will make the structure more durable and reliable.
Top panel installed
Step 6 . Place the back panel against the base and secure it with self-tapping screws. In this case, all the holes are straight, so you won’t have to tinker with the back wall for a long time. In addition, it can be cut from plywood, not wood.
Back panel secured
Step 7. Cut two curved templates from the board, as in the photo. You can set your own sizes. Once the elements are ready, treat their surfaces with sandpaper to eliminate any unevenness or burrs.
Curvilinear templates are cut out
Step 8: Attach the curved templates to the sides of the front of the structure. The fixing procedure is similar: the parts are placed on glue and pressed with special devices.
Curvilinear templates are fixed with clamps
Step 9. After the glue has dried, screw in the required number of screws so that the structure is solid. As you can see in the picture, the templates need to be glued simultaneously to the side and bottom of the shelf.
The result should be a solid structure
Step 10 . Polish the surface of the finished product using a grinding machine, making the surface perfectly flat and smooth. Then cover the shelf with stain and, after it dries, with several layers of varnish. After the shelf has dried, it can be attached to the wall. Of course, to do this, you need to screw special lugs into the back for fixation.
Ready-made microwave shelf
Note! Thanks to the use of a combined fastening method, the finished structure will have increased strength. This is an important indicator, especially when placing such a heavy item as a microwave oven.
Options for placing a microwave oven in the kitchen
For many people, a microwave oven is an indispensable assistant, with the help of which they can warm up or defrost food very quickly. Modern models of microwave ovens are equipped with a large number of functions that increase their popularity.
But it is precisely the owners of small kitchens who have a problem with where to place a rather large device in the form of a microwave oven.
The most common option is to install the microwave on the work surface. On the one hand, no fasteners are required, but on the other hand, the device takes up a decent part of the countertop, making it more difficult to cut and process food.
Another option for placing a microwave oven is a window sill. This is possible when it has a certain size and power to hold the microwave.
In addition, there should be a place for an outlet nearby. Among the disadvantages of this place is the formation of condensation in the winter season, since cold comes from the glass at this time, and heat comes from the microwave oven during operation. In addition, it will not be possible to install indoor plants on the windowsill due to the radiation that comes from the microwave.
If you have a refrigerator that is not too high, the microwave oven is installed directly on it. Although this is also inappropriate, because it heats up during operation, and the refrigerator emits heat.
The most successful option for placing a microwave oven is to hang it using brackets. In this case, the microwave oven is installed on any convenient section of the wall.
Using a hanging shelf is also an excellent option, which allows you to securely fix the microwave oven. The main condition for this type of installation is the presence of free air ventilation, which ensures the operation of the microwave. If this is not done, there is a risk of the device overheating.
In order to increase the free space in the kitchen, a microwave oven is built directly into the kitchen unit. But this option should be foreseen in advance, even at the furniture manufacturing stage.
Where can you install a microwave oven, or a shelf in the kitchen for a microwave
Traditionally, microwave ovens are placed in the kitchen on a table that is included in the kitchen furniture set and has built-in shelves inside. This option is widespread because it is simple. There is no need to attach brackets or a shelf for the microwave oven to the wall - install it, connect it and you can use it.
But a microwave oven is a specific kitchen appliance, which is characterized by certain installation rules. For example, you can’t cook food near a microwave, so a kitchen table is not the best option, especially if the kitchen area is small. It is worth noting that, in accordance with these rules, it is not recommended to install a microwave oven on a refrigerator.
The most popular option: microwave on the table
The second most popular option for placing a microwave oven is a window sill. Modern Euro windows have a fairly wide window sill, which is quite enough to install a microwave on it. This is not bad, but for winter this option is out of the question: even if you have sealed windows, the kitchen will still need to be ventilated.
In addition to shelves, the microwave oven is hung on brackets. How to choose a bracket is described in detail in a feature article on our website
Read about how to install brackets for a microwave oven here: https://remontspravka.com/kak-ustanovit-kronshteyn-dlya-mikrovo/
The article entitled “Mini Microwave” will tell you about the principle of operation and the main parameters of the device for which you decide to build a shelf.
How and with what to clean a microwave oven?
Recently, built-in electrical appliances in kitchen furniture have become fashionable. This is also a pretty good option, but only if there is free space. Therefore, the most convenient and practical option is a corner or hanging shelf for a microwave, which is attached to the wall in a free space.
The last method can solve the problem of lack of space in the kitchen. So, you can buy a wall or corner shelf for a microwave in many stores, including online resources.
Installing a microwave oven on a refrigerator
Another option is to create a shelf for the microwave yourself in the kitchen. Here are the instructions.
Microwave on the wall - features of fixation
The main function of mounting a microwave on the wall is to increase free space in the kitchen. There are several options for mounting a microwave oven, which differ in color and decorative solutions.
The price for installation work on installing a microwave oven is quite high, so it is cheaper to install it yourself.
Please note that not all microwave ovens can be wall-mounted.
Oversized structures will not be able to fully support it. Special requirements apply to the wall on which the microwave oven is mounted. It must be durable, preferably made of concrete or brick.
There are several types of microwave mounts. In relation to the color scheme there are:
The most popular colors are white and silver, since these are the most common microwave ovens.
The main fastening element for a microwave oven is a bracket that has drilled holes through which it is fixed to the wall. Next, the sliding linings are fixed on plastic plugs and their holes.
In addition, do not forget about the electrical network, since the microwave oven must be mounted in a place where there is an outlet or its subsequent installation is possible.
Types of shelves for microwaves
There are several options for practical shelves. They are supplied complete with wall cabinets or can be installed separately.
Tabletop
A table shelf will allow you to place not only a microwave oven, but also other kitchen utensils. The product can be made of steel, metal, with an anti-corrosion coating; with several shelves located one below the other.
Installed on the tabletop. Table stands are functional, have a modern design, and are equipped with additional shelves and bottle holders. Such designs are quite mobile and save space.
Mounted
Wall mounted shelves for microwaves allow you to solve the problem of unwanted proximity of electrical appliances in the kitchen. You can hang the microwave on the wall above a table or work surface, in a corner of the room or on any free wall. This option for placing the stove is safe for children and very convenient for housewives.
The shelf can be mounted on special brackets - such a mount takes up little space and is well suited for any kitchen. The design can support up to 35 kg.
Microwave wall mount and its choice
You should approach the issue of choosing fasteners for fixing a microwave oven on the wall with special responsibility, because the quality of fastening and the safety of people in the kitchen depend on the quality of the fasteners.
Among the main parameters that determine the type of fasteners are the dimensions of the furnace and the total weight of the structure. In relation to the dimensions, the brackets are variable in length, so they are adjusted depending on the length of the unit.
They are selected to a certain, pre-measured length. But when taking into account the weight of the microwave, you should compare it with the material from which the wall on which it will be mounted is made.
For example, when fixing a microwave on a concrete wall, no problems arise and it is possible to use less durable fasteners than when installing it on a wall made of plasterboard. But, first, it is recommended to read the instructions or technical parameters of the fastener, which must indicate the maximum weight of the device that it can withstand. It is preferable to choose fasteners with a small margin of 0.5-1 kg.
Pay due attention to such elements as clamps. They are designed to prevent the stove from accidentally falling. Most modern fasteners are equipped with them.
The last, but quite important parameter for choosing reliable and good fasteners is the attractiveness of the appearance. Although the fastener is almost invisible in the kitchen, manufacturers still offer a large selection of these parts in different colors and textures.
Most often they are plastic or steel. A combination of these materials is possible, which fits well into any interior style.
Installation method
Corner shelf for the kitchen: DIY wall mounted, small on the wall, on rails, how to hang it, video instructions, photo gallery
To install the brackets, a hammer drill and self-tapping screws are required.
First of all, choose a place to place the microwave oven. In this case, the requirements for operating the device specified in the instructions must be observed. This applies to its location relative to other household appliances, the sink, as well as the walls and corners of the room.
The placement of sockets plays an important role. The place where the microwave is turned on must have free access, which meets the manufacturer’s requirements for safe use of the device.
Brackets cannot be attached:
- close to the sink (water splashes should not fall on the device during operation);
- place under an electric oven (this will cause condensation);
- at a height below 80 cm above the floor (to protect children from the heated body when the grill or convector is on);
- at a distance closer than 10 cm to other household appliances (to ensure ventilation of the microwave housing).
You may also be interested in information about what it looks like and how it is used.
The video shows the installation process:
You may also be interested in which one is best to choose.
At the first stage, measurements are taken of the dimensions of the microwave oven and markings are made in the intended location.
Using a level, you check the conformity of the horizontal outlines made.
Then, using a hammer drill, holes are drilled in the wall and wooden or plastic plugs for self-tapping screws are installed.
The brackets are attached to the wall and checked for level relative to the vertical and horizontal guides.
The final stage is installing the microwave oven on the brackets, checking the level and securing it.
With a paired bracket on the mounting plate, the width of the stove is taken into account and appropriate markings are made. In all cases, during installation it is necessary to check the correspondence of parallel and perpendicular angles, which requires the use of a level.
But what is the best internal coating of a microwave oven and how to choose the right one, you can read
Wall mounts are used to compactly place the device in the kitchen or office. They can consist of corners on which the microwave is mounted or brackets and a special shelf that allows you to hang the microwave oven on the wall.
This type of mounting saves space. The brackets are made of stainless steel and have shades that match the body of the device. When choosing a mount, you must take into account the dimensions and weight of the device. Manufacturers offer both fixed and sliding consoles. The price range of fasteners varies from 300 to 100 rubles.
A wall-mounted microwave bracket is a great opportunity to create an ergonomic design. But among all the diversity, it is very easy to make a mistake and make the wrong choice.
For ease of reading, the article is divided into several main parts:
- the first part talks about the features and types of brackets;
- the second contains the main indicators when choosing in a store;
- the third offers a master class on creating a structure yourself.
For ease of navigation, there is a list of all the items below - you can use them to go to any place in the article without rewinding.
How to hang a microwave on the wall: procedure
The microwave oven is attached to the wall in two ways. It is fixed directly on the wall surface or built into a kitchen cabinet, in which it will also take up little space and can function normally.
The installation procedure begins with the selection of the element to which the fastening will be made. Most often it looks like two metal or plastic supporting parts parallel to each other, on which the fixation takes place.
It is possible to mount the supports on a beam for stronger mounting and support of a microwave oven with a large weight.
To select the type of fastening, you should compare the weight of the microwave with the technical parameters of the fastener on which it is installed.
To carry out installation work, you will need a drill or hammer drill, which will be used to drill holes for dowels. But, before that, it is recommended to take measurements of the product itself and the wall on which it will be installed. Draw a preliminary installation location with a pencil in order to attach the microwave evenly and efficiently.
Install the dowel into the base that is drilled for it.
When attaching a plastic dowel, use your hands; if it is metal, you will need special equipment in the form of a dowel gun. Next, place the part in the form of a microwave bracket on the wall and hammer it in with nails. Check the connection strength.
If you are concerned that these fasteners will not be able to support the weight of the microwave oven, it is better to replace the nails using anchor bolts.
If you plan to install a microwave oven in the design of a kitchen cabinet, you will need to purchase a special frame that can secure it in the cabinet.
To save on buying a frame, make it yourself using metal corners welded or bolted together. Paint the structure to match the color of the cabinet. Fix it to the wall surface using dowels or anchor bolts, as in the first option.
1. The first option for building a microwave shelf on the wall involves the use of purchased materials in the form of a furniture panel of the desired color and size.
For example, with a standard cabinet width of 60 cm, the bottom shelf is equipped on three sides. To provide additional space on which the microwave oven will be installed. Among the disadvantages of this type of construction, the following should be noted:
2. The second option is to install the microwave oven on a TV shelf. Their acquisition will not be difficult, and installation work is carried out very quickly.
3. The most optimal option for mounting a microwave oven is the installation and preliminary construction of a free-standing shelf. Among the advantages of this type of installation we highlight:
A standard microwave oven has a size of 50x41x30, we will focus on these numbers. If your microwave is larger or smaller, you may need to adjust the shelf size.
In the areas indicating the horizontal plane, mark the points at which the flange connectors will be attached: 3x3 cm from each corner. For the middle shelf, holes are drilled with a diameter of 2.2 cm. A rod will be installed in this hole.
But first you need to attach flanges to it. To do this, use self-tapping screws. To fix the rod on the surface of the panel, use the clamping screw, which should be turned towards the wall to avoid damaging the appearance of the shelf.
To obtain a shelf of the correct shape, you need to cut off four equal sections from the main rod, measuring from 60 to 70 cm. To assemble the shelf, just install the rods in the shield and connect all the other parts.
Microwave shelf requirements
In modern kitchens, it is quite difficult to find a place for a microwave: you need a strong base, good ventilation, and space for the door to open freely. It is necessary to ensure a safe distance from the stove, sink, and heating radiator. You cannot place a teapot or coffee maker on the appliance. The optimal distance from the floor is about 85 cm. The socket should be no further than one and a half meters.
To ensure good ventilation for the appliance, do not cover it with napkins or towels. The space behind the back wall of the microwave oven should be at least 10 cm, above the top cover - about 20 cm, around the side walls - 5 cm.
It is good to place household appliances on the desktop: when the device is installed no higher than chest level, it is easier to get hot dishes.
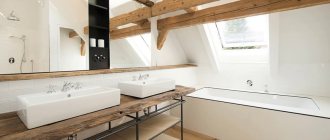
Sometimes the stove is placed on the windowsill. It must have sufficient width
It is important to remember that the elements of the device get very hot - in winter this can lead to cracks in the glass
You can place the microwave oven in a kitchen cabinet, providing ventilation holes in advance.
The best location for a microwave is a special shelf mounted on the wall.
You can simply purchase a shelf for the TV and install a microwave oven on it. But in this case, you won’t be able to do anything under the device—it’s unsafe.
The kitchen should be comfortable and safe. The microwave oven must be placed so that it is convenient to use.
In order to attach the product to the wall, you must follow certain requirements:
- There must be good ventilation. If the shelf covers the device from the top and sides, you need to drill holes for ventilation.
- The dimensions of the structure should not create inconvenience in the kitchen.
- The product must be made of durable material to support the weight of the microwave.
A shelf for these household appliances should be convenient, practical, reliable and safe.
Microwave stand on the wall: manufacturing instructions
To produce this type of supply you will need:
All the necessary elements are quite affordable, in addition, it is possible to replace the furniture panel with chipboard or MDF panels.
We suggest making a shelf with the following dimensions:
To cut parts into blanks, you will need to use a jigsaw. To carry out markings, you will need a ruler with one right angle, a pencil and a tape measure. Pay careful attention to the marking of parts, since lines or angles that are not too straight can significantly worsen the appearance of the structure.
When all the pieces have been cut, begin sanding them using a belt or vibrating sander. If this tool is not available, you should use regular fine sandpaper.
The final stage is the assembly of the entire structure. To do this, use wood screws and dowels.
Before you start screwing in the screws, pre-drill the holes for the dowels. This procedure will help prevent wood from cracking during operation. After assembling all the parts, attach a special mount to the back of the structure, with which it will be fixed to the wall.
Next, the shelf needs to be painted or varnished. If the second option is chosen, then the varnish must be applied in at least three layers, since the shelf is located in the kitchen and is constantly exposed to steam and moisture.
If necessary, the shelf is simply painted with a special paint designed for working with wooden surfaces. After drying, hang the shelf on the wall and install the microwave oven. Please note that when choosing a place to install a shelf, you should pay attention to the presence of an outlet or the possibility of installing it.
How to choose microwave brackets
A wall-mounted microwave bracket is a great opportunity to create an ergonomic design. But among all the diversity, it is very easy to make a mistake and make the wrong choice.
Option 3: shelf-shelf
If you have a lot of different appliances in your kitchen, then a shelf with several niches will help solve the problem of using space. For example, you can put a microwave on the top shelf, and a multicooker on the bottom. Or do it as in the photo - put 2 microwaves
A metal shelf-shelf differs from a wooden one in that it looks “lighter”, and therefore can be used in almost any kitchen without causing imbalance. In addition, you can use rails together with it to store tableware. Thus, a metal microwave shelf is one of the best options.
A very original and convenient shelf.
It has many advantages:
- it can be outweighed;
- it can be used to place other things;
- it does not spoil the interior;
- ensures proper ventilation.
To make a shelf-shelf you will need:
- three furniture boards of standard sizes 600x450 mm, which are sold in building materials stores;
- metal rods with a diameter of 22 mm;
- steel flanges for rods – 16 pcs;
- steel corners 200x300 mm.
Manufacturing procedure:
- On the horizontal planes of furniture blanks (boards), mark the places where the flanges are attached, which are spaced from each corner at a distance of 30 by 30 mm.
- Drill holes with a diameter of 22 mm in the middle shelf;
- Attach the flanges to the middle shelf on both sides;
- Four identical sections are cut from the rod - each section should be equal to 650-700 mm;
- Secure the rods with a clamping screw to the flange;
- The shelves are attached to each other;
- corners are attached to the back of the structure;
- The shelf is hung on the corners to the wall with self-tapping screws.
Operating principle of the bracket
A bracket is a device that holds objects on the wall. It is distinguished from ordinary hinges by its complex, durable design, capable of extension and tilt. True, the simplest brackets can be built without such luxury.
Microwave brackets are often curved angles that are attached to the wall and connected together for added strength. Complex models are panels with fastening strips and other structures.
The entire structure consists of different types of planks fixed to the wall. The principle of operation is to hold household appliances, in our case a microwave, in a place convenient for the owner.
Where is the best place to place a microwave?
I would like all household appliances in the kitchen to be arranged compactly and conveniently for use. If the working area of the kitchen is large, then the device can be placed directly on the table. This does not require any additional fastenings or additional effort. If the kitchenette is small, then this option for placing a microwave is extremely inconvenient.
You can place the device on the refrigerator, but high temperatures may affect the body of the product. In this case, the refrigerator should be low, otherwise it will be difficult to reach the stove.
What types of wall mounts are there for microwave ovens?
The whole variety of brackets comes in two main types - fixed and telescopic. The first is a static structure made of metal profiles and pipes that does not change its size.
The advantage of a fixed bracket is its strength: the absence of sliding units strengthens the connections. Often the fixed mount for a microwave on the wall is monolithic, which is good with maximum weight.
The telescopic one changes size, both vertically and horizontally. This fact allows you to adjust the dimensions within the permissible dimensions and load of the bracket. The solution allows us to obtain much less strength, which is definitely not good for the owner.
If you decide to buy a microwave for a long time, then it is more profitable to buy a fixed bracket without risking its strength and health. If you need to change your microwave in the near future, buy a telescopic one - preferably with universal fasteners.
Microwave bracket on the wall: what is it for, how to use it?
As already mentioned, the main purpose of the bracket is to secure the microwave to the wall. The bracket is also used as a shelf or a hanger for kitchen appliances: the possibilities completely depend on the model and installation location.
Its only use is to mount it on the wall and install the microwave. An important point is that brackets for microwave ovens are calculated only by their weight. Using a bracket for such a purpose harms both the object placed on it and the people around it, increasing the risk of injury due to breakage.
Brackets
A popular solution is also a universal holder-bracket designed for wall mounting of microwave ovens. It is available in the offer of most kitchen furniture manufacturers. This holder is easy to install and has the maximum level of safety for wall mounting of microwaves. The design can withstand loads of up to 35 kg. The adjustable base is also worth a look. Thanks to it, we can easily customize the holder for a specific oven model. The length of the gripping arms is usually adjustable from 34 to 50 cm.
Choosing a location for installation
The installation location depends on the type of fastener. Fixed brackets are often installed flush against the rest of the furniture to create a unified space. Sliding ones require more or less space in the future, since the dimensions can change.
The task comes down to creating an additional surface. This parameter helps to place the microwave in a good place and create an ergonomic, interesting interior.
A great place to place a fixed bracket is next to a kitchen drawer. An option is possible when installing a bracket under a separate drawer where there is no table top.
The telescopic one serves well as a continuation of the kitchen set to the right and left of it. Using the space will allow you to change the size of the bracket in the future without spoiling the appearance of the kitchen.
Where to put a microwave oven - options
At the very beginning, when these types of ovens began to appear in our market, none of us planned a special place for this equipment. For many people, their first microwave oven was used as a refrigerator. Later, when planning another kitchen, its place was already designated in a special niche. At the moment, there are many solutions - built-in equipment, microwave combined with other equipment and combining them into a “column”, etc. Here are some ideas.
- A low shelf is not very convenient, but it is better than nothing. In this case, the stove is easily accessible, but a little non-functional. Access is difficult and we also have to bend over to use the technology. While this solution works well for an oven that we don't use every day, it's not the best option for a microwave. In addition, it will be necessary to supervise children who have good access to the device.
- On the refrigerator - if the refrigerator is not too high, you can use this position: the oven will have perfect access, you can see the dishes inside the device, and nothing will interfere. The device does not take up valuable space on the countertop or in cabinets.
- In the closet is not a very convenient solution, but this can also be a solution. You just need to take care of ventilation.
- In the Pantry - Lucky people who don't use the microwave very often can put it in the pantry if there's a good spot there.
- On the countertop is perhaps one of the most popular places. This is often the simplest solution and the best one. The advantage is easy access to the inside of the device. The fact that the device takes up little valuable counter space in a small kitchen is a negative.
- On a free shelf - this is the easiest way to find a place for the stove; you will need to find access to an outlet and plug.
The ease of use of this household appliance will largely depend on its location. Modern models of built-in microwave ovens have an attractive appearance, they fit perfectly with the minimalist style of other kitchen appliances and the entire room.
In larger kitchens, a standard oven/microwave counter (such as one with fronts or drawers) that is well presented and easy to use will perform best. This way, all the equipment will be in one place, and, in addition, its connection will be less troublesome than a version with equipment located in different places. The cabinet is usually 56-58 cm deep, and we can fit even the largest stove model into it without any problems. Thus, a complete set of household appliances for baking and heating food is created.
If the kitchen is small and it is not possible to place equipment in this way, it is possible to install a microwave oven in a hanging cabinet. In this case, however, we are limited in depth (upper cabinets are 28-32 cm deep in standard cabinets). There are very few models that can be installed in such a small housing and they are more expensive.
Maximum permissible weight
The maximum permissible weight is based on the design of the bracket (bends, additional supports). The material of the product is also important. The maximum weight of fixed models is greater than telescopic ones, which is explained by the smaller number of vulnerable nodes in the circuit.
Look for the weight indicator on the bracket packaging. The number is theoretical and certified - the bracket will definitely not break under the specified weight. The mass above behaves unpredictably, even to the point of breakdown.
Choose the weight based on the weight of the microwave. In order not to be mistaken with the strength, take the weight of the microwave and add 3-5 kilograms to it, which will give you a margin of strength and allow you not to worry about the kitchen appliance.
Choosing a shelf mount
There are several main criteria by which you should choose a shelf design and fastening elements for it. It is necessary to take into account the technical characteristics and features of the electrical device.
Microwave shelf
As a rule, microwave ovens weigh on average 12-14 kg, but their weight increases with the food that is added inside. Therefore, when choosing fasteners, you should choose products that can withstand up to 30 kg. To avoid making a mistake with your choice, you should find out the exact weight of the shelf and microwave before purchasing.
Corner shelf for microwave
Dimensions
The sizes of microwaves can vary, so when making a wall shelf you need to take this into account. If the device will be fastened with special fasteners, which you can buy in a store or make yourself, their dimensions must also match the dimensions of the microwave oven.
Wall shelf for microwave
Ease of use
This depends on the individual preferences of the owners, because the microwave can be installed on special brackets or on a full-fledged shelf, the height, size and material of which will determine the ease of use. But if you make a shelf yourself, then you cannot skimp on material - it must be stable and reliable.
Microwave shelf
On a note! It is necessary to take into account the material of the wall in the kitchen when choosing where to install the shelf and fasteners. Since the microwave oven weighs quite a lot, installing the shelf on a decorative partition is strictly not recommended. The same can be said about finishing panels or false walls. Otherwise, the entire structure may collapse over time.
Dimensions
The fixed size corresponds to the size of the microwave oven. Otherwise, the microwave will stick out from the platform and may even fall due to careless movement. It is advisable to calculate the dimensions of the microwave when installing it so that it does not stand out too much from the overall interior of the room.
Take telescopic ones of the largest possible size so that they are no smaller than the size of the microwave. Telescopic brackets are purchased with a reserve for the future, so as not to replace the fasteners when purchasing a new stove.
Types of shelves
The microwave oven stand is made of wood, metal, plywood sheet or any other durable material. You can purchase ready-made shelves or even a cabinet (design with a top shelf and side racks).
There are several popular types of designs, each of which can be made at home. This:
- Brackets. They can be purchased at any hardware store or hardware store. The brackets are easy to install and reliable. Even a person who does not have furniture assembly skills can install them. These fasteners are almost invisible, so they will not spoil the appearance of the room. In addition, they provide air access to the oven (good ventilation is the key to long service life of the microwave). You can mark the equipment directly on the brackets or put a shelf on the brackets and place the stove on top.
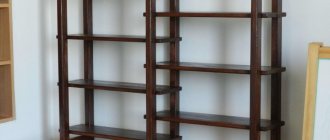
- Hanging shelves. This is the most popular option. The master can assemble a standard shelf or bookcase, consisting of several shelves connected to each other.
- Shelving. They are standard floor structures.
You can make a microwave shelf with your own hands in the form of an open structure or a cabinet with closing doors. The closing design allows you to hide the stove from prying eyes, but does not always provide high-quality ventilation. To prevent the oven from overheating, it is necessary to make holes in the side walls of the cabinet. Doors should be left open while cooking.
Material of manufacture
Among the materials, various metals are most often used. There is no particular difference between them - the whole difference depends on the weight of the finished structure and the softness of the material used. The softer it is, the more complex the structure will have to be created; if it is tougher, the simpler it will be.
Eliminate all options where powder steel is used - it crumbles very quickly and breaks easily. Therefore, you cannot trust brackets with plastic casings: powdered iron is often hidden in them.
There are also wooden options, most often from chipboard, laminated chipboard, and less often from solid wood. They are made in the form of a shelf and are often sold together with kitchen sets. In this case, you should choose solid wood - it is much stronger than chipboard.
Selection of materials
First of all, you need to select the material for the shelf itself.
A metal microwave shelf will fit perfectly into the design of a modern kitchen.
It can be:
- wooden boards;
- ready-made furniture panels;
- ready-made shelves sold in building materials stores.
Tools and materials:
- drill;
- screwdriver;
- roulette;
- jigsaw;
- drill;
- self-tapping screws
Brand and cost
The cost directly depends on the brand. Often, kitchen appliance manufacturers offer their own brands of brackets and produce them independently. Quality varies everywhere, but the more popular the brand, the higher its cost.
Branding here is similar to usual: there are expensive brands and cheap ones. But often the difference between them is very small. When purchasing, do not turn to “famous” brackets from Spain.
Therefore, pay more attention to the quality of the material and the indicators on the packaging and the company name. This advice will protect you from sudden troubles, such as a crack in the powdered metal in a plastic casing.
The cost ranges from 500 rubles to 4 thousand for fixed models and from 1000 to 5000-6000 for telescopic ones. The cost is greatly influenced by the presence of additional features - hangers and additional shelves.
DIY microwave bracket on the wall
This part of the article is devoted to how to make a microwave bracket for the wall with your own hands.
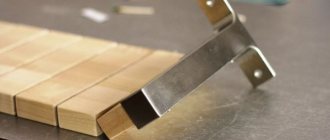
The easiest way to do this is with a jigsaw. The edges are rounded by marking the corner with a plate, giving a suitable shape. Using the resulting marking, a corner is cut out with a jigsaw. Sand the corners with sandpaper. Next comes the preparation of the bars to serve as the angle of support. A similar radius is made on the block using a plate in order to subsequently saw it. After preparation, begin to assemble the structure.
This is done using hexagon anchor screws. Drill holes in the side where the screws will be screwed in. Insert the screws and screw the self-tapping screws into them using a hex key.
It is important here that the screws fit into the end that is not covered with laminate. The corner fasteners are also screwed in. Corner fasteners must be secured on both sides. Next is cutting out the screed. This will bring the two corner support bars together.
First mark it according to the size obtained from the distance between the corner strips. Subsequently, the plank is sawn and inserted. Afterwards, all ends can be covered with trim tape to improve the appearance of the product. Attaches both to dowels and to other types of fasteners to the wall.
Communities › Do It Yourself › Blog › Microwave Rack Shelf
Today I decided to please my wife by removing the microwave from the tall refrigerator. And install it at a convenient height, I don’t want to hang it on the wall, I feel sorry for the tiles.
What was left over from installing shelving in the store were cuttings of chrome pipes. It’s a pity to throw it out and I can’t find a place to live for two years now. Today an idea came to me.
I cut the tubes to fit the microwave. I thought for a long time about how to make legs so that the tabletop would not be scratched. I found some plugs in the garage, some left over from Soviet cars.
He adjusted it a little on a knife and pushed it into the tubes.
I treated one with a knife, it looks like a factory one)), and I did the same for the rest.
On the one hand, I decided to raise the rack to the level of the railing and became attached to it.
In my opinion, the microwave fits well and looks great.
Comments 52
Cool of course. Well done. But isn’t it too high to take a plate of borscht out of it? Or is it a fairy tale compared to what it was? :))
Of course it’s a fairy tale now))), approximately 1.3 - 1.4 m in height.
It would probably be easier to use a commercially available “horned” suspension (like a fork on a forklift). It would be more airy. But you know better.
Maybe simpler, but more expensive. It's free and I don't want to drill holes in the tiles. In winter I’m thinking of changing the kitchen (set). There is already a place for a microwave and these horns and holes in the tiles will not be needed.
When I saw the word microwave rack I immediately thought of finding the joint safe. But no, I did everything as it should. The microwave is below and with its waves has the least impact. (I just saw how these microwaves are hung at head level.)
Thanks for your smart and positive comment.
When I saw the word microwave rack I immediately thought of finding the joint safe. But no, I did everything as it should. The microwave is below and with its waves has the least impact. (I just saw how these microwaves are hung at head level.)
depending on which head there is one and a half meters of illumination in the radius
When I saw the word microwave rack I immediately thought of finding the joint safe. But no, I did everything as it should. The microwave is below and with its waves has the least impact. (I just saw how these microwaves are hung at head level.)
What waves? Get this nonsense out of your head
Generally quite good