kitchen cabinets and place an order online (directly on our website) in the Kitchen Cabinets Store section.
Also in the store you can see prices and choose the colors of the boxes. Kitchen cabinet: Made from laminated chipboard made in Russia - Colors: White, Beige, Aluminum, Alder, Milky Oak, Wenge, Gvarneti Walnut, Ecco Walnut.
The case is supplied: disassembled, packed in thick paper, tied with polypropylene tape.
Complete set of cases: Lower case: Assembly fittings - Euroscrews, Plastic legs with adjustability.
The back wall is made of hardboard. Upper body Assembly fittings - Euroscrews, Kitchen awnings + rail for fastening awnings. The back wall is made of hardboard.
Additional equipment is possible for an additional fee:
- Assembly of boxes - cost 300 rubles - 1 piece.
- Assembling Boxes - cost 300 rubles - 1 piece.
- Installation of doors (facades) - cost 200 rubles - 1 piece.
- Reducing the size of the kitchen box (height, width, length). Cost + 0% to the total cost.
- Increasing or changing the size of the kitchen box (height, width, length). Cost + 10% to the total cost.
- Manufactured from Egger chipboard made in Russia and Germany. The cost is added from 10 to 25% to the total cost.
- Manufactured from laminated chipboard in Russia - 1 price group + 0% of the total cost. Manufactured from laminated chipboard in Russia - 2, 3 price groups + 10% of the total cost.
- Installation of guides: Full extension ball guides cost 1,300 rubles. - 1 PC. Metaboxes (metal sides with guides) cost - 2500 rubles. - 1 PC.
- Production of doors (facades) from: laminated chipboard made in Russia and Egger, AGT frame profile, MDF film facades, AGT glossy panels, wooden facades.
- Equipped with a moisture-resistant tabletop Moisture-resistant tabletop - dimensions 4100 x 600 x 38, Wall panel - dimensions 4100 x 600 x 5, Wall plinth to protect the joint between the tabletop and the wall panel Price according to price
- Delivery in Moscow and the Moscow region. Price according to price
Also on sale:
Kitchen countertops Wall panels for the kitchen, the color is the same as on the countertops.
Moisture-resistant tabletop - dimensions 4100 x 600 x 38 , Cost - from 10,000 rubles Wall panel - dimensions 4100 x 650 x 5 , Cost - from 10,000 rubles Wall plinth to protect the joint between the tabletop and the wall panel.
DIY kitchen design
The production of a kitchen set begins with a project. The project requires the overall dimensions of the place where it will be installed. After which you can begin to select the component elements.
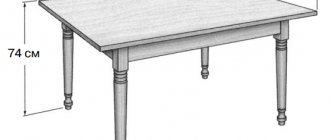
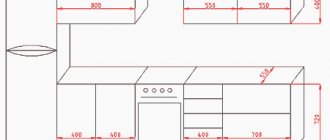
Fig.1.
Drawing of a kitchen set with dimensions.
The kitchen set consists of drawers that can have different contents, from shelves to pull-out baskets. For compartments in both the upper and lower rows, standard width sizes are established, starting from 15 cm to 100 cm, in increments of 5 cm, i.e. 15, 20, 25, 30, 35 cm, etc. You need to know them for design.
When preparing a project, you should be guided by standard dimensions, because... All accessories are manufactured taking them into account.
When determining the layout, you should take into account that the standard height of the bottom row drawers is 72 cm, the top ones can be 60, 72 or 90 cm. The depth of the bottom row is 55 cm, the top row is 30 cm.
Of course, when making a kitchen set with your own hands, you can set arbitrary sizes, but then you will have to abandon ready-made kitchen components (for example, the facade), and make all the elements individually.
If standard drawers do not fill the entire space allocated for the kitchen, then in the remaining space they make either shelves according to individual sizes.
The corner kitchen set has a distinctive feature. A corner kitchen cabinet can have several options: straight (Fig. 2) and with an angle of 135 degrees (Fig. 3). The same feature applies to the top row (Fig. 4).
Fig.2.
Straight corner kitchen cabinet drawing. Bottom row.
Fig.3.
Kitchen corner cabinet drawing. With an angle of 135 degrees.
Fig.4.
Corner wall kitchen cabinet drawing.
A corner cabinet for a sink (see drawing above) is often used if the space of the room allows it; for small kitchens, a straight cabinet. Thus, a rectangular or round sink is installed in a straight line, and a corner or round one in a corner.
When preparing a kitchen furniture project, you should follow the following recommendations:
- The space for installing the slab should be equal to the width of the slab itself, usually 50, 60 cm.
- For a built-in stove, the cabinet must be 60 cm wide and at least 55 cm deep. The same applies for the oven.
- The space for the hood should be 60 cm for built-in and 90 for other types.
- The distance between the hood and the stove must be at least 70 cm. The height of the cabinet for a built-in hood must be 30 cm less than the others.
- The space under the refrigerator must be at least 60 cm.
- Roll-out baskets are installed in standard-sized kitchen cabinets only.
Design Features
The positive parameters of using a corner cabinet include:
- due to its use, the usable area of the room is significantly increased, since the installation is carried out in a place that is not used for any other purposes or installation of other furnishings;
- although the kitchen floor cabinet intended for the corner is visually small in size, in fact it is distinguished by its excellent spaciousness and versatility, as it is equipped with different shelves, drawers or compartments for storing a variety of products or utensils;
- The sizes of kitchen cabinets can be different, which makes it possible to choose the best option for the room;
- Various methods can be used to decorate the facade, so they can be equipped with different decor or even made of glass, which has a positive effect on the appearance of the kitchen;
- if you choose a corner kitchen, then the kitchen set already includes corner cabinets for installation on the floor or for hanging on the wall, so they fit perfectly with other elements;
- In the kitchen, such a design always looks interesting, harmonious and stylish.
To create an interesting appearance for a room, a floor-mounted corner piece of furniture is usually combined with a wall cabinet.
Other features of such furniture include:
- the corner design is equipped with doors or created without them, and only attractive and beautiful dishes should be stored in open models;
- the shape of such a cabinet can be triangular, trapezoidal or L-shaped, and the choice depends on the preferences of the property owners;
- certain models are equipped with drawers in which small items can be stored, therefore combining a compact design with good capacity;
- usually the lower element is used under the sink;
- Often, various large household appliances can be installed in such a cabinet, which allows you to use them effectively in the kitchen;
- To decorate the facade, different methods can be used, for example, using a sandblasting machine or upholstery with leather or fabric;
- the lower elements can be equipped with legs or produced without them, and in the first case the ease of cleaning the room is ensured.
Cabinets equipped with carousel shelves are considered interesting, as they are an ideal solution for storing dishes.
How to make your own kitchen from chipboard
It is easiest to make a kitchen with your own hands from chipboard, since this material can be called traditional for such furniture. Laminated chipboard, abbreviated as laminated chipboard, is used with a thickness of 16 mm. All elements except the tabletop and apron are made from chipboard.
The facades of kitchen units are made from laminated chipboard, from chipboard covered with plastic (postforming technology), and from MDF.
The back wall of the cabinets is made of fiberboard or laminated fiberboard, 4.6 mm thick.
The countertop of the kitchen set is made using postforming technology. It can be 28.32 and 38(40) mm thick.
How to build a kitchen with your own hands? Three approaches can be distinguished. The first is to make all the parts yourself from laminated chipboards, the second is to make them to order, the third is to buy ready-made elements and assemble kitchen furniture from them. Ready-made cabinets can be purchased in stores such as IKEA, Leroy Merlin, etc.
The most economical and moderately complex option is when you do the detailing of the kitchen cabinets yourself and all the elements are made to order, after which the assembly is done by yourself. The advantage of this method is that you can make parts to individual sizes and at the same time save a lot of money.
To order parts, you need to draw a kitchen and determine all the dimensions, as well as the need for edging material and the presence of mounting holes.
Kitchen cutting is carried out based on the following considerations. The dimensions of the side walls of the cabinets are the height and depth of the cabinet. Dimensions of the bottom and lid: width equal to the width of the cabinet minus 32 mm, height equal to its depth.
The edge is made of plastic with a thickness of 0.4 and 2 mm. It is necessary to protect the ends of the laminated chipboard from moisture and mechanical damage. It is advisable to glue it on all ends of the parts. To save money, edging tape may not be used on invisible ends.
Ready-made holes for fasteners (additive) greatly facilitate, but introduce additional costs for the manufacture of parts. If saving is not your first priority, then before cutting the kitchen you need to prepare drawings of kitchen cabinets with details.
The tabletop and façade, as well as the drawers, can be made to order or purchased ready-made.
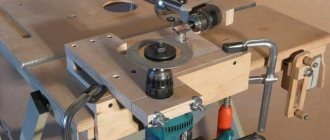
DIY kitchen furniture assembly
Assembly begins with the cabinets. Their parts are connected using a confirmat (Fig. 8). Holes for it are drilled at a distance of 8 mm from the end, with a slab thickness of 16 mm. It is convenient to assemble using a special device as shown in Fig. 5. It is easy to make it from scraps with your own hands. To simplify drilling holes for confirmat, it is convenient to use a special drill (Fig. 6). The additive can be made in each part separately; for this it is convenient to use a jig (Fig. 7).
Fig.5.
Fig.6.
Fig.7.
Fig.8.
The back wall is installed on the assembled cabinets. Next, the legs are mounted. They can be decorative or adjustable plastic, then the kitchen plinth is attached to the legs. Their standard lengths are 100, 120 and 150 mm.
Fig.9.
Adjustable legs. The first row of legs should be offset 7-10 cm deep into the cabinet.
The cabinets are installed in their places one by one and pulled together. For tightening, a special intersectional screed is used. Alternatively, you can use 30mm long self-tapping screws. They will work just as well. The caps of the screws can be hidden with a self-adhesive plug; the caps of the confirmat are also masked.
Fig. 10.
Screeding cabinets. In the photo, the screed is made with self-tapping screws 30 mm long.
The upper cabinets are tightened after installation in place. An adjustable suspension is used to install wall cabinets. It allows you to set all elements horizontally and vertically.
Fig. 11.
Adjustable hanger and strap. Used for hanging top row cabinets. The load capacity of the hangers is 80 kg.
The final stage of assembling the frame is installing the tabletop. The tabletop is attached to the cabinets with 30 mm long self-tapping screws.
Fig. 12.
The assembled frame of the lower row of cabinets with the installed countertop.
Installation of facade, sink, plinth
You can install a façade, plinth, sink, etc. on the finished frame.
The façade is secured with hinges. Recesses (milling) are made on the doors for the hinge cup. Depending on its size, the diameter of the recess is different. It is advisable to order milling for hinges when cutting. It is not expensive, but it will avoid additional work, possible errors and the need to purchase a special Forstner drill.
Fig. 13.
Installation of hinges for fastening the facade.
When installing doors in corner cabinets, it is necessary to use hinges with a non-standard opening angle.
Fig. 14.
Features of installing a door in a corner kitchen cabinet. Special loops are used.
After the doors are installed, you can install the handles.
For the kitchen plinth, a piece made of chipboard or a special plastic strip can be used. Using the latter is preferable, as it is protected from moisture and will last much longer.
The plinth strip is attached to the legs of the kitchen unit. It is advisable to recess the base into the body of the kitchen unit by 7-10 cm, so it will be more convenient to use the kitchen.
Fig. 15.
The base is secured to the legs with special fasteners that come with the legs.
Most sink models cut into the countertop. Using the template that comes with the sink, mark the cut line. After preparing the hole, the sink is installed using special fasteners.
Fig. 16.
How to install a kitchen sink.
Dimensions depending on type
The dimensions of these structures may vary. If they are part of a headset, they are the ideal size for connecting with other elements. If selected separately, they must match other straight cabinets. The dimensions of a corner piece of furniture may differ depending on whether it is floor-mounted or wall-mounted.
Mounted
If you select a corner-type top cabinet, then its dimensions are equal to:
- usually these elements are not used for installing large-sized household appliances; it is allowed to make them not too durable and spacious;
- the width can vary from 15 to 80 cm, and this parameter depends on the shape of the cabinet, since it can be triangular, trapezoidal, L-shaped or some other;
- the standard depth is 35 cm, but when choosing it, the depth of the lower drawers is taken into account, since these elements must fit perfectly with each other, otherwise the kitchen will not look harmonious;
- It is recommended to attach a corner wall cabinet for the kitchen at a distance of about 50 cm from the lower cabinets, but a deviation of 5 cm in different directions is allowed.
The above dimensions are considered standard and frequently encountered, but it is possible to choose designs with completely different dimensions, since the main factor is that they should be spacious, easy to use and attractive. The corner structure can be so small in size that it can be placed in a small niche, if there is one in the room. Often attached above the hob, it will therefore be used to store various spoons or spatulas used in preparing various dishes. When choosing a facade, it is taken into account that there may be one door or several of these elements. You can choose models that are not equipped with doors.
Floor
If you choose a lower cabinet, then the standard dimensions will be:
- Dimensions are selected depending on the parameters of the selected kitchen unit, and it is recommended to take into account the dimensions, height and other parameters of the stove, which can be gas or electric;
- if the kitchen is small in size, then it is advisable to choose a depth not exceeding 50 cm;
- the standard height is 85 cm, but this parameter can be adjusted in certain cabinets, since for many people this height is considered too significant;
- The width varies from 15 to 80 cm, with 60 cm being considered optimal.
An interesting solution would be to purchase a corner structure with dimensions of 600x600 mm, which will have optimal dimensions, so it will be really convenient to use.
Usually the lower element is installed after the upper one is attached. The lower structure should be symmetrical to the upper one. You can choose an element with or without legs.
Under the sink
Quite often, corner floor products are chosen for the sink. Their sizes can vary significantly, as they depend on the dimensions of the sink itself. It is taken into account how the structure will be fixed, since you can buy a mortise or overhead sink. Due to the large number of different sinks, there are certain difficulties with the correct choice of the optimal cabinet, so it is advisable to first select the sink, and then the piece of furniture.
For such cabinets, standard dimensions are considered optimal, but if you need to obtain any unusual design, then all parameters are calculated individually. The width can exceed 60 cm, and the depth can even reach 80 cm, although using such a cabinet will be difficult. Usually, for large products, two facades are chosen for the sink, but you can choose a model with one door. An excellent choice for any room would be the Madeleine kitchen, which has an interesting look, affordable cost and high quality.
Angular
A standard corner piece of furniture has different parameters. It can be mounted or floor-mounted, and is also created from a variety of materials. The most popular is a corner structure made of natural wood, but its cost will be extremely high. It is necessary to constantly protect the wooden product from moisture, which is not always optimal for the kitchen.
An excellent choice would be products made from laminated MDF or plastic. When determining the optimal dimensions, the recommendations of professionals are taken into account:
- the width of the base, which varies from 10 to 12 cm, and this indicator is not affected by the selected type of stand, so you can choose either a design with legs or a solid cabinet;
- the height is usually chosen within 70 cm, but if the product is equipped with a sink, then it is advisable to choose a lower design so that the sink achieves a single level with all the other cabinets that are part of the kitchen unit, and the lower element ensures ease of washing dishes;
- the height of the tabletop can be from 2 to 4 cm, and this parameter depends on what material was used for its production, as well as what structure it has;
- the width also varies from 40 to 80 cm, and this parameter is influenced by the shape of the corner cabinet, the filling of the element, since it may have not only shelves, but also drawers, as well as other storage systems;
- the depth varies from 30 to 50 cm, and it is selected depending on the same parameter of other straight cabinets installed nearby.
Thus, the dimensions of corner cabinets can vary significantly. They depend on numerous factors, and the ease of use of the structure for its intended purpose should initially be taken into account, and this especially applies to a cabinet that will be equipped with a sink, since the comfort of washing dishes depends on the correct choice of dimensions.
The distance between the lower and upper corner cabinet is standard 60 cm, but this parameter can be easily changed, since it takes into account the height of the regular user of the kitchen.
Apron for kitchen set
An apron is an integral element of any kitchen that decorates and protects the wall between the countertop and the top row of cabinets. It can be made of MDF or ceramic tiles.
An MDF apron can be purchased ready-made or made to order. It is attached to the wall with self-tapping screws, which are later hidden with corner covers.
Fig. 17.
Apron for kitchen set made of MDF.
How to make a kitchen apron with your own hands? It’s very simple to make it from ceramic tiles. However, this approach takes longer, because Installation work may take several days. At the same time, a tile apron is more durable and fundamental, which cannot but affect the design.
Fig. 18.
Ceramic tile backsplash.
The final element is the wall plinth. It also has a functional purpose - it covers the junction of the apron and the kitchen unit, thereby preventing dirt and moisture from entering unprotected areas.
Classic: corner floor cabinet for the kitchen under the sink
The corner kitchen set, which is familiar in design and configuration, uses one of three types of corner floor modules. You can find drawings of sink tables here.
Often the sink is taken out of the corner. However, the frame of the corner floor cabinet for the kitchen remains the same. Shelves and various pull-out storage systems are simply used as internal filling.
Another situation is when it is decided to build a slab into a corner. Such solutions look quite original.
If the stove is built-in and consists of a separate oven and hob, then they usually use the same table-cabinet module as for other ovens. Just place it diagonally. And they cover it with a corresponding pentagonal tabletop.
Kitchen furniture lighting
The lighting on the kitchen set is not only a decorative element, but also illumination of the work area, which directly affects fatigue, so it is important to make good and functional lighting.
Fig. 19.
Kitchen furniture lighting.
As can be seen from the infographic (Fig. 19), the most functional is the lighting under the kitchen cabinets. You can make lighting for your kitchen work area using LED strips. To do this, it is glued to the bottom wall of the top row of cabinets. Kitchen countertop lighting can be done using special boxes with a diffuser for ice strips.
Fig.20.
LED lighting for the kitchen.
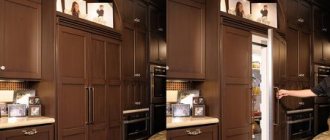
Non-standard solution: high floor corner cabinet for the kitchen
Someone is beginning to consider the possibility of moving a floor-standing corner cabinet with a sink outside the corner due to the existing protrusion, which prevents them from using this solution. In this case, we recommend that you read the article about how you can design shelves in the corner of the kitchen with a ledge.
And someone can’t decide how to play with the design and layout of the kitchen if there is a gas water heater in the corner.
In any case, if the kitchen itself is quite spacious, making a high floor-mounted corner cabinet instead of a sink is a great idea!
The frame of such a cabinet can be either completely cabinet-mounted or free-standing.
So is the built-in design.
Inside such a floor-mounted kitchen cabinet, you can install all the meters and “combs” of utilities, and at a level convenient for inspection and reading data.
And also place water filters, bowlers, washing machines and other large household appliances. And, of course, shelves for household chemicals, which, as you know, should be stored separately from food and dishes.
Drawings of kitchen units
Fig.21.
Drawing of a kitchen with a corner sink.
Fig.22.
Drawings of kitchen modules.
Fig.23.
Drawings of kitchen sections.
Fig.24.
Drawing of a corner kitchen.