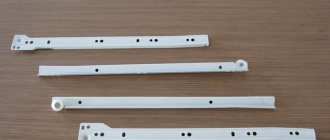
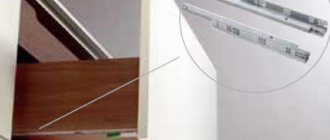
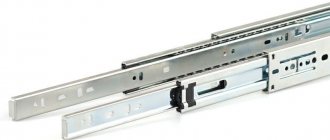
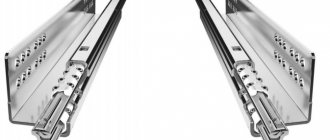
The most popular today, as before, remain telescopic (ball) full extension guides.
They look like this:
Their advantages include:
- Relatively inexpensive price
- Smooth and quiet running throughout its entire service life
- Able to withstand certain loads
- Wear resistance and strength
- Ease of installation
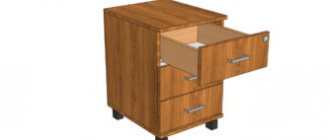
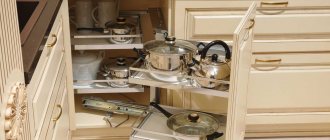
These mechanisms are very often used for drawers of chests of drawers, kitchen sections, wardrobes and other similar mechanisms, with the operation of which they do not want to have problems in the future.
Installation of telescopic guides
The most popular today, as before, remain telescopic (ball) full extension guides.
They look like this:
Their advantages include:
- Relatively inexpensive price
- Smooth and quiet running throughout its entire service life
- Able to withstand certain loads
- Wear resistance and strength
- Ease of installation
These guides are very often used for drawers of chests of drawers, kitchen sections, wardrobes and other sliding mechanisms, with the operation of which they do not want to have problems in the future.
Calculation of drawer parts
To properly install the full extension telescopic slides, let's make sure you've detailed the drawer itself correctly.
When assembled, the drawer (without a front) in width (between the drawer and the side of the product) should have gaps of 13 mm on each side (this is exactly how much the thickness of the “telescope” will take over).
The depth of the drawer should be equal to the length of the guide; usually they have a length from 250 to 800 mm, in increments of 50 mm. Also, be sure to leave at least a 1cm gap between the back of the dresser and the back of the drawer.
The height is usually made based on the needs of the person who will use it. The height is usually 80-250 mm.
Installation of ball telescopic guides
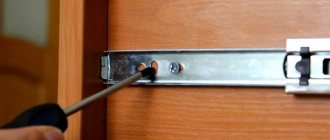
On the side of the drawer, horizontally, strictly in the center, mark a line and screw one half of the guide along it.
Now we need to mark a similar horizontal line on the inside wall of the chest of drawers.
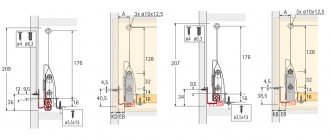
I took the exact distances and dimensions from the drawing of my chest of drawers; you can use the drawing of your furniture product, approximately as shown in the figure:
That is, we mark 417 mm from the floor on the sidewall, and mount the telescope at this height.
With this, the hardest part of the work is finished; now we screw the two halves of the guides to the box and to the side exactly along the line and put the box in its place.
Metaboxes
This is a type of roller guide. The steel runners of these guides are increased to the height of the drawer and completely replace its wooden side walls. Hence the name – metaboxes or metalboxes. The rollers are attached to the sides. The height of the side walls is from 54 mm to 150 mm. The height can be increased using special roof rails. The bottom of the metabox is made of chipboard, limiting the filling weight to 20 kg. The shorter the box, the greater the load permissible.
When attaching the facade to the metabox, vertical and horizontal adjustment is provided, which allows you to accurately align it with the body. Most often, metaboxes are used in the manufacture of serial kitchens in the budget category.
We attach full extension ball guides: how to take into account the dimensions for the additive
Today we will analyze such a popular type of drawer guides as full extension ball guides. Honestly, I personally really like them for their price/quality ratio.
These guides are convenient and easy to install, they are quite durable, have good performance characteristics such as smooth running and load (up to 46 kg).
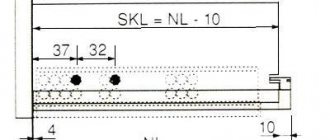
Manufacturers offer a fairly wide selection of these guides. The length varies from 250 mm to 700 mm (in increments of 50 millimeters). The presented diagram shows the main standard sizes, as well as filler sizes. It is worth noting that the location of the main holes may differ among different manufacturers, although there are also fixed ones (which we will discuss below).
Tandems
Tandems are concealed mounting guides. There are two types: full and partial extension. The box is mounted on such guides from above, completely hiding them under the sides and bottom.
Soft sliding (even with a load of up to 50 kg) is ensured by the bearing principle: a block of steel balls located on four sides of the runners (quad system), or cylinders - needles. The fastening allows you to adjust the position of the drawer relative to the body and remove the drawer from the guides without tools. Tandems are available in several versions:
- with a closer – normal opening by the handle and smooth closing;
- with tip on or push to open mechanism – opens by touching the front;
- with electromechanical opening.
What types of telescopic rails are there?
Despite the fact that their design is simple, telescopic guides are divided into types depending on their form and functionality. In theory, the following points can be distinguished:
- the ability to disassemble into removable and non-removable parts;
- number of “steps” (two-section or multi-section);
- by type of construction - single- and multi-level.
Non-demountable structures, as a rule, cost less than collapsible ones. This is due to the fact that when using the latter, it is necessary to use special methods for producing rails and methods for attaching balls to them. It is these same balls that allow you to freely assemble and disassemble the structure without fear of losing small parts.
The price may differ in the number of steps in the structure, and also depends on the number of levels involved in it. Roughly speaking, the more complex the system, the more it costs.
Advantages of telescopic guides
Despite the variety of other systems for pulling out drawers, it is ball guides that have a number of visible advantages. The main ones:
- long service life, corrosion resistance;
- ease of installation;
- low price;
- smooth sliding, unlike simple wooden analogues;
- durability and high-quality assembly.
These types of guides are applicable in almost any type of furniture: cabinets, kitchen units and other structures.
How to mark places for fastening guides
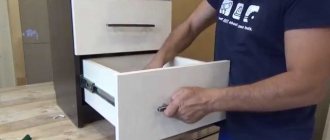
Installing ball guides is much easier than it might seem at first.
The telescopes (by squeezing the black “tendrils” you can pull out half) can easily be disassembled into 2 parts, attaching one of them to the side of the box, and the second to the inner wall of the cabinet.
The main goal is to accurately determine the locations for these parts. They must be marked with a marker. After that, each half must be screwed on with screws and the box must be inserted into the cabinet, connecting the two parts into one whole.
How to calculate sizes correctly
For correct operation of the structure (full extension back and forth), you need to carefully mark the places where the components are fastened. Check the size. Between the wall of the cabinet and the side of the drawer you need to leave gaps where the guides will be located. Most often it is 13 centimeters on each side.
The guides are usually 25-90 centimeters in length in increments of 5 centimeters. In this case, you need to make sure that they are 6-10 centimeters shorter than the box. That is why the structure is mounted in the middle of the side of the box, leaving a little space in front and behind.
Let's sum it up
Installing furniture components is, in its own way, a real art, mastered only by experienced furniture makers. However, it is up to everyone to gain quality experience. So, if you are installing for the first time, take your time, carefully watch the videos presented in the article and re-read the instructions. You will need this to assemble the furniture efficiently.
Video - How to attach ball guides
Hello!
In this short post, I want to solve the problem of many novice furniture makers. Sometimes I read interesting questions, one of which sounds something like this: “How to install a drawer with telescopic guides into a box?”
The fact is that when the drawer is inserted into the box, when closing it (the drawer), some resistance is observed. And this is natural. But the following may also happen: when closing the box, the front part of the movable plate (containing holes in which metal balls are located) may “bite”, that is, it will be slightly deformed (bent). In this case, how much this part bends, how many balls will fall out of it.
This problem is solved simply: the plate takes its original shape using pliers (of course, the dropped balls are put in their place), after which its front ends (those that were bent) are pressed against the guide itself as far as possible with the same pliers.
In order to correctly insert the box with telescopes, you need to observe the following points:
- Those parts of the guides that are attached to the box itself should be pulled out of it as much as possible.
- The moving plate with balls (which we talked about above should also be shifted forward as much as possible - from the box to the outside).
- When a drawer is inserted with its guide rails into the corresponding places of the guides, which are fixed on the box itself, you need to make sure that the drawer does not warp when it slides inside the box. It should go straight in.
- At a certain stage, slight resistance may appear. If the drawer slides smoothly, then you need to apply a little force, the latches on the guides will work, and everything will go like clockwork.
Here, in brief, are the main points of working with telescopic guides.
How to Install Hidden Guides
Hidden ball guides are installed according to the following scheme:
- The clamps for the system slats are attached to the bottom of the box. The fasteners can be fastened in the following way - using self-tapping screws, according to a special scheme that was developed by the furniture fittings manufacturer.
- Then the ball guide strips are inserted into the clamps.
- For fittings whose size does not exceed 4-4.5 centimeters, auxiliary clamps are not needed. During the installation of large-sized guides, the bar can, if necessary, be additionally secured using self-tapping screws.
- Holes must be drilled near each fastener. Their size should be equal to the size of the hooks for fixing the guide.
- On the body, fixation points for the rail bases are marked and the components are further secured using self-tapping screws.
- The rail parts are combined with each other.
Tandemboxes
Tandembox is a box consisting of metal sides with double walls, the bottom is usually made of chipboard, the back wall is made of metal or chipboard and hidden mounting guides. These are the same tandems, equipped with double side walls. It is possible to further increase the height of the drawer using rails and a special profile. Some manufacturers make extensions from glass strips.
To organize the internal space of the drawer, additional options are provided: mobile dividers, containers and stands for cutlery and spice jars.
Tips and tricks
Here are some useful tips and tricks that home craftsmen should consider when getting started:
- during the installation process, it should be noted that the height of the box should be approximately five centimeters less than the immediate height of the facade;
- Most people often confuse ball drawer slides with roller drawer slides. It's actually not difficult to distinguish them. The second ones are painted white as standard. At the same time, the drawer is pulled out using plastic wheels. Professionals say that this version of guides is not as convenient as ball guides. And, besides, it is not so resistant to wear. Therefore, it is not advisable to purchase them;
- If the bottom of the drawer is inserted into special grooves, it will be more useful to secure it with thin edged screws. Otherwise, the entire contents of the box may fall out along with its bottom;
- if the box has to be heavily loaded, it is useful to use a pair of rails;
- Professionals recommend installing ball mechanisms even before the furniture (chest of drawers, wardrobe, etc.) is assembled. If you act in this way, then it will be much more convenient to install the mechanism, and in such a case, much less time will be required for work. After assembling the furniture, all that remains is to adjust all the details.
In fact, installing a ball mechanism for drawers is not at all a hassle. It will be enough to buy good quality guides and follow the instructions. It should also be taken into account that for stable operation it is necessary to correctly take measurements and adjust the mechanism. If you follow all these details and instructions for use, then the guides will last a long time without any problems.