Pull-out fittings for drawers from Hettich: how to install
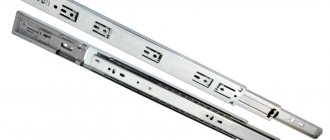
Today we will look at the installation of such a type of retractable fittings as the InnoTech system from Hettich. This is very good fittings, the quality is quite comparable to the well-known Blum. Personally, I don’t really like their characteristic movement dynamics (before sliding, the box almost stops, after which it seems to be quickly sucked into the box), but this is purely my personal opinion.
This system is a representative of full extension drawers with a double steel wall. The height of the boxes can be of three types: 70 mm, 144 mm and 176 mm. We will analyze the installation using the example of a high 176 mm box.
I’ll start my story with an additive scheme specifically for a 176 mm box. The rest can be viewed in the official file of the manufacturer attached at the end.
Now let's go over the calculations of the components (bottom and back wall) - for all varieties.
| Height 7 cm | Height 14.4 cm | Height 17.6 cm | |
| Bottom depth | NL - 1 cm | ||
| Bottom width | LB - 2 x 12.5 - 51.5 | ||
| Rear width | LB - 2 x 12.5 - 63 | ||
| Rear wall height | 65.5 mm | 144 mm | 176 mm |
where NL is the nominal length of the guide LB is the internal width of the housing
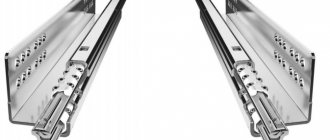
So, we calculated and sawed the dimensions of the components. So we can get to work. The following photo shows all the system components that we have to assemble and install.
These include:
- Pair of double side walls.
- A pair of Quadro full extension guides (there are also partial extensions, but that’s not about us today).
- A pair of rear wall connectors.
- A pair of front panel (facade) fastenings.
- Set of longitudinal rails (2 pcs.).
- Pair of end caps with Hettich logos.
The facade is calculated according to general principles for all drawers. In terms of width, I make them 3 millimeters narrower than the width of the box. In general, I make the interfacade gaps equal to 3 mm.
Let's start the work by assembling the box itself. First of all, the back walls are assembled. Why do you need to attach the rear wall connectors to it? First, the connectors are attached to the rear wall from the rear surface with a self-tapping screw, aligning the bracket along the bottom edge.
The second self-tapping screw in the upper part is screwed in from the end. For this purpose, there are wide holes on the sides of the connectors.
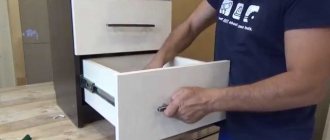
After this, the side walls are attached to the connectors of the rear wall, clicking on the sides. The bottom is inserted into the grooves of the side walls.
The bottom is wound in all the way, aligning along the front edge with the sides. The drawer is turned upside down and the bottom is secured with self-tapping screws (I usually put three on each side).
This completes the main part of the box.
All we have to do is attach the façade and the rails attached to it to it.
To do this, it is necessary to secure fasteners to the facade. They should be installed in 10 mm holes, which can be conveniently drilled with a Forstner cutter of the appropriate diameter.
For correct marking, we return to the first diagram. Considering that we have a bottom drawer, then to the size of 40.5 mm we add the thickness of the lower horizon of 16 mm, which gives a total of 56 mm. The remaining values correspond to the diagram. On the sides you need to set aside size A, which is 23 mm. That is, we retreat 23+15 mm from the edge of the facade (the thickness of the vertical pillar minus the inter-facade gap, which I usually make 1.5 mm - on each side. The lost millimeter is easily compensated by the adjustment capabilities of the system, but if you are a perfectionist, then on one side you need to add to size A 16 mm, and on the other 14 mm, or make 4 mm gaps between the facades).
Using a Forstner cutter, we drill these holes to a depth of 1.2 cm. We do this carefully so as not to drill through the facade. It is advisable to use a drilling machine or at least a stand with a drill depth limiter for this, but a simple hand drill can do the job.
We press fasteners into the holes, which, after pressing, are fixed with screws (they spread the jaws of the futor, tightly securing the fasteners in the holes).
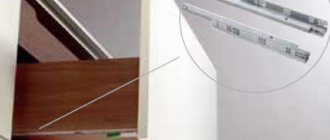
Now we install the roof rails. First, we attach them to the rear wall connectors, snapping them into place.
We repeat this manipulation on the second side. It turns out something like this.
We snap the facade onto the side walls.
The front part of the railing is mounted on the fastening elements of the facades. They are inserted into the groove from above, after which they are closed with decorative bushings.
In the next photo I showed the position control panel.
Now we mark the guide. Let's focus on the first diagram again. To do this, we set aside 3.6 s from the bottom of the facade (remember that the lower facade will be lowered by another 1.6 cm). We draw a perpendicular and mark the traditional 3.7 cm on it.
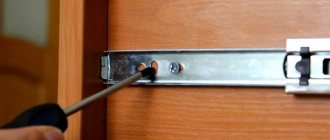
We lay the guide on the perpendicular so that the line passes through the centers of the top row of holes. The attachment points of the self-tapping screws (at least three pieces) are pricked with an awl.
We assemble a furniture box. In my case, this is a box with lower drawers.
We place the box on the guides and push it until it clicks. It is not necessary to remove the façade.
But I dismantled the facade so that it would not be scratched during transportation and therefore put them in place.
Tilt in the frontal plane is produced by rotating the roof rails. At the same time, as they lengthen, they tilt the façade forward, or when rotating back, they tilt it backward.
The façade is shifted left and right by rotating the screw (which is located on the right side). You can move it up and down by rotating the wheels (they are on both sides of the box). To dismantle the facade, you need to press the blue button in front of the window.
All that remains is to close the technical window with a plastic plug with the Hettich logo.
That's it, the work on installing the box can be considered complete.
To conclude the story, I will provide a file from the manufacturing company, which contains installation information presented in official language. See here:
Furniture pull-out fittings InnoTech (1.7 MiB, 403 hits)
Kitchen fittings Hettich
The German manufacturer of kitchen fittings Hettich is one of the most popular brands in the global furniture industry. The company has been on the market for more than 120 years, during which time it has established itself as a reliable brand with an innovative approach. The company’s employees are as customer-oriented as possible and try to make the selection of accessories convenient and understandable.
Below we will talk about the company’s establishment on the market, as well as the types and purposes of Hettich kitchen fittings.
About company
The Hettich company first announced itself at the turn of the 19th century. In 1888, Karl Hettich founded the production, which from the very beginning was characterized by modern equipment and a qualified workforce. It was decided to name the company after the surname of the founder, and to this day it proudly bears the name of its creator.
QuoteExpand
Quote:
It all started with a simple machine that had only one function - Karl Hettich mechanized the production of anchor escapements for watches.
The Germans are known throughout the world for their precision, meticulousness and quality. This applies to automotive production, household appliances and furniture. Karl Hettich did not deviate from national principles and adhered to not only the principle of quality in production, but also introduced the latest technologies that allowed and continue to allow the creation of truly high-quality, practical and convenient fittings for the Hettich kitchen.
Brand formation
1888 - the brand began its activities in the city of Schramberg 1930 - moved to the city of Herford, the center of the furniture industry in Germany 1966 - the head office of the Hettich company moved to the city of Kirchlenger 1995 - the beginning of activities in Russia
Hettich kitchen fittings are now sold all over the world thanks to well-developed distribution channels.
Products
What does Hettich do?
The activity is aimed at the production of furniture fittings for various rooms: kitchen, living room, bedroom and work area. Fittings are that component of furniture that is not visible to us, but it is what makes the use of familiar cabinets comfortable and convenient. When ordering furniture, you can save on various components, but never on fittings! Any furniture maker will confirm this!
Poor-quality hinges, cheap guides - all this can spoil the impression of using even the most beautiful and expensive kitchen.
Hettich has developed its own concept, according to which furniture fittings should be comfortable and safe. The secret of customer loyalty to the company is continuous quality control at all stages of production, as well as close communications with customers and timely receipt of feedback from them.
Thanks to all the above-mentioned qualities, the quality of the final product is at its best! Innovative ideas are improved and updated on an ongoing basis.
Hettich hinges
Sensys Quick Installation Hinge
This is a hinge with a built-in damper for silent closing of the door. The self-closing system is suitable even for wide angles. Simple design and maximum comfort are confirmed by international awards. Available in black and metallic.
Intermat quick installation hinge
Multiple mounting options provide the ability to adjust the loop for comfortable use. Even the most experienced furniture maker can install this option. Suitable not only for kitchen units, but also for office cabinets.
SlideOn hinge
A hidden folding hinge made of steel with a double spring will securely fix the door in the required position. The simplest installation allows you to quickly install the loop.
Push to open opening mechanism
This mechanism is relevant for kitchen sets in which the owners decided to abandon standard handles. To open the door, you just need to lightly press the facade; to close the door, press the facade again.
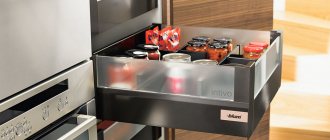
Hettich drawer systems
ArciTech and InnoTech Atira
These two systems were created for ergonomic opening of drawers. InnoTech Atira is a time-tested system that provides increased functionality and comfort. ArciTech is an advanced system with a smooth running and quiet operation. Both systems meet international quality standards for premium furniture. You can choose any color and design.
MultiTech
MultiTech drawers with single-wall sides offer a choice of five heights and six lengths. Safe installation combined with excellent quality made this system especially popular among users.
Quadro drawer guides
There is a huge range of drawer guides; in the Quadro line you can choose solutions for any type of furniture. Thanks to the movement of the ball bearing, the drawers open and close smoothly and precisely. Silence is achieved due to the correct position of the balls inside the guide, and hidden installation allows you to make the system invisible.
Systems for sliding and folding doors
Hardware systems for sliding doors with top running:
InLine : suitable for sliding doors without handles, smooth operation and adjustable damping of the system.
TopLine: suitable for any type of furniture, absolutely silent opening and closing.
SysLine S : the door opens with a light touch; the advantage of this is that the system is completely invisible - the upper running profile is mounted on the top panel.
Hardware systems for sliding doors with bottom running element:
SlideLine M : suitable for the installation of 2- or 3-door cabinets and also allows the creation of combinations of open and closed cabinet sections.
SlideLine 66 : the perfect solution for a bookcase - the single-track system is suitable for doors weighing up to 10 kg.
SlideLine 55/56 : suitable for any cabinet design, door weight should not exceed 15 kg.
SlideLine 97 : ideal for glass door installations, the plastic coating reduces noise levels.
Folding door hardware systems
The line of sliding door systems allows you to implement any design solutions for your kitchen set. A reinforced damper for opening and closing ensures comfort, and even an amateur can handle the installation.
The main message of the Hettich company is that good furniture must have good fittings! And judging by user reviews, this brand does a great job of following this principle. Hettich kitchen fittings have established themselves as a quality product that justifies its cost.