When making furniture for the kitchen, bedroom or children's room, you cannot do without furniture fittings. However, quite often during its installation many problems arise, including damage to furniture elements. This is due to the lack of technical information on how to properly use and install this or that type of furniture fittings. In addition, there are many small and inexpensive elements of fittings that are used in conjunction with standard ones and can provide better ergonomics of furniture, but which are little known to non-specialists in this field. This material will discuss the main elements of furniture fittings, application options and installation features.
Furniture handles: types and installation features
Furniture handles are used in any furniture. There are a huge number of different design solutions. However, the entire variety of handles can be divided into 3 groups according to the installation method: button and drop handles, bracket handles and railing handles, profile handles. All of these groups of handles can be used on any furniture with any type of facade, with the exception of the third group.
Button and drop handles can be installed on any furniture and facade of any design. They have one attachment point. Handles of this type are fixed to the facade using a screw with a diameter of 4 mm; for this purpose, a thread is provided in the handle. To secure the handles of a point or drop, you need to determine its location and drill a hole with a diameter of 5 mm, and through the hole secure the handle to the facade.
Fig.1.
Fig.2.
Fig.3.
Fig.4.
Shackle handles and railing handles are used as often as the previous group. There are also a huge variety of handles of this type. However, unlike the previous group, the bracket handles have a two-point fastening and are available in various sizes. The fastening elements are a screw with a diameter of 4 mm. To install the handles, you need to drill 2 holes with a diameter of 5 mm and secure the handles with screws.
Fig.5.
Fig.6.
Fig.7.
Fig.8.
The greatest difficulty in installing bracket handles and rails is the center-to-center distance of the mounting holes. The size range of the center-to-center distance is formed starting from 64 mm, in increments of 32 mm. Those. The center-to-center distance of the mounting holes can be: 64, 96, 128, 160, 192, 224, 256, 288, 320, etc.
There are several ways to determine the center-to-center distance of the mounting holes. You can measure the distance between the fasteners directly on the handle and select the appropriate one from the standard range given above. Also, quite often the symbol for handles contains the center-to-center distance of the fastener.
Fig.9.
A common problem with installing handles is determining the center-to-center distance of the fastener. It's easy to define. It is often indicated in the model designation. You can measure the approximate distance and round it to the nearest standard range.
It should be noted that there is another difficulty in installing handles, which is characteristic of both handles with one attachment point and those with two, associated with the length of the mounting screw. Most handles have a thread depth of 4.5 mm, and the length of the screw that comes with the handle is 20 mm. This screw is intended for a facade made of laminated chipboard with a thickness of 16 mm. However, if the facade has a different thickness, for example, it is made of an MDF profile with an insert, then with a screw of this length it will not be possible to properly secure the handle. Therefore, before installing the handles, it is necessary to determine the required screw length. The length of the screw should be 3-4 mm greater than the thickness of the facade at the location where the handle is installed. Screws are standardly available in lengths from 8 to 40 mm.
Profile handles are the easiest to install. There are a huge number of different designs of this type of furniture handles. The simplest design is a bracket. This type of handle profile is secured with self-tapping screws to the back side of the facade.
Fig. 10.
Fig. 11.
Fig. 12.
Fig. 13.
The use of profile handles has certain features. This type of handles will look good when the facade panel is a laminated chipboard or MDF board, i.e. has a rectangular profile in cross-section. If the facade is made, for example, from an MDF profile with a non-rectangular cross-section, then the use of handle profiles will not look appropriate.
Fig. 14.
The façade profile has a rectangular cross-section. In this case, the handle profile completely covers the upper end of the door, thereby becoming one with the front panel.
Another point is not true for all profile-handle designs, but for many of them it is a problem of installation on a non-standard façade. The fact is that for facade panels (drawer doors) the accepted size range is 150, 300, 450, 500, 600, 800, 900 mm. The size of the handles is thus adapted to this size range.
For example, the standard size of a 500 mm drawer door has an actual size of 497.5 mm, respectively, the installation length of the handle will be 497.5 mm. If you plan to install handle profiles, then this feature should be taken into account when choosing the size of the drawers and the width of the front panels.
Fig. 15.
The handle profile completely covers the end of the door, protecting it from moisture and drops. By using a handle profile, you can save on gluing the edge where the handle is installed.
There are many different designs of mortise handles, but installing them yourself in most cases is problematic. This is due to the fact that to install such handles it is necessary to mill out the space for installation, i.e. modify the façade panel. It is very difficult to do this efficiently without using a router. Therefore, if your choice fell on such handles, then it is advisable to provide for this modification at the stage of ordering facade panels.
Fig. 16.
Fig. 17.
Fig. 18.
Fig. 19.
Further actions
The cabinet box is assembled. There is no need to rush to hang the doors. First you need to look at what else can be inserted inside to strengthen the cabinet. In any closets, in compartments too, there is a special stick - a spacer, strengthened inside the closet. Hangers with suits and dresses are then attached to it.
The spacer must be strengthened as soon as the cabinet frame is assembled. The spacer is also part of the fittings, like other parts necessary to strengthen it inside.
Monitor the quality of work. Since an unevenly installed spacer is a defect during assembly. Install all shelves. When all this basic assembly work is done, the cabinet stands firmly and does not wobble.
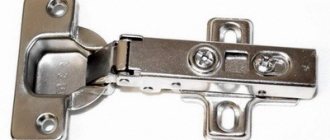
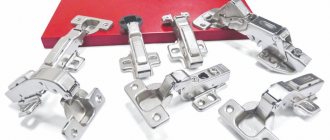
Hinges: types, installation methods
There are as many structural varieties of hinges as there are varieties of furniture handles. However, unlike the latter, for each type of loop there are special formulas (tables) for calculating installation dimensions. When calculating hinges, the type of hinge, method of fastening, thickness of the facade, reveal (the gap between adjacent doors) and several other parameters are taken into account. All calculations are simple, but they are needed mainly for the industrial production of furniture. To make furniture with your own hands, it is important to choose the right type of hinge, know the adjustment methods, and the connecting dimensions can be left to the organization that will manufacture the furniture parts.
As already mentioned, there are many types of designs, but the most common is the mortise four-hinged hinge. It and its design options will be discussed further. A four-hinged hinge consists of the hinge itself and the mounting bar. The hinge is attached to the front, the strip to the wall of the drawer. Both parts are connected using the screws included with the hinge.
According to the method of application, hinges can be divided into overhead, inset and for corner drawers. An overhead hinge is designed for a door that, when closed, “overlaps” the end of the drawer. The inset hinge is designed for a door that, when closed, is flush with the end of the drawer. There are also semi-overlay hinges, which are convenient to use for adjacent doors, but then it is necessary to carry out additional calculations of the installation dimensions of the hinges and the dimensions of the facade panels in order to maintain the gap between the doors.
Fig.20.
Depending on the method of installation of the facade, various hinges are used. If the door is recessed into the body of the cabinet, then an inset hinge is used; if the door is placed on the end of the cabinet, then an overhead hinge is used.
Corner hinges are designed for doors that are located at an angle to the side walls of the drawer. There is also a version of hinges that are designed to attach the door to the wall of the box at an angle of 180 degrees (attachment to the false panel).
Fig.21.
Hinges are angled 30, 45 degrees and for false panels 180 degrees. It is important to note that corner hinges come with opening angles of +30, 45 (obtuse angle) and -30, 45 (acute angle), depending on whether the cabinet has an acute or obtuse angle where the door is installed.
Another important hinge parameter is the door opening angle. Depending on which hinge is installed, the cabinet door can open at an angle of 90, 110, 120 degrees. Using hinges with a door opening angle of more than 90 degrees can be very convenient for hard-to-reach or deep cabinets.
An important point in choosing hinges is determining the number of hinges per door. Since the hinge has a certain maximum permissible load, depending on the size and weight of the door, from 2 to 5 hinges may be required. The following recommendations on the number of hinges are given based on the fact that the door material is a 16 mm thick chipboard panel, the panel width is 60 cm. So for a panel up to 90 cm high (weight 4-8 kg) you need 2 hinges, from 90 to 160 cm (8 -13 kg) – 3 loops, up to 160 to 200 cm (13-17 kg) – 4 loops. The maximum dimensions are given; to ensure reserve, 1 loop can be added to each size group.
Fastening furniture hinges to the facade and drawer is carried out in the following way. A groove is made in the façade panel for the bowl using a router or Forstner drill. Next, the loop is secured to the facade panel with self-tapping screws. On the side of the cabinet, a place is marked for the installation platform, after which it is secured with self-tapping screws.
Fig.22.
Fig.23.
Fig.24.
Fig.25.
It is possible to do as described above only by knowing all the installation dimensions. You can determine them using special tables in the instructions for the loop. In practice, at home, it is convenient to do things a little differently. It is important that the quality of the hinge installation does not suffer from this.
Typically, the outer hinges are located at a distance of 10 - 15 cm from the top and bottom of the door, the intermediate ones are evenly distributed in the space between the outer hinges. To ensure a gap between adjacent doors, for most hinges a distance of 4-5 mm is made from the end (side) of the door (the exact size is indicated in the instructions for the hinge). Based on these dimensions, a groove with a diameter of 35 mm (the most common size of a hinge bowl) and a depth of 12.5 mm is milled into the facade panel.
Next, the loop and the platform are connected, all adjusting screws are brought to their extreme position. Then the loop is fixed to the facade, while making sure that the loop is located at a right angle to the facade. Then, holding the door in the desired position, secure the mounting bar to the drawer. In order for the door to hold, it is enough to install 1 self-tapping screw in the mounting strips of the outer hinges. Now you can adjust the door height and secure it with the remaining screws.
Fig.26.
The height of the doors is adjusted using the fasteners of the installation strip. To make adjustments, loosen the screws and install the door in the desired position. Then tighten the fasteners.
The final stage is adjusting the position of the facade. The door has already been adjusted in height using the self-tapping screws that secure the bar at the previous stage. Now you need to adjust it for reach and inclination. Two adjusting screws No. 2 and No. 3 are responsible for this.
By releasing screw No. 2, the door can move back and forth. In order for the door to stand level and not touch the drawer when opening, you need to move the door 2-3 mm towards you. A similar operation must be repeated with all loops.
Fig.27.
Using screw 2, the gap between the door and the furniture body is adjusted. A sufficient gap of 2-4 mm. Screw 3 is responsible for the tilt of the door and the gap between adjacent doors.
Screw No. 3 is responsible for adjusting the door tilt; at the same time, using this screw, the gap between adjacent doors is adjusted. By rotating screw No. 3, it is necessary to achieve a uniform gap between the doors and eliminate possible tilt of the doors in the horizontal plane. This adjustment is performed first with the outer loops. The intermediate ones are adjusted to fit the already exposed door.
Often, when building a kitchen set, it is difficult to install doors in a corner cabinet of an L-shaped kitchen, in particular which hinges to choose for such a cabinet. It's actually quite simple. The door of such a cabinet consists of 2 parts. The composite door is attached to the kitchen unit using a regular hinge, but with an opening angle of 120 degrees. The door halves are fastened together with hinges for a false panel with an opening angle of 90 degrees.
Fig.28.
Fig.29.
Fig.30.
Fig.31.
Criterias of choice
Following these recommendations will help you avoid mistakes when replacing kitchen fittings.
- To begin with, you need to set your priorities correctly, since each subgroup has certain requirements, for example; when choosing external parts, it is better to focus on their presentability, and in the case of fasteners, it is preferable to pay attention to quality and functionality.
- The auxiliary parts are expected to be instantly replaceable; each such part must be very durable and fit tightly into the corresponding grooves.
- Quality of the material. Kitchen components usually consist of metal, plastic, and less often glass or wood. Particular attention should be paid to the selection of fastening and component systems - it is better not to save money here. Budget options are prone to rapid wear and tear and regular replacement, which will cost much more.
- The popularity of the manufacturer, as a rule, high-quality products win the respect of consumers.
- Even the best elements must correspond to the overall chosen style, without being conspicuous and creating a neat appearance for the set.
- Chrome elements are suitable for a high-tech kitchen.
- The classics will be emphasized by gilding or bronze.
- In modern style, painted details are welcome.
- Mediterranean style requires natural elements.
Advice to avoid mistakes when choosing, before ordering kitchen components online, you should clarify the parameters in accordance with the already existing parts. Or even take a photo of the old item and use the help of a sales consultant, which is certainly available in every online store.
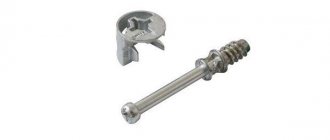
Shock absorber and soft closing system
Shock absorbers are necessary for comfortable operation of furniture. After all, it’s not much fun if the doors slam hard when closing?! This unpleasant circumstance can be eliminated with the help of shock absorbers. There are several different types of shock absorbers, which differ in technical capabilities and installation method.
The simplest type of shock absorber, and the cheapest, is a damper. There are several options for dampers, the simplest is a self-adhesive damper. It is a disk with a diameter of 7-10 mm and a thickness of 1.5-2 mm. It is made of soft material that perfectly dampens the sound from the closing door. This damper has an adhesive layer, making it very easy to stick to the end of the cabinet. It is worth noting that this is the most common way to eliminate door slamming.
Fig.32.
To eliminate slamming when closing the door, a silicone damper is used. It is glued to the end of the cabinet body. For one door use 1-2 dampers.
Another solution to the problem of silent door closing is a furniture shock absorber. Its cost is higher than the previous option, but it has the effect of smoothly closing the door. There are 3 types of shock absorbers: loop shock absorber, overhead shock absorber and mortise shock absorber. They all have the same operating principle. The choice in favor of one design or another depends only on your preferences.
The hinge shock absorber is mounted directly on the hinge on which the door is held. To do this, the loop must be equipped with a special groove to which the shock absorber will be attached. You can give advice: if your choice fell in favor of this structural group of shock absorbers, then it is advisable to purchase hinges and shock absorbers at the same time, from the same manufacturer.
Fig.33.
The shock absorber installed on the hinge does not require modification of the furniture and takes up virtually no space. However, not all hinges provide the possibility of installing a shock absorber.
It should be said that there are varieties of hinges with a shock absorber already built into the hinge design. Naturally, such hinges are more expensive than regular ones, but they do not take up extra space inside the cabinet.
Overhead and mortise shock absorbers are not tied to the design and type of hinges. In addition, they differ only in the presence of an installation platform for the former. The overhead shock absorber is attached to the inner surface of the box. For a mortise shock absorber, it is necessary to make a hole in the end of the wall of the box with a diameter of 10 mm and a depth of 55 mm. The advantage of an overhead shock absorber is the ability to replace it if it breaks, although this happens extremely rarely; a mortise shock absorber will be much more difficult to replace. The advantage of a mortise shock absorber is that it does not take up space inside the cabinet.
Fig.34.
Overhead (left) and mortise (right) shock absorber. Another type of shock absorbers: overhead and built-in. The first type of shock absorbers has its own housing and can be replaced if necessary, but takes up space in the box. The second type is installed in a hole in the end of the box. It doesn't take up space, but it's much more difficult to replace.
There are no restrictions on the installation location of shock absorbers; the efficiency of its operation depends on many factors, such as the installation location, the weight of the door, the closing force, etc. However, there are the following recommendations: it is advisable to install the shock absorber at a distance of 150-200 mm from the wall on which the hinges are installed.
Assembly using fasteners
Which set is included with the cabinet depends on the type of cabinet and its design. Bolts are used where necessary. If necessary, wood veneers are hammered. Each disassembled cabinet from the store is given an assembly diagram.
By carefully reading the instructions and following the assembly diagram, you can assemble the cabinet yourself on site, in your apartment. If the cabinet is unfamiliar, something that a person has never assembled, you need to carefully delve into the diagram. Take your time when assembling.
Otherwise, you can ruin the accessories, which are in limited quantities. In addition, you can lose time during assembly. It's better not to rush. It must be done thoroughly. This is the right path to success. You also need to have good assembly tools on hand.
Repulsion systems
Is it possible to open a cabinet without handles? Can. To do this, you can use the repulsion system. Externally, it is very similar to a shock absorber and even performs its functions. But the main feature of this system is that when you press the door, the pusher moves the door to a distance of up to 6 cm, which allows you to open it further by hand without using the handles. In this way, you can make a facade without handles, and at the same time save a lot of money on the latter.
Fig.35.
The cabinet doors do not need to be equipped with handles, but pushers can be installed. When you press the door, the mechanism will push the door away by about 5-6 cm, in which case it will be convenient to open it by hand. This way you can make a very interesting facade without handles.
Repellers come in mortise and overhead types. They are installed similarly to shock absorbers. The difference in installation is that they must be mounted on the wall opposite to where the hinges are installed. To hold the door, pushers can be equipped with magnets. The repeller operation is adjusted by rotating the rod, so you can select the optimal repulsion value.
Repulsion systems can be used for both doors and drawers, together with any other mechanisms, from hinges to elevators.
Rating of quality accessories of average price
Boyard
The brand from Yekaterinburg produces and distributes furniture components for various purposes. The company places the main emphasis on elements for kitchen corners. The main advantages of the corporation are the overhead hinge H301A02 they developed with a clip-on system and a closer function. This device allows you to open the doors at an angle of 105.
Video review of a kitchen equipped with fittings from this brand:
Contrary to its name, the company belongs to Ukraine, with its head office in Kyiv. The company produces sliding and hanging systems mainly from aluminum. Also developing in other areas, including the creation of finishing elements, there are 3 areas in total:
- auxiliary parts and equipment;
- sliding wardrobes with self-made profiles;
- decorative components.
Braun fittings
Advantages:
- Wide selection of additional parts for assembling kitchen furniture;
- ease of installation;
- reliability of fastenings;
- good materials;
- ease of use;
- price + quality ratio.
Flaws:
- There may be shortages.
Cost: 500 ₽
Hettich
This German manufacturer has long been a success among zealous owners and is deservedly considered a guarantor of quality in the creation of furniture fittings. All systems from this brand are distinguished by the reliability and durability inherent in true German premium quality. The company offers a wide range of parts and components, allowing each of its clients to find what they need. Like, for example, the strip for hanging cabinets HETTICH 2 m 953003, which can be used on both sides. The rack is quite strong and can hold a load of almost 150 Kg.
Video review of the interior with brand fittings:
The products of the Polish brand have become widespread not only in Russia; parts produced by the company are supplied to different countries. At the same time, the structure is actively developing, increasing the number of its regular customers. The brand’s assortment includes a wide variety of various accessories for kitchen furniture, from simple components for handles, hinges, legs and other small items, to complex mechanisms such as a full extension guide with a Modern slide PB-0SHX-600-A closer. The main distinguishing feature of this design is considered to be a hidden installation method, that is, it involves installing the system not, as usual, on the sides of the box, but on its bottom.
Stylish and functional kitchen with facades from Kronospan and fittings from GTV:
door closer Modern slide PB-0SHX-600-A GTV
Advantages:
- Possible choice;
- quality of fittings;
- maximum load 40 Kg.
Flaws:
- Not found.
Average price: 1627 ₽
Other nuances of the hitch
If the doors are hinged, the fittings used are different. Special furniture hinges. They also come in unusual shapes. The one attached to this cabinet is the one that is attached. According to the drawing, according to the scheme, this is planned, and not something else. It’s better not to invent anything unnecessary here, to follow the scheme.
The loops are secured. Then the doors themselves are hung. The scheme may differ for different designs. But everyone has the same principle. Doors must move freely in both directions and be reliably protected from falling out of their intended sliding limits.
On doors that are not installed on the cabinet, you also need to secure the handles for the cabinet in advance. With this element it is easier to hang doors on the closet. After all, when installing a lock, the door has to be opened and closed. Check. It is inconvenient to attach a lock to the door without a handle.
Materials
The following types of materials are used for the manufacture of furniture fittings:
- wood, used mainly for making handles, the product is durable, suitable for various types of kitchen interiors;
- metal, the material is used for the manufacture of many types of furniture fittings;
- glass and leather, materials used for the design of handles, have high decorative characteristics;
- plastic is used to make handles, legs and some elements of retractable systems. Plastic products are considered not durable and require frequent replacement.
Correct door hanging
Different models have different ways of constructing door reinforcements. Some require door guides. Which must be secured to the cabinet in advance before putting the doors on. These wardrobes have sliding doors.
It is better to fasten the guides in this way. Mark the locations with a marker. There will be screws there. Then use a thin drill to drill a little in these places. And attach the guides to the screws.
Do-it-yourself upholstery of upholstered furniture: step-by-step master class, advantages and disadvantages of updating furniture (130 photos)Wardrobe for the bedroom: the best models of 2022 and modern solutions from leading manufacturers (120 photos and videos)
Shelves for the bedroom - modern ideas for use and current combinations with interior design (125 photos and videos)
To be sure, you must first secure the front, middle, and end of the guides. Then the rest. Typically, two sliding doors have two guides, to the right and left of the cabinet.