Home » Assembly
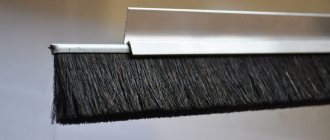
The brush-shaped Schlegel seal is a recommended accessory for every wardrobe. The brush seal is attached to the end of the compartment door. Functions as a dust cover - the pile prevents dust from penetrating into the cabinet through the working gaps. Softens the closure of the cabinet door, acting as a gasket between the profile and the body of the cabinet, thereby saving parts from wear.
- The right approach to choosing a brush seal
- Reliable adhesive composition
- Price
- Rich color palette
- Possible tape density
- How and where to glue the Schlegel seal
How to choose a brush seal (schlegel) for a wardrobe
The brush-shaped Schlegel seal is a recommended accessory for every wardrobe. The brush seal is attached to the end of the compartment door. Functions as a dust cover - the pile prevents dust from penetrating into the cabinet through the working gaps. Softens the closure of the cabinet door, acting as a gasket between the profile and the body of the cabinet, thereby saving parts from wear.
- The right approach to choosing a brush seal
- Reliable adhesive composition
- Price
- Rich color palette
- Possible tape density
- How and where to glue the Schlegel seal
The right approach to choosing a brush seal
To purchase a brush seal that will be compatible with the door structure, it is important to take into account the door dimensions and operating clearance. The design of strip brushes allows you to install them horizontally, vertically, at different angles, based on the required size. Adhering to economy, connection is allowed. The height of the pile directly depends on the width of the gap.
A number of functions that the brush seal has:
- The density of the doors to the side walls of the cabinet. The design of the sliding wardrobe assumes the presence of working gaps, and there is no escape from this; the brush does an excellent job of sealing.
- The brush, together with the sealing functions, plays the role of anther. One should not overlook the fact that the pile also traps moisture, preventing it from getting inside the cabinet.
- Brushes on the end of the door facilitate its soft closing. The tape acts as a buffer and is able to absorb sharp impacts, preventing possible damage to the cabinet.
Reliable adhesive composition
During the production of the tape, a special adhesive composition is used, which provides the tape with sticky properties for a long time, and even after repeated use. Adhesive testing is carried out according to the following criteria:
- Adhesive properties (parallel peel test is performed).
- Shear retention, this determines the load retention time for the vertical gluing method.
- Temperature test at which the adhesive properties begin to weaken. Can be used in cold winters, in unheated rooms.
- The glue grades comply with European requirements, this confirms reliability and instills confidence in the sealant.
Retail prices assume the cost per linear meter:
- A boot with dimensions of 7x6 mm will cost 30 rubles/m.
- A boot with dimensions of 7x12mm will cost 40 rubles/m.
- The price of the fixing clip is 15 RUR/piece.
Rich color palette
The color range offered by manufacturers is suitable for even the most daring design solutions. Colors have a palette of shades. Metallic can be used. The composition of the paint prevents fading and even the slightest change in color during use.
Monocolor is widely popular in use - when the base of the tape has the same color as the bristles of the brush. This is especially visible in the finished product; such cabinets have an expensive look.
Possible tape density
The number of lines determines the density of the pile. The denser the brush, the stronger and more reliable it is, the longer it retains its original appearance, and its high resistance to wear. Today's market includes products with the following densities:
- 3 lines - medium density, marked as (3P)
- 4 lines - standard density is marked as (4P)
- 5 lines - super dense, and is designated as (5P)
Brushes are offered in wound coils of 150 m, 200 m and 275 m, convenient for use in production or retail sales. Basically, the standard tape has a width of 7mm, height starts from 4mm and reaches 15mm. Depending on the application of the tape, overall dimensions may vary.
How and where to glue the Schlegel seal
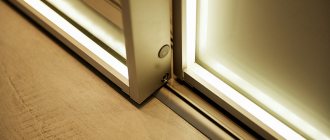
Each wardrobe door has an aluminum profile frame. The end profile is equipped with a groove into which the brush seal is glued. The gluing process is quite simple. The bottom of the groove must be degreased, then remove the edge of the protective film from the adhesive side of the tape, and starting from the top edge, gradually removing the rest of the protective film, stick Schlegel to the very bottom. The edges of the tape are held in place by a special clip. There are cases when the edges lag behind and there is no clip; you can always glue the tape with regular superglue.
Production nuances
Manufacturers try to make sure that the Schlegel does not stand out against the background of the aluminum profile in which the seal is installed. Therefore, most often ribbons are sold in gold, white, silver, gray, black and other colors similar to or close to the color of the profile itself.
The material is always the same. This is polypropylene. A special adhesive impregnation is applied to one side of the product, and a protective film or paper is applied on top. Before installing the Schlegel, you just need to tear off this protective tape, evenly distribute the buffer over the profile and press it.
The bristles themselves are made from pile or felt. The pile is more optimal because it has several options in size and is more effective at suppressing noise. Felt is not bad, but it does not contribute to the most reliable closing of doors. This material is recommended to be used only with minimal gaps on furniture.
I do not recommend peeling off the entire protective film covering the adhesive layer at once. Remove it gradually as the profile fills with sealant. This will allow the installation to be performed more smoothly and accurately.
I think we have sorted out this issue. If there is anything you don’t understand or want to know something additional, write in the comments. We will try to answer you as quickly as possible.
Thanks everyone! Subscribe, leave comments, ask questions and tell your friends about our site!
Schlegel
Schlegel (brush seal) has become a necessary component of a modern wardrobe. Schlegel is a narrow fleecy tape that is securely glued to the sides of the doors.
1. Depreciation when opening/closing doors. Since the door handle and side of the wardrobe are made of fairly hard materials, it is absolutely necessary to use an intermediate soft layer, otherwise you can soon scratch both the handle and the body of the wardrobe. Schlegel copes well with this task, ensuring smooth closing of the doors.
2. Helps protect stored items from dust. The presence of a schlegel helps the doors fit more tightly to the sidewalls. Due to this, gaps between cabinet elements through which dust can penetrate are eliminated. As you know, in residential buildings, dust often causes allergenic reactions and can lead to serious illnesses, so keeping things in the closet clean is very important.
3. Noise reduction. The sound of doors closing becomes significantly quieter.
Sandy uses only high-quality schlegel from the best manufacturers. In the aluminum profile used in Sandi wardrobes, there is a special groove for the Schlegel. Thanks to this design, the junction between the Schlegel and the profile is hidden, which increases the aesthetic characteristics of the doors and also eliminates the possibility of the seal coming off.
Chain of furniture stores "Sandy" Sliding wardrobes, wide range of models (more than 340 models) Corner sliding wardrobes, bedrooms, chests of drawers, beds, hallways, cabinet furniture, bedroom furniture
Sitemap | Print version | Details | Payment and delivery Privacy Policy | User Agreement Development - NN Website
You cannot use laminate with this model if the door width is more than 800 mm
Write a letter
You have questions? Send us a message and leave your contacts.
Request a call
You have questions? Leave your phone number and we will call you back.
Functions
The widespread use of Schlegel for sliding wardrobes in the furniture industry is no coincidence: the part carries an important functional load in the operation of furniture. The fluffy tape glued to the aluminum profile ensures reliable operation of sliding systems. In particular, Schlegel performs the following functions:
- depreciation when opening and closing the doors. In the absence of this device, the door will constantly hit the counter bar from the inside. Over time, this will cause significant defects in the form of chips and cracks in the chipboard. Schlegel copes with the task perfectly, ensuring smooth closing of the compartment doors;
- protection from dust - if the door does not close tightly, then gaps appear at the joints of furniture panels. Dust and dirt accumulated in the apartment easily penetrate through them. The constant accumulation of dust leads not only to contamination of things, but to the fact that household members develop allergies. Sealing tape will easily help hide the gap and prevent dust from getting inside;
- noise reduction - this function is important if there are small children in the house. Often, a mother needs to open the closet in order to get clothes while the baby is sleeping. Cushioning will help prevent the characteristic knock and prevent noise and popping.
In high-quality furniture, a special groove is cut out on the aluminum profile into which the buffer tape must be glued. Standard manufacturers do not prepare such conditions for installation; the tape must be glued directly to the profile.
Questions and answers on remodeling an old wardrobe.
From time to time, our customers have various questions that relate to various aspects of handling furniture ordered from us. And a huge part of these questions relate specifically to wardrobes. Probably, such an interest is quite natural, because today a wardrobe can be found in many houses and apartments; it, one might say, has become an integral part of our life. Therefore, we have collected all the most frequently asked questions regarding sliding wardrobes and their components in one place to make it easier for our customers to solve emerging problems.
Is it possible to move a built-in wardrobe to another location?
Why not? In the end, a wardrobe is not like an Egyptian pyramid to stand in place for several millennia without any movement, even if we are talking about a built-in wardrobe.
At the same time, however, it would be useful to take into account several important nuances. For example, the dimensions of the new location of the cabinet should be the same (or at least not smaller) as in the old location. If the ceiling height is not enough, then it is better to refuse to “move” the cabinet. It will be possible, of course, to adjust the size of the cabinet to the parameters of the new room, but this is so troublesome and difficult that the complexity and cost is comparable to creating a new wardrobe.
If the ceiling height in the new place is the same as in the old one, then moving the wardrobe is quite possible. The only advice on this matter: select and save every smallest detail, every screw. Ideally, it is better to somehow even mark where this or that part came from; this will greatly help you when assembling the cabinet in a new place.
If you are careless and lose some of the parts, there is a high probability that there will be nothing to replace them during assembly. As a result, in a new place, your wardrobe will look shabby and unkempt, much older than its age.
Is it possible to change the flooring under the wardrobe?
Most often, this question arises when, during renovation, the flooring (laminate, parquet board, etc.) is changed in a room where a built-in wardrobe is installed.
First of all, decide whether this is advisable? After all, to replace the covering under the cabinet you will have to disassemble it and then reassemble it. The process is troublesome and difficult, and also requires tools and certain skills.
In such a situation, our craftsmen advise doing something simpler - remove the compartment door wings, unscrew and remove the lower track along which these doors move; if there is a backing underneath, it also needs to be removed. Be careful not to break anything or deform metal parts.
Now cut the covering along the middle line of the bottom track (a grinder is best suited for this purpose), and you can re-lay the flooring in the room. At the end of the work, we put the bottom track and doors in place, it turns out that the room now has a brand new floor, and inside the cabinet there remains the same covering, which, however, will serve you for a very long time, because the load on it is minimal. The junction of the two coatings is covered by the bottom track, so no flaws in the work are visible.
You can, of course, completely disassemble the cabinet in order to completely change the covering, but it is simply impractical to do this, because this will require a lot of time and effort, and besides, can you guarantee that you will reassemble the cabinet after finishing the work?
Ceiling and wallpaper inside the wardrobe
If you want to somehow improve the back wall (for example, put wallpaper there), which has a built-in wardrobe, or make a ceiling, first think about how practical this is. After all, such a procedure will require a lot of time and effort, for example, you can make the ceiling of a cabinet from laminated chipboard or other board material, but this ceiling will not bear any functional load - the role of the ceiling of a built-in wardrobe is played by the ceiling of the room.
Such a ceiling will most likely not look very aesthetically pleasing - it is quite difficult to accurately adjust the laminated chipboard rectangles to the size of the sections, so cracks will probably be visible. And you will have to attach it with the help of mounting corners, which will also be visible and will definitely not add to the beauty of your furniture. Therefore, it will be much easier and faster to paint the ceiling with water-based paint; fortunately, such paints are now sold in any hardware store. They are odorless, environmentally friendly and dry quickly.
As for finishing the wall of the room inside the wardrobe, our experts also recommend limiting it to painting. You can, of course, try to stick wallpaper on the wall, but most likely it will cost you a lot of effort and nerves.
When painting - both the ceiling and the back wall - use paper-based masking tape. They need to cover the edges of the chipboard so as not to smudge them when painting.
If you decide to add lighting inside the cabinet
Now there are many options for solving this problem, but most often LED strips are used as light sources - they are compact, economical and safe. The main thing is to decide which shelves and sections you want to highlight, calculate how you will lay the wires and where to place the power transformer.
The location of the light sources should ensure uniform illumination of the entire cabinet space; if they are placed only in the upper part, this will not give the desired result. Most of the interior space will be covered with shelves, so it will be dark.
It is better to place the transformer that supplies power to the LED strip where it will not be conspicuous. It is usually mounted at the top of the cabinet.
The main difficulty when organizing wardrobe lighting is the laying of wires - to do everything correctly and accurately, it may take some time and appropriate skills. If, when installing a built-in wardrobe, there is a socket left inside it, this will make the work somewhat easier, otherwise you will have to run the power cord into the cabinet from the outside.
When it comes to turning the light on and off, different options are possible. The simplest solution is to install a regular push-button switch. You can also consider using a door sensor or touch switch as options. Battery-powered lighting systems have also now appeared - their advantage is that there is no need to lay wires inside the cabinet.
Is it possible to add new equipment to the wardrobe?
Most often in this case we are talking about additional drawers, various baskets or mesh shelves for linen. Of course, if you have free space, you can add anything you want. When purchasing, it is only important to take into account the door travel parameters and the dimensions of the new devices so that when they are pulled out, they do not touch or rest against the door leaf.
How to change the Schlegel (brush seal) on a wardrobe door yourself?
First you need to remove the old Schlegel - to do this, you need to warm it up a little with a hairdryer to dry your hair, then it will come off easier. If the profile has a film coating, try not to overheat it, otherwise you can tear off the coating along with the schlegel. After this, carefully remove the remaining old glue and degrease the surface. It is better to use medical alcohol for degreasing, as the solvent can damage the surface of the profile.
After this, we glue a new schlegel in place of the old one. Sometimes the ends of the schlegel come off during use; to avoid this, you can immediately grab them with super glue.
Problems with sliding doors
Most often the problem is that the door jumps off the guides when moving. The reasons for this may be different. The spring located inside the wheel support may have weakened or broken. To make sure of this, you need to slightly lift one side of the sash (or remove it altogether), then press up on the lower wheel with your finger. A working wheel will resist pressure and the spring will push it back. If this does not happen, then it needs to be changed. To ensure you buy a wheel of the same brand, carefully unscrew the broken one and take it with you when you go to buy a new one. Even if there is no wheel of the exact same brand, specialists will be able to select a full replacement.
If the spring is in order and pushes the wheel out normally, examine the surface of the wheel itself - if it has become worn down during operation, then it also needs to be replaced.
The adjusting screw could also have come loose - in this case, the wheel moves a lot inside the aluminum profile. In this case, it will be enough to tighten the screw. Also, the head of the adjusting screw could slip through the hole in the metal profile. Here a washer of a suitable diameter will help us, which will prevent the cap from slipping.
Is it possible to convert a regular hinged wardrobe into a wardrobe?
The main difference between a sliding wardrobe and a regular wardrobe is the sliding door system. Therefore, it is theoretically possible, by replacing the doors, to turn an ordinary wardrobe into a compartment. However, before doing this, you need to decide whether such a procedure is advisable.
After all, the system of sliding sliding doors takes up quite a lot of space inside the cabinet - up to 10 cm. Therefore, you will have to either reduce the depth of all internal partitions (and this will require completely dismantling the entire cabinet), or make new external surfaces of the cabinet (sides, floor and roof) of a larger one size. Then it will be possible to install a sliding door system. All this, of course, will require a fair amount of expenditure – both financial and your time and effort. Isn’t it easier to contact a specialized company and order a new wardrobe there?
The same goes for changing the size of the wardrobe - this may be necessary if you move it to another place, but the dimensions of the new room do not allow it to be installed. The easiest way is to reduce the depth of the cabinet, but if you need to reduce the height or width, then the main problem is sliding doors.
Indeed, in addition to the fact that this will require a certain amount of labor and time, the internal layout of the cabinet, the width of the sections and the dimensions of the fixtures are tied to the width of the sliding door wings. All this must be taken into account when remodeling, so the cost of such work may be comparable to the cost of manufacturing a new cabinet.
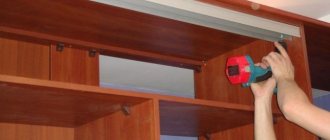
Fastening process
Let's get started with the work:
- First of all, it is recommended to prepare the workplace. It is better to place the door on some kind of flooring, so as not to worry about the surface of the floor or table on which the work will be performed.
- On the door you need to draw the correct placement of the mirror using a template. If you glue it unevenly, it will ruin the appearance of the cabinet.
- Let's move on to degreasing the surface: to do this, wet a rag with a special solvent and apply it to both surfaces that will be bonded in the future. Moreover, when working with a mirror, you need to be extremely careful so as not to damage it. To do this, it is recommended to spread some kind of blanket and only place our workpiece on it. And then start treating the back of the glass with a degreasing agent.
- Insert a tube of silicone into the gun, cut off its edge and you can start applying the product to the surface. It is better to do this in a zigzag pattern in increments of no more than 10 cm.
- As soon as silicone has been applied to the back side, the workpiece must be placed on the door according to the drawn marks. To do this, it is recommended to place the edge of the glass in the drawn corner and align the sheet along the side line. If the mirror blank is large, it is better to use the help of a friend.
- The glass is gently pressed against the surface of the door. Care must be taken to ensure that it does not move or warp. All lines along the mark must coincide with the edges of the workpiece.
- The final fixation on the door will occur in a day. During this time, you need to place heavy objects on the surface that will improve the adhesion of the materials. The main thing is that it is a uniform load.
After gluing the mirror, wait a few minutes to check that it is securely attached.
What is Schlegel for cabinets, its types and installation instructions
One of the reasons for the incorrect operation of the sliding system in sliding wardrobes may be the lack of a seal. During assembly, careless craftsmen, out of savings or accidentally forget to put in the Schlegel. Let’s look at what lies behind the name “schlegel”, which is outlandish for the common man, what is the purpose of this fittings and how difficult it is to secure it with your own hands.
Despite its unprepossessing appearance, the schlegel is an important accessory for a coupe cafe.
Application of Schlegel for sliding wardrobes
The door seal is not as simple as it seems. In the professional world, this type of fittings is divided according to a number of parameters, but before moving on to the intricacies of choice and purpose, let's look at the definition.
What is a furniture door seal?
Schlegel is a narrow fleecy strip that is glued to the side vertical profiles of sliding wardrobe doors.
This strip has a dual purpose: firstly, it softens the impact of the side vertical profile on an adjacent surface (cabinet wall or adjacent door), and secondly, it blocks the movement of house dust both from the cabinet and into the cabinet.
Nowadays, seals are produced for all types of side door profiles.
What other names does Schlegel have?
Craftsmen call such fittings differently; the most common names include the following:
- Boot - these tapes have a pile length from 7 mm to 15 mm, as the name implies, the main purpose is protection from dust;
- Seal – the length of the pile of the seals does not exceed 6 mm. At the dawn of mass production of sliding wardrobes, there were attempts to attach soft rubber, foam rubber and silicone stickers to the end of the doors, but practice has shown that in operation the pile is an order of magnitude ahead of its competitors;
- The shock-proof brush, buffer strip and shock-absorbing strip are, in fact, speech analogues of the above-mentioned sealing tape.
The most popular are schlegels with a width of 7 mm.
Functions
- Noise protection - the smooth movement of the door leaf along the guides indicates the quality of the roller system, but the door itself is heavy and even with a slight push it hits the side obstacle hard. Without schlegels, the “music” of opening doors will be heard by all the neighbors in the area, not to mention the household;
- Shockproof protection - sliding wardrobes are assembled from laminated chipboard, MDF, veneered furniture board and natural wood. None of these materials are considered shockproof. And if we also take into account that the blows of the door profile will be applied constantly and at one point, then without compaction within six months the side wall will lose all attractiveness;
Glass and mirror doors have become popular lately. Acrylic glass is not afraid of impacts, but ordinary quartz glass can crack if hit hard. In addition, shockproof tempered glass has critical points at the ends and a light blow to such a point leads to multi-link destruction of the glass sheet.
Reputable manufacturers produce sealing tapes in a wide range of colors.
- Dust protection - at least 70% of sliding wardrobes are used for storing clothes, bed linen and other similar things. Simply put, any clothes closet is a large dust collector. House dust is one of the ten allergens dangerous to humans, and any protection against it will not be superfluous.
What materials are door shock absorbers made of?
The first models of shock-absorbing gaskets for doors were made of felt; the material is good, but short-lived. Now the share of felt models has decreased to 15–20%. The main market is occupied by synthetic polypropylene tapes with different densities.
Polypropylene tapes are considered the highest quality.
Varieties of Schlegels
When choosing a shock-absorbing tape, you should pay attention to several product parameters.
| Illustrations | Recommendations |
| Brush buffer. |
- Polypropylene anthers with a tape width of 6 mm and a pile of 12 mm are on a self-adhesive basis;
- Felt tapes have a pile up to 15 mm long, while there are self-adhesive models and tapes with clips;
- There are anthers with pile sandwiched into a plastic molding. These models are inserted into a special profile groove.
Older models of felt boots are glued by hand, as they do not have an adhesive layer.
The durability, price and performance characteristics of the tapes depend on the level of pile density. According to the technology, the pile is applied in lines, respectively, the more lines, the denser the tape. There are 3 varieties here:
- Medium density has 3 lines and 3P markings;
- Standard – 4 lines, 4P marking;
- Extra or super thick tape - 5 lines, marked 5P.
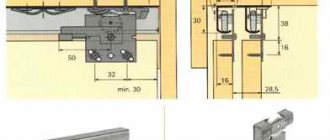
How to install a Schlegel in a wardrobe door
First, let's figure out which tape should be glued and where. There is nothing complicated here; tapes with long pile are used in sliding systems with 3 or more sections. Anthers are attached to the edges of the central section to block the movement of dust between the two guides, as in the diagram below.
Installation diagram for schlegels with long and short pile.
Self-adhesive tape is glued in 3 stages:
- Degrease the side profile with any alcohol-containing solution. If there is glue left there from the old Schlegel, then clean everything clean;
- Remove a small part of the protective tape and apply it to the top of the profile;
- At the same time, fix the tape with one hand so that it fits neatly into the groove, and with the other pull off the protective tape. At the bottom, cut the tape to size.
It is advisable to remove the protective tape as the seal is glued.
There are profiles where the Schlegel is additionally fixed with clips. In this case, after gluing, fastening clips are installed.
Conclusion
Using the tips described above, you can easily decide which tape to buy and how to install it. The video in this article shows a basic repair of a peeling tape. If you have any questions, write in the comments, I will try to help.
Clips at the edges of the profile are not attached to all profile models.
Performed tasks
It is not at all necessary to buy the original, as was provided from the furniture factory. You can replace it with any other Schlegel with the parameters that suit you, regardless of the manufacturer.
Many people are interested in how to install the product themselves and how to glue the Schlegel. Let's start with the fact that new materials often have a self-adhesive layer. But it usually lasts no more than 5-7 years, after which it dries out. In theory, you can take the same Schlegel, treat it with Moment or some kind of second glue, and return it to its place. Considering the cheap cost of the seal, I strongly advise you to tear off the old one, take a new one and lay it in an aluminum profile.
As for the functions of the Schlegel, this seemingly simple tape actually performs a number of key tasks. The main one is to ensure the efficient operation of the sliding system. Several main functions and tasks of the Schlegel can be identified.
- Shock absorption of doors during opening and closing. Remove the schlegel, and the door will hit the internal slats every now and then. As a result, chips, defects, and damage to the chipboard will soon appear on the cabinet;
- Prevent dust accumulation. When compartment doors are not closed tightly, gaps appear at the joints, and dust easily penetrates through them. It settles on clothes, accumulates, and can provoke allergic reactions. It’s trite that you will have to clean the closet much more often;
- Noise reduction. If there are small children living in the house, and the closet is in their room, opening it without a schlegel can easily disturb light sleep. By eliminating pops, noises and knocks, Schlegel additionally takes care of the healthy sleep of your household.
Modern and high-quality sliding wardrobes include aluminum profiles, which have a special groove. It is into this that the buffer shock-absorbing tape is glued. In ordinary profiles these grooves may not be present. This is not scary, since here the tape is applied directly to the profile.
Sliding wardrobe: terms and concepts
This information will be useful to buyers who want to understand what is involved when ordering a cabinet, as well as to professionals who want to refresh their knowledge. Because, as popular wisdom says: “It’s bad when you don’t know, and even forget.”
- Sliding doors are a mobile structure consisting directly of a door panel (chipboard, mirror, glass, rattan, bamboo, plastic) enclosed in a steel or aluminum frame to which the movable mechanisms are attached.
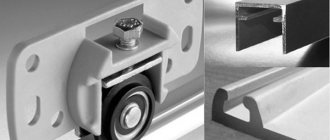
- A coupe system is a structure that includes a steel or aluminum frame of compartment doors to which the lower and upper wheels are attached. The wheels, in turn, move in the grooves of the lower and upper rails of the coupe system.
- The profile of the compartment system is the material from which the compartment door frame is made. The profile usually acts as a handle when opening and closing the door. One of the main differences between coupe systems and each other is the profile shape.
- Rails: lower and upper - tracks along which the wheels move.
- A cabinet wardrobe is a cabinet that has its own walls, floor, ceiling and back wall (fibreboard).
- Built-in wardrobe - a wardrobe that lacks one or more elements of a cabinet wardrobe. The built-in wardrobe is attached to the walls, floor and ceiling.
- Schlegel is an “inter-door brush” that is glued to the side surface of the sliding door (in contact with the wall) to absorb shock and reduce noise, as well as to the ends of the internal filling of the sliding wardrobe to prevent dust from entering the closet when the sliding doors move.
- Silver mirror is a 4mm thick mirror with a regular mirror surface.
- Bronze mirror is a 4 mm thick mirror with a slightly darkened mirror surface that has a bronze tint.
- Mirror with sandblasting pattern - sandblasting allows you to matte mirrors, as well as apply one-sided or double-sided patterns of any complexity.
- MDF is a board material made from dried wood fibers, treated with synthetic binders and formed into a carpet, followed by hot pressing (density 700-870 kg/m3) and sanding.
- Rattan - (it is correct to say “rattan”, not “rattan”) - a rattan palm, is a tropical vine, the main advantage of which is that, unlike willow vine or bamboo, it has a smooth trunk, a significant length (up to 200 m) and an even diameter, often exceeding 70 mm. In the manufacture of sliding wardrobes, slabs with a front surface made of wicker rattan are used.
- Bamboo , just like rattan, is used as a decorative material for making furniture facades and filling wardrobe doors.
- Decorative plastic - 4 mm thick plastic, used as an independent material for insertion into a sliding door, or 1 mm thick plastic, glued to a laminated chipboard. It is distinguished by an aesthetic and modern appearance, as well as significant lightness, which is important in the manufacture of sliding doors.
- Hanger (pipe) - a metal pipe for hangers.
- An end hanger is a small metal bracket that is attached to the back wall of the wardrobe or directly to the wall (if the wardrobe is built-in). Designed for front placement of hangers. It is mainly used in wardrobes that have a small depth.
- Pull-out hanger - Attaches to the bottom surface of a shelf and allows hangers to be pulled forward for shallow cabinets where it is not possible to place hangers perpendicular to the wall.
- A pantograph is a complicated version of a regular hanger - the so-called “elevator”, that is, a bar that can be lowered by 80 cm if you pull a special handle. The practical meaning of this device is the ability to position the barbell with hangers at a greater height (80 cm).
- The tie rack is a pull-out section for small wardrobe items, divided into compartments for convenience.
- Edge processing - the edges of laminated chipboards formed after cutting can be closed in various ways. The edge strips are “welded” to the edge using modern equipment, which makes the laminated chipboard part environmentally friendly and resistant to mechanical stress.
- Melamine edging is a furniture edging with a thickness of about 0.2 mm. It is not practical enough, because... Over time, this material tends to chip. However, sometimes, in order to save money, the buyer deliberately prefers a melamine edge, because it is much cheaper than a PVC profile or LAN edge.
- PVC profile is a furniture edge with a thickness of 2 mm, characterized by increased wear resistance and aesthetic appearance.
- U-shaped plastic profile - a profile that is put on the cut of a part made of laminated chipboard. To prevent the profile from jumping off the slab, it is usually glued to the cut with special glue. It must be taken into account that this profile prevents the evaporation of formaldehyde contained in the chipboard to a much lesser extent than glued edges. The advantage of this profile is that it can be used when processing the edges of curved parts.
- T-shaped PVC profile is a profile for which a narrow groove is milled at the end of the slab. This profile holds up better than the U-shaped one. It is mainly used for processing the edges of curved parts.
- Furniture corners - Plastic corners with which furniture parts are connected to each other. Used for installation of the internal filling of the wardrobe.
Selected works[edit]
- Vom ästhetischen Werte der griechischen Komödie
(1794) - Uber di Diotima
(1795) - Versuch über den Begriff des Republikanismus
(1796) - Georg Forster
(1797) - Uber das Studium der griechischen Poesie
(1797) - Uber Lessing
(1797) - Kritische Fragmente
("Lyceum" -Fragmente) (1797) - Fragmente
("Atheneums" -Fragmente) (1797–1798) - Lucinda
(1799) - Über die Philosophie. Dorothea
(1799) - Gespräch über die Poesie
(1800) - Über die Unverständlichkeit
(1800) - Idean
(1800) - Characteristics and criticism
(1801) - Transcendental philosophy
(1801) - Alarcos
(1802) - Reise nach Frankreich
(1803) - Geschichte der europäischen Literature
(1803/1804) - Grundzüge der gotischen Baukunst
(1804/1805) - Über die Sprache und Weisheit der Indier
(1808) - Deutsches Museum
(ed.), 4 vols. Vienna (1812–1813) - Geschichte der alten und neueren Literatur
(lectures) (1815)
Letters [edit]
- Ludwig Tieck and Bruder Schlegel.
Briefe ed. Edgar Lohner (Munich, 1972)
Sämtliche Werke
Friedrich Schlegel published in 10 volumes.
(1822–1825); second edition (1846) in 55 volumes. His Prosaische Jugendschriften
(1794–1802) was edited by J. Minor (1882, 2nd ed. 1906);
there are also reprints of Lucinda
and
's Vertraute Briefe über Lucinde
, 1800 (1907).
See R. Haym, Die romanticische Schule
(1870);
I. Rouge, F. Schlegel and other genies of romanticism
(1904);
the same, Erläuterungen zu F. Schlegels “Lucinde”
(1905);
M. Joachimi, Die Weltanschauung der Romantik
(1905);
W. Glawe, Die Religion F. Schlegels
(1906);
E. Kircher, Philosophie der Romantik
(1906);
M. Frank "Unendliche Annäherung".
“Die Anfänge der Philsphischen Frühromantik” (1997);
Andrew Bowie, From Romanticism to Critical Theory: The Philosophy of German Literary Theory
(1997).
How to glue a seal on a closet door
By the way, the true name of the element that protects the profile from impacts and chips is a sliding wardrobe schlegel.
Few people know the official name, but there are many substitutes:
- shockproof tape/brush;
- buffer tape/brush for compartment doors;
- brush seal;
- shock absorber for compartment doors;
- anther.
There are several options to restore the original condition of compartment doors with shockproof tape:
- Tear off the buffer tape and glue a new one (purchase a roll with a brush seal with an adhesive base in the store, degrease the profile and glue the tape).
What are the advantages of this method:
- almost all new shockproof tapes have an adhesive base, which means you don’t have to look for glue;
- If the Schlegel has served on the compartment doors for several years, indelible dust has accumulated in it - the new one will not have it and the doors will take on a fresh look.
- The second option is to apply buffer tape to the compartment doors .
The cabinet may still be new, or the tape may be difficult to find on sale - there are no options other than gluing it.
How to glue buffer tape to a wardrobe
Many people try to glue the seal to the profile using second glue or another one available at home.
However, attempts usually end in failure and after the first hit of the door on the cabinet wall, the schlegel comes off again.
The base of the seal is made of polyester/polyester, the profile to which the tape is attached is painted or covered with lamination. Based on the available data, just what kind of glue will not work.
So what to look for in the store, glue for seals on sliding compartment doors:
- The simplest option is double-sided adhesive tape on a fabric basis (do not use foam tape - the foam comes off in pieces, and when you subsequently replace the seal, nothing can remove it). This double-sided tape can be 8-9 mm wide and it adheres perfectly to both bases.
- Nairite glue, for example, 88 P-1.
- Adhesives for thermoplastics and polyurethanes, for example:
- Anles polyurethane adhesive based on Desmocoll rubber,
- 88-NT,
- Desmocoll glue.
Instructions on how to apply shockproof tape to a compartment door
- If possible, remove any remaining old adhesive from the door profile. Usually, solvent 646 or similar is used for these purposes, but be careful to treat the residues spot by spot, as the solvent can remove the decorative coating/paint from the profile. In general, this item is carried out at will and opportunity.
- We treat the brush seal on the gluing side and the profile with a degreaser or alcohol (not vodka). Degreasing partially removes the old adhesive. Let the liquid ventilate for 5-10 minutes.
- Apply a thin layer of glue (for example, Anles or another from the list) evenly on both surfaces, since applying glue to the tape itself is inconvenient - apply a strip to the profile, attach the buffer tape and immediately peel it off. Be extremely careful not to stain the profile and everything around with glue. Next, leave the glue to dry without connecting the parts - a film should form that does not stick to your hands. The holding time is indicated on the glue packaging, but on average it will take 5-10 minutes. To prevent the tape from sticking while the film dries, you can throw it on a stepladder or something similar.
- Next, take a hair dryer (a household hair dryer will do) and heat the glue to 60-80 degrees - this takes on average 6-10 seconds for each area to be blown (do not increase the heating temperature or prolong the exposure time). Be careful when heating the adhesive layer on a profile in a wood laminate - the material may not withstand it and will peel off or melt. The glue must be heated on both surfaces - the profile and boot of the compartment door. Warm up sections of 10-15 cm and, pressing, glue the buffer tape to the profile, so stick all the torn bristles.
- After gluing, apply pressure with your palm over the entire glued seal.
- For high-quality adhesion, it is necessary not to impact the surfaces being glued for a day and, in particular, not to hit the wall with the buffer tape.
After such repairs to the compartment door seal, it would be a good idea to purchase a bristle clip to prevent future peeling.
By the way, the clothespin can be replaced with a regular paper clip. VIDEO INSTRUCTION
Further reading[edit]
- Berman, Antoine. L'épreuve de l'étranger.
Culture et traduction dans l'Allemagne romantique: Herder, Goethe, Schlegel, Novalis, Humboldt, Schleiermacher, Hölderlin. , Paris, Gallimard, Essais, 1984. ISBN 978-2-07-070076-9 - Philippe Lacoue-Labarthe and Jean-Luc Nancy, The Literary Absolute: Literary Theory in German Romanticism
, Albany: State University of New York Press, 1988. [Philosophical interpretation of early Romantic theory focuses on F. Schlegel, Novalis and the Athenaeum.]
What is a Schlegel and how to attach it?
The wardrobe door frame is made of aluminum profiles, the side wall is made of chipboard or laminated chipboard. Both materials are hard, so to prevent impact and loud knocking when closing, a special seal is attached to the side surface of the door. It also fills the gap between the door and the side wall of the wardrobe and prevents dust from getting inside.
What is a Schlegel for a wardrobe?
Schlegel is a brush-shaped shock absorber seal placed on the side end of a sliding wardrobe door. Other commonly used names for such components are “buffer tape”, brush seal.” The Russian term “Schlegel” comes from the name of the German manufacturer company Schlegel International.
Structurally, Schlegel is a plastic tape, which is stitched with the same plastic thread, which forms a pile on one side. The most common material for making brush seal pile is polypropylene thread impregnated with special additives. This type of seal has standard dimensions:
- base width - 7 mm;
- pile height - 6 mm.
The brush seal is basically self-adhesive. Hot-melt adhesive of permanent stickiness is applied to the bottom of the Schlegel base, which is covered with an anti-adhesive base. When installed, the protective base is easily separated and it is glued to the side of the door.
What kind of schlegel is there?
Brush seals differ in the following main characteristics:
- color;
- pile density;
- base width;
- protective base.
The Mebax company produces Schlegel in a wide range of colors, 10 colors: white, milky, gold, silver, gray, black and others. That is, you can always choose a color that will harmonize with the wardrobe. The color of the pile and base may vary or be the same (“monocolor” option).
The density of the pile is determined by the number of rows of stitching. High density - 4 rows, medium density - 3 rows. The use of Schlegel with a high pile density is more functional, but its price is also higher.
What materials is it made from?
Today, brush seals are produced in several colors that are as close as possible to the shades of the aluminum profile of sliding wardrobes:
The material from which the miracle brush is made is called polypropylene. An adhesive layer is applied to it and the consumer only needs to peel off the protective paper and evenly distribute the tape along the desired perimeter of the sash. To do this more accurately and evenly, it is recommended not to peel off the entire paper layer at once, but to evenly separate it as you stick the brush.
Felt or bristles are used for bristles. The second option is considered optimal, as it is produced in several sizes and will have an excellent noise barrier. Felt tape is also good, but the thickness of the brush does not allow you to close the door securely, so it can be used for small gaps.
It is necessary to select the color of the Schlegel for the coupe according to the color scheme of the furniture and the shade of the profile - this way the materials will look more harmonious.
Thank you, Dmitry! I did it!
Hello, Olesya! Happy for you! Continue furnishing your home. I will definitely help you.
I would like to thank the author for this article. We made the doors for the wardrobe ourselves for the first time. My husband entrusted me with the calculations. (before this, I only had to calculate the details of cabinet furniture) Honestly, it was very scary, and it was scary to mess up with the dimensions. Considering the cost of profiles, this would be very sad in case of failure and miscalculation. Of course, you can find an automatic calculation for a specific system, BUT I wanted to understand how and where all these numbers come from, and the principle of measure 100,500 times and then cut has not been canceled. I calculated both automatically and manually according to the described scheme, I understood the whole principle of calculation. The only thing I would add is that if you use a buffer tape, then you need to take into account its width for the calculation so that the handles of the front and rear doors end up lying perfectly one behind the other. I saw this moment in another article from another site. This is the only thing I changed in the calculation. And so, thank you very much to the author! With such a description, you can actually calculate the dimensions for any sliding system, understanding the basic principles of calculation. it’s really very simple, everything worked out and came together down to the millimeter, there’s nothing to complain about.
Do-it-yourself furniture cladding repair
In order to glue peeling veneer, you will need the following tools and materials:
— iron — paper sheet — award — wood glue — jamb knife — stain — varnish
The working process:
— First of all, you should try the simplest and least expensive method, namely, iron the peeled veneer with a hot iron through a clean sheet of paper. If this does not give the desired effect, then move on.
— We make a small notch along the veneer fibers using a marking, slightly raise the edge of the veneer and coat the base with wood glue on both sides of the notch. Now you need to grind it in properly.
— If the glue has leaked out in the cut areas, it can be carefully removed when it dries using a jamb knife or scraper.
— Now let’s bleach the seam using a solution of oxalic acid and a sharpened wooden stick.
— Then, if desired, you can choose a stain to match the color of the coating and treat the seam with stain several times and finally coat it with colorless varnish.
After these simple steps, your furniture with peeling veneer will look great again.
What to do if the veneer peels off from the end along the edge?
If the veneer has peeled off along the edge of the end of the furniture, then the base of the damaged area must be smeared with glue and the peeled veneer must be rubbed in. For grinding, it is best to use a block of hard wood and be sure to wrap the block with a piece of flannel in several layers. This way you will not damage the varnish during grinding.
What to do if the veneer has completely peeled off and the base is visible?
This defect can also be eliminated. You need to glue the edges of the area and rub them in, then putty and tint with stain to match the coating, and finally apply several layers of varnish.