Not everyone can boast of spacious housing and have the opportunity to furnish the rooms at their disposal as functionally as possible. For those who live in small apartments, transformable interior items for various purposes come to the rescue. They can be purchased ready-made or made yourself. Folding tables mounted on the wall are convenient for organizing maximum free space in the kitchen or, for example, on the balcony.
DIY folding table
What is a folding table?
This is an interior item in the form of a board attached to the wall. Placed in a small room, it serves as a table. It can be an excellent assistant if used correctly.
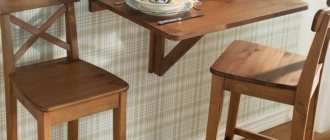
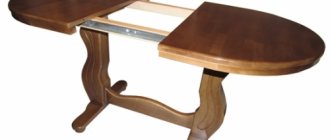
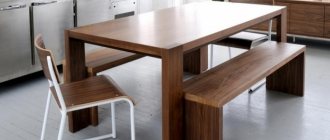
Reclining table and bench
The folding table is distinguished by its functionality and ergonomics, and fits harmoniously into the space of any room. It can significantly save working space.
Drawing selection
Before you make a folding table with your own hands, you should choose a folding mechanism. Then you need to draw a diagram of the product. When starting to make a folding table, it is important to create the drawings correctly. Of course, you can try to do them yourself, but it takes a lot of time and the likelihood of error is quite high. Therefore, it makes sense to find a ready-made drawing on thematic resources and adapt it to the desired dimensions. Many sites offer special calculators for this purpose.
For details you need:
- First, transfer the drawing in detail onto thick paper.
- Draw a sketch on plywood. For measurements you should use a ruler, square, level.
Once the image has been completely transferred, you can begin cutting out parts from the plywood sheet. For this purpose, special equipment will be required. If there is none, you can contact specialists. After sawing, you should treat the edges of the plywood around the perimeter with glue, this will help avoid shedding and destruction of the sheet.
If the material is purchased at a hardware store, you can usually order the sheet to be cut to your own dimensions.
Table details
To build a folding table, you need to prepare the following parts:
- table top
- bottom and top of the shelf
- sides and partitions
- back
As accessories, it is necessary to prepare self-tapping screws, hinges, confirmants and anchors.
During the work you can use the following tools:
- electric jigsaw (hacksaw or regular jigsaw)
- manual milling machine
- grinder
- screwdriver
- drill and set of drill bits
They also use a ruler, tape measure, pencil, level and construction square.
Having prepared the parts and the necessary tools, you can begin to work.
Preparation of the drawing
When building a folding table with a wall mount with your own hands, drawings of the parts and the product itself are done first.
The prepared diagram will help you quickly and without errors make a built-in piece of furniture. The drawing must contain the exact dimensions of the product.
Description of materials
They are used depending on the location and shape of the table.
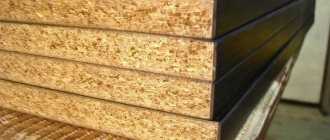
Plywood, chipboard, MDF
This sheet material is used in the manufacture of countertops. Integrity is the main advantage of the material. Using a jigsaw, you can cut out a tabletop that is ready for use. Only on the cut edges you need to stick a special tape. A table made from this material is light in weight, which allows the tabletop to easily recline.
When choosing one of these materials, plywood deserves more consideration. Especially laminated and moisture resistant. It has a long service life compared to others.
Natural wood
This is an environmentally friendly, elegant, stylish, fairly durable material. When using it to make a table, two conditions must be met:
- the right type of wood
- the presence of special equipment due to complex manufacturing technology.
These factors affect the cost of the product, even if you make it yourself. If you have your own hand router, or at least a jigsaw and a wooden board, you can easily build a wall-mounted kitchen table.
Glass
Thick tempered glass is used for tabletops.
This type of countertops must be ordered separately, since this material will not be cut at home. It is used extremely rarely.
The choice of material is influenced by the location where the built-in table will be installed. Made from wood or glass, it will look different when installed separately from other pieces of furniture. MDF, chipboard and plywood are considered universal materials.
The shapes of countertops can be very diverse, but the most popular are square, rectangular, round and semicircular.
An electric jigsaw is used to cut the selected material into the required shape. The edges are processed with a sanding machine and covered with a special tape to give it a marketable appearance.
Making a table for the balcony with your own hands
If the finished products are not satisfactory in size, appearance or cost, there is always the opportunity to assemble a folding structure yourself. Moreover, the process does not cause any particular difficulties.
To manufacture the structure, you need to stock up on material, hinges and fasteners. The tabletop can be cut from furniture board, thick plywood, chipboard or MDF.
What is the difference between MDF and laminated chipboard?
If slabs are used, it is recommended to finish the ends with an edge that matches the color. To do this, you will need an iron and a sharp knife to cut off the excess. When installing a table in a room decorated with wood, a wooden table top will look more harmonious.
An option is proposed for producing the simplest design of a folding table from furniture panels for a balcony.
Two parts made of chipboard will be used as supports (can also be made of wood, but we used what was at hand). You can make one support, but the table turns out to be quite large, so for the strength of the structure it is better to install two support elements that fold in different directions. You will also need two bars. One is for fastening the tabletop, the second is for fixing the supports.
Table. Materials and equipment for making a table.
| Required | Illustration |
| Furniture panel size 1000 x 500 mm | |
| Bars 40 x 50 mm, length 600 mm (2 pcs.) | |
| Laminated chipboard size 450 x 450 mm | |
| Universal hinges (2 pcs.) | |
| Furniture hinges (2 pcs.) | |
| Self-tapping screws |
Step 1.
The furniture board is varnished and dried.
Furniture board
If necessary, the tabletop can be polished (before applying paint)
Step 2.
Markings are applied to the wall to secure the block. It will be installed at a height of 700 mm from the floor. When carrying out work, you must use a level.
Step 3.
Using four self-tapping screws, the block is fixed to the wall.
Step 4.
At a distance of 30 mm from the edges, two door hinges are attached to it.
Step 5.
Two triangular parts are cut out of a piece of laminated chipboard (or the triangles are assembled from timber), which will serve as supports.
Assembling a triangular support from bars
The bars are fastened with self-tapping screws and a perforated corner.
For reliability, all joints are glued with wood glue Step 6.
Both support legs are applied vertically. Marks are made for attaching piano (furniture) hinges.
Step 7
Furniture hinges are attached with self-tapping screws to the legs and the wall.
The corners are held on piano hinges
This is what the supports look like when folded
Step 8.
A block is attached to the inside of the tabletop (parallel to the first one). The distance from the outer edge is 200 mm.
Step 10. The table top is placed on top of a block with hinges attached to the wall. On the inside, it is attached with self-tapping screws to the free hinge flap.
The tabletop is supported by two short hinges located horizontally. There is a beam fixed under the tabletop
Folded table
Important! The length of the screws must be chosen so that they do not protrude from the front side of the slab.
A functional and reliable structure that does not take up extra space on the balcony is ready. If necessary, the table top rises, the legs move at an angle to the center and securely hold the structure.
Compact structures purchased from the manufacturer or assembled with your own hands, distinguished by budget and functionality, in some cases are irreplaceable interior items.
Video - Homemade folding table for the kitchen in 20 minutes
Supports used in the product
To securely fix it, supports are made for the table. They may look like a triangular headscarf or the letter P.
If the structure is short, use a triangular support. The bracket is attached with hinges under the bottom of the tabletop. You cannot install a folding table in this way above the radiator, since the entire weight of the product will fall on it.
A triangle is suitable when attaching the structure to the wall surface. By installing two strips on the sides, you can strengthen it.
To make U-shaped supports, beams are used, connected to each other by the letter P. They are installed under the bottom of the tabletop, on the sides. The finished structure is attached to the tabletop using hinges. This will allow you to fold the finished table.
Technology for mounting a folding seat to the wall
Before using the mechanism, it must be secured. Most often, a wall or partition acts as the base. If there are columns in the interior, you can attach a folding seat to them.
Even before starting work, it is necessary to determine how well the construction material corresponds to future loads. If it is lightweight and cellular concrete, and even more so plasterboard, it is necessary to strengthen the fastening points. Wood requires the appropriate type of anchorage.
The structure is fixed to anchors. The sequence of actions is as follows:
- To ensure accurate installation, markings must be made first. Some seat models come with a template to make this step easier.
- Using a hammer drill, drill holes for anchor devices.
- Expansion anchors are inserted into the drilled grooves and then secured with a wrench or screwdriver.
- The decorative trim is removed from the seat mount, attached to the anchor bolts, and then returned to its place. Check the operation and make adjustments if necessary.
The process of assembling the finished structure
One of the simplest answers to the question is the process itself, how to make a folding table with your own hands. It will take a maximum of 30 minutes. The manufacturing instructions are quite simple.
To make a folding table, you don’t need any special knowledge. Anyone can create a design and install it, even without much experience in such work.
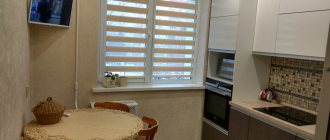
A wall near the window sill or the window sill itself is ideal for mounting this piece of furniture.
A folding table will fit most harmoniously into the interior and will not take up much space. In addition, this arrangement will save electricity, since the lighting will come from the window. If a heating radiator is placed under the installed structure, the countertop must have holes so that a sufficient volume of warm air can penetrate into the room.
To clarify the parameters, it is necessary to attach the workpiece to the intended mounting location.
The tabletop is connected to the support strips with hinges and is attached to the wall or window sill with their help. Can be fastened with self-tapping screws. Finally, the structure is tested for strength.
In this way you can make a folding table with your own hands. This homemade table will be distinguished by its compactness and practicality.
Popular varieties
Today, folding tables come in a wide variety of designs, models, shapes and sizes. They all differ in configuration, purpose, and style. Among the most popular models are:
When choosing a model of a folding table for the wall, it is important to correctly determine its dimensions. You should focus on the parameters in the unfolded state, when the tabletops recline. It is important to take into account the dimensions of the room, as well as the number of people who should be accommodated at the wall-mounted folding table.
Standard transformable products reach a height of 70–75 cm, this distance is comfortable for those sitting.
The following dimensions are suitable for the working area: length - 1.2 m, width - 0.8 m. It is advisable to adhere to these dimensions if the product will be used as a working or writing place.
For the dining table, the norms change:
There are parameters that determine the size of a table that is comfortable for a person - 60 and 40 cm in length and depth, respectively. But the dimensions of oval and rectangular folding models often exceed these figures several times.
How to do it yourself
A table for the balcony with your own hands is quite possible. No professional carpenter skills are required. The necessary materials and tools can be found at your nearest hardware store.
Characteristics of a desk for two children, selection criteria
Preparatory work
To make a table on the balcony with your own hands, you need a drawing. You can create it yourself or download the version you like from the Internet, taking into account the dimensions of your own balcony. The diagram will also be needed to calculate the amount of materials.
The master will need:
- construction square and level;
- sheet of plywood 12 mm thick or more, MDF, chipboard for countertops;
- a piece of metal pipe;
- hacksaw or jigsaw;
- screwdriver;
- self-tapping screws;
- hinges (ordinary door hinges will do);
- corner fastenings;
- electric drill and set of drills for wood and concrete;
- a sheet of sandpaper;
- special impregnation for protection against fungus, mold and rot, microorganisms;
- varnish or paint for woodwork.
Manufacturing process
Detailed step-by-step instructions will help you figure out how to make a folding table on the balcony with your own hands:
- Transfer the tabletop drawing to the plywood. Carefully cut it out. Drill several recesses (5–10 mm depending on thickness), the number and diameter matching the future legs.
- On the remaining material, draw a rectangle 10–12 cm wide, matching the length of the tabletop. Cut it out too.
- Sand both pieces thoroughly, ensuring maximum smoothness, especially around the edges. Shake off any remaining wood dust.
- Impregnate the plywood with a special compound. After waiting the required time (indicated in the instructions), coat with 2-3 layers of varnish. Let dry.
- In the chosen location, attach corners for support to the wall. Their reliable fixation is very important - it is better to use several self-tapping screws.
- Fasten the tabletop, plank and corners with hinges.
- Cut the metal pipe into pieces, calculating in advance the height required for the legs. Clean the cuts thoroughly.
This model is one of the simplest. The main difficulty here arises when you need to fix the tabletop strictly horizontally. To do this, it is recommended to use auxiliary supports made of thin metal rods or hollow tubes.
Folding tables on the balcony are an excellent example of rational organization of living space. They can perform different functions. In stores, such furniture is presented in a wide range - a variety of designs and colors allows you to choose the best option.
Transfer the drawing of the tabletop to plywood and carefully cut it along the contour, it is better to make the edges rounded
Sand the parts with sandpaper
Impregnate the plywood with a special compound, then cover with 2-3 layers of varnish
Fasten the tabletop, plank and corners with hinges
Secure the tabletop
The folding table is ready
Decorating ideas
The folding surface may well serve as an additional decorative element. Ideas for decorating such furniture:
By showing your imagination, you can easily create a multifunctional piece of furniture from a folding table. The reverse side of the tabletop can be decorated with an author’s photo, an image of a pet, or you can draw your own unique masterpiece there. The main thing is that the homeowners like the decoration.
Making a folding table for the kitchen or living room does not require much time; even a beginner can install the product. However, the final result cannot but please us - the product saves space, has a stylish look and is convenient to use. A kitchen table of this type can act as a work surface for preparing or directly eating food. Folding tables are the optimal solution for small apartments, loggias, kitchens and other small spaces.
Main stages of work
It will be necessary to weld steel pins to the strip, and drill holes in the ends of the shelves and corners.
After this, we connect all three shelves using a strip. A similar operation must be done on the other side of the shelves.
“Ears” with holes need to be welded to the corners on which the shelves rest. We connect them to strips of metal using pins so that the structure can fold.
At the last stage, all that remains is to paint all the parts, after which you can begin assembly.
For details on how to make a convenient transforming shelf for your home workshop with your own hands, watch the video.
Source
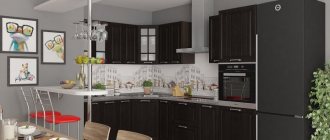
Small kitchen is the solution
The folding tabletop is always fixed on a vertical plane. To support it, one leg, a corner and a folding structure are provided. This is the most common design principle; it combines a large number of products of different types. The tabletop can be lowered or raised.
Fully metal folding structures are rare, because they are not universal, which means they are suitable only for interiors of certain styles. Stone and glass countertops are practically not used. This is due to the intricacies of their operation and high price. For example, artificial/natural stone is characterized by greater weight, although it looks attractive. Glass products are dangerous, so they are not used as folding tabletops.
Small tables for a small kitchen are characterized by a number of positive aspects:
- thanks to such designs, space is saved, which can be used to install another, more necessary piece of furniture in everyday life;
- simplicity of the device, which allows you to assemble and disassemble the tabletop as quickly as possible;
- possibility of DIY installation;
- There are a large number of design options for folding structures.
The disadvantages of such kitchen tables are few, but they are significant. First of all, note the small dimensions of the structure. Because of this, it is not always possible to fully use such a piece of furniture for its intended purpose. In addition, of all existing materials for the table, it is advisable to use only wood.
Model Variations
Shelving tables differ from each other not only in the material they are made of, but also in appearance and technical characteristics. This in turn affects the functionality of the products. There are desk, computer, dining and wall-mounted shelving tables on the market, which are popular among buyers.
Writing
Transformable desk-racks are the simplest in design. Some models of such products have additional properties that allow writing or reading more correctly - in accordance with the rules and regulations determined by experts.
Computer
Transforming computer tables in most cases differ in their appearance and configuration of elements. It allows you to easily place on the product a computer, laptop, keyboard, mouse, speakers and some other devices that the buyer may need.
Dining
A distinctive feature of this transforming table model is its ability to be used for joint breakfasts, lunches and dinners.
As a rule, such products are made of materials that can be easily washed or cleaned of dirt. Some models allow you to easily accommodate even a whole family.
Wall option
A table in the bedroom may be needed quite rarely.
In turn, a shelf that can be placed on the wall can become not only a functional element, but also an interesting addition to the interior of the room. Currently, there are a large number of models of wall-mounted shelving tables on the market that can serve as shelves. You can place flowers, joint photographs, toiletries, cosmetics, figurines or books on them.
Peculiarities
A folding workbench when folded takes up to 10 times less space than when working.
Portable - a version whose operating principle is similar to a folding chair or a regular extendable table that is easy to carry. The disadvantage is the almost complete absence of drawers, which noticeably weigh down the structure: instead of them there are one or two shelves without back walls, the workbench itself resembles a rack.
Universal - a structure that is attached to the wall, but unlike a regular wall-mounted table, this table has all four legs. The scheme is complicated by retractable wheels, allowing you to use the workbench as a cart. This version is reminiscent of a mobile table for preparing hot dogs, popular among fast food sellers in the 90s of the last century: there are shelves with back walls (or full-fledged drawers). It can be folded against the wall, lifted and secured, and rolled to another place. Carrying requires the help of two more people: the weight is significant - tens of kilograms.
A folding wall-mounted workbench is used in a home “office” or utility room – outside the home. It is stylized to match the general design of a home interior, and can be made as a mini-transformer, from the appearance of which guests will not immediately guess that this is a workbench. A profile pipe can be used for the underbench.
Advantages and disadvantages
Folding tables for the kitchen have the following advantages:
- they significantly save kitchen space when they are not needed;
- the models are compact, but sufficient to accommodate a minimum amount of utensils for meals;
- the products are variable in design, they are made from different materials, due to which you can choose an option taking into account the furniture already available in the kitchen;
- models can be an independent element of the dining area or be part of a set with a folding chair of a similar design;
- depending on the type of product, installation differs, but it is not complicated; every head of the family can install such a table;
- products differ in the shape of the tabletop: the folding part can be rectangular, semicircular or even semi-oval;
- such tables can be installed not only along walls: they look great near a window, when closed they present a laconic panel of small width and a length equal to the window opening;
- such products can be purchased in stores or made independently; this will not take much time, and the manufacturing process itself does not require a large amount of materials and labor;
- the color schemes of these products can be varied, due to this, folding tables can become a support for a kitchen apron or facades of a colored set;
- such products can replace children's tables in small apartments;
- when there is enough space in the kitchen, such tables can be used as a mini-greenhouse, mounted under the window of the room;
- These pieces of furniture can be placed in the kitchen as an additional shelf-table for small household appliances, for example, a microwave or coffee machine.
However, in addition to the advantages, folding tables also have disadvantages. For example, the load on the fastenings of such products is greater. Considering that they have to be constantly opened and closed, this messes up the transformation mechanism. In addition, household members may get tired of constant assembly and disassembly, and they will want to buy a stationary table. As for the material of manufacture, particle boards are not designed for long-term use. Over time, the fastenings of such structures become weak.