What will we make it from?
The main advantage of folding tables is their mobility, and for this they must be light. Exactly to the extent that the housewife can cope with their transformation and movement. It is unlikely that a table made of solid wood will be easy to lift, and with small dimensions such material is completely inappropriate.
It is intended to use light and thin laminated chipboard strips, either factory-cut or self-cut, to create the base of the table.
When it comes to countertops, the choice is virtually unlimited. You may prefer the usual particle boards, but also pay attention to MDF panels, furniture panels or 40 mm kitchen countertops made of chipboard with acrylic or vinyl coating. However, keep in mind that the back side of most of these materials is different from the front side; it simply cannot withstand normal operating loads. This point may be of decisive importance in some table designs.
Materials and tools used
At home, folding tables are made from different materials. They are chosen based on qualities such as strength, weight, ease of processing, aesthetic appeal, durability, resistance to moisture and biological degradation. Suitable for work:
- tree;
- chipboard;
- laminated chipboard;
- MDF;
- plywood;
- metal.
Making a laptop table with a cooling system with your own hands
Wooden tables are distinguished by their beautiful appearance, reliability, and long service life. But if you plan to transport it manually, then it is better to opt for lightweight material. Furniture made from plywood or particle boards is more preferable in this regard. With high-quality assembly, it can last for more than one year. Metal is often used for individual structural parts. Metal legs guarantee stability, reliability, and strength of the furniture. If the entire product is made from this material, its heavy weight should be taken into account. Before starting assembly, in addition to the raw materials, it is necessary to prepare tools and accessories. To work you will need:
- hacksaw;
- jigsaw;
- screwdriver;
- screwdriver;
- screws, nuts;
- corners;
- piano hinges;
- sandpaper;
- brushes;
- paints, varnish.
If you need to make a lightweight metal table, it is recommended to choose aluminum.
Tree
laminated chipboard
MDF
Plywood
Metal
Rotary, sliding or classic “book”
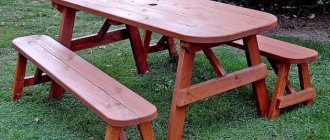
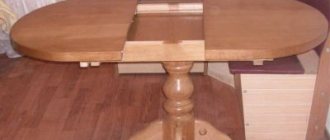
There are truly many ways to transform a tabletop. The simplest and most familiar of them is used in a cabinet table, which has two lifting tabletops on piano hinges and swivel legs as a support for them. The table is not always comfortable: for those sitting at the central section there is simply nowhere to put their knees, and when unfolding it, it often has to be moved and turned. The aesthetic value of such furniture is almost zero, but the “book” is the most budget option for a table.
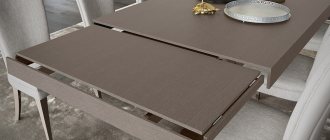
Sliding tables have a rigid frame with fixed legs. Only the tabletop undergoes transformation: it is moved to the side to the middle of the frame, while the open part is covered with the second half, which is stored separately. Such tables are good in spacious dining rooms; transformation is carried out in a few simple movements.
By the way, there are several layout options; for example, the edges of the tabletop can be moved with the insertion of a central segment. Or, for example, the tabletop can be folded in half on hidden mortise hinges and fold back onto the open part of the frame after sliding. Do not ignore the rotating structures, in which the tabletop does not move to the side, but turns perpendicularly, after which it is supplemented with a second half.
Final finishing and decor
After the wooden table is assembled, we begin to process its surfaces. Natural wood requires special antifungal and moisture-repellent impregnations. The product is applied in two or three layers. Each time, the surface is completely dried and only then proceed to the next application of the product.
Algorithm for making original coffee tables with your own hands
If the item is made of MDF or laminated chipboard, then treatment with an antiseptic liquid is skipped, since the laminated film on the surface is a kind of protective coating. But these slabs require processing of the edges of the tabletop. Veneer is glued to the end parts to close the cut.
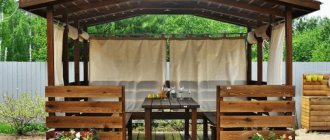
To make a folding table made of wood or metal look aesthetically pleasing, it is coated with varnish or paint. The product is processed completely, including the legs. If the surface has a beautiful wood pattern, then you can use transparent or tinted varnish. The product is applied twice. Tables painted in pastel or rich colors look no less aesthetically pleasing. Bright colors can maintain a cheerful mood, which is especially important during picnics and holidays.
Step-by-step restoration of an old table, ideas for original decoration
Techniques such as painting, appliqué, decoupage, craquelure, and burning will help transform furniture. If the product is not intended for interior purposes, but serves purely practical purposes, then it is best to cover the tabletop with self-adhesive film. It will protect the surface from moisture, dirt and make it easier to care for the item.
Making a folding table with your own hands is a creative activity. Having constructed the desired model and drawn all the details on the diagram, it is not difficult to turn your plans into reality. With high-quality assembly and proper processing of the material, homemade furniture will last for many years. A beautifully decorated item acquires a unique look and therefore can become an original decoration for a room.
Making table legs
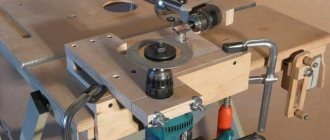
The legs for the “book” are assembled from three laminated chipboard strips. Two of them are fastened with the letter G on 60 mm confirmats. To do this, you need to drill a 4 mm through hole at the end of the 100 mm rail, widen it with a 6 mm drill to a depth of 70 mm, and then with a 10 mm drill to a depth of 60 mm. In other words, manually and step-by-step milling for a recessed confirmation.
To prevent the tabletop from swaying from side to side, the leg is covered from the end with a 100 mm wide plank and secured with 45 mm confirmats in three arbitrary places, hiding traces of the previous fastening. This fastening method is the least noticeable and most durable, but you can also use overhead corners, dowels or ties.
For an extendable table, legs made from two laminated chipboard strips folded perpendicularly are suitable. Between the legs, a rectangular frame is assembled from the same material, holding the base of the table together. Another, more complex option is to assemble square boxes from 84 mm wide planks and tighten them with confirmats. Such strict and discreet legs will fit most interior solutions, while providing good stability and allowing you to comfortably stretch your legs.
You can also use chrome pipes or turned items as legs for all types of tables.
Types of mechanisms
If you decide to make such furniture with your own hands, based on a drawing, or buy something from the Flamingo, San Remo or Butterfly assortment, for example, I advise you to decide on the mechanism in advance.
On sale you can find different names, such as:
- OZMF 593;
- OZMF 587;
- Hafele opla-top 505.73.935;
- MT-2;
- Hafele Lunch 505.73.945, etc.
But what is hidden behind all these articles and designations is difficult for an inexperienced person to understand.
Several of the most popular and relevant mechanisms can be identified.
- Acrobat. It is considered one of the most modern and practical. This is an elevator-type mechanism, which is based on a metal frame and a spring axis. The main tabletop is mounted to them. There are locking plugs on the sides to hold the retractable components. The acrobat allows you to turn a compact coffee table into a spacious table for a large company;
- Sliding systems. The dimensions of the furniture increase thanks to hidden sections that are located under the table. The elements are stretched to the sides, and a gap with grooves is formed. Additional components are inserted into them. It is better to use metal mechanisms here, since plastic quickly breaks down;
- Lifting mechanisms. Long-known systems, familiar since childhood. This is the same legendary book-table that was once in almost every home. The side sections are lifted and fixed with supports. Manufacturers abandoned heavy metal frames and switched to lighter structures.
If you walk through furniture stores, of which Moscow or Yekaterinburg offer a huge assortment, you will come across many transformable dining tables, coffee tables, kitchen tables and other tables. But the mechanisms everywhere use the same principle of operation. The only difference is their quality.
Advantages and disadvantages
From personal experience I can say that a high-quality mechanism for transforming a table completely justifies its cost. The Chinese analogue will cost several times less, but such a design will last just as much less.
If we talk about the strengths and weaknesses of table transformation, then only in relation to really well-made mechanisms. Under such conditions, a number of advantages can be identified. Namely:
- High level of versatility and multifunctionality;
- Ability to change the size, height, width and length of the table;
- An impressive range to satisfy even the most demanding needs;
- Adequate pricing policy;
- Reliability and safety of mechanisms that do not pose a threat to children;
- Compactness. An extremely relevant plus for small apartments and rooms;
- Attractive appearance;
- Long service life;
- Basic operating instructions.
What are the disadvantages here? They are difficult to find. Yes, low-quality mechanisms quickly fail. High-quality products also do not last forever, so potential damage to the transformer can be considered a disadvantage.
It is a mistake to believe that transformable tables are more expensive than ordinary furniture for the kitchen or living room. A lot depends on the specific model.
Having a compact size when assembled, such a table will take up minimal space in the room. When the need arises to receive guests, the structure unfolds, and no one feels uncomfortable at the small table.
The main frame is very simple
For sliding and rotary tables, the main frame is made of laminated chipboard strips with a width of 120–200 mm. In general, the frame encircles the legs in a circle and hides traces of the tabletop fastening. Square legs can also be fastened not with an external belt, but with intermediate inserts. The upper ends of the parts need to be flush; to give diagonal strength, it is possible to add jumpers inside the frame. The elements are fastened with furniture corners from the inside.
The total length of the base should be 40–50% less than the length of the tabletop when unfolded. The width is chosen so that the overhang of the tabletop at the edges is at least 100–150 mm.
When assembling the base for a “book”, the main dimensions have a more strict relationship. The central segment of the tabletop determines the overall width of the table, which should be 20–25 cm less than the length of the side wings. That, in turn, should be approximately 50 mm less than the height of the table. Since the legs are hidden inside the base when the table is assembled, its minimum width when folded is at least 300 mm.
The base itself is assembled in the shape of the letter P and reinforced with one crossbar 400 mm wide in the center on the edge. It is possible to fasten from the inside with furniture corners, but in this case it is better to prefer confirmations. The hinges of the legs are attached no closer than 50 mm to the edge of the side walls.
Color solutions
Many people think that since the pull-out table in the kitchen can be pulled out from under the countertop and can be hidden, you can not pay attention to its color. In fact, you should choose a color scheme based on the interior of the room and its size:
- White, beige, milky models are ideal for small rooms. They do not burden the space and even visually expand it. Suitable for country, Provence and Scandinavian style interiors.
- If you want the table to become the highlight of the interior, you need to choose contrasting colors that differ from the facades of other kitchen furniture. For example, choose a white table for a black set.
- An interesting solution when the tabletop of a retractable table repeats the tabletop in the work area, or the kitchen apron. It can also be the same shade as windows or doors, baseboards.
- If you want to bring something bright to the kitchen, you can choose a pull-out table in red, green, orange, and blue.
Hidden storage sections
Often the interior space of the table base is used to store dishes or household chemicals. The easiest way to organize storage space is inside a folding “book”. The width of the central segment should be increased by 200–250 mm and several horizontal shelves should be used instead of one vertical crossbar. It is also possible to have a blank lining of the inner box and install doors at the ends of the base.
Due to the complex shape of the legs, the door will be 100 mm wider than the frame on both sides, so it is important to remember one point: the handle on the door is installed on the side where the table leg is located when folded. Accordingly, under different wings, the direction of opening the doors and the location of the legs should be opposite.
In sliding tables, to create a niche, it is enough to line the frame from below with a solid sheet of MDF and add several transverse strips to secure the bottom more firmly. Another option is to use frame strips up to 400 mm wide and fasten the base along the center. Drawers on full extension guides can be installed in the formed niches.
What you will need for assembly
When working with soft woods such as chestnut, willow, and alder, you will need a minimal set of tools. Harder ones (oak, walnut), as well as knotty spruce, require special blades and careful processing.
To make a table yourself, you will need the following materials:- timber The frame and legs of the product are made from this wood. Cut using a circular saw or chain saw;
- array. Necessary for making a tabletop;
- boards. Instead of solid wood, it can be used to make a tabletop.
Tools required for work:
- jigsaw;
- grinder;
- drill and screwdriver with a set of drills of different diameters;
- screwdriver;
- self-tapping screws;
- metal corners;
- sandpaper;
- varnish;
- impregnation;
- square, ruler and tape measure;
- level, pencil.
Countertop options
The tabletop for the “book” must be assembled upside down, laying out the chipboard sheets on the floor and carefully leveling them. The wings are connected to the central section with piano hinges, then drilling is done for dowels to secure them to the ends of the base. Additionally, it is necessary to provide limiters in the center of each wing so that the leg does not collapse due to accidental movement of the leg.
The most universal option for mounting the top of sliding tables is on drawer guides. To do this, the tabletop or its halves are supplemented with a pair of longitudinal ribs, the distance between which is 20 mm greater than the width of the base body. The guides can be used either regular or full extension; their length should be comparable to the overhang of the tabletop when unfolded. This installation allows you to maximize the size of the unfolded table, while at the same time the strength and stability do not deteriorate.
If the tabletop is assembled from two halves, they can be folded with their front surfaces facing each other and hidden hinges can be cut into the ends. With this option, the front surface of the unfolded tabletop always remains intact, that is, its individual parts will not have different degrees of wear.
Metal dowels at the ends of different segments of tabletops are also very useful, which ensures greater solidity and eliminates the formation of edges and differences.
Production instructions
When the type, shape, and size of the table are determined, you will need detailed instructions on how to make a kitchen table.
- Draw a drawing.
- Provide the necessary tools.
- Purchase the necessary material. For example, if the tabletop is 80 cm in size, then you will need four dry boards 120 cm long.
- Sand the surface of the table top. Treat the joints of the boards so that they are in proper contact with each other.
- Drill holes at the ends at a distance of approximately 10 cm for connection and sand.
DIY sewing corner
For those who are engaged in sewing, handicrafts and, in general, arts and crafts, they simply need their own place for work and creativity. The author planned and made this sewing corner with his own hands just for these purposes. This is the original design of the author, developed to suit his own needs, so you need to set the final dimensions yourself, depending on the size of the room and your needs.
The photo on the right shows a design drawing; you can use its basic model, changing the dimensions, but maintaining the proportions. Briefly the manufacturing process. The first step is to make the main table. Then cut notches at the corners of the tabletop to attach the back frame, and then attach it to the table. The next stage is the manufacture of a rack with crossbars for storing rolls of textiles. One side should be open and the bottom board should be shorter so that it is easy to unwind the rolls. Attach the stand using screws and corner brackets. Then we make a retractable table with shelves and screw on the wheels. That's basically it. More information is available on the website, you will find the link under the gallery.
Photo source lazylizonless.blogspot.com/2012/07/arts-and-craft-table.html?m=1