Advantages of a self-made gazebo table
If you make a gazebo table yourself, then its owner and creator will have several advantages.
- Price. Making a piece of garden furniture yourself will be cheaper. After all, you don’t need to pay the master for services. You can also use improvised means and work with existing tools.
- Appearance. And although there are plenty of gazebo tables on sale today, it is not always possible to find what is required in a particular case. When making garden furniture with your own hands, the builder already has a completed idea in his head, which he will accurately bring to life.
- Dimensions. In the process of developing a table, the dimensions of the finished gazebo, chairs or benches are also taken into account. Therefore, in order not to run around the shops looking for furniture of the right size, it is enough to make the drawing correctly.
The advantages include pleasure from the process. Many summer residents like to make all sorts of useful items for their home, which then become the object of their pride.
There are no downsides to making your own table. It's just a waste of time. And time spent with pleasure cannot be considered wasted.
Conclusion
To decorate your vacation, you don’t have to spend a lot of money. Wood, metal, plastic or other available materials are always at hand. Additions made with taste and soul will create a unique image and respectable style.
For a visual example, you are given many options for designing gazebos; the video in this article will tell you about the process, and the final decision on the design depends on you.
Did you like the article? Subscribe to our Yandex.Zen channel
Choosing what the table will look like
Before you get down to business, it’s worth deciding on the types of design. There are many, but here is a brief description of several types:
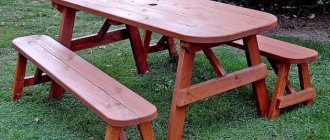
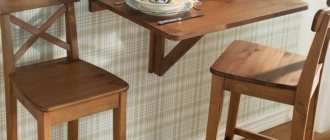
- Folding table. Its main advantage is its compactness. This design has twist-out or folding legs, as well as a folding tabletop. This table is easy to carry, transport, or fold and remove from the gazebo for a while.
- Transformer. This type of table is represented by a folding mechanism. The design differs from the previous type in that this table can be transformed into a bench. The option is quite convenient, but not very durable due to the many sliding mechanisms
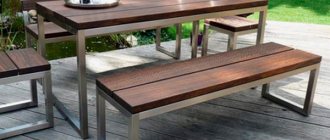
- Stationary table. This design is without additional mechanisms, without the possibility of a transforming table. Looks great in a gazebo or on the terrace.
- Decorative designs. Wood craftsmen decorate the table with various animal figures, patterns or ornaments. When creating decorative tables, you can show your own imagination. Or look at ready-made options on websites on the Internet. Specialized stores sell ready-made table decorations made from different materials.
- A round table visually adds space and adds aesthetics to the gazebo. The leg of a round table can be one massive stand, which is well secured with a cross at the bottom. Or maybe the tabletop rests on four legs located in the corners.
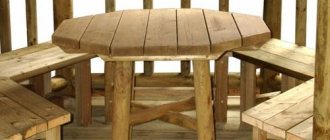
- Hexagonal table. Suitable for a gazebo with strict elements and several corners. Guests at a hexagonal table will feel freer than at a round one.
Treatment
Protective compounds are applied before starting work (fire retardant and antifungal drugs, stain) and as a final stage (varnish or wax).
This allows you to reveal the wood texture and increase the service life of the product:
- This procedure is especially necessary for furniture designed for year-round use in the fresh air.
- After assembling and adjusting the structural elements, the saw cuts also need to be processed.
You can prevent the varnish from peeling if you dry and sand the first layer well, and then apply several more layers. Acrylic varnish creates a thinner transparent layer and dries faster.
Selection of size and shape
There are many unusual options for creating garden furniture. In order not to regret later the efforts expended and wasted time, it is better to choose among the standard options. Despite their simplicity, such tables allow you to realize all kinds of design ideas.
The construction of the table begins by measuring the floor area in the gazebo, as well as the distance between the benches and opposite walls. Even when you need a small table for a large gazebo, its location and dimensions need to be thought out.
To simplify the task, draw a diagram, indicating the widths and lengths of all components. Accurate visualization will allow you to make fewer mistakes.
It is advisable to display all details to scale. On drawing paper or whatman paper you will need to draw the legs with their fixation and taking into account all the features.
Before displaying your idea on paper, you finally decide on the material of the table - it will be metal or wood.
It is easier to fit a small round table into a round gazebo. The table can also be a polygon, with edges equally distant from the center.
But an inscribed elongated rectangle will take up a lot of useful space. Rounded tabletops can be used in rectangular gazebos, as they are comfortable and look colorful.
To save usable space, a square or rectangular table is placed in an elongated gazebo.
The legs of the tabletop are placed either in the center or along the edges. To ensure stability, the central support at the bottom must be expanded.
Table legs are available in different options: cross-shaped, vertical, intersecting in the center. The supports are made flat or volumetric, and their cross-section is round or square. The closer the legs are to the edges of the table, the more they interfere with the legs. And the closer the legs are to the center, the less stable the table becomes. When designing, it is important to choose the “golden mean”.
Preparation
In order for the process of making a wooden table to occur quickly and with minimal effort and nerves, it is necessary to prepare the following materials and tools:
- A drill with a soft start or a screwdriver with appropriate attachments - bits and drills;
- A jigsaw is an alternative to a hand saw for wood;
- Angle grinder (grinder) or vibrating, eccentric sander. An alternative is a plane;
- Water or electronic level, tape measure, square, pencil;
- Screws must have a high-quality anti-corrosion coating;
- Sanding paper of various grain sizes;
- Carpenter's putty to match the wood used;
- Antiseptic and protective agents for wood: stains and/or paints and varnishes.
Table drawing with dimensions
Let's look at the step-by-step production of such a table as in this photo:
The finished product will have the following dimensions:
- length - 2 m;
- width - 0.75 m (5 boards, each 15 cm).
- protrusion beyond the leg – 0.3 m;
- leg height – 0.7 cm;
- height to tabletop - 0.7 m.
Depending on the parameters of your gazebo, you can proportionally increase or decrease the size of the table proposed for consideration.
This table is suitable for both small and medium gazebos. In large gazebos it is necessary to use longer and more solid material.
Original garden furniture
An original version from scrap material
Benches (see How to make benches with your own hands for a gazebo), tables and chairs for a gazebo can be made not only from boards, but also from scrap materials, for example, using stumps and thick tree branches.
As a rule, stumps are used to make a support for a tabletop:
- For a round and square table you need one stump, for a rectangular and oval table - two.
- The bark is removed from the stumps, and the entire surface is thoroughly sanded. As a finishing coat, a transparent varnish is applied in several layers. This allows you to highlight the natural beauty of the wood.
- Using a level, a saw and a plane, the horizontal surfaces of the stump are leveled. The table top is made as described above and attached to the stump with nails or self-tapping screws.
- In the same way, you can make a base for a table and bench from thick branches that are attached not only vertically, but also diagonally.
Note. Sometimes the table and bench for the gazebo are made from logs sawn in half (blocks). It looks solid and monumental and is suitable for a large gazebo or open air. In this case, it is not necessary to remove the bark, just thoroughly clean it of dirt and varnish it.
In addition to the bench, you can make original chairs and armchairs from stumps and blocks. Their production technology is exactly the same. Regardless of whether the tables and chairs for the gazebo are made with your own hands or purchased at a furniture store, they will serve for a long time and will be a great incentive for gathering good company in the fresh air.
Construction tools and material for work
To build a wooden table for a gazebo, you will need:
- dry board 15 cm by 5 cm (about 20 meters);
- bars, measuring 5 cm by 5 cm and 70 cm long (4 pieces);
- a plane or grinder with a grinding wheel;
- galvanized wood screws;
- screwdriver or drill;
- electric saw or jigsaw.
On the Internet there are many photos of wooden tables for gazebos, which are made from waste. This option reduces the time spent searching for blanks, as well as the cost of purchasing them. It’s just impossible to get good quality using this option.
The disadvantages of such a design will be not only a short service life due to low strength, but also the appearance of the table, which leaves much to be desired.
To build a good, solid table, you will need high-quality materials. Conifers such as pine and spruce are usually used.
Deciduous trees have high strength, especially oak. Such materials are difficult to process, but their service life increases significantly. It is also worth noting that hardwoods contain less resin.
The workpieces must not be damaged. Boards with falling knots and resin stains are not suitable for work. Gray spots on the surface of the board must be cleaned off. This is mold that will gradually destroy the array.
The main task is to buy 20 meters of board. Self-tapping screws cost pennies, and you can ask friends for the missing tool or rent it for the weekend.
Tree selection
A table made of wood looks aesthetically pleasing and stylish; it is an environmentally friendly and pleasant material to work with. However, there are many types of wood from which you need to choose the best one. When choosing a breed, it is worth considering not only visual characteristics (color, texture, general appearance), but also more important qualities.
Wood for furniture must meet three basic requirements: to be durable, wear-resistant, and resistant to various types of deformation.
All of the listed characteristics depend on the density of the tree (the ratio of mass and volume). There are three types of density:
- Soft. These include linden, willow, juniper, cedar, aspen, pine, chestnut, and fir.
- Solid. This group includes ash, elm, rowan, apple, larch, and beech.
- Very hard. Its representatives: hornbeam, yew, boxwood, white acacia, dogwood, birch.
Wood species for making furniture.
Let's look at the most common types of wood with their advantages and features:
- Pine. Perhaps the most common and affordable type of wood. It belongs to soft breeds, therefore it is pliable in work, resistant to moisture, dampness, temperature changes and rot. It glues well, and after de-resining it can be easily processed with paints and varnishes.
- Oak. A hard, durable type of wood, pleasant to work with, resistant to rotting. Oak furniture has a beautiful appearance, the color without treatment varies from yellowish-white to brown.
- Beech. Durable and hard wood, easy and pleasant to work with. The price tag is more affordable than oak. The main disadvantage is hygroscopicity.
- Ash. The wood is characterized by strength on par with oak, has a beautiful soft golden color, and does not crack. However, the tree does not tolerate high humidity conditions.
- Linden. Durable, does not rot, does not crack or deform when dried.
- Walnut. Dense wood, nevertheless pleasant to work with, has a beautiful texture and is easily covered with paints and varnishes, although the natural color of wood is very rich in various shades and transitions.
Step-by-step process of constructing a table
Below you will find instructions, following which you can get a decent table for the gazebo.
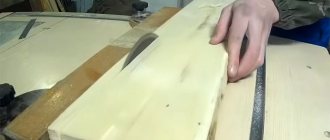
Preparing the boards
First you need to mark and cut the boards. You will need to make 18 separate parts.
When the boards are prepared, they need to be dried in the sun, otherwise they will change their shape and size during service. And then you will have to update the connections between the parts so that they do not fall apart.
It is best to dry it in the sun, laying out the material in stacks, but separating the tiers for ventilation with planks.
At night, the boards are covered or brought into the barn. Then the dried boards are treated with fire retardants (the drug slows down the burning of wood) and antiseptics (the product prevents the appearance of mold on the surface of the wood).
Making a countertop
The dried boards are cut with a wood saw. The tabletop consists of five boards, each of which is 2 meters long according to the drawing, which are fastened with bars. Two of them are installed on each side.
There remains a gap between the bars, into which the legs will then be inserted. According to the diagram, the legs are removed from the edge by 30 cm. From the edge of the tabletop, the center of the outermost bar is located at a distance that is calculated as follows:
30 - 5/2 = 27.5 cm.
The distance from one bar to another is 5 centimeters.
The surface is sanded with emery or a grinder with a grinding wheel. The chamfer is removed from the ribs using a plane. The corners should not be left, they are constantly worn out and broken off. And the protruding sharp parts of the table often create inconvenience.
The photo shows the connection of 5 boards:
When choosing high-quality material, there will be no unevenness or cracks on the front side of the tabletop.
Manufacturing and installation of legs to the tabletop
Legs from dried boards are cut out to the desired shape and size, then sanded. This is enough to prepare them for assembly. The lower part of the legs looks like in the photo:
Here you can see that the legs and the tabletop itself look massive, but they will withstand the weight of the set table and the dancing guests. For stability, boards are attached to the bottom of the support with self-tapping screws on both sides, the length of which is equal to the length of the bars. After attaching the legs, you need to sand the bottom part further to ensure stability.
Strengthening the legs for table stability
For stability, an additional board is used, which is installed between the legs. It is attached with self-tapping screws to the inside of the legs. The dimensions of the additional board are 1.65-1.7 meters. According to the rules, the edges of the board protrude slightly beyond the legs (and in the drawing the board and supports are flush).
The excess part of the board is cut off and the edges are sanded.
Processing and grinding
After installing all the elements, you need to treat the surface of the tabletop and, of course, the corners. The table should have a smooth and even surface.
To prevent the legs from becoming loose, the bottom is sanded with a plane and the finish with sandpaper. You don’t have to do this, but nail rubber stands from below. The stands will give the table a horizontal position and also protect the structure from moisture and abrasion.
Chair
To make a wooden folding chair you will need:
- screwdriver/drill;
- plane;
- jigsaw;
- chisel;
- sander;
- groove cutters;
- drills for making holes of various diameters;
- wood screws with a length of 7 cm and a diameter of 8–10 mm;
- varnish/paint.
Workpiece dimensions
Beam with a section of 25×40:
- for a long leg – 91 cm long, 2 pcs.;
- for a short leg – length 55.7 cm, 2 pcs.;
- for sitting – length 31.5 cm, 2 pcs.;
- length 34 cm, 6 pcs.;
- for the back – 42 cm long, 1 pc.;
- for jumper – 34 cm, 1 pc.
Jumper with a diameter of 18 mm, a length of 34 cm – 3 pcs.
Fasteners:
- card loop for attaching to the back leg of the chair and the bottom of the seat – 2 pcs.;
- bolts Ø=8 mm, length 70 mm – 2 pcs.;
- washers for Ø=8 mm – 6 pcs.;
- furniture dowels Ø=10 mm, length 50 mm – 2 pcs.;
- cap nuts – 4 pcs.;
- waterproof glue for working with wood;
- pin Ø=8 mm, length 470 mm with double-sided thread.
Manufacturing
First of all, make an action plan and draw a drawing. Cut out the blanks according to the dimensions. You need to drill holes in them and make grooves with a milling cutter. Assemble the connections in this order:
- On the support block, insert the slats into the groove with a tenon.
- Glue the parts together.
- Insert furniture dowels into the holes at the ends of the seat, which are 30 mm deep.
The next step is to assemble the chair frame:
- You need to secure the backrest to the posts with glue, and a cross member on their bottom side.
- The seat dowels should be inserted into the guide grooves on the legs.
- Install the stud under the seat by screwing M8 cap nuts onto it on both sides.
- Glue cross members into the back leg.
- Bolt the front and back legs together to create a folding chair.
- Now you need to screw the seat to the rear legs. This can be done using ombre loops.
Finally, the chair or chairs, if you have collected several, should be painted with protective agents.
Round table for gazebo
First, they make a cover for the round table. To do this, glue the number of pine boards required according to your drawing with wood glue. They are secured with clamps.
Next, you need to draw a circle on the bonded boards after the glue has dried. To draw the radius, drive a nail in the center. A fishing line or strong thread with a pencil is tied to the nail. The thread is pulled and a line is drawn around the circumference.
The circle is cut along the contour.
For cutting, use an electric jigsaw or chainsaw. But the cut will be more accurate when using a jigsaw. The tool body is applied to the surface and aligned with the markings. There is a line in the middle of the front of the jigsaw; it should coincide with the line drawn in pencil.
The jigsaw blade moves up and down. The frame of the tool rests on the surface of the boards.
The edges of the round table top are trimmed using a plane and sanded with a grinder.
Both the top and bottom corners are cut off. It will take patience to make such a wooden table into a gazebo, because you will need to do a lot of cutting, planing and sanding.
Having prepared the shield, we begin to make the legs. They are made in the same way as in the previous version. But if desired, the legs are made round, which means you have to tinker with a plane and sanding.
The legs are mounted in the center of the tabletop at a distance from each other that is equal to the width of the supports. Both posts create one column with a square cross-section. In this form the table will be unstable.
To give stability, 2 more boards are added to the bottom, which are perpendicular to the base and form a cross-shaped stand with it. The connection is made using grooves.
The grooves are cut with a jigsaw in the finished base and perpendicular parts. The groove has a depth that is equal to half the width of the rib. All elements are secured with self-tapping screws and the surface is polished.
When the base faces the grooves down, the connection will be stronger. The entire load falls on the base, and the perpendicular holders simply support the table in a vertical position.
Every owner of a summer house or personal plot wants to have a personal corner for relaxation. By placing a table you made yourself in the gazebo, you will create a comfortable place to relax in nature. You can also invite your family and friends to get-togethers.
About the design
The simplest table design consists of a tabletop, legs and a supporting frame (frame), which connects all the elements together. The optimal table height in the gazebo is 70-75 cm. This allows you to comfortably use standard chairs with a seat height of 42-47 cm.
Table option for gazebo
For the tabletop, it is advisable to use boards with a thickness of at least 30 mm, which will completely eliminate their damage and deflection even under the influence of intense loads. The width can vary within any limits, but the most convenient for work is 150-250 mm.
When selecting the cross-sectional dimensions of the bars for the legs, not only the weight of the tabletop is taken into account, but also the expected loads. For example, will a portable grill be installed on the table, will it be allowed to be used as a scaffold for repairs, etc. It is recommended to use square timber from 50x50mm to 70x70mm.
For intense loads, it is recommended to strengthen the legs with a metal angle, or to make the main supports entirely from metal - a profiled pipe, a channel, an I-beam.