Materials
I bought the necessary materials at a construction supermarket. The shopping list was:
- confirmations – 30 pcs.;
- metal loops for attaching the table to the wall – 4 pcs.;
- PVA glue – 1 tube;
- wooden dowels – 10 pcs. (were in stock);
- dowels for hanging tables and mirrors – 4 pcs.;
- white MDF sheet – 2 m2;
- edge furniture tape – 12 m;
- telescopic guides for drawers – 2 sets (4 pcs.);
- wooden dowels – 8 pcs.;
- furniture handles – 2 pcs.;
- hanging mirror 890 × 650 mm;
- desk lamp.
I decided to present the entire process of assembling the hanging table in the form of the following instructions.
Expert opinion
Strebizh Viktor Fedorovich, leading construction foreman
Even if you have chosen the most laconic model from the photo, try to grind out every detail with special care so that there are no problems with fitting in the future. If you want to clarify something, please contact me!
Design Features
Traditional makeup furniture consists of a regular table complemented by a mirror. The products are equipped with drawers for storing cosmetics and all kinds of accessories. There are also models with built-in and pull-out cabinets. Illuminated structures are made in various shapes: rectangular, oval, square. The width of the working surface varies between 40–80 cm; you can choose the best option for any room.
Mirrors are classified by shape and size. There are products built into the tabletop, as well as independent reflective surfaces. The latter are mounted on tables, walls; large products consist of several doors.
Separate mirror
Built into the table
Illumination of makeup tables is provided by built-in or independently selected lamps. They can be located in any convenient place: on the sides, on top, around the entire perimeter. Each lighting option has its own advantages and disadvantages:
- Built-in lights are part of the makeup table. Pros: detailed reflections, soft, eye-pleasing light, long service life. Minus - it is impossible to choose the type of lamps.
- Separately installed chandeliers and sconces are also a good option. Products located parallel to mirrors or at eye level are popular. Pros: variety of light sources, you can choose the installation location at your own discretion. The downside is bulkiness.
A suitable makeup table should meet basic requirements. Among them: spaciousness of the cabinet, drawers, high quality mirrors, comfort of use. The furniture is designed to provide convenience for storing cosmetic products and personal care.
Built-in backlight
Separately installed lamps
Labor and cost
When I assembled and installed the table, I wrote down the amount of time spent completing the work at each stage. Here's what happened:
- cutting MDF sheet – 4 hours;
- finishing the ends with furniture tape – 2 hours;
- case assembly – 6 hours;
- manufacturing and installation of boxes – 6 hours;
- table installation – 1 hour;
- mirror installation – 30 min.
I summed up the costs of purchasing materials without taking into account the small parts that I had in stock.
- MDF sheet with an area of 2.2 m2 – 880 rub.
- Edge furniture tape (12 m) – 240 rub.
- Confirmations (30 pcs.) – 90 rub.
- PVA glue (1 tube) – 50 rub.
- Telescopic guides for drawers (4 pcs.) – 240 rub.
- Furniture handles (2 pcs.) – 36 rub.
- Hanging mirror – 1500 rub.
- Table lamp – 750 rub.
Do not forget that, in addition to its functional qualities, the table should decorate the interior of a bedroom, dressing room or salon with its appearance. But for a person with experience in assembling furniture, it will not be difficult to make just such a dressing table with your own hands.
Of the parameters, there are only two that are really worth paying attention to. This is the height of the tabletop and its minimum width
The height of the dressing table is determined in much the same way as the height of the desk. In theory, it should be matched to the height of the owner. After all, women spend a lot of time looking in the mirror. At the same time as the height of the table, you need to choose a chair, armchair or banquette - it depends on what you plan to place next to it.
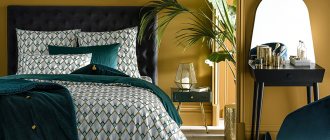
Boudoir table - for a classic style bedroom
A certain standard is the tabletop height of 75 cm, but you need to focus on your height. Next, we determine from the height of the seat. When a woman sits, her legs should be bent at the knees at an angle of 90° or close to this value - this is the most comfortable position. So choosing the height of a chair or armchair is not so difficult.
The dimensions of the dressing table are adjusted depending on the height of the owner and the available space
If the women's table is equipped with a hanging mirror, you also need to know at what height to hang the mirror. This parameter also depends on height. Sitting in front of a mirror, a lady should look approximately at the center of the mirror surface. If desired and the size is sufficient, you can lower the edge by 10-15 cm. The main thing is that the top of the head is visible.
| Tools | Set of screwdrivers, tape measure, square, drill and screwdriver, electric jigsaw, sandpaper for sanding surfaces |
| Accessories | Hinges and handles for bedside tables, decorative elements for shelves |
| Fastenings | Nails, self-tapping screws, Euro bolts, metal corners, drawer guides |
Expert opinion
Strebizh Viktor Fedorovich, leading construction foreman
Tools A set of screwdrivers, a tape measure, a square, a drill and a screwdriver, an electric jigsaw, sandpaper for sanding surfaces Fittings Hinges and handles for a bedside table, decorative elements for shelves Fastenings Nails, self-tapping screws, Euro bolts, metal corners, guides for drawers. If you want to clarify something, please contact me!
The main purpose
The dressing table characterizes a purely female territory. This is where all the power is given to cosmetics. A little girl also wants to have a corner like this to feel big and grown up. Furniture manufacturers could not ignore this interest and introduced special children's corners in stores. They all differ in:
- size;
- age;
- growth;
- cost;
- compactness.
Children's dressing tables are produced just like adult models, only in miniature sizes.
DIY dressing table, assembly master class with photos
- The first step is to determine the size and location of the product.
- Then make a project, transfer each detail onto special paper used for drawings.
- Take sheets of material, put a drawing on them and use a jigsaw to cut out the parts.
- The ends are treated with sandpaper and primer, but it is better to cover chips with special tape.
- An edging is placed on the tabletop itself, and a melamine film is placed on the ends, which must be fixed with a well-heated iron.
- Drill holes at the designated points and assemble all the individual parts into one structure. Fix with self-tapping screws.
- Assemble the retractable sections, drill individual parts and fasten them with confirmators.
- Make holes on the front panel for the fittings and secure them.
Preparatory work
When figuring out how to make bathroom furniture at home, you need to do some simple preparation. At this stage, a number of measurements should be taken, components should be purchased and drawings of future structures should be drawn up.
Drawing of corner bathroom furniture.
Taking into account the size of the room and layout
Before manufacturing, it is worth assessing the size and layout of the room. In small rooms it is customary to install structures with a corner configuration or cantilever sinks. Such items are more durable and practical.
Necessary parts and accessories
In addition to choosing the material, you need to prepare a set of tools and consumables. The list of required parts includes:
- Pens.
- Closers.
- Loops.
- Corners.
- Self-tapping screws.
Furniture drawings and design
Ready-made drawings of items for bathrooms have been published on thematic resources. But you can prepare the project yourself, taking into account the measurement results and the features of the future product. On the schematic drawing you need to indicate the dimensions of the assembled kit, the placement of fittings, sliding or hinged doors and other structural elements.
Scheme of future bathroom furniture.
Backlight installation
Installing LED lighting for your makeup table is necessary so that you can find something in your nightstand without turning on a bright chandelier. This is especially true if you plan to place furniture in the bedroom. The main thing is to strictly follow the step-by-step work algorithm:
- Make a frame for the makeup mirror according to the shape of the glass. You can buy ready-made.
- Drill holes around the perimeter for cartridges.
- Insert LED lamps.
- Install a push-button switch with a socket at the bottom.
After this, the dressing room mirror is installed in its place: attached to the tabletop or hung separately. If the frame is square, the number of lamps is 10: 4 on the sides and two on the top. For round glass, the illumination depends on the diameter.
Make a frame for a makeup mirror
Drill holes for sockets, insert LED lamps
Install a push-button switch with a socket at the bottom
Set in place
Ready
Step-by-step instruction
Let's look at how to make a children's dressing table with a mirror. For a positive result, do everything carefully and according to the instructions:
- Trace the mirror onto a sheet of plywood or fiberboard. Be sure to make indents to create a beautiful and large frame. These outlines can be made in the form of a floral design or a cat's face.
- Cut out the workpiece.
- Attach the mirror to a base made of chipboard. For this, furniture corners or glue are used.
In addition to this table, you can build a chair. Children's furniture can be decorated with lighting. In products of this type, it plays two roles:
- decorative;
- functional.
In the first case, a multi-colored LED strip can be used. It is mounted everywhere except the countertop. Functional lighting is installed in a mirror frame. The glow should be as natural as possible.
As you can see, making a children's dressing table is not as difficult as it seems at first glance. The design is easy to think through on your own. If you can’t make furniture with your own hands, then you can always find a ready-made option that the little fashionista will like.
Painting the product
First, mix 1 part chalk paint with 2 parts water. Then use light brush strokes to apply the paint to the surface of the nightstand. Try to leave small brush marks so that the wood can be seen in some places.
If you get sharp lines during the painting process, you can smooth them out a little
To do this, take a damp sponge and wipe the entire surface, paying special attention to the places where you need to even out the tone. Repeat the process until you are satisfied with the end result
One hand is clean, the other is dirty: how to avoid getting infected in a public place
Mironov’s words, which became his last in his life (he said them on stage)
The husband figured out how to decorate the veranda and made tall flower pots
After this, the paint should dry completely in the fresh air. This process may take 48 hours before you can move or touch the product.
| Tools | Set of screwdrivers, tape measure, square, drill and screwdriver, electric jigsaw, sandpaper for sanding surfaces |
| Accessories | Hinges and handles for bedside tables, decorative elements for shelves |
| Fastenings | Nails, self-tapping screws, Euro bolts, metal corners, drawer guides |
Expert opinion
Strebizh Viktor Fedorovich, leading construction foreman
You can also make such a table yourself, if you decide in advance on its appearance, create a competent project, and prepare the necessary materials and tools. If you want to clarify something, please contact me!
Model selection. Final finishing
Let's take a closer look at the choice of model
.
Shallow countertops, niches or drawers for storing cosmetics and accessories and relatively small sizes, the distinctive features of this type of table are the presence of a mirror with additional lighting. Standard modifications can also be: In addition to dressing tables in a classic design, they can be used as dressing tables (models based on a compact chest of drawers with a high mirror) and trellises (a similar design to a system of folding mirrors).
- moved to the wall - with 2 or 4 supports;
- corner - with or without supports.
- floor - moved away from the walls;
- hanging - without legs;
_
Model
- a product that is a three-dimensional simplified image of an object on a specified scale. The model is an integral part of the layout. (GOST 2.002-72)
The latter option is less common. The shape of the tabletop, dimensions, weight, method of attaching the mirror, differences can also appear in the type or number of drawers. Due to the need to retrofit the table with storage systems and place a large number of small items, furniture makers do not recommend abandoning models with stable supports, even taking into account their fastening to the walls. In addition to the usual placement in bedrooms, dressing tables can be hidden in niches in corridors or spacious bathrooms.
When choosing a specific model, first take into account its size and compatibility of the design with the overall style of the room. Classic compact tables decorate a small bedroom. Well-lit rooms, a trellis or dressing table with a mirror fit better into large ones.
_
Room
- a unit of a real estate complex (part of a residential building, other real estate object associated with a residential building), allocated in kind, intended for independent use for residential, non-residential or other purposes, owned by citizens or legal entities, as well as the Russian Federation, constituent entities of the Russian Federation Federations and municipalities. ; - space inside a building that has a specific functional purpose and is limited by building structures. (SNiP 10-01-94); - a space inside a house that has a specific functional purpose and is limited by building structures. (SNiP 31-02-2001)
Compatibility
— the suitability of products, processes and services for joint use, without causing undesirable interactions, under specified conditions to meet specified requirements. (GOST R 1.0-92)
Now let's take a closer look at the final finishing
.
For decorating a dressing table
Both standard techniques are used (painting, opening with varnish or covering with film) and original design methods. Chalk or similar interior paints with varying degrees of gloss; an interesting effect is also achieved when painting the cosmetic table with acrylics. When working with wood products, transparent varnishes applied in 2-3 layers or stains that change the shades of wood, but do not hide its structure, help to emphasize the beauty of natural wood. In general, there are no restrictions when choosing colors; preference is given to pastel and muted tones.
For additional decoration use:
- Beads or beaded stickers decorating a dressing table for a girl or models for romantic boudoir.
- Paints and varnishes for artificial aging of surfaces.
- Paints for artistic painting of surfaces, allowing you to decorate a dressing table you built yourself in any style.
- Shelves made of tempered or acrylic glass, increasing the elegance and functionality of the structures. Furniture with this decor matches any type of modern interior.
- Drawings or ornaments made using the decoupage technique. The best option for furniture in Provence, shabby chic, and country styles.
- Moldings or similar voluminous decorative stickers decorating a table in the rococo or classic style.
The color and texture of the table itself and other items, the chosen decoration technique must be in harmony in style with the mirror frame and lighting. as a result, many designers deliberately use them to emphasize the individuality of the interior. Traditionally, this furniture is considered the most original accessory, setting the tone for the entire room.
DIY dressing table mirror
- Everything that can be removed, you remove and disassemble. Remove old fittings.
- Surfaces must be clean and free of grease. This is easier to achieve with a soft cloth soaked in dishwashing detergent. Then everything is washed off with warm water and a small amount of vinegar. Wipe with a dry cloth.
- Cut out the details. It is better to cut the film 8-10 mm larger. The remains are then cut off with a paper knife.
- Spray the part to be glued with water from a spray bottle. On a wet surface, the film can be moved if something goes wrong. You can even peel it off without damaging it.
- After removing the protective layer from the film, carefully lay it out. Having leveled it, begin to smooth it with a soft cloth from the middle to the edges. Try not to have any bubbles. To do this, you need to move gradually, without jumping from place to place.
- If there is still a bubble, you can pierce it with a thin needle approximately in the middle. Then expel air from the edges of the bubble to the hole and rub the puncture site.
- Having glued the film, take a clean thin cotton cloth, spread it on top and iron it with a warm iron (medium heat).
- We glue the trim and install new handles.
Can I do it myself or not?
The design of this piece of furniture is quite simple, there are no difficulties. The simplest option is a table of a certain size. And it doesn’t have to have a mirror on it – it can be mounted on the wall. The more complex the structure, the more boxes and cavities it has. Very often, when making furniture, craftsmen cut out different configurations of cabinets, drawers and shelves. You can make a dressing table yourself, but you need to consider some points.
It is best to develop the project yourself - in this case, you will be able to adjust the table to the place in which it will be installed. But if you have no experience in drawing up drawings, you can turn to ready-made ones. The article provides several design options. You can choose any one you like. This means that we can draw the following conclusion: any home craftsman can make a table on his own.
Labor costs
- manufacturing of wooden parts (table top, walls, bottom, legs) – 4 hours;
- assembling the table body, subframe, installing legs – 3 hours;
- polishing – 2 hours;
- stain treatment, varnish coating without taking into account drying time - 1 hour;
- assembly of the box and mirror frame – 3 hours;
- drilling mounting holes, installing cartridges – 1 hour;
- installation of wires and switch – 1 hour;
- installing dowels in the wall. Inserting a mirror into a frame and hanging the entire structure on the wall takes 1 hour.
In total, the installation of the makeup table with mirror took 16 people/hours.
Materials and tools
The most popular materials used to make a makeup table are wood and MDF. Some craftsmen, continuing the traditions of Soviet times, work with chipboard and laminated chipboard. The drawers and back wall are usually cut from sheets of plywood. What you will need for the work is indicated in the table.
Expert opinion
Strebizh Viktor Fedorovich, leading construction foreman
Tools A set of screwdrivers, a tape measure, a square, a drill and a screwdriver, an electric jigsaw, sandpaper for sanding surfaces Fittings Hinges and handles for a bedside table, decorative elements for shelves Fastenings Nails, self-tapping screws, Euro bolts, metal corners, guides for drawers. If you want to clarify something, please contact me!
A little about security
It’s worth noting right away that you need to choose children’s furniture only from high-quality materials that do not emit toxic substances or harmful odors.
If you choose a wooden dressing table for your little princess, it is better to use the following simple tips:
- choose only high-quality laminated chipboard or MDF;
- materials must be of group E1 (the presence of formaldehyde resins in them is minimized);
- there should be no sharp corners;
- All parts must be assembled with high quality.
If you are looking at a plastic dressing table:
On a note!
A children's dressing table is a great addition to a little princess's room. Its presence is a must for young fashionistas. This way they have the opportunity to develop properly.
If you purchased a model with a mirror, then choose one that is covered with a special anti-splinter film. This will protect the child from various injuries if used carelessly.
From an old bedside table to a dressing table
- for cutting MDF sheets;
- perforator; ;
- drill/driver for drilling mounting holes and installing screws;
- a set of bits for fixing in a drill chuck to use it as a screwdriver;
- hammer;
- development on wood;
- square;
- tape measure and metal ruler;
- level;
- knife.
How to treat the surface → Room decoration → How to choose the right paint → Surface treatment technologies → Leveling and finishing the walls → Selecting and applying a primer → Removal from the surface → Stretch ceilings and technologies → Reviews and testimonials
Manufacturing process step by step
As an example, it is worth considering the process of creating a wooden model. Wooden furniture is versatile, environmentally friendly and durable.
Some recommendations at work that are worth considering:
- The product must fit perfectly into the room and leave room for sitting and space for movement;
- The number of people who will use the product. Count on at least 70 centimeters in width for each;
- For children, consider age and height, stool characteristics;
- The shape of the tabletop can be oval, round, rectangular, square, or irregular.
- Size – most often choose a width from 80 to 120 cm;
- The number of legs can vary from one to four. Their length and dimensions must be the same. The shape of the legs varies, but the upper part should end in a square for better fastening. The material may be different from the countertop. Ready-made legs can be purchased or welded from a metal profile;
- If you are a beginner, choose a durable countertop material that is easy to work with, such as oak.
Having decided on the design, functional purpose and choosing the material for the future product, you can proceed to creating a drawing
It is important to perform all actions correctly and consistently, otherwise you will have to redo all the work again
If there are ready-made examples of drawings, great, but study them carefully before using them. You can draw your own ideas on paper or in a special computer program. Indicate the dimensions of each element.
It is necessary to make separate templates for all parts. Prepare the canvas, dry it, clean it, cover it with antiseptics. Then the templates are transferred to the canvas and parts are made: table top, legs, fasteners.
Next comes assembly - connecting the parts into a single structure by drilling holes and tightening bolts, using glue. At the processing stage, the product is sanded and coated with paint and varnish products. Carved patterns will help decorate the product.
Necessary tool
Here is a list designed for repeated feats. So:
- Electric drill with chuck up to at least 10 mm. Ideally, a good screwdriver, it’s more convenient.
- Jigsaw with chipboard saws. If you are afraid of a jigsaw, prepare money to order figured cuts.
- Roulette.
- Construction angle (something along which you can draw a perpendicular, with millimeter marks). The length of the measuring ruler is sufficient at 300 mm.
- Wood drill bits with a diameter of 8 mm and 5 mm. It's easier to buy a set.
- Combination screwdriver with bit set. The kit must include a hex bit for confirmations (ask at the construction market, they will know).
- Iron.
- Pencil, hammer, knife, dry rag, fine sandpaper.
Recommendations: From this list, only a pencil can be Chinese.
Finishing
The assembled dressing table can be decorated in various ways. Wooden products are decorated with painting or decoupage techniques .
Also, such furniture can be painted and varnished. This will not only add aesthetics to the product, but will also extend its service life, since paints and varnishes will increase the product’s resistance to increased moisture and sudden temperature changes.
The surface of the dressing table can be made monochromatic or multi-colored. To shade the product, it can be pre-coated with stain before varnishing .
Such a piece of furniture can be decorated with any decorative elements: painting, pebbles, beads. The main thing is to choose the right style, according to the overall interior of the room.
The end result can be a decoration for any bedroom:
Dressing table for children: a daily fairy tale for little princesses
Children are our miniature version. They try to imitate us in everything. In this regard, copies of adult furniture have become popular in stores. These include children's dressing tables. Even the smallest children know about such a product, since almost every mother has such a thing on which cosmetics and various care products are stored. Let's take a closer look at what types of children's furniture exist and whether it is possible to make a dressing table yourself.