With its help, you can greatly facilitate the process of decorating cakes and make it enjoyable, comfortable and safe.
If you are not planning to purchase it in the near future, then an experienced craftsman can assemble it yourself.
Features of the rotating table
If you want the cake to be accessible to you from all sides at the same time, and at the same time you do not have to run around it, be sure to consider having a rotating stand.
What is a rotary design for cakes? This is a product consisting of:
- round work surface;
- legs-bases;
- rollers, rubber bands.
Thanks to its design, the table easily rotates around its axis and provides convenient access to the confectionery product . With such a supply, you can create elegant and original decors in the most convenient way and create decorations of any complexity. At the same time, you don’t have to worry at all that your masterpiece will move, get damaged, or fall to the floor.
You can either purchase a turntable for cakes ready-made or make it yourself. A homemade design has many advantages. Firstly, you will be able to make a product that will fully meet your requirements and preferences . Secondly, you yourself will be able to create a thoughtful drawing of the product, select materials for its manufacture and think over the most optimal dimensions. In addition, a homemade design will be much cheaper than a purchased one.
Basic option
The basic option includes a single-tier cake stand. It’s easy to make it yourself; this work will take no more than 15 minutes. To do this, you need to take a piece of polystyrene foam, which you can purchase at a hardware store.
Expanded polystyrene of the desired shape is combined with a special food substrate, which is a thin cardboard with a foil coating on one side. Such a substrate should have a round shape. Its diameter should correspond to the size of the confectionery product that will be created. Connect the substrate to polystyrene foam using double-sided tape.
If you can’t buy a store-bought backing, you can make it yourself. To do this you will need thick cardboard and scissors.
To make a round substrate:
- cut out of cardboard the most perfectly even circle;
- connect with polystyrene foam as indicated above;
- Using a sharp knife, carefully trim the polystyrene foam that extends beyond the edges of the backing.
After all the manipulations, you get a round cake stand. To prevent the edges from being rough, it is better to trim them with sandpaper and then tie them with a satin ribbon. Double-sided tape is used to secure the tape.
When using a homemade cardboard base, the surface in contact with the food must be covered. A hot tablecloth or adhesive glossy paper that can be washed may be suitable for this purpose.
Thanks to the materials used to create this stand, the product does not deform, since it is quite solid and will reliably hold even a heavy cake.
Materials
A rotating table can be made from any available materials :
- Fiberboard;
- MDF;
- plywood;
- tree.
Each individual option has its own advantages. Wood is environmentally friendly, safe, and has a texture that is pleasant to the touch . MDF and plywood are easy to process. In addition, this material has a low cost.
But chipboard is inexpensive, looks attractive, and is a pleasure to work with.
Tip : in order to save consumables, you can use a door from an old kitchen set to make a countertop.
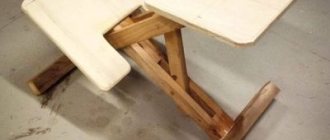
DIY rotating tray from an old stool
An old stool can be turned into a handy turntable. For this we need his round seat. A rotating mechanism in the tray is necessary so that during dinner each family member can turn it to the desired side. You can display spices, sauces on the tray, or simply place a vase of flowers on it. It looks very interesting and stylish. Details of making a rotating tray with your own hands from an old stool in step-by-step instructions.
Materials
For work, prepare:
- the stool itself with a round seat;
- swivel mechanism;
- screws;
- a round piece of cork board;
- furniture handles;
- A4 paper;
- stain;
- black paint;
- drill;
- grinding machine or sandpaper;
- hammer;
- screwdriver;
- brush;
- ruler;
- pencil;
- scotch.
Step 1
. First, you will need to disassemble the stool to separate the seat from it. What kind of tool you need for disassembly will depend on the fastenings in the furniture. In this case, a screwdriver was used.
Step 2
. Remove the old paint layer. Depending on its thickness, you may need special solvents. If the paint layer is thin, use a sanding machine with a coarse-grained attachment.
You will need to process the top and bottom surfaces, as well as the side of the seat.
Step 3
. After completely stripping the seat of paint, you can cover it with stain. Choose a tone that suits your style and idea. Apply the coating material to all surfaces.
Step 4
. Since the tray is stylized in a rustic direction, it needs to be further aged. Dents will be an ideal decorative technique. Apply them with a hammer, but do not make them too deep.
Step 5
. Apply a second coat of stain. Let it dry for 24 hours. After this, decide whether the color of the tray is sufficiently saturated.
Step 6
. On a sheet of paper, print out the inscription prepared for the stencil, which you will transfer to the tray. Using a utility knife, make the stencil itself.
Step 7
. Apply the stencil to the already dry surface of the tray. You can secure it with small strips of tape. Using black paint and a sponge brush, fill in the empty space of the stencil.
Step 8
. After the paint has dried, mark the surface of the tray to attach the handles.
Step 9
. Drill holes at the marked points.
Step 10
. Attach the handles to the tray.
Step 11
. Use a pencil to mark the center of the circle on the underside of the tray.
Step 12
. Attach the rotating mechanism.
Step 13
. Attach a circle of cork board to the bottom of the mechanism.
The tray is ready!
DIY rotating tray from an old stool
4/5 — Ratings: 62
Tools
Having decided to make a rotating cake table with your own hands, prepare the following tools and materials :
two bearings (they can be purchased at any auto store);- lumber for the countertop (in our case, plywood);
- hard nails;
- self-tapping screws;
- plastic tubes;
- metal circle;
- thin plastic.
Important: bearings are double and pressed. The second option is preferable when assembling a rotating cake stand, as they are more convenient to install.
The most popular stand diameters
Just like cakes, roller coasters come in all sorts of diameters. When purchasing a table, you need to consider what size the cake layers will be. The margin should be 2-3 centimeters for convenient decoration of baked goods. The most popular are those with a diameter of 25-30 centimeters, since standard cake diameters are 20-25 centimeters.
When choosing a rotating cake platform, check whether there are markings on it.
How to make a rotating table?
Making a turntable is quite easy and simple. First you need to make a well-thought-out sketch. In this drawing, indicate the design of the product, its exact dimensions and materials of manufacture. Having such a diagram at hand, you can easily assemble the table the first time and without errors.
The manufacturing process of the rotary table is carried out in the following sequence:
According to the drawing, we cut out a round tabletop from plywood.- Take the bearing (if you chose a double bearing rather than a pressed one, then use nails to hammer the smaller element into the larger one).
- two circles with a diameter of 20 cm in a wooden slab .
- We insert a bearing into one of the pre-made circles .
- Next, we twist the two parts together using self-tapping screws and place the bearing in the center.
- The turntable is equipped with plastic pipes . They will connect the top and bottom of the product. The tube must fit into the bearing with millimeter accuracy. It is best to make it 15 cm long. This will simplify the process of decorating cakes. Since you won't have to constantly bend over your masterpiece.
- The top of the table is made of metal . Particular attention is paid to its diameter. It is best if the diameter of the metal surface varies within 30-40 cm.
- Next, we weld the elements together . If you do not know how to use a welding machine, you can use cold welding.
- We install the rotating part on the pipe and fasten the elements with self-tapping screws.
That's the whole simple process of manufacturing a rotating structure.
Tip : to give the product a decorative appearance, it can be covered with thin plastic.
The product can also be decorated with self-adhesive film. It simply sticks on and is easy to clean.
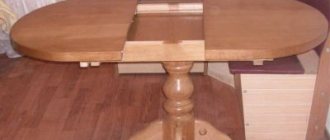
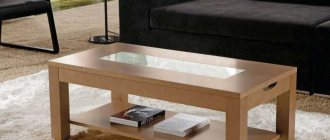
Tip : An extendable table, coffee table or a good quality kitchen table can also come in handy in the kitchen.
How is it convenient?
This table will be useful not only for professional pastry chefs. It will be very useful both for those who like to cook for pleasure, and for cooks taking their first steps. This table will come in very handy for housewives who decorate cakes with fondant. It looks like a circle-pedestal on a leg that rotates around its axis. The main goal is to make the pastry chef’s work as ergonomic and convenient as possible, and to simplify the task of decorating the finished cake. The cake is placed on a stand, and by rotating it, you can easily cover it with fondant, decorate it with figures, inscriptions and other decor. In this case, there is no need to walk around it, the confectionery product will rotate on the stand, and the hostess will have access to any place on the cake.
A cake turntable will make decorating your baked goods easier
Baking cakes is not only interesting, but also responsible. The quality of decoration determines the aesthetic appeal of the confectionery product and the ability to arouse appetite among consumers. Therefore, you cannot do without a special rotating round table designed for decorating sweets.
The stand consists of several parts. Using step-by-step instructions, you can make a cake turntable yourself.
What you need
In order to make a cake turntable with your own hands, you will need:
- Bearings - 2 pcs. It is better to use double pressed bearings.
- Wooden blank for a circle. This could be a door from old furniture or any chipboard material available.
- Nails.
- Self-tapping screws.
- Tube (plastic or iron).
- Circle made of iron (metal).
- Plywood sheet.
- Plastic or decorative self-adhesive film.
Video
Watch a video about making a wooden turntable with your own hands.
Every pastry chef should have a cake turntable in their arsenal.
With its help, you can greatly facilitate the process of decorating cakes and make it enjoyable, comfortable and safe.
If you are not planning to purchase it in the near future, then an experienced craftsman can assemble it yourself.
Rotating base on a ring bearing for mounting a round tabletop
The rotating base consists of three parts : 1) The lower support circle ensures the stability of the entire structure on the table. 2) The turntable is designed for attaching a tabletop to it (for this there are holes for self-tapping screws).
3) The rotation mechanism is a metal ring ball bearing.
Rotating base, side view:
The rotating base is a product completely ready for installation. To assemble the rotating center, you will additionally need: a round tabletop, a screwdriver, a ruler, a pencil and self-tapping screws of the appropriate length (usually 3.5x20 or 3.5x25 mm).