Of course, such furniture can be purchased ready-made, choosing from a wide range. However, this is expensive and does not always fit perfectly into tight spaces.
You can make a table of different sizes yourself. Moreover, depending on your existing carpentry skills, you can select a drawing of varying degrees of design complexity.
Features of round shape
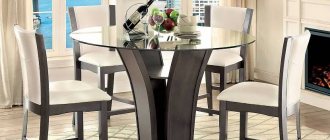
For small spaces where a dining table is installed (kitchen, living room or separate dining room), the round design looks practical and attractive . It takes up less space and allows you to comfortably fit around.
Problems begin when a significant number of family members and guests gather around the dinner table. Oversized furniture simply does not fit in a cramped room.
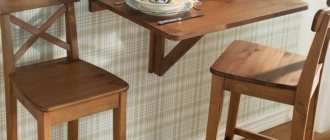
The sliding design eliminates the problem . Its essence is as follows. In its normal state it looks like a small round table for 3-4 people. It is easy to move and install in a new location.
If necessary, the table top is transformed - it moves apart, taking on an oval shape.
Inserts help create a significantly larger surface area. Help : this table can already accommodate 8-10 people.
The simplest system has a tabletop divided in half, the halves of which can move along guide elements in opposite directions.
The gap in the area where the halves diverge is filled with special inserts to preserve the integrity of the tabletop. When assembled, the inserts are located inside and are invisible to others .
Important : the final capacity of the extended table depends on the distance by which the elements can be moved without compromising its stability.
In order for the design in question to work reliably, the following requirements :
- sufficient strength of the tabletop with maximum expansion;
- ensuring the required capacity and ease of use;
- assembly and disassembly without unnecessary effort by one person;
- the possibility of practical use of the entire surface of the extended tabletop;
- mobility;
- ease of making with your own hands;
- low cost;
- external attractiveness.
Making furniture yourself: advantages
Not every person can decide to independently manufacture various pieces of furniture, but such actions have several main advantages:
- Saving. This is a good opportunity to save your budget, because you don’t have to pay furniture makers for services.
- The most accurate measurements. You can not only pre-measure the place where the table will be installed, but also adjust some details while working.
- Creation of a unique design. Only on your own can you create an exclusive table that cannot be found on sale.
- Possibility to buy only good quality materials. Furniture shop craftsmen do not always act in good faith, and in order to earn more, they purchase low-quality materials and accessories. That is why it is recommended to do your own purchasing - you won’t fool yourself.
Making furniture with your own hands has a large number of obvious advantages.
Of course, in the absence of any skills in making furniture, making it yourself is a certain risk, because a beginner can simply ruin the materials due to inexperience. But, if you do everything slowly and thoughtfully, then even the first time you can get a very worthy result that you can be proud of.
Wood or plastic?
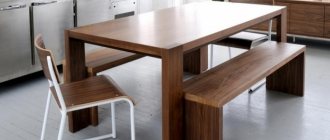
The choice of materials for a homemade table is determined by their availability and appearance. Particular attention is paid to the tabletop. It can be made from the following materials:
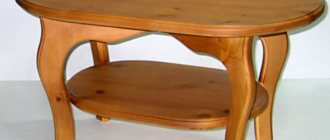
tree .
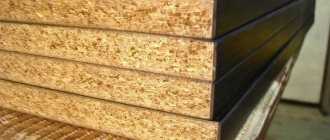
The most spectacular, but also expensive, option is solid wood. Such tables have a rich appearance, but the overall design is heavy. A cheaper option is shields assembled from boards. They can be tightly fitted to each other, imitating a monolith, or they can be laid with a gap - a lightweight country table;- wood-shaving and wood-fiber materials . Chipboard, MDF, and plywood are widely used. They are technologically advanced, but have a reduced service life;
- plastic _ Plastic sheets can be selected in different colors. Their advantage is low cost, light weight;
- glass . Glass countertops have become fashionable and are in demand for modern interior styles. The main disadvantage is the complexity of manufacturing.
In addition to the tabletop, the table must stand securely on legs. For their manufacture, wooden beams are most often used.
Tip : you can also use a metal profile for them; in particular, an aluminum flat pipe, corner or U-shaped profile looks modern.
White countertops in the interior
If the kitchen does not have a large area, a white table will fit perfectly into such an environment. The surface of this color is universal, it is practical, attractive, and will fit perfectly into any room.
The white table has important advantages:
- Brings harmony to any style.
- Graceful emphasis on design, unity of composition.
- A good background for bright contrasts.
- Versatile combination of materials. A white table is equally beautiful on a wooden, metal or plastic base.
Acceptable materials for white countertops
A white table made of wood is luxury, naturalness and external beauty. It does not require special care. The white oak surface allows you to place hot pots on it, and it can withstand maximum mechanical loads. However, stains from coloring products, such as coffee, tea, wine, and tomato, may remain on the wood. Therefore, a white table requires careful handling.
MDF, as an analogue of wood, has similar advantages. A white table with a glossy frame looks especially impressive: its shine visually expands the boundaries of space.
The stability and gloss of the coating are given with a special varnish. A white surface requires the elimination of scratching agents and chemicals. All kinds of coasters will help preserve the shine.
A white glass table is an incredibly practical and unpretentious device. The hardened coating is not afraid of strong mechanical influences, paint components and hot pans. A white chipboard table seems to be the most affordable type of coating. It will be a good basis for any environment, however, intense mechanical stress is detrimental to it. Despite the shortcomings, a white table in the interior is clean, strict and light.
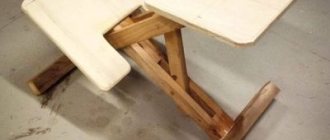
Drawings and assembly diagram
Work on making a table begins with the development or selection of a project. Assembly drawing and detailing required.
Schematic diagram of an extendable table
General drawing of an extendable table
Unlike a regular table, in a sliding design the base of the tabletop is firmly fixed to the legs, and the main tabletop is mounted movably on it and consists of two halves . The base is made in the form of a frame connecting the legs together with collets.
To ensure the movement of the tabletop, guides are permanently installed on it. It is recommended to use standard guide strips for full rollout drawers. Additional elements that slide along guides are attached to the main tabletop below. Depending on the length of the maximum rollout, the number of additional elements is 1-3 pieces .
Important : the length of the slats must be at least 35 cm.
After fixing the tabletop halves in the extreme position, the resulting gap is filled with rectangular inserts. In the simplest design, they are simply removed from storage and installed manually. To prevent displacement, furniture pins are used. In more complex designs, lifting mechanisms are installed that automatically raise the inserts to the level of the countertop surface.
What types of sliding tables are there?
It should be noted that both dining and work tables are of sliding or folding type. However, most often they are installed in the kitchen or dining room.
According to the method of increasing the area, tables for small rooms are:
- folding;
- sliding.
The first option is quite simple - the tabletop is secured here using ordinary furniture hinges. When it is necessary to increase the area, it is moved back and secured to the leg.
If you wish, you can create a large folding table with your own hands
Sliding tables are a structure whose area increases thanks to a built-in mechanism or guides.
Table 1. Types of transformable tables.
| View, illustration | Description |
| This is the most famous folding table, which was popular back in Soviet times. When assembled, it looks like a cabinet, and if necessary, you can quickly unfold the tabletop and leg. Modern models can already have a different appearance, many of them are distinguished by the presence of small folding parts on both sides, making the table more functional both when folded and disassembled. |
| This is another unusual folding table model. When it becomes necessary to unfold it, the tabletop rotates 90 degrees. This is a very simple mechanism that will function for many years - there is simply nothing to break here. |
| In this case, the tabletop is divided into two equal parts in the middle using telescopic guides. In the normal position, these parts are fixed, and when the need arises to increase the area of the structure, it will be enough to pull the table by the edges on both sides. The guides move apart very quickly without any extra effort. In Soviet models there was only one additional board, thanks to which it was possible to increase the dimensions of the table; modern products require the presence of two central tabletops. |
| There are various sliding mechanisms for tables. They are usually made of aluminum or galvanized. If you choose the second option, the possibility of rust cannot be ruled out, because liquid may leak from the table onto the mechanism. The principle of the mechanism is that you just need to pull it, and it will expand the table itself. The main disadvantage of this option is the too high cost of the structure. |
How to assemble a book table yourself? Find diagrams and step-by-step instructions in a special article.
Tools
When making a wooden table with your own hands, you should prepare the following tool :
electric drill;- Bulgarian;
- plane;
- screwdriver;
- hacksaw for wood and metal;
- hammer;
- screwdriver;
- chisel;
- files of different sizes;
- paint brush;
- Grinder;
- construction knife.
If using plywood, you will need an electric jigsaw . Grinding and emery cloth are used to treat surfaces. Measurements and quality control are provided with a tape measure, metal ruler, caliper, plumb line and building level.
Dimensions
Most often, the dimensions of an extendable table are selected based on the area of the room in which it will be used. In addition, the expected number of guests who will sit at it is taken into account (it is optimal if there is approximately 60-70 cm of table space per person).
The standard height of the dining table is 73 cm, but if necessary, you can slightly change this parameter to suit the individual needs of the family.
How to make and assemble?
The dimensions of the finished table are determined by the number of people planned to be accommodated. The standard height is 72-75 cm .
Assembly diagram
The size of the tabletop is selected based on the condition - 60-65 cm per “eater”. Manufacturing and assembly is carried out in the following order:
- Making the base of the table .
The legs are made of wooden beams measuring at least 4x4 cm. The larger the size of the table, the more powerful the legs are needed. So, when the length of the table when extended is about 2 m, it is recommended to use 8x8 cm timber. The legs are strengthened and connected into a single structure by the base frame. Their connection is ensured by wooden collets made of boards about 20-25 mm thick and 9-11 cm wide. The collets are secured in the grooves. To increase strength, the joints are treated with glue and reinforced with self-tapping screws. If the table has significant weight, then “kerchiefs” or slopes are installed in the areas where the collets are attached. - Laying the base surface . The basis for attaching the sliding mechanism is a plywood sheet or chipboard with a thickness of at least 12 mm. The sheet is attached with self-tapping screws to the base frame. After laying it, a rough round table of a fixed structure is formed.
- Making a countertop . 2 identical semicircles are cut from the selected material. The straight end is processed, and 2 holes are drilled in it for inserting the insert pins. The hole diameter is 8-10 mm.
Manufacturing a U-shaped additional element .
It has the shape of a box and is made from a board 2 cm thick and 10-11 cm wide. You can use a similar strip of chipboard. The corners of the box are reinforced with aluminum furniture corners. Narrow guides are fixed on the inside of the box walls, raised to a height of 2-4 mm from the edge.- Fastening the box to the tabletop . In the middle of the semicircle of the tabletop, a box is fixed so that its free ends are adjacent to the straight cut of the semicircle. The box is secured with aluminum corners.
- Installation of guides . The bases for them are made of an aluminum profile (angle) with a height of more than 4 cm. The length of the guides is 5 cm. The guide strips themselves are attached to the corner. The distance between them must exactly match the distance between the guides on the tabletop box.
- Manufacturing of removable elements (inserts). Their size should correspond to the width of the gap when the tabletop halves are moved apart as much as possible. Each insert is made up of 2 identical rectangular plates with a length equal to half the diameter of the tabletop. Holes are drilled at their ends and connecting pins are inserted.
Final assembly involves inserting the tabletop guides into the grooves of the base guides. Next, if necessary, extension limiters are installed.
Selecting the product type
A wooden extendable table can have a round (or oval when extended) shape or be made in the form of a book-table.
The choice of one option or another is individual, but a round sliding table is more practical and has a presentable appearance.
Drawings of sliding tables indicating the dimensions of the finished structure are easy to find on the Internet.
Finishing
The table should have an attractive appearance, which is ensured by the finishing. First of all, the end is processed . To avoid scratching on a sharp edge, it is recommended to remove a small chamfer.
The end itself is ground to eliminate the risk of splinters. The entire surface of the tabletop is also processed. It should be perfectly flat, horizontal and smooth.
Important : the most common finishing methods are painting and varnishing.
After sanding the surface, the wood can be impregnated with tinting compounds that will create a specific shade and emphasize the wood structure. A layer of varnish will seal the finish. With the help of alkyd paints, you can provide almost any color of furniture for combination with other interior elements .
Another common option is self-adhesive film. It is often used to finish chipboard countertops. With its help, you can imitate various natural materials - wood, natural stone, marble, metal, etc. Inlay or veneering adds special sophistication to the table.
Advice : if the issue of free space is acute for you, also take a closer look at the designs of a folding table, a laptop table, a coffee table and a children's table.