Is it worth assembling furniture with your own hands?
And yet, today, self-assembly of furniture is not as labor-intensive and incomprehensible as it used to be. Of course, it will require knowledge of the design features of various pieces of furniture and possession of the simplest tools.
In a furniture showroom, it is convenient to buy furniture that is already assembled, which only needs to be placed in the right place, but the offer of different types of furniture is so large that you do not have to buy it in the first store.
In addition, when ordering furniture for self-assembly, it is often much cheaper and comes directly from the manufacturer.
Many models come with assembly instructions, which you can always refer to if you have any further questions. And after you assemble at least one cabinet, I guarantee that you will cope with all the other elements much easier.
Features of the material
Laminated chipboard contains natural wood - in structure it is chipboards that have undergone high-quality sanding and covered with melamine film. It is this coating that distinguishes the two types of slabs. Laminated chipboard has high moisture resistance and greater strength than conventional boards.
The laminated surface exhibits greater resistance to mechanical influences, as well as to chemically active substances - acetone, gasoline, alcohol, acids, solvents, coffee. Therefore, furniture made from chipboard can often be found in public places: in reception areas, in offices, in multifunctional centers, in educational institutions, in cafes, in kindergartens, in playrooms and children's rooms, in the kitchen.
The advantage of the material is the variety of its shades and textures
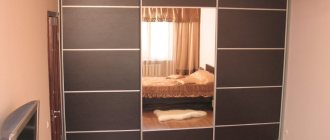
The film not only gives the material excellent performance characteristics, but also allows you to give it a unique appearance - from any shades and textures of natural wood, to images applied according to individual sketches. The ability to choose any shade allows you to produce cabinet furniture for any interior. This is especially true for children's rooms, where bright, rich colors are welcome. Bright furniture is also used for advertising and trade stands, as a body for reception desks with the possibility of being manufactured in the company’s colors with a logo.
Multifunctional cabinet furniture
Note! The laminated layer makes the surface of the chipboard monolithic and does not allow harmful substances that may be contained inside its structure to pass through.
The formation of the laminated layer occurs by pressing paper, which acquires properties comparable to plastic, filled with melamine resin under pressure (up to 28 MPa) and high temperature (up to 210 degrees). Decorative paper impregnated with resin is pressed into the top layer of chipboard.
The surface of such a plate, among other things, is heat-resistant, which allows you to place hot dishes on it - this has made laminated chipboard a popular material for making kitchen countertops.
Cutting laminated chipboard
General recommendations
Once your furniture has been delivered, ensure that the number of boxes matches your order and that all items needed to assemble the furniture you ordered have been delivered.
- Whenever possible, try to always follow the manufacturer's instructions when assembling each item.
- Before you begin assembling furniture, carry out all planned repair and construction work, such as moving utilities or laying tiles.
- Use an angle iron and a spirit level to check the levelness of the floor and walls.
- Assess what material the walls are made of. Our consultants will advise you which fasteners to use to attach cabinets to a specific wall.
- Mark on the wall where the electrical and plumbing systems are located to avoid damaging them when drilling into the wall.
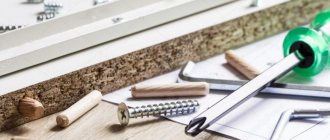
Selection of furniture fittings
In addition to fastening elements, there are other furniture fittings, without which the product will lose its decorative and functional qualities.
Table 4. Types of furniture fittings
| Name | Description |
| A necessary element that provides convenience when opening doors and drawers. Fixed with screws. Selected in accordance with the color scheme and style of the furniture facade. |
| For the stability of the structure, especially when the floor surface is not too flat, choose products with height adjustment. The material must be practical and durable, moisture-resistant and resistant to mechanical stress. The appearance is also selected according to the design style. |
| Silicone damper | An inconspicuous but important detail that ensures silent closing of the doors. Fixed from below and from above on the door or end of the cabinet. |
| An important element that ensures the opening of the sash. Equipped with a mechanism for adjusting the height and depth of the door. |
| Wheels | Used for comfortable operation of roll-out drawers and cabinets. |
| Masking fasteners. Matched to match the body. |
| Shelf supports | Used for fixing additional shelves in wardrobes and racks. |
| They are used inside wardrobes and on panels in hallways. |
| Crossbars and bars | They may have different cross-sections and radii. Used in wardrobes. |
| Lock | Used for doors and drawers in cabinets and office shelving. |
Video – Furniture fittings
Assembling furniture with your own hands (step-by-step instructions)
Today I will try to describe as accurately and clearly as possible how the assembly works. We did this using the example of a chest of drawers with four drawers. Among all the pieces of furniture, I chose the chest of drawers because of the rather complex (at first) assembly of the guides in each of the drawers. Plus, I find it much easier to assemble a desk, cabinet, or shelf.
Let's start, of course, by opening the package with the elements and a set of necessary parts (screws, plugs, etc.). Before work, it is important to prepare the tools: hammer, rubber mallet, Phillips screwdriver and negative screwdriver.
Here is a set of small standard parts. From above: painting furniture assembly instructions, slides, furniture legs, wood pins, Vikol glue, end caps, furniture hinge, spindle, handle screws, knobs, silver screws, gold slide screws and nails.
The first step is to properly group all the elements together, as this will simplify and speed up your work.
- You can start assembling furniture directly from the bottom, that is, from the base, or you can start from one of the sides of the chest of drawers. We used the last option.
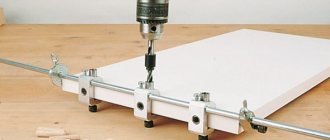
- There are many holes inside the chest of drawers. I'll explain what needs to be screwed in or driven in. Let's start with the sides and legs of the furniture.
- It is best to immediately attach them to the floor, because then it will be difficult for us to turn the entire product upside down. Nail the dresser legs.
- We insert a round furniture joint into the largest holes. It is important to place them with the cross facing up and the empty space towards the hole on the edge of our side.
- You have to do it this way because then we have to tighten the spindle to give stability to the whole structure.
Insert wooden pegs into the smaller holes. But before we put them there, we squeeze out some Vikol glue. Only now we put a peg and nail them with a hammer. We place the pins in the small holes next to the pins.
They should be screwed to the side wall of the cabinet with a Phillips screwdriver. By tightening the furniture joint with a hairpin, all places can be masked with a plug to match the color of the furniture. When we have difficulty pressing it accurately, we can help ourselves with a rubber mallet.
- When almost all the holes are on our side, we repeat the same action on the other side of the chest. Then we move on to installing and screwing the guides.
- I'm going to explain how to screw them in correctly, but you can also see how to do it with other furniture you have in your home.
- There are 4 slides in one set: two on the sides of the dresser and two on the bottom of the drawer on both sides. For now, leave the drawers alone and use the drawer runners to prepare all those with extra space above the wheel.
- We screw them in a circle to the front, to the front of the chest of drawers. To do this, we use small gold screws, which we screw into small holes on the side of the chest of drawers.
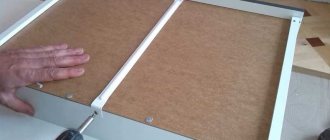
Now, to the finished side of the dresser, place the bottom of the dresser and the middle shelf in the appropriate places, which will support and stabilize the entire structure. Don't forget to glue all the holes where the pins go! Then place the dresser on the other side and the top. We tighten all the screws, blind it, and the frame of the chest of drawers will be ready.
At the very end, we nail the plywood to the back of the chest of drawers. This can be done now or at the very end of assembling the entire piece of furniture. It's time to move on to stacking the boxes. It’s good to start folding by marking the elements of the box. Then we tighten the handles, thanks to which our drawer will open, using self-tapping screws for the handles.
The box is installed quite easily compared to others, because no screws are used except for the guides. Apply glue to the places where the tenons enter and press the side firmly with a pin, using a rubber mallet to help you.
Nail the plywood to the bottom of the box. Install the guides on the sides of the drawer bottom. This time with a ring in the back of the drawer. We do this with each subsequent box. We check if everything is stable, and if so, then our box is ready. All we have to do is insert the drawers into the chest of drawers and the chest of drawers is ready for use.
Pros and cons of using laminated chipboard for making furniture
The advantages of laminated chipboard include the following:
- Low cost.
- Easy processing.
- Ability to cut parts of any shape.
- The presence of a safe edge at the ends.
- The ability to create furniture with rounded corners, which is especially important for children's furniture.
- Excellent performance properties: mechanical, thermal, chemical resistance, moisture resistance.
- Preservation of operational properties throughout the entire life of the furniture.
- Wide range of colors.
- Easy care, possibility of daily wet treatment.
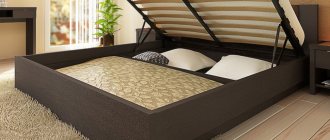
The laminating layer protects the boards from the negative effects of moisture, which makes it possible to make furniture from them for rooms with high humidity.
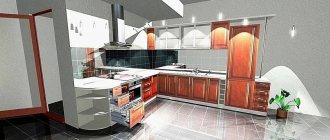
Kitchen set made of laminated chipboard
The disadvantages of laminated chipboards include the fact that they contain formaldehyde, however, the laminating layer and the sealed edge at the ends of the furniture completely neutralize the release of harmful substances into the environment. The edge also protects the slabs from moisture, which can cause them to swell.
Edge
As noted earlier, any part made of laminated chipboard must have an edge that will protect the material from moisture and the environment from the harmful effects of formaldehyde. Having a drawing of the product in hand, you can order sawing and edging from a specialized company that has special equipment. In the future, you can assemble the finished product yourself.
Melamine edge
Table 1. Types of edges
| Edge type | Description |
| Melamine | The budget option is not of very good quality. Using an iron, you can glue it yourself. |
| PVC | This edge is fixed using special equipment during the cutting of individual parts. It is made with a thickness of 0.4 mm and 2. A thin edge is made on the invisible ends, and a thicker one on the outside, where more serious impacts are possible. |
| T-shaped mortise | A rare type of edge in use, which has a T-shaped section and is fixed into a groove at the cut. |
| U-shaped waybill | A significant disadvantage is that the edges protruding a few millimeters are vulnerable to contamination. The advantage will be the ability to hide a poorly executed cut. |
Photo instructions for assembling furniture with your own hands
What tools are needed?
The tools available in the house are suitable for assembling cabinet furniture:
- screwdrivers;
- screwdrivers;
- Sander;
- jigsaw;
- wood hacksaw;
- ruler;
- simple pencil.
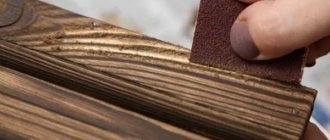
The popular design with craquelure varnish makes the facade of the cabinet look original and expensive.
Sandpaper is suitable as a material for cleaning surfaces. In order to measure the elements correctly, it is necessary to do this not on the floor, but on a table, preferably a carpenter's table or something similar. Stools can be used as supports when cutting off extra centimeters from the board.
To assemble a cabinet or chest of drawers, you must first calculate the parameters of the future product.