Hi all! Even if you are not a professional furniture maker, but rather an amateur, you may still be interested in a tool for assembling furniture.
When buying furniture, in extremely rare cases it arrives already assembled. Basically, these are structural elements that need to be combined with each other. This is how items of upholstered furniture, kitchen furniture, cabinet furniture, etc. are purchased. Here is a set of parts and fasteners. It doesn’t matter whether it is made of chipboard, chipboard, solid wood or even natural wood.
A furniture maker always has a certain set of tools in his arsenal, which allows him to save on the services of assemblers from the store and do everything with his own hands.
If you want to do the assembly yourself, then to make ready-made structures you will need to assemble a specific kit. Some you already have at home, other components are easy to buy at Ikea or similar stores. All tools that may be useful during assembly are conventionally divided into marking and assembly (fixing).
Choosing power tools for a carpentry workshop
If there are usually no problems with choosing a hand tool, then when it comes to choosing a power tool, a lot of questions arise. Therefore, it is important to make a basic list of the essentials.
To the so-called Basic power tools, without which it is impossible or difficult to make furniture, include:
- Electric drill;
- Electric screwdriver;
- Jigsaw;
- Belt sander.
This set is enough to start making, albeit not the most complex, but high-quality products. In the future, as skill grows and work becomes more complex, this list will be replenished.
When choosing a power tool for a novice craftsman, the main thing is not to go to extremes, buying only the cheapest models or chasing expensive professional products from one brand. It is worth sticking to the golden mean of “price/quality” and choosing a tool that will be convenient for you to use.
This article explains in detail how an amateur power tool differs from a professional one.
Beginner carpenters often have a question: do they need power tools such as a milling machine, jointer, surface planer, or circular electric saws in the workshop and at what stage they need to be purchased.
I thought about equipping my workshop. I need to process the boards for wall cladding, and in the future I plan to make furniture. With hand tools everything is clear, but with electric tools there are a lot of questions, and you have to “fit into the budget.” I need expert advice on what I will need in the future. For now I'm planning to buy the following:
Theme created by Archimed,
caused a wide response. Many professional craftsmen offered their own options for equipping the workshop.
When I first started carpentry, I needed to make a simple workbench, and all I had was a bow saw, a drill, an old plane, several chisels, Forstner drills and a shoe knife. All. But I made a workbench. Now, after 10 years of carpentry, my arsenal consists of the following tools:
Belt and eccentric sander;
Electric jigsaw, electric drills and screwdrivers;
Compressor for a carpentry workshop with a spray gun;
Moreover, Sitnikoff
does not plan to stop there and is thinking of acquiring:
- Joiner;
- Band saw;
- Drilling machine;
- Wood lathe;
- Install a chip removal and air ventilation system.
Natural wood for furniture
When choosing wood for the manufacture of a particular piece of furniture, you should pay attention to the following factors:
- surface texture, shade;
- material strength, hardness, moisture resistance.
The last criterion is important if the furniture will be placed on the balcony, in the bathroom, in the kitchen, or in the open air. Moisture-resistant species include:
- Siberian larch;
- oak;
- teak;
- mahogany (mahogany);
- Puinkado.
Mahogany
The hardness of the material affects the service life of the finished product. But at the same time, the hardest types of wood are the most difficult to process. Inexpensive softwood can be processed quickly and easily, but the furniture will not be sufficiently resistant to mechanical stress.
Expert opinion:
Masalsky A.V.
Editor of the “construction” category on the Stroyday.ru portal. Specialist in engineering systems and drainage.
What wood is best to make furniture from? The answer to this question will depend on the purpose of the item being manufactured, operating conditions, and personal preferences of the owner (regarding the appearance and shade of wood).
| Breed | Description and Application |
| A budget option. Ideal for beginners learning the basics of carpentry. It is easy to process and paint, does not rot, and smells pleasant. The shade of the wood is light, yellowish-brown with darker veins and a pronounced pattern of annual rings. Cabinet furniture, frames of upholstered furniture and beds are often made from pine. The main disadvantage of pine is its softness, susceptibility to deformation, and low mechanical strength. It is not difficult to leave a scratch or dent on the surface. However, shallow defects can be easily eliminated by grinding. |
| Larch timber and boards are much more expensive than pine. The higher cost is due to high moisture resistance and low flammability. The material is very strong and durable. Larch is similar in hardness to oak. Larch furniture has a subtle aroma, very pleasant. Inhaling larch essential oils is good for your health. Not only furniture is made from this rock, but also stairs, parquet boards, plank floors, and veneer. The wood is not uniform in color. In the core the shade is reddish-brown, closer to the bark it is lighter. The texture is very beautiful, it is emphasized with transparent varnishes, less often painted with colored stain. |
| Solid oak is used for the manufacture of luxury furniture. This is an expensive material, hard and durable, not susceptible to rotting, very hard. In order to reduce the cost of finished furniture, oak veneer is used. The wood can be either almost white or quite dark (wenge, cognac, black). There are no reddish tones in the oak palette; shades are golden, grayish, brown. It is customary to decorate oak furniture with carvings and coat them with matte and glossy varnishes. |
| Beautiful white wood is used to make home and bath furniture, as well as decorative items and tableware. Linden is easy to process: sawing, touching, sanding, decorating with carvings. Wood is not hygroscopic and is practically not subject to shrinkage when dried. When the material is heated, a delicate honey aroma is felt. Linden is valued for its antibacterial properties. The surface is homogeneous, with a noticeable shine. Linden is painted with various stains. |
Functional fittings for internal filling
See also
Options for internal filling of a sliding wardrobe: diagrams, dimensions, photographs
Mostly closets are filled with shelves. Plus there are drawers.
If these are removable shelves, then shelf holders are used. Fixed ones are connected by confirmations.
There are also pull-out drawer systems. The following types of fittings are used here:
- roller guides (the cheapest, and therefore used only in budget furniture);
- ball or telescopic guides (divided into full and partial extension systems);
- metalboxes (metaboxes) with improved load-bearing capacity;
- retractable systems with pusher and closer.
Also included in the category of functional fittings are components for filling drawers and cabinets.
If this is a kitchen cabinet, then the following options are possible:
- bottle holder;
- grids;
- drying;
- carousels;
- magical corner;
- built-in bucket;
- containers, etc.
All this is aimed at increasing the practicality as well as the spaciousness of kitchen cabinets. Accessories are needed to maintain order.
The filling in wardrobes is somewhat different. But the task is the same. This means storing items neatly and organizing them.
The accessories are like this:
- hooks;
- pockets;
- hinges;
- trousers;
- pantographs;
- crossbars;
- laundry baskets;
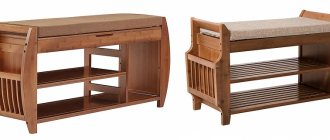
- shoe shelves;
- tie makers, etc.
Thanks to such fittings, it is possible to organize the contents of the cabinet.
The main tool is the knowledge of the master
Of course, the total cost of all the above tools is impressive, however, having all the necessary arsenal of fixtures and devices, the master will be able to efficiently and quickly assemble and install the kitchen, so no one will skimp on buying good tools.
The weight of such luggage can vary from 50 to 80 kg, so collectors most often arrive by personal transport. In general, no matter what working set a master has, what is primarily important is his ability to use all these tools, experience and knowledge in his field.
Best wishes, msksborka.ru
Additional set of power tools
| Circular saw, designed for transverse and longitudinal cutting. Replaces a jigsaw at the stages of cutting tabletops, wall panels, various parts and has a more professional character in the work. The disk rotation speed is not lower than 5000 rpm. |
| A miter saw (miter box) is designed for cutting parts straight and at various angles. It is also advisable to select the disk rotation speed min. 5000 rpm |
| Construction hairdryer. Simply necessary for gluing edges. Can be replaced with an iron. |
| Belt sander. If your kitchen design involves rounding the countertop, then you simply cannot do without this machine. Of course, unless you are going to do this work manually, which is very inconvenient and difficult. |
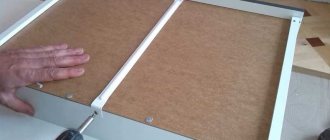
Nuances of assembling a corner structure
Corner kitchens are becoming increasingly popular. This is due to the fact that the installation of a corner set can be carried out even in the smallest and most non-standard room. Designs are available in numerous types, which makes it possible to choose the best option for any room.
The main difficulty in installing a corner set is the joining of different elements in the corner. Also, to obtain the correct and attractive result, the recommendations of specialists are taken into account:
- assembly of the structure begins without fail from the angle chosen for installation;
- It is not advisable to assemble all the cabinets at the same time, since the orientation should be from one assembled module, after which subsequent elements are assembled;
- In a corner kitchen, especially much attention is paid to joining two adjacent drawers in the corner of the room;
- Most often, a sink is located in the corner, but if it is not very convenient for the owners of the premises to use it, then it is permissible to leave the corner cabinet either empty or install on it some small household appliances that are not used too often;
- All joints are necessarily treated with a sealant that protects the most important areas of the headset from high humidity and dirt.
Thus, the kitchen is an important room in any home. It is intended for the process of cooking food, so numerous interior items are certainly installed in it, making this procedure simple and quick. These primarily include a kitchen set, and you can install it yourself if you understand the process well and use high-quality materials and tools. In this case, you can save a significant amount of money paid to professional installers. Particular attention should be paid to the alignment of all structural elements, since various distortions or other problems contribute to the short service life of the entire headset.
Facial accessories
See also
How to make cushions for a sofa with your own hands: instructions for beginners
And there is also such a thing as facial fittings. Only these are more likely components for external design.
This includes a handle, decorative corners, linings, as well as various accessories that allow you to improve or complete the appearance of the assembled furniture.
According to the instrument they meet...
With experience, each master himself begins to select the necessary and most convenient tool for him. Practice shows that it is possible to assemble a kitchen with the help of not a very large arsenal of labor, but professionals have always been famous for their ability to do the job quickly and flawlessly, using various modern tools.
It’s nice to see how a specialist assembles a kitchen, using all his equipment: you must agree, it’s interesting to watch how easily and simply the future kitchen is created before your very eyes from a set of facades, panels and boards. In order for everything to be this way, the assembler must have all the necessary tools.
Main materials used
Metal, glass and plastic are increasingly used in furniture production. They are used to make entire sets and individual decorative elements, but the most common material for making furniture remains wood and its derivatives, including:
- array;
- plywood;
- MDF;
- chipboard;
- Fiberboard;
- OSB.
Upholstered furniture is made from the same wood-based materials. Timber and slabs are suitable for load-bearing structural elements, and thin sheets of plywood or radio cardboard are used to cover the frame. This technology is typical for handicraft production. Upholstered furniture cannot be imagined without polyurethane foam and upholstery fabric.
Materials for furniture repair can be chipboard, oriented strand board, MDF, etc., however, chipboard elements in many cases do not meet the strength requirements.
Natural wood hangers
Theater begins with a hanger, everyone knows this. This means that the hanger should not only be comfortable, but also beautiful.
On a note! The simplest hangers can be made in a smaller version and used as a key holder.
Option one. Simple hanger for home or office
Simple hanger for home or office
Rectangular shaped hanger. To make it you will need a board or a small furniture board; you can choose the dimensions at your discretion. You also need to purchase several screws, hooks, loops on which the hanger will hang, as well as 2 dowel nails.
Tools you will need are a screwdriver or screwdriver, as well as a saw if the workpiece is larger than required. If the surface is not smooth enough, you should prepare sandpaper.
Tools for work
To decorate a hanger, you need to prepare stain, 3 shades of enamel or acrylic paint and masking tape, a medium-thick brush, clear varnish or wax composition.
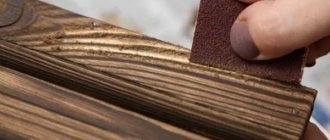
Step 1. Measure the required length of the board or furniture panel and put a mark with a pencil. We cut off the excess. We process the edges and surface of the workpiece with sandpaper.
Cutting boards
Surface grinding
Step 2. Cover the wood with stain in 1-2 layers. We wait until the workpiece dries well.
Applying stain
On a note! In the example under consideration, a rosewood stain was used.
Wood stain: varieties
Step 3. Turn the board over and cover the perimeter with masking tape. The reverse side of the hanger will not be decorated.
Pasting tape from the inside out
On the front side we outline a beautiful geometric pattern, chaotically gluing strips of masking tape.
Pattern Formation
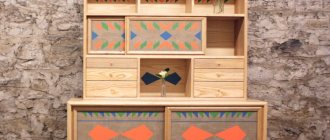
Step 4. Paint the front surface of the hanger in three shades. In our case it is white, beige and blue. But even if you take only one shade, the finished product will look stylish.
Coloring
When the paint dries, remove the tape.
Removing tape
Step 5. Cover the hanger with wax to protect the surface.
Applying wax with a sponge
Step 6. We fasten the fasteners from the wrong side, stepping back 3 cm from the ends, in order to hang the finished product on the wall.
Fastening awnings
We drill 2 holes in the wall for dowel-nails. The distance between the holes is equal to the distance between the fasteners on the hanger. We drive dowels into the holes and screw in the screws, but not all the way, the caps should protrude slightly.
Step 7. Screw on the hooks. We use short screws.
Fastening hooks with self-tapping screws
Now the product can be hung on the wall and used for its intended purpose.
Stylish hanger
Vintage hanger for home and garden
A hanger stylized as a rustic fence will decorate a hallway in a rustic, eco, chalet, or rustic style.
Hanger for home and garden
To make a hanger, you will need a saw, a screwdriver or a screwdriver, hooks, a sander or sanding block with paper of different grains, clear varnish, acrylic paint and colors (blue and brown), a brush, and a wax or paraffin candle (without dye).
You can make a hanger either from new boards or from an old wooden pallet. The main thing is that the wood is not rotten or heavily stained, especially by fatty substances such as machine oil.
Step 1. We disassemble the pallet into separate planks. In our case, the hanger consists of four segments, but you can increase their number if necessary. The segments are held on two horizontal bars.
We make markings on the boards, and then cut out the blanks with a miter saw or jigsaw.
Blanks from old boards
We grind the surfaces of the workpieces clean.
Step 2. Paint the blanks with white acrylic paint in one layer. The texture of the wood will be favorably emphasized, but not hidden under a layer of paint.
White acrylic paint is applied, the pile is sanded
If the pile on the boards rises during the process of applying paint, then after the workpieces have dried, they must be sanded with fine-grained sandpaper. At the same time, the first abrasions will appear on the boards.
Step 3. Rub the workpiece with a candle in those places where the paint will be removed the most. This way we will achieve the effect of an aged surface.
Use a candle to rub the workpieces unevenly
Step 4. Paint the boards with blue acrylic paint in one thin layer. We wait until the paint dries. This usually takes from 1 to 4 hours.
The blanks are painted blue
Step 5: Take a sanding block and start sanding off the blue paint. First we use 80 grit sandpaper, then finer ones - up to 240.
Step 6. Now, to make the surface more “natural”, add some “dirty spots”. Mix white acrylic paint with brown color. Apply a little paint to the surface of the workpieces with a brush and immediately wipe with a damp cloth. There should be light brown streaks left.
Workpieces in the process of painting
The final layer is clear varnish. Apply it in one or two layers and leave the workpieces to dry.
Step 7. Turn the boards face down. Place it on top of the cross member. We fasten everything with self-tapping screws.
Step 8. We fasten the canopies and hooks with self-tapping screws. The hanger is ready!
Vintage hanger
Video - Original hanger organizer
Tools and fasteners necessary for self-assembly of furniture at home
For trouble-free and high-quality furniture assembly, you need to have on hand a complete set of necessary tools and components for assembly. Furniture fittings are usually included with the purchased product. But there are situations when the set is incomplete. In such cases, you can independently supplement it with some missing details.
Accessories for connecting parts of the kit:
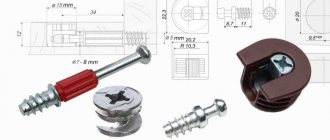
- screw tie - comfirmat, euroscrew - a budget-friendly, reliable and durable connection that does not require special precision drilling, excellent for wooden parts and furniture made of MDF;
- furniture corners made of metal and plastic. Reliably fixing parts when connecting elements of cabinet and upholstered furniture;
- minifix - a tie made at a right angle - a common element for connecting complex structures, with the function of reusable assembly and dismantling;
- Rafix - a connecting part for fastening with fixation in two mounting holes - is not used in all pieces of furniture;
- self-tapping screws - a type of fastener for intersectional ties of parts - are inferior in reliability to euroscrews and minifixes, but have a budget cost and are quite suitable for fixing shelves and hinges;
- Countersunk screws are a simple fastener, usually not included in the package, but suitable for attaching back walls and shelves inside a structure.
This list must include anchor bolts and metal hinges for mounting wall cabinets. All parts must be packaged in separate bags. A detailed drawing with an assembly diagram must be included with the mounting material. A furniture manufacturer drills parts in its production. The assembler only needs to connect them at the indicated locations using the appropriate fasteners.
The list of tools required for assembly may vary depending on the type of furniture that you plan to assemble.
But the main experts believe:
- a screwdriver, with which almost all furniture assembly operations are performed, easy to use and maintain;
- bits - cross, asterisk, hexagon - necessary for tightening self-tapping screws, installing built-in household appliances, installing couplers;
- stationery knife;
- a level, without which it is impossible to verify the exact horizontal surface of the countertop and shelves;
- roulette;
- wrench for installing upholstered furniture;
- a hammer drill required for drilling walls in places where the top line of kitchen cabinets is installed;
- jigsaw for inserting the sink into the work surface;
- a drill, which may be required if the holes on individual pieces of furniture do not match.
It’s probably not worth talking about the need to have a set of different screwdrivers, a hammer, and pliers on hand.
Manufacturers install various railings, sliding systems, awnings, moldings and other finishing fittings and internal filling parts themselves during the production of furniture elements. Therefore, they are not included in the mounting kit.