Home pageArticlesWorkshop /IndoorFurniture eccentric screed (minifix - Minifix) - what types are there, mark and install fastening fittings with your own hands
How to connect laminated chipboard furniture parts using eccentric ties. Let's figure out how to mark, find out the size of the holes and what tool is needed for this...
The furniture eccentric tie, or as it is also called “minifix”, is definitely a hit in the furniture industry. Minifixes are an indispensable fastener where it is necessary to make a hidden connection of slabs, and at the same time through holes for confirmatory ties are excluded.
In this video, we will look at the two most popular and most used options for furniture eccentric ties, and also learn how to mark and connect furniture parts using simple ties with a 15mm eccentric. and couplers - shelf holders, with an eccentric in a housing with a diameter of 20 mm.
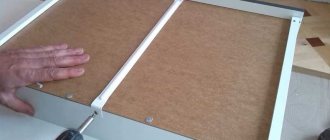
Installing an eccentric coupler
Let's look at how an eccentric screed is used using the example of a countertop and a cabinet.
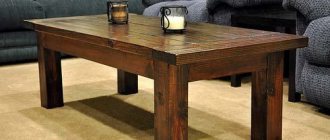
An example of the use of an eccentric coupler is a desk, or any case where it is necessary to connect two parts in a hidden way. An eccentric coupler consists of two parts: a rod and an eccentric.
The rod is installed in one part, and the eccentric in another. Fig.2.
To install the eccentric coupler, you need to drill several holes. In one part, a blind hole is made for an eccentric with a diameter of 15 mm and a depth of 12.5 mm (the distance between the center of the hole and the end of the part is equal to the length of the rod), as well as a hole for a rod with a diameter of 8 mm (the distance between the center of the hole and the surface of the part is 8 mm). In another part, a blind hole with a diameter of 5 mm and a depth of 12 mm is made for installing the rod.
The installation of the eccentric coupler begins with markings. Before marking the parts, you need to know the installation size. In the example below, the installation dimension is 26 mm. You can find out the size either on the packaging, or upon purchase, or by measuring the stem. From the head to the beginning of the thread.
Marking the holes for the eccentric coupler
It is convenient to do the marking as follows. It is necessary to place the parts to be connected on top of each other, and mark the location line of the eccentric coupler.
Fig.3.
It is convenient to make markings on both parts being connected at once. The position of the rod relative to the front or rear end of the part is marked on the parts (usually 5-7 cm). On the part in which the eccentric will be installed, mark the center of the hole along the eccentric.
In the photo, two parts are connected at once, so I did the markings at the same time.
Next, on the part where the eccentric will be installed, the center of the hole for it is determined. In the photo above, this is a horizontal serif. The length of the segment is the installation dimension equal to 26 mm.
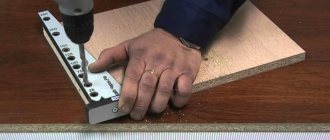
Hole drilling tool
After the markings are made, it is necessary to drill all the holes. The holes on the tabletop are made with a regular drill with a diameter of 5 mm. It is convenient to use special wood drills. Using a similar drill only with a diameter of 8 mm, a hole is drilled in the end of the mating part.
In order to make a sample for the eccentric, a special Forstner drill is needed. These special drills come in different diameters, so for high-quality installation of the eccentric, you should purchase a drill with a diameter equal to the diameter of the eccentric.
Fig.4. The hole for the eccentric is made with a Forstner drill with a diameter of 15 mm
Here it is important to accurately observe the depth of the hole. Traditional hole depth 12.5 mm
You can maintain the depth of the hole using a drilling depth limiter.
Using this drill, we make a hole with a depth equal to the thickness of the eccentric, which is about 12.5 mm.
Fig.5.
After the hole for the eccentric is ready, drill a hole with a diameter of 8 mm for the rod. The order of drilling the holes is important, so drilling a hole too deep for the rod will not allow the hole for the eccentric.
Examples of using an eccentric coupler.
Fig.6.
Fig.7.
Fig.8.
Video description
If the piece of furniture consists of several parts, then a screed for the countertop is needed. Fasteners are used for rigid fastening. The part joins the structure in such a way that the individual components do not move apart horizontally. The model is ideal for kitchen furniture. Based on the type of contraction, there are 3 types:
- Nuts. The long steel rod is complemented by washers on both sides.
- Gearbox with cylinder. Consist of a barrel and a stud with double-sided thread.
- QUICK. The structures have a tie with a self-tapping screw and a counter piece.
Paired fasteners are mounted in prepared holes. Holes are made using a Forstner drill and a groove is created with a chisel. The connecting part is placed in the free areas, and the nuts are carefully tightened with a wrench.
Screw tie
The screw coupler consists of a screw and a barrel. This kit is used to attach the end of one panel to the face of another. For example, for attaching a shelf to a side panel or a headboard to the drawers.
This is a very strong fastening due to the large tightening stroke. The only drawback of this fastener is that the screw head is visible from the front of the panel.
You can, of course, close them with special plugs, but this is also not a panacea. The plugs on the outer panel of the cabinet do not look aesthetically pleasing.
Installation of this type of fastener requires skills. Beginners may encounter such a problem as inaccurate alignment of the barrel holes with the hole in the end of the shelf, and it is not so easy to remove the unwanted barrel from its nest.
But the inconvenience during assembly and aesthetic errors are more than compensated for by the reliability and durability of the connection.
Eccentric coupler
One of the most popular types of fasteners today. All high-quality furniture is assembled on an eccentric screed (minifix). Its operating principle is as follows: an eccentric rod is screwed into the face of the part to which another panel will be attached at the end, into which the eccentric itself is screwed through the end of the other shelf, and then the eccentric turns the rod into itself.
An eccentric tie is always used in conjunction with a wooden dowel, which was described earlier. The dowel provides additional rigidity to the assembly and prevents the fixed panels from moving relative to each other.
Furniture assembled on this screed can be disassembled and assembled an unlimited number of times! There are different diameters of the eccentric itself: 25, 15, 12 mm. More common is an eccentric with a diameter of 15 mm.
Since the eccentric itself is visible on the side panel, plugs are provided for it to match the color of the panel. One of the disadvantages is the weakening of the tie in the event of spontaneous rotation of the eccentric.
To avoid this, some hardware manufacturers have provided notches directed in the opposite direction from its rotation during installation, which enhances adhesion.
Types of eccentric couplers
As practice shows, furniture is assembled and disassembled with great difficulty if all the fasteners in it are metal ties, described above. Let’s say that in order to remove one shelf, you practically need to disassemble half the cabinet. For horizontal parts (shelves), it is more convenient to use eccentrics, which allow you to place horizontal parts in an already assembled furniture box. Their operating principle is the same as that of the previously described eccentric coupler.
The only difference is that the eccentric, located in the shelf, fits onto the rod screwed into the face of the sidewall from above and there is no need to disassemble half the cabinet for this. In some factories, this type of fastener is called a shelf holder, since it is intended only for horizontal parts. Horizontal shelves assembled using these ties further tighten the joint, which increases the rigidity of the entire furniture frame.
Repeated dismantling and installation of furniture on such fasteners does not lead to wear of the connections.
Euroscrew
This fastener is often used for assembling kitchen furniture modules and in economy class furniture. Just like with a screw tie, Euroscrew heads or plugs are visible on the front side of the side panel of the cabinet.
It screws into the end of the shelf with a pre-drilled hole. This screed also belongs to the economy class. To install it, 2 holes are drilled - into the end of the shelf and into the face of the part. They are attached perpendicular to each other. The most commonly used euroscrews are 7 mm in diameter and 50 or 70 mm in length.
This screed has 2 significant drawbacks:
Firstly, the outer side of the cabinet, if there are many shelves behind it, as a rule, is all “disfigured” with caps or Euroscrew plugs. Therefore, these fasteners are used in economy furniture. In kitchens, this drawback is hidden thanks to the cabinets standing in a row.
Secondly, furniture assembled with euroscrews cannot be disassembled and reassembled more than 3 times, since screwing the tie into the end of the shelf destroys its internal structure.
Screw
Fasteners are used when connecting two thick parts. The hardware consists of a metal or plastic cylinder with a hole running across it. At the top there is a pin with a cap. The thread is machined along its entire length, which ensures reliable screwing. The design has high resistance to lateral loads.
When installing, 2 holes are drilled in the surface of the ends of the parts. A cylinder is inserted into the first, matching the holes in all elements. The screw is threaded through a groove in another panel. If the structure becomes loose, the fasteners can be easily tightened. The cap is visible, so they cover it with plugs.
The screw tie is ideal for connecting chair parts. The method allows you to repeatedly disassemble and reassemble interior items without damaging the components. The only drawback of the technology is that installation is carried out by professionals using special equipment. Without skill, it is difficult for a person to accurately match holes for fasteners. If there is a mistake, it is difficult to pull the cylinder out of the groove.
How to use eccentric ties (minifixes) - Blog - Everything for making furniture - Partner Center
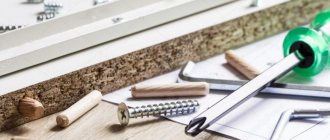
To use eccentric couplers, you need to tinker with the preparation of the holes. There are three of them in total:
Expert opinion
Strebizh Viktor Fedorovich, leading construction foreman
The eccentric - the main character of the minifix - is inserted into a specially prepared blind hole, clings to the rod and, when twisted, pulls the rod into itself. If you want to clarify something, please contact me!
Mounting features
Eccentric furniture ties consist of the following parts:
- stand (another name is a rod, it can be either a self-tapping screw or a screw);
- eccentric;
- futorka (performs the functions of a nut).
Sometimes the kit includes a sleeve, also known as a coupling, to screw the rod not into wood or plastic, but into it. If the diameter of the screed is large, a plastic decorative plug is added to the front side. The bushing increases wear resistance and strength - the metal part is not as loose as a hole made in the chipboard. So it is better to choose fittings with couplings to avoid breakdowns and extend the life of the furniture.
The basic principle of operation is quite simple: a coupling is inserted into a round hole on the furniture, a stand is screwed into it, and an eccentric connects them from the side. If some unsightly detail remains visible from above, then a plug is put on.
Benefits of use:
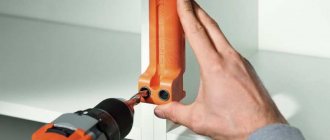
- If the minifix is already built into the right place, the bushing and eccentric are inserted, installation will not take much time. The only tool you may need is a flathead screwdriver.
- This type of fittings is very wear-resistant and can withstand repeated assembly and disassembly without becoming loose or losing its quality and strength.
- From the front side, the screed is invisible and does not spoil the design of the product; it can only be seen from the inside, and even here, if necessary, a plug is used.
- The ability to fasten parts at different angles (the most common options are 90, 135 and 180 degrees).
- The fastening adds rigidity to the entire structure.
- Reducing the number of spare parts, for example, if you attach the tabletop directly to the sides, drawers will not be needed.
- Long service life and ability to hold heavy weight.
Classification of furniture safes, tips for choosing them. Disadvantages include:
- Relatively high cost. An eccentric minifix is approximately twice as expensive as a regular confirmat. When using a large number of elements, such a difference can significantly affect the final cost of a piece of furniture.
- A single-piece confirmat requires only one drilled hole for installation, whereas a minifix requires three holes. Because of this, installing furniture screeds is somewhat more complicated.
- Working hours. Screwing in a Euroscrew is much faster.
The number of advantages of minifix outweighs its minor disadvantages, especially when it comes to assembling high-quality, durable furniture for your own use.
Additive for eccentric coupler
Drilling holes, or as they say, adding an eccentric screed, is the stage on which the quality of fastening elements of furniture construction depends. The process of drilling grooves itself is accompanied by difficulties
It is important not only to observe all dimensions, but also to take into account that the groove for the eccentric should not be through. To drill it, you must use a special Forstner drill and a depth stop when drilling.
Doing this kind of work on your own for the first time is not easy.
Required tools:
- router and Forstner drill;
- drill with two wood drills (diameter 5 mm and 8 mm);
- screwdriver or screwdriver.
To install such a connection, you need to drill three holes of different diameters and depths. The mandatory procedure when drilling slots for furniture minifixes is as follows:
- Make a non-through groove in the surface of one of the fastened elements for installing an eccentric. Standard groove dimensions: diameter 15 mm and depth 12.5 mm. Its center is located from the end of the part at a distance corresponding to the length of the rod. It is drilled out with a Forstner drill, thanks to which the eccentric can be placed in the groove without gaps. To accurately drill such a groove, use a depth stop. Otherwise, there is a possibility of damaging the surface of the furniture if the drill goes through.
- Drill a hole for a screw in the end of the same element perpendicular to the groove for the eccentric. If it has a diameter of 8 mm, then the hole should have the same dimensions. The optimal distance between the center of the hole in the end for such a rod and the surface of the furniture element is 8 mm (the middle of the chipboard thickness).
- To strengthen the screw, make a blind hole (12 mm deep and 5 mm in diameter) in the surface of the second mating part.
Another way to make grooves for the additive is to use a ready-made jig. It will make marking and drilling easier. When working with a conductor, the following procedure is recommended:
- Install the jig on the part, mark the location of the groove for the eccentric through a special hole in the jig.
- Use a Forstner cutter to make a groove for the eccentric.
- Insert a marking pin into the hole in the conductor. Place the jig on the end of the part and drill a hole for the screw.
- Make an installation hole for the screw in the second part.
How to calculate and perform additives (all holes) for minifixes?
To use eccentric couplers, you need to tinker with the preparation of the holes. There are three of them in total:
- Hole 5*12 mm in the plate. The hole is blind, the depth may be greater, depending on the thickness of the material and the length of the rod.
- The hole is 8*24 mm (can be 34, depending on the specific ties) in the end. The other side of the rod will be inserted here, which will be tightened with an eccentric.
- Hole 15*12.7 mm in the plate. The eccentric itself will be inserted into this hole. It is better to make this hole with a milling cutter and very accurately so that everything is pulled together evenly and without gaps. Such a hole is milled at the distance of the rod depth (without thread) - usually 24 or 34 mm.
The main difficulty in making all the holes for the minifix lies in the accuracy of the dimensions and the evenness of the milling. The eccentric must be installed exactly parallel to the surface, without distortions, and the holes for the rod in both parts must be coaxial, then the rod will not be distorted and will perfectly tighten the parts.
Eccentric coupler: types
Eccentric couplers consist of an eccentric, a stand and a nut (foot). Depending on the manufacturer, they are divided into:
- minifix;
- rondofix;
- rafix.
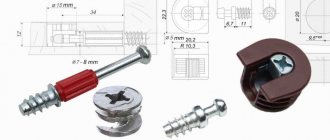
Photo 1 — ST01-46-1WZN-01 BOYARD
Minifix fasteners
Minifix is used for assembling furniture from laminated chipboard. Most often it is used for “disassembly-assembly” type furniture, which is often transported from one place to another; or for seasonal furniture - tables and sofas for verandas, picnic furniture; or in cases where, according to the design project, there should be no visible fasteners on the furniture or part of it on the front side.
Minifix is a semi-hidden furniture fastener. When assembled, only the eccentric on the inside of the mount is visible.
Photo 2 - Minifix DPLIT 16 mm D=15 mm, BOLT 34 mm without sleeve
Advantages of MF:
- Quick installation. Assembling furniture from parts with already installed minifixes does not take much time. A simple flathead screwdriver is sufficient for assembly.
- Reliability. Such fittings can withstand many “assembly and disassembly” cycles without losing the quality and strength of the connection.
- Aesthetics. The mount is not visible from the front side. The eccentric can be installed in an inconspicuous part of the fastening unit.
Photo 3 - Minifix plastic with screw Ø 25 mm Blum
Disadvantages of minifix:
- The cost is higher than that of the classic confirmat. And in furniture where there are many areas for fastening parts, a large number of minifixes can affect the final cost of the entire product.
- Complex installation technology. If when installing a confirmat it is necessary to make two mounting holes, then when installing a minifix you will need three such holes. Confirmat is a fastener consisting of one element. Minifix consists of three parts.
Photo 4 - Steel fasteners
Fastening accessories for Rondofix furniture
Rondofix in assembly is an alternative version of minifix. Its advantage is mobility and repeated assembly/disassembly without damage to furniture fittings and parts. Installation is the same as for the minifix.
Photo 5 - Fastening accessories for furniture rondofix (rondoRfix)
Rafix eccentric coupler
Let's look at the process of installing an eccentric coupler using the example of a Rafix from the Hettich company. It is easier to install than the minifix, and allows you to mount the shelves on the fasteners from above, which is very convenient and looks neater.
Photo 6 - Rafix VB 35/16 (nickel plated)
For installation we will need:
- drill with a 20 mm Forstner cutter and a 5 mm drill;
- carpenter's square and marking pencil;
- hammer;
- screwdriver.
Photo 7 - Rafix eccentric + screw 6x11
Let's start the additive from the shelves. We set aside a distance of 50 mm and 250 mm from the rear edge (we will then transfer these dimensions to the vertical stand). We draw a perpendicular from the edge of the shelf and set aside 9.5+/-1 mm on it. This will be the center of the drill.
Using a Forstner cutter, we drill blind holes 13 mm deep (be sure to attach a tie to the end and see if the depth is sufficient). We place the tie over the hole, carefully align it (there will be no second attempt) and hammer it in with a hammer or mallet.
We're done with the shelf, let's move on to the second part of the screed. At the level of the center of the proposed shelf, we draw a perpendicular. On it from the back we set the same distances as on the shelf (50 and 250 mm). We drill them out with a 5 mm drill - holes 8 or 11 mm deep (depending on the type of screwed-in rod).
We screw the rods into the resulting holes. We combine the shelf with the stand, insert the rods into the grooves of the eccentrics and wrap the latter. The shelf is pulled tightly into place.
Photo 8 — Messan Raffix Hafele D20 mm white with eccentric + screw D6x7.5 mm
Furniture items
A few examples of furnishing a kitchen combined with a living room:
- 1. Sofa. It becomes an object that zones space. The sofa is placed with its back facing the place where food is prepared. In small rooms (less than 20 sq m) a corner is placed, which is placed against a wall installed perpendicular or parallel to the kitchen.
- 2. Set. According to designers, minimalist models without elaborate details look modern. The service, vases or glasses are placed on an open shelf. You can buy a fashionable display case for them. Furniture is placed near the wall. If the space is large (20 sq. m, 25 sq. m or 30 sq. m), then in the central part you can install an island, which also has sections for kitchen appliances.
- 3. Furniture set. The style should be combined with the design of both rooms. In small rooms, a compact table and chairs made of transparent material or painted in light colors look good. You can add a table with a round top to your living room interior. In spacious rooms, the kit is installed near the wall or in the central part. An elongated rectangular dining table would look good here.
Read here: How to make a bench - beautiful and unusual options for making garden benches (135 photos)
Eccentric coupler: types, application features and mounting options
Eccentric tie, rastex, minifix or clamp - all these words are known to people who make their own furniture. In fact, each of these definitions applies to one type of fastener. In today's review, we will take a closer look at its types, sizes and application features.
What it is
This is the most common type of furniture fastener, which consists of the eccentric itself, a stand and a foot. The latter acts as a nut. All of them are divided into the following types:
- diameter and size;
- the length of the stand itself;
- type of rack fastening (screw or self-tapping screw);
- type of foot.
Similar fasteners are used for products made of chipboard or laminated chipboard using the “assembly-disassembly” type. If you are making furniture for yourself and know that it will often move from place to place, then it is better to use just such elements.
These connections are preferably used during assembly where no traces of fasteners should be visible. Only the eccentric itself will be visible, and then only from the inside. In the future, it can be hidden with an additional plug.
Advantages and disadvantages
The furniture connection has its undeniable advantages, which are appreciated by craftsmen. Namely:
- Rapidity. With its help, you can assemble the product without any extra effort. To work, you just need to prepare a regular flat-head screwdriver.
- This is the most reliable type of connection. Withstands heavy loads. Ideal for frequent assembly and disassembly. At the same time, the quality and strength of the connection is not lost.
- Does not spoil the front side of the product at all. Aesthetics are important when assembling. They will be noticeable only from the inside of the products.
It has good positive qualities, but there are also some disadvantages. Let's look at them:
- High price. In contrast, ordinary confirmations are considered budget elements. If a large number of connections are expected, then the presence of eccentrics will increase its price several times.
- Complex installation technology. Using confirmation is much easier. It only needs two holes. With minifix everything is much more complicated. You will need three of them.
- It is necessary to have precise equipment. Without it, it is difficult to make precise markings perfectly straight. Otherwise, it will not be possible to assemble the furniture.
Such fasteners do not have any serious disadvantages. If you want your products to be strong and durable, then you should choose only such an element.
Variety
There are several minifixes that every furniture maker encounters:
- stock;
- eccentric;
- bushing (plastic or metal).
You can also find double-sided and corner eccentric couplers on sale. But in modern furniture production they are not used, as they are considered inconvenient to work with.
The most popular fastener today is a special eccentric clamp, the rod of which has a thread made for chipboard.
Usage
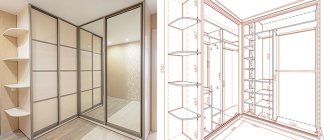
Eccentric couplers are used in fastening L- and T-shaped elements. Namely:
- tables;
- countertops;
- wardrobes;
- in any furniture elements where drilling holes on the front side is neither possible nor desirable.
In all these cases, the connections must be hidden. The rod is hidden inside the part, and the eccentric is visible only from the inside.
Fastening without bushing
To learn how to use fasteners, we prepare the following tools:
- cutter with a diameter of approximately 15 mm;
- drill 7 mm;
- drill or confirmat 5 mm;
- ruler;
- screwdriver or drill;
- awl;
- pencil for marks.
Before work, remember that when installing on a surface, you need to make three holes.
Now you can start installation:
- The height of the protrusion of the rod head should be 6 mm. In this case, you can install an eccentric on it efficiently. To screw in the rod, make a passage for it with the smallest drill.
- We make two holes in another part. We mark the first at a distance of 34 mm from the edge using a cutter. The second is done exclusively in the center, using a medium-diameter drill.
- We screw the rod into a small diameter hole. We install the second part on it and fix it with a minifix.
Bushing mount
The whole procedure is identical to the first one. You will also need tools and materials for the work. The only difference is that the rod requires a hole of a different diameter. A 10 mm drill is used. The plastic sleeve is secured using PVA glue.
From the video you will learn in detail how to properly install an eccentric coupler with your own hands.
How to remove a cam from furniture
Thank you! It helped a lot. I mixed up the eccentrics in the same way. And also furniture from Shatura. They should somehow mark different eccentrics.
Great advice, thanks! I’ll add to determine the size - for different eccentrics the same self-tapping screw is screwed (or inserted) to different depths
Eccentric coupler
Minifix - what is it?
Unscrew the broken thread from the tap
Professional kitchen measurements before ordering furniture
How to replace rollers in a shower stall.
HOW TO PROCESS A 2 MM PVC EDGE WITH A HAND MILLER
How to remove a drawer with telescopic guides
Minifix installation, detailed instructions
How to install furniture eccentrics
Solid wood furniture. Six tips
Axle or eccentric? What to choose?
Furniture assembly. All about furniture joints.
How to Hang Kitchen Cabinets Using Mounting Strip and Universal Hangs
We offer you a wide variety of entertaining, educational, children's, news, music, and humorous videos in excellent quality, which is good news.
Humorous videos are perfect for evening entertainment. More than ever after a hard day at work, humor will help you take your mind off life's problems or laugh heartily in the company of friends. Here you can find various sketches, stand-ups, pranks, video jokes and various comedy shows.
We are very glad that our site will be able to help you in various life situations. We tried to select suitable content for our viewers. We wish you pleasant viewing.
Expert opinion
Strebizh Viktor Fedorovich, leading construction foreman
The alloy of silicon and aluminum is not as strong as steel or iron, so the hardware can withstand a limited number of assembly cycles. If you want to clarify something, please contact me!
Confirmat
It is a direct descendant of self-tapping screws for a knife screwdriver, who liked to hammer in correctly instead of carefully screwing in. Using the confirmation will not cause problems even for an inexperienced user. It is a self-tapping screw that has an increased diameter and is also not equipped with the usual tip. The furniture confirmat is designed for use with a special hexagonal nozzle. You can't screw it in with a regular Phillips screwdriver. Such fasteners have become especially in demand with the growth in the production of cabinet furniture. The latter is assembled from laminated chipboards using facades or MDF inserts.
With the help of the confirmat, two furniture parts are fastened only at an angle of 90 degrees. If a different angle is required, then fasteners are used, which will be discussed below. Since the confirmat does not have a sharp tip, it cannot simply be screwed into wood. Before assembly, holes are drilled in the parts. Near the head, the confirmat has a slight thickening, which requires the use of a 6 mm drill. For the threaded part you will need a consumable with a diameter of 5 mm. It is most convenient to use special drills for confirmations. They are a small crown or cone into which a 5 mm drill is inserted. As soon as the drill is completely recessed into the material, the cutter makes a slight expansion under the head of the furniture fastener.
Note! The head of the confirmat must fit flush into the furniture. This is done to hide furniture fasteners with special plastic or other covers.
Usually the furniture board is 16 mm thick, so the hole is drilled in the end in the middle. If a hole is drilled in a furniture board from the front, then an indent of 8 mm is made from the edge in order to smoothly join the parts
This is done to hide furniture fasteners with special plastic or other covers. Usually the furniture board is 16 mm thick, so the hole is drilled at the end in the middle. If a hole is drilled in a furniture board from the front part, then an indent of 8 mm is made from the edge in order to smoothly join the parts.
Confirmats can be used in conjunction with other fasteners, for example, dowels. This is done for a more durable joining of furniture parts. It is worth understanding that the fixation of furniture parts can be ensured at the highest level only during the first assembly. If you frequently assemble and disassemble furniture, the confirmators will not be able to fix the parts with the required rigidity. When screwing in furniture fasteners, it is necessary to select the correct force. If it exceeds the required limits, then the confirmat will simply begin to scroll or damage the second part.
Advice! It will be easier for inexperienced masters to reach the confirmation manually.
Those who have been working with cabinet furniture for a long time have learned to feel the tool and avoid deforming parts by excessive tightening.
Installing a furniture eccentric with your own hands
An eccentric fastener (rastexes, minifixes, eccentric clamp - whoever calls it that) is one of the most common types of furniture fasteners.
Minifixes are good because parts fastened with their help can be disassembled and reassembled many times, without loss of rigidity, which would not happen when using confirmats, where with each assembly/disassembly the fastening will lose rigidity.
There is only one drawback to minifix furniture - it is painstaking work to install it. If you do not have expensive filler equipment, to install it yourself, you need to very carefully mark and accurately drill three different holes in three different planes, which usually takes a lot of effort and time.
This work does not tolerate mistakes in marking. After all, you won’t be able to adjust the connection in the end.
Also, its cost cannot be called completely cheap. The price of a minifix is usually 3-4 times more expensive than a confirmation.
Therefore, it should be used in the most necessary cases.
How to unscrew the eccentric in furniture?
- Ability to withstand heavy loads. The fastening has a high level of reliability. It tolerates repeated assembly/disassembly of structures without deterioration in quality;
- Long period of operation;
- Increasing the rigidity of assembled furniture.
- Easy installation of a furniture eccentric. Almost every person without experience or construction skills will be able to carry out the installation independently. This work will not take much time. To do this, an ordinary screwdriver is enough (provided that the holes have already been made in the furniture).