Home pageArticlesWorkshop /IndoorFurniture eccentric screed (minifix - Minifix) - what types are there, mark and install fastening fittings with your own hands
How to connect laminated chipboard furniture parts using eccentric ties. Let's figure out how to mark, find out the size of the holes and what tool is needed for this...
The furniture eccentric tie, or as it is also called “minifix”, is definitely a hit in the furniture industry. Minifixes are an indispensable fastener where it is necessary to make a hidden connection of slabs, and at the same time through holes for confirmatory ties are excluded.
In this video, we will look at the two most popular and most used options for furniture eccentric ties, and also learn how to mark and connect furniture parts using simple ties with a 15mm eccentric. and couplers - shelf holders, with an eccentric in a housing with a diameter of 20 mm.
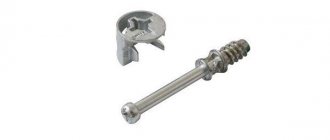
Simple eccentric couplers
They may differ in the diameter and long threaded part, the type of threaded part of the pin, as well as the diameter and height of the eccentric itself. For different slab thicknesses, there are different ties. The most common couplers are for 16 mm slabs, with an eccentric diameter of 15 mm. and height 12 mm.
The height of the eccentric for different types of couplers can vary from 10 to 16 mm.
The tie pin may have different threads. Self-tapping, or Euro-thread - intended for screwing into drilled holes with a diameter of 5 mm and a depth of 8 mm to 11 mm.
If the pin has a metric thread, it is screwed into a special plastic sleeve, which is pressed into the plate in advance.
An option with a plastic sleeve, it is good to use in not very dense slabs, where the Euro-thread of the pin can break out.
Also, the lining is good as a repair option when a pin with a self-tapping thread no longer holds in the slab, instead of which you can always install a tie with a lining.
How to properly install a furniture eccentric coupler
Eccentric ties are always made together with a dowel connection. When the former create a force between the parts, the latter determine the specified relative position of the parts, which is mandatory for installing a stable screed.
To install minifix furniture, you will need drills with a diameter of 7 and 10 mm, as well as a cutter with a diameter of 15/25 mm. The installation diagram is quite difficult to understand at first glance for a beginner.
Installation of a furniture eccentric coupler is accompanied by drilling three holes in different planes:
- 5 mm in diameter on the inside of the sidewall (vertical).
- 7-8mm in diameter at the end of the shelf or tabletop (horizontal).
- Use a cutter with a diameter of 15 mm on the “wrong” side of the shelf or tabletop (horizontal).
In a similar way, a furniture eccentric tie is installed for fastening the rear walls and false panels. In this case, the role of the horizontal is “performed” by the front part, and the principle of fastening remains the same.
How to install a double-sided eccentric coupler is more clear in the diagram.
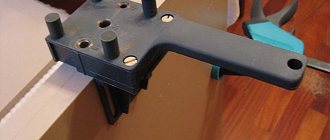
To make it easier to apply markings for drilling under the eccentric, it is convenient to use furniture jigs. They are sold ready-made. You can also make them yourself from scrap materials.
The strength of the eccentric coupler is influenced by the quality of the materials themselves and the correct installation. High-quality parts are a little more expensive, but if you want a strong and reliable screed, then you shouldn’t skimp on parts. But even if all the elements of the screed are of the highest class, but the holes are made incorrectly, or the rods are installed incorrectly, then the quality of the screed itself drops significantly. Be careful.
Screed-shelf support
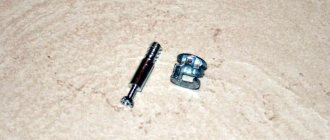
This coupler has a short pin with a self-tapping Euro thread, and the eccentric is located inside the body which is pressed into the plate. The eccentric body can be made of either plastic or metal.
This option is good because of its ease of installation; you need to drill not three holes as with the option with a simple screed, but only two.
Also, with such ties, we get the opportunity to assemble furniture in a limited space, since to install a shelf you do not need to move the walls to the sides; you can simply lower the shelf from top to bottom.
Some manufacturers offer ties with the ability to tighten the eccentric on both sides. Thanks to this option, you can install, for example, the bottom of a cabinet, and the fasteners will not be visible.
Euro-threads are most often used on the pins of such couplers, and the diameter of the hole for the eccentric part with the body is 20 mm.
Now let's move on to the practical part - marking and installing eccentric couplers.
Where are minifixes (eccentric ties) used?
Of course, zip ties can be used wherever you find it convenient and logical. Your project is your rules, but there are generally accepted nodes in which almost everyone installs minifixes:
- Drawer fronts (fastenings visible from the outside are not allowed here);
- Shelves between two racks (you can also use dowels, but the minifix is more reliable and gives additional rigidity to the entire structure);
- Back walls of cabinets;
- Countertops (from a desk to a kitchen set);
- Lid and bottom (cabinets, cabinets, chests of drawers, etc.);
- Fastening of built-in furniture (where it is impossible to close the Euroscrew, for example, from the side of the wall);
In general, minifixes are about L-shaped and T-shaped connections. They save in two main cases - the visual factor (minifixes - hidden fasteners) and the technical one - when it is impossible to screw in a Euroscrew due to lack of space for it.
Marking for screed with 15 mm eccentric.
I would like to immediately note that the connection using simple ties with a 15 mm eccentric is more correct to make in combination with the additional installation of dowels.
Such a connection, thanks to the precise fixation of the part using a dowel, will not allow the parts to move. Because the tie pin gives a certain backlash, due to which the furniture structure will not have the correct geometry and rigidity.\
Taking as a rule, one tie, one dowel, I mark holes for drilling in the mating parts, markings are always made from the front edge of each part.
For convenience and accuracy of adding parts at home, I use the simplest jig for 16mm laminated chipboard.
Such a jig allows you to accurately mark and make end drilling of holes at an angle of 90 degrees. We mark a hole for the pin at the end of the plate, and on the side of the same plate the middle of the blind hole for the eccentric. The end hole is located exactly in the center of the plate, at a distance of 34 mm from the edge, I mark the middle of the hole for the eccentric.
Using a 15 mm Forstner drill to a depth equal to the height of the eccentric, a blind hole is drilled for the eccentric; when using a Forstner drill, you need to be careful not to drill through the slab.
To do this, I installed a depth limiter for drills and a wide washer on a Forstner drill. For those who use such a drill for the first time, before drilling, you can drill a preliminary hole with a thin drill of 1.5 - 2 mm.
In order for the hole entrance to be smooth and without chips, until the hard front laminated layer has been passed, I begin to drill at low speeds, trying to hold the drill exactly at 90 degrees and carefully press it to the workpiece, having passed the laminated layer, I increase the speed and reach with the drill all the way to the limit washer.
Next, a hole is drilled from the end part with an 8 mm drill to the depth of the hole for the eccentric. Since I am using a jig in which the hole is designed for a 5 mm drill, I first drill through the jig with a 5 mm drill, and then with an 8 mm drill without a jig.
I check that the inserted eccentric is completely recessed into the slab and will not protrude.
Next, on the second part of the mating part, at a distance of 8 mm from the edge, a 5 mm hole is drilled with a depth equal to the height of the pin thread. For this, I still use the same conductor.
Next, I install the dowels in the pre-prepared holes.
I screw the pins into place; on many pins, for convenience, plastic bushings are installed; you can use them to hold the pin while screwing.
Now, you can connect the mating parts.
I install the eccentrics in their places, connect the two parts, and turn the eccentrics.
The connection is ready, and thanks to the presence of furniture dowels, the parts are held rigidly and do not play among themselves, as could be the case without installed dowels.
Minifixes, eccentrics. Installing minifix.
Minifix
or as it is also called - an eccentric tie, a fairly common type of fastener for assembling furniture from laminated chipboard.
I most often use minifix for the manufacture of furniture, which is often subjected to a “disassembly-assembly” cycle. For example, for furniture that is often transported from one place to another. Or for temporary furniture, for example tables, which after short-term use can be easily disassembled and stored until subsequent assembly, when they are needed again. Minifix is also used in cases where, according to the design project, there should be no visible fasteners on the furniture or part of it on the front side. Those. In fact, minifix is a semi-hidden furniture fastener. In the installed minifix, only the eccentric is visible, which is usually located on the inside of the mount.
Advantages of minifix:
- Minifix is a furniture fastener for quick installation. Those. Assembling furniture from parts with already installed minifixes does not take much time. And to do this, a simple flat-head screwdriver is enough.
- Minifix is a reliable fitting; it can withstand many assembly-disassembly cycles without losing the quality and strength of the connection.
- There is no visibility of the fastening from the front side. The minifix eccentric can be installed in an inconspicuous part of the fastening unit.
Disadvantages of minifix:
- Greater cost than the classic confirmat. And in furniture where there are many areas for fastening parts, a large number of minifixes can affect the final cost of the entire product.
- A more complex technology for installing this type of fastener. If when installing a confirmat it is necessary to make two mounting holes, when installing a minifix, you will need three such holes. Confirmat is a fastener consisting of one element. Minifix consists of three parts.
How to install minifix.
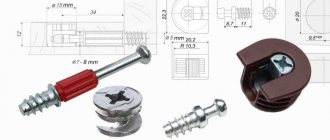
Minifix coupler is a three-element type, consisting of a metal eccentric, a plastic coupling and a rod (eccentric rod).
To install the minifix you will need: a milling cutter with a diameter of 15-16 mm, drills 7 and 10 mm.
In its cutting part, a minifix cutter exactly resembles a hinge cutter.
The procedure for installing minifix.
These are the details, using an example of which I will show the process of installing minifix.
1.
Minifix installation diagram.
| In this example, we will consider the installation of a classic minifix 42 mm long, designed for installation in a 16 mm thick slab. Almost all the different types of minifixes are described below. |
2.
We start by using a 10 mm drill in the plane of the part that is being attached. Drill a blind hole for the plastic coupling.
We make markings as usual. 8 mm is the middle thickness of the laminated chipboard.
Hole for minifix coupling.
A drop of glue (PVA or B3) so that the coupling is installed more firmly. Although this operation is not necessary. The diameter of the coupling itself is approximately 10.5 - 10.6 mm. Those. It is installed in the part so firmly enough.
The coupling is driven into the hole flush with the surface of the part. The minifix rod will be screwed into it.
3.
We drill a blind hole for the eccentric.
For this type of minifix, the size for the eccentric from the end of the abutment to its center is 34 mm.
For accuracy of subsequent assembly, the remaining dimensions at the end and the abutment plane must match according to the preliminary design.
It should be noted that the distance is 34 mm. is not universal for all minifixes. There are minifixes in which this distance is 28 or 30 mm. Finding out the installation size of the eccentric is not at all difficult; you can look at the diagram or simply measure the rod itself with a ruler (more on this in this article, see below).
Depth of hole for eccentric = 14 mm. The thickness of the eccentric itself (for a 16 mm minifix) = 13.5 mm. Those. the eccentric should fit flush into the hole (slightly below the plane by 0.5 mm)
4.
Hole for minifix rod.
The last thing to do is to drill a hole at the end of the mating part for the minifix rod so that it goes into the eccentric hole.
The hole is drilled with a drill with a diameter of 7 mm. It is 0.5 mm wider than the diameter of the rod.
Minifix installed.
A decorative plastic plug is installed on the eccentric. There are also thin self-adhesive plugs, like those that are hung on confirmat hats, only with a slightly larger diameter.
Assembly and disassembly of the connection unit on the minifix occurs using a regular flat-head screwdriver.
Types of minifixes.
Simple minifixes. I managed to put together several types of simple minifixes. see photo.
Minifixes on the left, 2 pcs. — under the slab 18 mm. (this can be seen by the size of the eccentric). Also, the minifixes on the left are installed without a coupling; they are directly screwed into the part. To do this, drill a hole, like for a shelf holder.
Minifixes on the right, 3 pcs. — under the slab 16 mm. All three are installed via a coupling. Although the two middle ones can also be installed directly. One of the minifixes is shortened by the size up to the eccentric 25 mm. (used mainly for table tops in office furniture).
With simple minifixes, you often come across ones whose size to the eccentric is 30 mm. In general, this size does not depend on the standard, but on the “invention” of the minifix manufacturer.
There are also mini-fixes, corner (hinged) and tie-down (double-sided).
Corner minifix and its installation diagram. Here, the “X” dimension is the size along the surface of the part, and not along the axis of the rod. With different connection angles, this size will change, while the size of the rod does not change.
Minifix coupling, installation diagram. It is also called an eccentric coupler.
Various variations of minifixes.
How to find out the size for the minifix eccentric.
It's very easy to do. Minifix head = 3 mm. thick. And 3 mm. you need the rod neck so that the eccentric grabs the head. This means that 6 mm must be subtracted from the length of the rod. - this will be the size for the eccentric. Also with a corner minifix. You need to take the size of the rod from the center of the joint and minus 6 mm.
Questions and discussion on the forum:
Supporting Information.
(all links open on a new page)
- Tool for assembling furniture.
- How to drill assembly holes.
We mark and connect the parts using shelf support ties with short pins
So, we mark a hole for a short pin with a self-tapping thread.
Then, on the mating part, at a distance of 9.5 mm from the edge, mark the center of the hole for the eccentric.
Next, I use a 5 mm drill to drill a blind hole for the pin, and on the mating part, using a 20 mm Forstner drill, I drill a blind hole for the eccentric.
I screw in the pin and install the eccentric in the housing into the mating part.
I connect the parts, after which I turn the eccentric to fix it.
Once again I would like to repeat, for better marking and drilling of parts, it is advisable to use jigs, thanks to which the accuracy, quality and speed of work increases, and the money spent on a jig will come back to you in the form of no defects, saved effort and time.