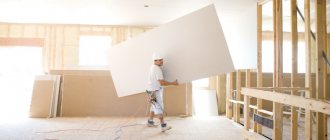
Remodeling an apartment is something that everyone has thought about. For one reason or another, you may need to redistribute the space in the room. But to do this, you need to build a new wall, which is a difficult and costly process. That’s why they came up with the idea of creating partitions from plasterboard. Outwardly, they may be indistinguishable from real walls. However, they are built easily, quickly and cheaply. That is why a plasterboard partition for zoning a room is a good solution for remodeling an apartment.
What is zoning and why is it needed?
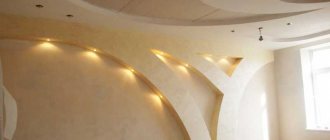
Zoning should be understood as dividing a room into zones with different functionality. If we talk about the role of drywall in zoning, then it is used for these purposes when creating ceilings and partitions. A multi-level ceiling can, by its shape, divide a room into several zones. For example, the kitchen can be visually divided into areas for cooking and eating. However, this is only a visual separation, but the partition gives a more tangible effect in this regard.
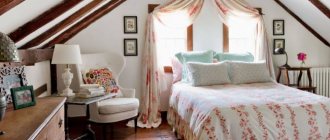
Typically, zoning with a partition is carried out in large rooms to divide them into functional zones. In the classic version, a partition “protects” the sleeping area from the rest of the room. Typically, this method is used when the living room also doubles as a bedroom. Therefore, in order to somehow separate these zones, a partition is used.
When you have to divide a room into two parts, even visually, you should make sure that it is beautiful. Therefore, a decorative plasterboard partition should be used to zone the room, and not a simple rectangular structure, indistinguishable from an ordinary wall.
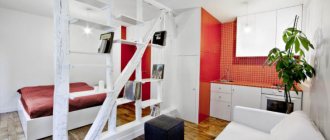
It is necessary to separate not only large apartments, but also small ones. If we are talking about a studio apartment, then the kitchen and bedroom are in the same room. It would be a good idea to separate them with a partition. Its thickness is small and it takes up little space. But the visual effect of two different rooms will be created, which will lead to an increase in the level of comfort.
A one-room apartment can also be zoned using plasterboard partitions. This may be necessary when you live with children. The partition, although small, will allow them to create their own corner and an additional sense of security.
Ultimately, every owner of his apartment always knows where to divide the room.
How to do it
Before you finally make a bet on a plasterboard partition, instead of a bulky and heavy brick wall, you need to think about everything. First of all, contact the housing and communal services, where they will tell you whether the walls can be demolished.
Dividing a room with a plasterboard partition And also, invite BTI employees who will approve or reject the possibility of redevelopment in the apartment.
Important nuances
In order to avoid problems during the redevelopment process, you need to:
- View the apartment project plan in the housing cadastral passport. A room with a usable area must be no less than 9 square meters. The width should not be less than 2 meters 25 centimeters.
- And also remember that rooms such as a sanitary unit, as well as the kitchen area, cannot be moved under any circumstances.
- If you plan to use plasterboard to divide the kitchen space and the room, and they will be separated by a plasterboard arch, then you cannot install a gas stove in the kitchen.
Zoning of a one-room apartment - You should also be aware that load-bearing walls must not be demolished under any circumstances. As a rule, this is reported by BTI employees or representatives of the housing and communal services.
The advantage of partitions and drywall
To zone a room, you can use different designs and materials. So why then should you choose drywall and partitions? Let's look at what advantages gypsum board has in this regard.
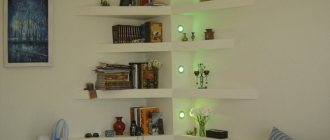
From gypsum plasterboard you can create partitions of unprecedented beauty
- This is a very light material, which means it will not create additional significant loads on the base.
- It is the finishing that will play a decisive role and create a decorative design. Drywall is suitable for finishing with any decorative finishing coatings.
- A plasterboard partition for zoning a room is hollow inside. This means that it can be used for wiring and laying communications.
- There is moisture-resistant drywall that can be used to divide a bathroom.
If everything is clear with plasterboard, then you need to decide why the partition should be used for zoning, and not figured ceilings, newly erected walls or other structures. It's all about the following advantages:
- separation by partitions allows you to design different zones in your own unique style;
- opaque design helps create more personal space and privacy;
- there is a visual separation of zones from each other;
- although the zones are separated from each other, they are always visible, because partitions do not serve as walls;
- you can correct errors in the apartment layout;
- new rooms are added to the apartment;
- A properly executed partition adds sophistication to the room.
All glass or in combination with glass
Partitions can be made entirely of glass or in combination with other materials. Most often, laminated chipboard or coated MDF is used for this. The glass itself is allowed in different types:
- hardened;
- multilayer;
- tinted in bulk;
- with different types of processing;
- with film covering;
- mirror
The glass thickness ranges from 6 to 12 mm; high-strength material that is resistant to mechanical damage is used for partitions. If the integrity of the fabric is damaged, the material breaks into small pieces without sharp corners, which eliminates the risk of cuts and injuries.
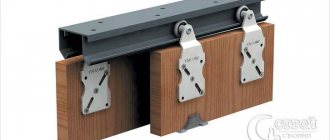
Partitions are made to order according to the size of the room. The structures are simply assembled and their location can be easily changed. Mounting is carried out to the floor and ceiling, but wall mounting options are also available. For this purpose, clamping profiles and other fasteners are used. Door leaves of different types are installed in such partitions:
- swing;
- recoil;
- all-glass or combined.
Partitions made of glass or combined materials have a number of advantages:
- strength and long service life;
- creating obstacles to the spread of sounds and smells;
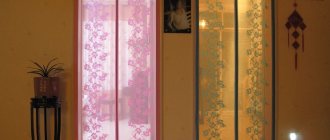
- translucency (if you choose an option with light decor or without it at all);
- resistance to mold, mildew, mechanical stress, etc.;
- ease of installation and ease of dismantling;
- light weight, which makes it possible to use in ordinary apartments;
- such structures take up minimal space;
- Sliding partitions are being installed.
Creating a diagram taking into account all the nuances
A very important planning stage begins. On it you need to decide on the location and shape of the partition for zoning. It is necessary not only to understand where exactly the structure will be installed, but also to determine what shape it will take. It is advisable to make it as decorative as possible. A simple rectangular design will look very simple and uninteresting.
It is best to display plasterboard partitions for zoning space on a diagram. In this case, there will be specific dimensions and a clear understanding of where zoning will take place. In addition to the general drawing with the placement of the partition, you may need to draw it separately. The more complex its design, the more necessary the drawing.
The general plan should show the entire room (top view) with all the elements in it. Then you will need to think about where it is best to use the plasterboard structure. You may have to remodel by moving the furniture a little. In addition to the general plan, you will have to draw the appearance of the partition in profile. This is required in order to correctly assemble the frame.
When zoning, the partition may well be half or two-thirds of the height of the room. It should also cover about half the passage or less.
When creating diagrams, drawings and sketches, you need to take into account some nuances. When allocating new space, it should occupy 25-35% of the total area of the room (no less). In this case, most of the room should have a window. If a bedroom area is created in the living room, then it can occupy half the area of the main room.
Decorative openwork fence
The materials used for such structures are:
- plastic;
- MDF;
- tree;
- metal;
- plywood.
Thanks to modern technologies, patterns of any complexity are available. Metal structures are made of rods connected in a pattern. For other materials, laser or milling cutting on a machine is used.
Plastic structures are practical to use, lightweight and durable. They are resistant to moisture, easy to clean, and resistant to damage. Hassle-free movement of the barrier is available. Relevant use for creating children's areas.
Wood products are environmentally friendly and have an aesthetic appearance, but they are not highly resistant to moisture and mold. It is not recommended to place structures near direct sunlight to prevent the material from drying out.
Marking and installation of a basic rectangular frame
A plasterboard partition for zoning a room can be assembled according to two different schemes, depending on whether it will span the entire height of the room or not. Therefore, in one case the profile is mounted on the ceiling, but in the second there is no need to do this.
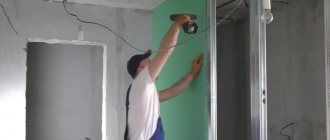
The first step is to mark the floor and wall to which the partition will be adjacent (the ceiling is also marked if necessary). This is done using a level and plumb line. After the marks, straight lines are drawn that will mark the edge of the frame (not its center, but the edge). The guides must lie flat so that the structure does not come out skewed.
This is how the guide bends at a right angle
In order not to join the guides in the corners, it is recommended to trim the edges of the profile so that it bends at a right angle. Then the guide can go along the floor, and then flow at a right angle to the wall. The same can be done with the joining of wall and ceiling profiles. This is a convenient system for those cases when mounting to the ceiling is not carried out. Then the profile is trimmed and bent in several places, which allows you to create smooth and strong edges of the frame.
A plasterboard partition for zoning a living room is usually made from floor to ceiling. In a large room, this design is quite appropriate. When zoning other rooms, it may make sense to create a partition half or two-thirds of the room's height.
The guides are attached to the base surface using dowels. If work is carried out on a concrete surface, then it will be difficult to do without a hammer drill. The result should have been a rectangle, which would be the basis of the frame. The corners of such a frame need to be fastened together so that the guides do not bend. To do this, 2-3 cuts are made in each corner on each side of the profile using a cutter. If such a tool is not at hand, then you need to use “bugs” (small screws for metal).
The distance between the posts is 60 cm
To ensure the strength of the frame, vertical posts must be inserted into it. They should be inserted so that drywall can be screwed to them on both sides. The easiest way is to insert the stand edgewise if it fits that way (you need to think about this at the stage of purchasing profiles). You can connect two profiles together (insert one into the other, creating a box) and use them as one rack. Then, despite the size, it will always be possible to attach drywall to the rack on both sides.
If you need to make “windows” in the partition for zoning, then they are simply taken into account when assembling the frame. Several jumpers are added so that they can then be sheathed with plasterboard from the inside.
Trimming and bending the jumpers depending on how the racks are installed
Now you can insert horizontal jumpers that are attached between the vertical profiles, creating a more reliable structure. Everything is also fastened with a cutter or bugs. It is worth considering that the jumpers will have to be cut so that they can be inserted between the racks. Moreover, exactly how the racks are installed will play an important role.
Techniques for identifying zones in rooms of different sizes
Few people would want to convert a large multi-room apartment into a single studio. Therefore, people use this design in one- or one-and-a-half room apartments. Converted two-room apartments are even rarer.
Agree that each individual apartment has its own dimensions, and sometimes there is no way to fit some things into it. For especially small rooms, there are certain zoning recommendations, which we will outline throughout this chapter.
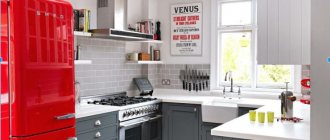
Kitchen area
Let's start with the most difficult thing, because a kitchen with open walls means constant odors, grease and soot in the living rooms. In addition, due to the fact that the interior decoration of this area will always be visible, it is worth organizing its space in such a way that there are enough cabinets and drawers for kitchen utensils for all the dishes without leaving a trace.
- To put all this into practice, you will have to equip the kitchen with a powerful forced ventilation system.
- Also, in order not to take up too much space with kitchen furniture, it is recommended to install multi-level storage systems with pull-out and fold-out elements that can effectively use the corners of the room.
- Drop-down cabinets are also very convenient, since some models are not attached to the walls and are attached directly to the ceiling.
- Another point to consider during renovation is the removal of debris that constantly accumulates in the kitchen. This can be avoided by organizing a multi-level floor, which should be lower in the kitchen. However, this problem does not stop many people, and on the contrary, they raise the floor in the kitchen.
Attention! If you live alone, then the garbage problem is unlikely to affect you, but if you live with a family, even a small one, you will definitely encounter it.
Bar counter with drawers
If the size of your apartment does not exceed 30 m², then to save more space, you can use a table to create a partition, or install a bar counter that will successfully replace it. This design is also good because on the kitchen side, you can place drawers or cabinets in it to store dishes, and it will be very convenient to cook food on its surface.
But if you have plenty of surfaces for cooking without a counter, then it can be placed as a separate zoning element, at which it will be convenient for a large number of diners to sit.
How to partition a studio apartment: a table as a divider
Such a bulky element of any kitchen as a refrigerator can be disguised, or you can immediately purchase a built-in model. The size of these devices must be selected according to the needs of the user.
Original layout of household appliances, electrical and plumbing
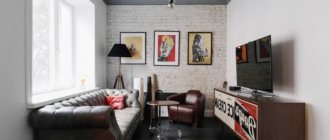
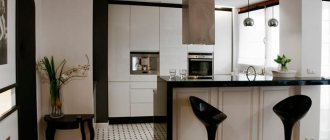
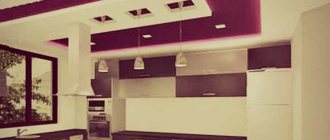
If the size of the studio apartment exceeds 35 - 40 square meters, then you can take a walk and put up a more solid, beautiful partition. But it should not be too bulky, but rather, emphasize the spaciousness of the room as much as possible. Wall projections with beam ceilings are perfect for these purposes.
Studio apartment: zoning
It’s very good when you can place a full-fledged table that can be installed on the border of two zones. To give the space an original appearance, you can play with the geometry of the partitions and openings, making them round or wavy.
The main thing to remember when organizing a kitchen area is to make the room not only beautiful, but also comfortable. Therefore, always be restrained in your imagination, limiting it only to the necessary functionality of the room.
Sleeping area - relaxation area
The next, no less important task is to plan the area in which we will rest from the hustle and bustle of everyday life and gain strength for new labor and creative exploits.
To implement a bedroom “inside” an open space, there are several ways. One of them is to get a folding sofa (see Sofa in the bedroom instead of a bed: which is better), which in the evenings will turn into a comfortable sleeping place. In addition, you can install various kinds of ottomans, armchairs, designer chairs, and a coffee table next to it.
Modern folding sofa
The second way is to separate your sleeping area. Some simply place a bed, fitting it into the interior due to the color and texture of the material, others prefer greater privacy and hide it behind all kinds of partitions, including retractable blackout curtains, which provide a private corner inaccessible to prying eyes.
Studio apartment: sleeping area
How do you like this solution - to hide the bed behind a bookcase? It looks original, and in practice, saves a lot of free space.
Partitions for a studio apartment
Many people prefer to do without a bed at all, and place the sleeping place on the podium. But it is worth noting that to implement such an idea, you will need high ceilings - at least 2.7 m.
Podium bed
Children's area in a studio apartment
Despite the fact that living with a large family in a common open space is, for obvious reasons, not entirely convenient, some people deliberately turn their apartments into studios, following the call of fashion or their personal preferences.
Organizing areas for children requires its own special approach. And if for a small child it is enough to provide a sleeping place and a play area, then for schoolchildren and students the space should be made more functional.
- It should include a work area with good lighting. It’s good if there is a window nearby, which can also be used by turning the window sill into an original reading area.
- If a relatively small area is enough for written work, then to accommodate computer equipment (PC, printer, etc.), it will require much more. A built-in computer desk will be an excellent solution for saving space.
- If your child is not an avid gamer, then instead of a stationary device it is better to buy a laptop or all-in-one computer.
- Well, don’t forget about the bookshelves, on which you can conveniently arrange countless textbooks, reference books, workbooks and notebooks.
Installation of a figured frame - the initial stage
When zoning a room, it is very important to do everything carefully so that the created partition does not look stupid and inappropriate. The best way to avoid this is to make it decorative. When a plasterboard partition for zoning a room has a figured appearance, it unobtrusively fits into the interior. But giving it such forms is not an easy task.
The beginning of work is the same as when creating a rectangular frame. After the guides are attached to the floor, wall and ceiling, you need to look at the diagram where you can install a vertical stand. You need to find the point farthest from the wall, from which the edge of the partition takes on a curved shape. This is where the vertical stand is installed. Additionally, jumpers are installed for greater structural strength.
Some designs may have such an ornate appearance that there is even nowhere to install this rack. Then the profile is placed diagonally to make the frame more or less durable. It will be possible to lower the jumper to this diagonal profile from the middle.
Cutting an arc or wave from drywall can be a very difficult task.
When the base of the figured partition for zoning is done, you need to take a sheet of drywall that will go to the edge of the partition. It is cut into the desired shape (usually an arc or wave). First, the sheet is marked with a pencil, and then carefully cut with a jigsaw or other tool. Another sheet is made in the same way, which will be used to cover the frame on the other side.
We cover the frame completely with plasterboard on one side. We fasten it with self-tapping screws in increments of 15 cm. Do not forget about all the places where there are jumpers, we attach the gypsum board to them for greater stability of the structure. We can say that one side of the figured plasterboard partition for zoning the room is ready. However, now comes a very difficult and responsible moment.
Installation of the figured frame - the final stage
You need to attach a profile along the inner edge of the drywall. To do this, take a guide and cut it so that it bends like a snake. It should bend so as to completely follow the contours of the attached drywall. To do this, the side parts of the guide are cut to the base in increments of 5-8 cm (depending on the curvature of the structure). Moreover, it is necessary to make V-shaped cuts so that the guide can be bent inward.
When cutting the profile and working with it in the future, you must wear protective gloves to avoid damaging your hands.
You need to be very careful, because the guide will bend very easily under the pressure of the screw and you will have to hold it with your hand. The main thing is to keep it away from the place where the shurpa is screwed in, otherwise you can pierce your hand. Self-tapping screws pass through the drywall and press it against the cut profile, creating a metal rim. You can attach each petal or one at a time.
The profile snake is applied to the edge of the drywall, and they are fastened with self-tapping screws
The second side is sheathed more easily, because there is already a rim made from a snake from the guide. Therefore, the drywall is attached to the frame and to the snake. The result is not only a shaped gypsum plasterboard sheet, but also a shaped profile, which completely repeats the bend of the drywall.
According to this scheme, a plasterboard partition can be made to zone a room, even if openings of different shapes are created in it. In this case, the internal openings will also be framed with a cut profile, which can repeat any bends. Ultimately, you will need to cover the entire structure with plasterboard. In the places where the arcs and waves are created, there is already a profile back to which the plasterboard can be attached. On such small bends it will easily follow the given contour. As a last resort, you can use more pliable and less breakable arched plasterboard. All that remains is to putty the joints and prepare everything for finishing.