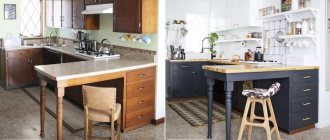
The countertop is one of the most vulnerable surfaces in the kitchen. Chips, cuts, and traces of dishes appear on it. At the same time, the neatness of the entire interior depends on its appearance. To freshen up your space without replacing furniture or repairs, you can try restoring it yourself. In this article we tell you how to update your kitchen countertops with your own hands.
How to update your dining table top?
Installation technology
- Cover the prepared boards with polyurethane varnish. ...
- Leave the boards to dry for a day, then carefully sand the surface with sandpaper, wipe off the dust and apply a second coat of varnish.
- After the varnish has dried, paint the boards with enamel paint in 2 layers and leave to dry for 12 hours.
Interesting materials:
Where can you hang an icon? Where can you hang a microwave? Where can you hang a mirror? Where can I get a medical examination? Where can you study for free? Where can you study to become a graphic designer? Where can an air conditioner be installed? Where can the outdoor unit of the air conditioner be installed? Where can I find out if there is a ban? Where can I find out about accrued taxes?
Paint selection
Before you start painting the surface, you need to decide how to paint the countertop in the kitchen. The choice of paint is one of the fundamental points when replacing the coating. The ideal option for laminated chipboards is acrylic , which does not create problems during application. Due to the water base, it is easy to apply, dries quickly, and the smell does not last long. It contains no components that can cause allergies. If you are not satisfied with the shade of the dye, then you can buy a white base and pigment it with color.
Paints based on epoxy resins look good, but they also have a number of disadvantages:
- takes a long time to dry;
- may cause allergies;
- The smell lasts a long time.
Pay attention to: Painting walls over plaster: choosing paint and step-by-step instructions for performing the work
Therefore, if you still have to work with such paint, it is better to carry out painting work in the fresh air, where you can leave the painted wooden tabletop until it dries completely.
Acrylic paint is best
Preparing for painting
In order for the painted countertop to please you for a long time, it is necessary to carry out all the work correctly. So, they all take place in several stages. It is impossible to exclude at least one of them, otherwise the paint will not adhere well or smudges and blisters will form.
Removing an old layer
Furniture in the kitchen is most exposed to high temperatures and water. Therefore, to prevent the surface from swelling and to last longer, manufacturers cover it with a thin layer of plastic. If you repaint the countertop without removing this layer, you may not get the best result. Paint applied to plastic will not stay on the surface for long: it will run off or roll off. To prevent this from happening, you must remove this protective coating.
This can be done using chemicals. The main thing here is to be able to choose the right product that will wash off the paint but will not damage the surface.
Or you can remove the old coating mechanically. To do this you will need to use a hair dryer. There is no need to try to soften the coating using a conventional hair dryer. Hold a hair dryer over the surface and you can scrape off the softened paint.
Before painting you need to remove the old paint layer
Sanding the surface of the tabletop
Often, to repaint a countertop, simply removing the first layer is not enough. In order for the paint to last long, it is necessary to sand the surface. The most common means available to any housewife will help in this process. This is the simplest sandpaper, spatula and putty. If you wish, you can buy a sanding machine, this will speed up the process of removing paint.
Pay attention to: Basic principles and secrets of painting fiberglass
To make it easier to sand the coating, it is better to disassemble it into small parts and assemble it after painting. This will ensure that no corners are missed and the surface will be covered evenly. But if you only need to cover the top countertop, it is not practical to disassemble the entire kitchen.
First you need to sand the wooden surface. To do this, rub the wooden base with sandpaper to remove the first layer. You can also use a sanding machine, but this requires skill and dexterity so as not to damage the wood.
Then you need to degrease the surface so that the paint lays evenly. If you wish, you can buy special degreasers at hardware stores, or you can use dishwashing detergent and a sponge. After the sanded wood has been washed with a concentrated soap solution, you need to rinse the surface to prevent the appearance of streaks. And leave everything until completely dry.
Now you need to level the tree. Even after all the manipulations described above, irregularities may remain on the surface, which will become noticeable when repainting. Putty will help get rid of this . It needs to cover all cracks that have arisen and leave until completely hardened. If obvious deficiencies are still visible after this, you can repeat this procedure.
The main thing is to apply all new layers on well-dried putty.
Sanding the table top
Surface primer
The very last step in preparing for painting is priming . This is necessary so that the dye lies on a flat surface. It is not necessary to buy primers designed for wooden surfaces. You can also buy solutions for painting glass or tiles. They are easier to use.
You need to prime the table armed with gloves and a protective mask. Then you need to leave the product to dry. The time allotted for this is indicated by the manufacturer on the primer label.
Universal acrylic primer
Work order:
At first I wanted to paint it like this without removing the door, then I realized that it would be inconvenient. So I took a risk. and took it off. It turned out not to be difficult. True, worries about how to put them back on were present until the last moment. In the end, I also screwed it myself; I didn’t have the patience to wait for my husband))).
I pulled out the built-in lights and wrapped them in a suspended state with masking tape. The same tape was used to protect the walls on the sides of the cabinet, the floor, and the mirrors on the doors. Prepared the workplace. I decided to paint it. on the bed)))! I covered it carefully with polyethylene. And I have never regretted this choice. The bed was large and high, everything fit, there was no need to bend over and crawl on all fours. I prepared approximately equal stacks of books and wrapped them in cling film. They are needed as substrates so that the doors can be lifted and painted as if suspended; the painted edges will not come into contact with a flat surface.
Stage 2.
I sanded all surfaces that needed to be painted. It is necessary to sand lightly, without fanaticism, with the finest sandpaper. Light circular movements. Purpose: to create roughness without removing the laminated layer. If there are dents and scratches, they should be filled with putty at this stage. After sanding, thoroughly wipe all surfaces with degreaser. It will remove dirt, grease marks, and everything that can disrupt the adhesion of the primer and paint.
Stage 3.
Primer. I went through hard-to-reach places with a brush, and the rest with a roller. A thick layer is absolutely not necessary; it must be covered with primer without drips and in a thin layer. Uneven coloring is not a problem, but there should be no gaps. I didn’t prime the rattan inserts; the paint applied well to them anyway.
They are easy to paint - just roll them with a roller; with a brush it is more difficult not to go beyond the edges. Wipe off any blemishes immediately with a cloth. Each layer was dried as recommended by the manufacturer; the acrylic dries “touch” in an hour and, in principle, you can carefully turn the door over and paint the other side.
Stage 5.
I assembled the closet. I screwed the doors and handles. I removed the masking tape and cleaned everything up. At first I planned to keep the doors open for two days, I was afraid that they would stick. Nothing like that - you can close it right away.
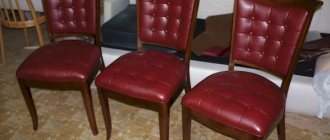
Dresser.
Mirror.
Important!
Acrylic paints dry quite quickly “touch-free”, but polymerize for at least a month; with a primer the process can take even longer. The painted product can be used almost immediately (or it’s better to wait 2 days) and even wiped with a damp cloth. But within a month, the coating remains very vulnerable; it must be handled carefully, not scratched or rubbed with force. If shelves or horizontal surfaces are painted, then it is better not to immediately place things on them that could “stick”, wait until the paint “sets”. Although I immediately put everything I needed on the chest of drawers, nothing stuck).
Here you go. The work is labor-intensive, but I was pleased with the result. The paint job ends up looking no worse than the factory paint, no brush marks are visible. It holds up well too. I haven’t tried scratching, I use the furniture as usual. But usually I don’t scratch it))). Although I will conduct an experiment in a month. The room has been pretty updated). Alas, the photos after compression leave much to be desired; in fact, the colors are brighter and cleaner, but this is not so important.
If you also want to redo furniture and have questions, write to me and I will answer. And if such a rework seems complicated to someone, I assure you that it is not, labor-intensive - yes, but quite doable without any experience. You can just start with internal, unnoticeable parts, or with small furniture, a chair, for example. The rework took three days. At the same time, I managed to cook and... suffer from bronchitis + my leg is still slightly lame after the cast. The “disabled painter” was able to paint, which means you can too))).
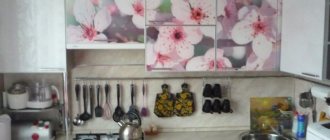
What could be the decor of facades?
Material such as MDF is quite expensive. It is not only high quality and highly durable, but also very environmentally friendly.
Moreover, it should be borne in mind that MDF boards can be given absolutely any color and shade, and this, in turn, means that furniture made from painted MDF can be matched to absolutely any style.
Don't forget about special paints with special effects. You could see them in photos in magazines more than once.
When choosing facades for the kitchen, the customer can give his preference to any shade and make his kitchen either monochromatic or multi-character, choosing different colors for the facades of floor and wall cabinets, but combined in one color scheme. Let's look at the most interesting special effects that facades can have:
- The most popular of them is called “chameleon”. Kitchen fronts made with this effect will never be monochromatic or monochromatic. They will constantly change their color depending on the viewing angle and lighting.
A kitchen with a special “chameleon” effect changes its color
For classic kitchens, facades with a “crackle” effect, which is also called “patination,” are often chosen. This interesting coating helps give the kitchen façade an aged effect. Crackles are small cracks that give modern furniture a classic, aged appearance. You can see options for such kitchens in photos in magazines or on the Internet.
Painting process
Before you start painting, you need to remove all the handles from the tabletop . If this is not possible, then you can wrap them in a layer of durable film to protect them from the ingress of dyes.
Pay attention to: How to paint a wooden table: ways to decorate vintage furniture
Now you need to choose the right roller for painting work. Here it is better to choose a tool made of foam rubber rather than velor. This way there will be no unpleasant streaks or grooves on the painted surface.
If the furniture is not disassembled before painting, hard-to-reach places should be painted with a brush dipped in the prepared solution. You need to choose not the cheapest models, otherwise lint will come out of them, which means it will remain on the painted surface.
The time allotted for painting depends on what paint is chosen, as well as how many layers it is applied in. The drying time of the dye can be found by looking at the label; manufacturers indicate everything in detail. If for effective painting you need to repeat the procedure, then this should be done only after the previous layer has completely dried. Otherwise, the product will be damaged, and the entire process of removal, preparation and painting will need to start all over again.
Tabletop painting process
Required tools and materials
To make a beautiful wooden tabletop and legs, you will need the following building materials:
- sandpaper;
- antiseptic;
- white primer;
- waterproof varnish or paint;
- masking tape.
You need to make sure you have the tools in advance:
- brushes and rollers;
- paint tray;
- grinding tool.
To paint your table while protecting your hands from harmful chemicals, make sure you have rubber gloves.
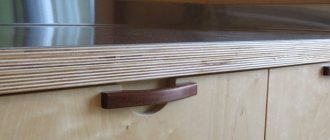
The need to paint a wooden countertop
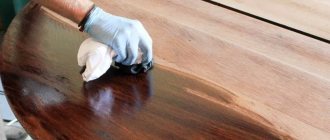
Painting a countertop
Under the influence of moisture and sunlight, the structure of the wood changes, mold appears, and insect pests settle in. In kitchen conditions, wood constantly changes humidity, this leads to changes in geometry (swelling or shrinkage), warping, and cracking. The untreated surface of a wooden tabletop wears out and becomes dirty. Not only does the appearance of the product deteriorate, its strength decreases.
Manufacturers offer a large selection of protective equipment to cope with this problem. Coloring wood allows you to bring a design idea to life, emphasize the natural appearance of the material or change it beyond recognition. For work you will need paint and varnish material, a brush, a roller, and rags. A mechanical sprayer will speed up the work. Before painting, the tabletop must be thoroughly dried.
Stages of painting a wooden countertop:
- removal of existing coating;
- treatment with protective agents - antiseptics, water-repellent impregnations, fire retardants;
- repairing damage, puttying, sanding to obtain a smooth surface;
- primer, it reduces paint consumption and improves its adhesion to the surface;
- coloring.
To apply oil paints, use soft brushes; you need to paint the tabletop 2-3 times, sand each layer. Nitroenamel is convenient to apply with a sprayer. You will have to make 4-5 layers, each of which should be sanded after drying.
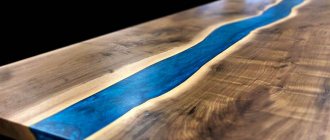
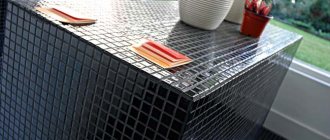
Achieving a stone effect using a glaze additive
A beautiful “stone” surface can be obtained by covering a layer of paint with glisal (glaze). This method is also called glazing. Glizal is a translucent layer that provokes a shimmer of color. To make the tabletop material look like stone, it is advisable to make the appropriate texture.
- Having prepared the surface, paint it with base paint.
- Immediately apply a film to the paint, carefully stroke it with your palm and fingers, making small waves, lines, etc. Remove the film and wait for the surface to dry.
- Apply a layer of glaze. Waiting for it to dry.
Having chosen the appropriate method, you can paint not only the tabletop, but also other furniture, kitchen apron, window sills, doors, etc. as stone.
Source: www.domstoy.ru
Removing old coating
Furniture made from MDF, chipboard, laminated chipboard is covered on top with a thin layer of plastic (polyvinyl chloride, PVC). It is resistant to water and most solvents. Painting over such a film will not work. Even very expensive and high-quality paint will roll and run off. To prevent this from happening, the old coating is completely removed.
- chemicals and reagents. When selecting a remover, it is important to take into account the type of old paint or other coating, so as not to completely ruin the countertop and not spend extra money;
- construction hairdryer The household power is not enough for these purposes. First, the coating is softened under a stream of hot air. Then you will have to work with a scraper.
Both options are quite labor intensive. But, if you want to get a new kitchen at minimal expense, you will have to work.
Expert opinion
Strebizh Viktor Fedorovich, leading construction foreman
We have already mentioned that operating conditions and the nature of the environment play an important role when choosing materials for painting wooden products. If you want to clarify something, please contact me!
How to repaint old chipboard furniture with your own hands
Modern interior items very quickly go out of fashion or lose their attractiveness, but purchasing new ones is not always possible. This raises the question: how to repaint chipboard furniture with your own hands so that the product acquires an attractive appearance? This is not always easy to do, because the result is influenced not only by the correct choice of materials and technology, but also by the accuracy of the process.
The nuances of repainting furniture chipboard
Painting old furniture with your own hands is considered a difficult and risky procedure. The fact is that for the manufacture of interior items (cabinets, chests of drawers, kitchen modules) processed materials with a decorative layer are used. Therefore, it is necessary to correctly determine the type of coating in order to draw up a work plan.
Chipboards used in furniture production can be of the following types:
- Lacquered. Wardrobes, beds and dressing tables made more than 30 years ago are made from this material. Now this furniture is being produced again. The manufacturing technology is that several layers of varnish are applied to the decorative base. Parts processed in this way are used for facades or visible parts of the body. It is very difficult to repaint varnished products; it is much easier to polish if there is damage.
There are other types of slabs, but they are not as common.
Construction portal No. 1
In a room like a kitchen, absolutely everything is important.
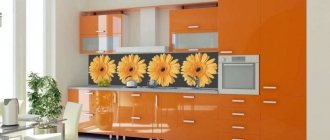
Not only comfort and convenience, but also appearance. Specially designed kitchen designs with thoughtful content and good fittings will help you achieve just this effect. As for the facades, they will provide you not only with beauty and comfort, but also with a good mood every day. For all fans of modern style, painted MDF facades are perfect for kitchen decoration. Beautiful red fronts definitely decorate the kitchen
To finish such facades, polyurethane enamel is used, which is why painted facades can also be called enameled. But the point here is not at all in the name, but precisely in the fact that such facades look not only beautiful, but also modern, irresistible and simply luxurious. Moreover, painted MDF facades combine perfectly with modern kitchen appliances.
Production of painted facades
Painted panels and facades are produced according to a specially prepared scheme:
- First of all, the slabs are prepared. They are cut according to the specified dimensions. Then sanding, priming, and sanding again is done. The appearance and performance characteristics of facades depend on the quality of this process.
- The next stage involves painting the MDF. The slabs are painted not in one, but in several layers. Moreover, each layer is completely dry, dried and sanded. This is done in order to achieve the effect of a glossy photo.
- After painting, the surface of the future facade is varnished.
- Before the work is completed, the final polishing takes place.
As you can see for yourself, the process of painting facades is not that complicated. Looking at various photos of kitchens in magazines or on the Internet, you will see that MDF facades can have absolutely any shape. Of course, in most of the photos the facades will be even and smooth, since this option is the most common.
In general, MDF is a very plastic material that lends itself perfectly to a wide variety of processing. Thanks to such remarkable characteristics, the slab can be given absolutely any shape. In the photo you can see the convex and concave shape of the slab. In addition, you can also do embossing, milling, and also round the edges.
Furniture with bent MDF
During the last, final painting, polyurethane enamel is applied to the MDF board. It is capable of creating a real protective field for the material, filling all the edges, recesses and other volumetric details on the facade. Modern designers use the features of this decorative coating, bringing their wildest ideas and fantasies to life.