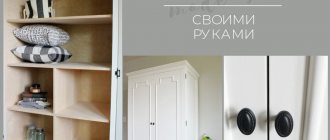
Hi all! A beautiful and practical kitchen is the dream of every housewife. At the same time, it is important to achieve optimal performance in all directions. We rightly put practicality first. And the work surface plays one of the key roles. A homemade plywood countertop for the kitchen can be an excellent solution.
Some people are afraid to use this material. In fact, using a laminated and moisture-resistant plywood board, you can create an excellent, as well as practical, surface for cutting and cooking in the kitchen.
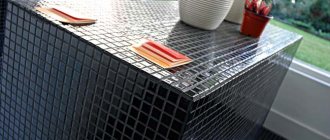
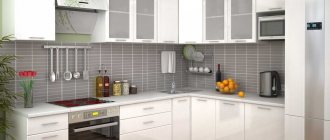
Laminated plywood table top
Today we’ll talk about how to make it, what to assemble it from, and what else you need to know before assembly, as well as during finishing.
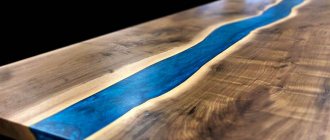
This method is suitable for those who love wood, or rather its structure, and this material is also relatively environmentally friendly. It completely imitates a wood-look countertop for the kitchen.
Material selection
The first step is to buy blanks in the form of plywood sheets.
Of course, you can simplify your task and purchase a custom-made kitchen, including worktops. But today we are interested in a plywood countertop for the kitchen, assembled with our own hands.
Homemade plywood table top
- Variety
. The optimal choice for the manufacture of such a kitchen element would be first grade Sh2 plywood. They are polished on both sides. Such parts do not have surface defects; - Moisture resistance
. Usually they choose between FC and FSF. The first option is only suitable for interior work. This is a priority for a computer or desk. FSF has much higher moisture resistance. Therefore, it is suitable for assembling kitchen furniture; - Laminated layer
. Highly recommended. However, in the kitchen the material will be exposed to moisture, temperature changes, and chemicals. Lamination makes the product more stable; - Plywood material
. In terms of ease of processing and strength, birch plywood demonstrates good performance. But there are other options; - Thickness
_ To make a tabletop, you should take plywood sheets with a thickness of at least 20 mm. Also, to get a more solid surface, you can connect 2-3 sheets together.
Three layers of plywood
All that remains is to purchase the required amount of materials. Here you have to do the calculations yourself, based on the size of the kitchen. Just remember that the width of a standard size table top is 60 cm.
Branch processing
After the pockets are made, you need to decorate them. The easiest way to do this is to stick appliques with fairy-tale characters. It will look beautiful if beautiful embroidery is done on the pockets in advance. The appliqués are attached before the pocket is sewn on.
You might be interested in this Interesting patterns and tailoring of things in boho style
Step-by-step instructions for processing pockets are as follows. The lower side edges are folded into a deep fold. This is necessary to give the pockets volume. To make flaps to close the pockets, they are cut in a trapezoid shape and sewn to the base at the wider part. For fastening, it is convenient to use a Velcro-type connection.
Decorated with appliqués
Rules for working with plywood
To make a kitchen plywood countertop of high quality, practical and durable, you need to learn how to work with the material.
Here it is worth highlighting the following basic principles:
- to connect sheets, use moisture-resistant glue and self-tapping screws;
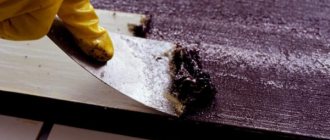
- in order to protect against moisture, each layer can be treated with bitumen mastic;
- make the tabletop only according to the detailed drawing;
- for cutting, it is better to take a jigsaw with a new attachment;
- carefully process and sand all edges;
- when connecting with self-tapping screws, first make holes in the sheets using a drill and a thin drill bit;
- the optimal material for joining sheets is wood glue;
- if the tabletop consists of 2 or more sheets, treat with glue, screw in screws and clamp in clamps;
- the distance between the screws should be about 15 cm;
- open areas of plywood sheets must be treated with sealant and then covered with edges or strips.
Plywood with edge
This is the basic knowledge with which you can get started.
Decor options
Each cabinet and its hanging pockets are individual. To make the organizer bright, you can use fabric with checkered, striped, polka dots, flowers or stars. If you decide to stick to a plain base for the product, then the finished pockets can be decorated:
- buttons, rhinestones (it is better not to use small parts for safety reasons);
- ribbons and bows, lace;
- applique, stripes, embroidery;
- images of cartoon characters and animals;
- the base can be the same color, the pockets are decorated with a pattern.
The right combination and reasonable selection of decor is important. You should not use many small decorative elements on fabrics with a ready-made pattern. If the base is monochromatic, it can be diversified with a combination of contrasting colors.
Tabletop manufacturing procedure
See also
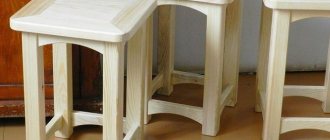
How to make a chair from plywood with your own hands at home
Assembling a plywood kitchen countertop is quite easy. Of course, if it does not provide for complex shapes, as well as corner structures where two elements need to be connected.
Corner plywood table top
In fact, it is an ordinary rectangular sheet. It is only assembled from one thick sheet, or from 2-3 thinner ones.
The build process can be described as follows:
- draw up a detailed drawing of the future countertop;
- prepare the material, preferably a two-layer type of plywood;
- if there are several sheets, treat them with bitumen mastic to protect them from moisture;
- cut using an electric jigsaw;
- connect the sheets together using self-tapping screws and wood glue;
- if this is a countertop for a sink, then you need to cut a hole according to the template (for more details, see the material on how to embed a sink into a countertop with your own hands);
- treat surfaces with moisture-proof impregnations;
- pay special attention to the ends that will be most exposed to moisture;
- let the workpiece dry completely.
Of course, you must have a base on which the countertop will eventually be installed. You can fix it with corners, glue and screws. Special clamps are used to secure the sink.
Fastening the sink to the countertop using special fasteners
Do not forget that under a plywood sink you need to use silicone sealant, as well as rubber or rubber gaskets that come with the sink. This will prevent moisture from coming into direct contact with the plywood. Consequently, this design will last much longer.
I have already written material about moisture-resistant countertops for the kitchen, look at the link
We sew pockets in a locker for a kindergarten with our own hands
To make pockets, you will need to take 2 types of fabric: elegant calico with a printed pattern for the visible sides, and white calico for the lining. Before starting work, it is advisable to wash, dry and iron all fabrics so that they immediately shrink as much as possible.
The finished size of the pockets is 65*25 cm. From the main and lining fabric, cut out 2 blanks measuring 68*27.5 cm. This will be the basis of the pockets for the wrong side and the lining for sewing on the pockets
- From the main fabric, cut out 3 pieces of pockets measuring 22.5 * 27.5 cm. Glue the upper sections of the blanks with adhesive dolikov, cut in the form of strips 1 cm wide. They will protect the upper edge of the pockets from being pulled out during use.
- Also, from the main fabric, cut out 3 parts for the facings of the upper sections of the pockets - rectangles with dimensions of 3.5 * 27.5 cm
- Then you can start sewing. First, iron the lower longitudinal section of each facing 5 mm towards the wrong side.
- Then place the facing on the pocket, face to face, align along the top edges, pin
- Sew the facing with a 7mm wide seam. Remove the pins
- Press the facing seam onto the facing. Fold the facing onto the wrong side of the pocket and iron it, fixing a transition edge 1-2 mm wide from the main part towards the facing, pin along the lower (ironed) edge to the pocket
- Place finishing stitches close to the top and bottom edges of the facing, remove pins and iron
- Prepare all the pockets in the same way.
- Then continue working with the lining of the pockets. First, place the first pocket on it, aligning it along the bottom and side edges and pinning it with pins. Then mark the place where the first pocket begins, add 5 mm upward and draw a line - this will be where the bottom cut of the second pocket will be applied. Attach it to it, pin it and sew it with a seam 7 mm wide
- Iron the second pocket up, stitch the seam of its stitching along the edge
- Check that the pockets are sewn on correctly. They must go one right after the other
- Process the last pocket in the same way.
- You should be left with a small uncovered area at the top of the lining. Measure its height, add 7mm to the seam and sew it in the same way as the pocket. So the entire front side of the pockets will turn out beautiful
- There can be several ways to attach pockets to a cabinet door. The simplest one is hanging loops of ribbons, through which the pockets are hung on small hooks. To make them, cut a grosgrain ribbon of a suitable color, 1 cm wide, into pieces 7 cm long. You will need 5 pieces in total. Scorch the cut of the loops with fire to prevent them from spilling out. Evenly distribute the prepared loops along the upper cut of the front side of the pockets
- Place the main (back) part on the front side of the pockets, align and pin along the edges
- Sew the pocket pieces around the perimeter using a 7mm wide seam, leaving a small unstitched area at the bottom for turning inside out. Remove the pins
- Turn it inside out, straighten the pockets right side out, iron them, stitch along the perimeter close to the edge, and at the same time sew up the opening for turning them inside out.
- Finish the buttons or overcast the loops and sew buttons to close the pockets.
New clothes for kindergarten are ready.
How and with what to process
See also
How to easily make a table for a sewing machine with your own hands
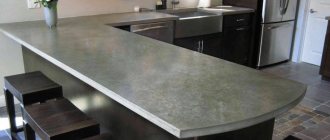
In fact, you already have a plywood countertop for your kitchen. But its current appearance is unlikely to please you.
The question is how to finish or process the product.
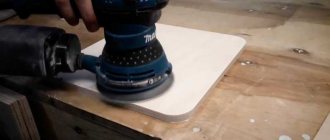
DIY plywood sanding
If you watch different videos, they offer many options for how to cover the structure. Let's look at the main options.
- Varnish and paint
. Popular solution. The only problem is that such a surface will not be so resistant to damage. You will have to be careful when cutting food on it. And you can’t put a hot pan on either. Nevertheless, the option has a right to life. First you need to coat the surface with a chipboard primer. It should be water-based, not oil-based. And then there are 2 layers of varnish or paint; - Plastic
. Another option is plastic opening. You will need to buy special sheets. Take enough to cover it completely, then glue it on. You may need to use a hairdryer to straighten it; - Tile
. Objectively this is the best option. After moisture-proof treatment and priming of the base, markings are made on the countertop for tiles. Use tile adhesive. You can take both small tiles, mosaics, and large panels. Focus on kitchen design. Use cross stitches to ensure even but minimal seams. Fill these seams with moisture-resistant grout.
Laying tiles on a plywood countertop
With tiles, it is important to create a good contact layer.
There are 3 options available here:
- installing a painting mesh using a stapler;
- laying plasterboard with glue;
- creation of a cement pad.
Base for tiles
If you decide to use a cement pad, then you should wait about 2 days before laying the tile itself. This will allow the base to dry properly.
If you are interested, the website has detailed material on how to make a countertop from ceramic tiles for the kitchen with your own hands.
Varieties
In order for the child to have everything he needs, there should be room in the pockets on the locker, for example, for the following things:
- socks;
- T-shirt;
- tights;
- sweater;
- handkerchief.
Organizer for a locker
You may need not only these, but also many other things that are convenient to store in special pockets (for example, a comb, hairpins for a girl). Of course, these things can be folded into a neat pile or placed in a bag, but using pockets is much more convenient. Usually they are sewn onto fabric and hung on the door of the cabinet in which clothes are stored.
Each child can easily find their locker
Pockets with various methods of attachment to the door are used. The following options may apply:
- The most common is the use of eyelets or loops. They are hung on screws screwed into the cabinet door, or hooks attached to it.
- You can use an elastic band for fastening. In this case, there is no need to install hooks or hammer nails. Therefore, this method is convenient, but the elastic pockets will sag.
- Can be attached with adhesive tape. To secure it more securely, it is bent over the top edge of the door.
- You can use double-sided tape to hang the pockets. This method will be convenient in cases where it is not possible to screw screws into the door or attach hooks.
Pink organizer
Each pocket can be made open or closed. The following options can be used:
- Using buttons or Velcro.
- Make sure that the elastic bands go through the top edge.
- Sometimes open pockets are suitable.
- It will be beautiful if they are decorated with embroidery or appliqués depicting your favorite cartoon characters.
You will be interested in Sewing on your own and patterns of interesting shorts
To attach to the door, it is convenient if the fabric with pockets is folded to the outside of the door. In this case, it will be possible to attach a recognizable picture on the outside for each child and write his name.
For your information! This will allow the kindergarten teacher to easily find the things of a particular child, and the child to find out at first glance where his things are stored.
Organizers for children
The models used can be distinguished by pocket sizes:
- Large pockets can be used (for which old jeans are used, for example), occupying the entire door or most of it.
- Sometimes they are made of medium size, the size of half a door or a little larger.
- It is common to use models that use several small pockets.
Note! When choosing how to sew pockets for a kindergarten in a locker yourself, you need to take into account that a small number of pockets will not allow you to efficiently organize the storage of your baby’s things, and too small ones will not always allow you to find enough space for larger, replaceable things.
The pocket closes with Velcro
Tool preparation
The kit depends on how you plan to cut plywood. It is recommended to do this in a furniture workshop, since the process requires high precision and the presence of a plunge-cut saw with an attachment for cutting sheet materials. To assemble the furniture you will need:
- Cordless screwdriver or screwdrivers, drill, drill set
- Hammer, chisels, files, chisel, plane, hammer, mallet
- Plunge saw, jigsaw, hacksaw
- Tape measure, ruler, square
A standard set of tools should be in every home
Summing up
Preparing materials, furniture diagrams and drawings, and directly assembling a kitchen from plywood is a painstaking but interesting task. The headsets are durable and beautiful, the release of harmful substances is minimized. Self-manufacturing of the design allows you to take into account the nuances of a particular room and the individual characteristics of family members. If the set is a complex structure, then the table can be assembled in 1 day. Try to start with this to understand how plywood behaves and what skills will be required to make more complex structures.
Let's do handicrafts together
Why do we need pockets for kindergarten? Mothers who have already raised more than one child know that such an accessory is very convenient to use. As practice shows, closets in preschool institutions are not very spacious. All clothes do not fit.
But we put spare panties, panties, socks, pajamas, and shoes there.
To put everything neatly and neatly on shelves, we came up with original fabric pockets. Of course, you can buy ready-made pockets and simply attach them to the cabinet door, but it’s much more pleasant to make such an item yourself.
You and your child can decorate the pockets with various figures, embroidery, appliqués and other designer little things.
The shape of the pockets should be narrow and long. To avoid getting into trouble, first measure the width and height of the door. Be responsible when choosing fabric. It should be elastic and moderately dense.