But what to do if there is not enough space in the apartment, but you need to store things somewhere. Then you should take care of making a cabinet. You can put various things in it and lighten up your living space a little.
In the store you can buy various cabinets that will easily fit on the balcony space. They are made in different sizes, designs and from all kinds of materials. But they are unlikely to satisfy consumers in size, design, shape and capacity. Since all balconies are different, and as practice shows, they are not particularly large in size. It’s best to make a cabinet for the balcony with your own hands. Then it will exactly match the characteristics of the room, and your personal wishes and requirements.
Peculiarities
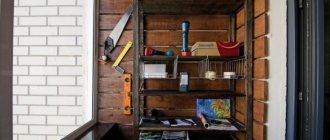
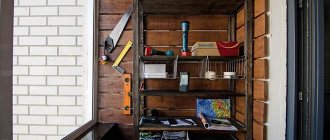
A cabinet on the balcony can become not only a place for storing tools, conservation and other things, but also an interesting design solution. It is recommended to do it in the same style as the interior of the balcony .
An interesting design would be:
A beautiful tabletop on which you can place a vase of flowers or any other decoration.- Location near the chair base. Then the cabinet will also turn into a small table for drinking tea.
- By adding a soft top cover, the cabinet can turn into a comfortable additional seating area.
The main requirements when creating a cabinet for a balcony are:
- Arrangement of built-in furniture without additional walls. Thus, the piece of furniture is more spacious.
- Wise choice of materials. If the balcony is glazed and heated, furniture can be made from any available materials . If the balcony is open and not heated during the cold season, moisture-resistant and durable lumber is selected for making furniture.
- Free passage to windows, doors and passages. Furniture should not clutter up the space or interfere with the entrance to the balcony.
Tip : before making a cabinet, think about whether the assembled product will fit through the doorway. If not, then it is better to assemble it directly on the balcony.
Possible solutions
A cabinet is a low cabinet or drawer. For a balcony, this is the optimal solution, since a tall cabinet visually conceals the already limited space.
The design options that can be made for installation on a balcony are varied:
- with drawers that can be located above each other or on the same level;
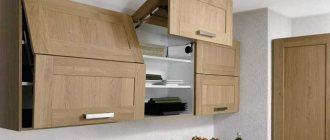
- with hinged or sliding doors. The design of the doors should be chosen based on the space available in front of the cabinet. If it is not enough to open them, sliding ones would be the ideal solution;
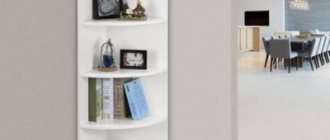
- bookcase with open shelves;
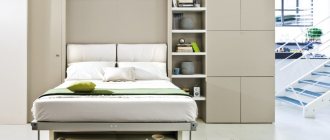
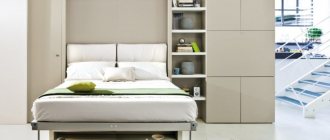
- a tall cabinet, flush with the window sill, the upper surface of which can serve as a tabletop;
- a low cabinet, which is also a bench, its top can be made folding, covered with foam rubber, covered with upholstery fabric;
- on legs, resting on the sides, the space between which is closed by a plinth, on wheels. The latter option is optimal if the structure must be mobile; such a cabinet is easier to move without scratching the floor.
You can install a deeper cabinet at the end of the balcony, and a shallow but wide one under the window. Sometimes the configuration of the balcony is such that it is most convenient to make a corner cabinet; it can be built-in, triangular or L-shaped. In general, built-in furniture without side walls and a backdrop for a limited balcony space is the optimal solution, especially if the balcony is lined with clapboard or wall panels from the inside. Design advantages:
- you will need less material to make the cabinet;
- its useful internal space will expand by a couple of centimeters;
- If the balcony is of a non-standard shape, it is easier to fit built-in furniture into its space.
Constructions
All balcony cabinets are divided according to design features into:
- stationary;
- built-in;
- corner;
- with or without doors;
- with a hinged top cover instead of doors.
In a small space, you can make corner furniture, which will visually hide the boundaries of the space and make the room less cluttered.
If the balcony space is very tiny, it is better to install a cabinet with three doors. They turn out to be shorter in length.
For mobility of the product, it is recommended to supplement it with furniture wheels. This way you can always pull the cabinet out of the corner and gain access to the window sill.
Tip : for spacious balconies you can install a cabinet-chest, a cabinet-bench and other interesting options.
Posting rules
Corner cabinets need to be installed so that they make the loggia functional and comfortable. You should not install a bulky structure in this room, because it will block the room and cause great inconvenience.
When installing corner cabinets on a balcony, you must take into account several important recommendations:
- For placement it is better to choose a place that is rarely used. A good option would be to install a cabinet on the side between the window and the door right next to the wall;
- if there is a wide window sill on the loggia, then you can put a built-in wardrobe directly under the window sill along the wall and all the way to the corner;
- A good option would be a low corner cabinet, which can also be placed between the window and the door. But it will also make a good table.
The placement of corner structures must be completely thought out, this item cannot be installed in any place, otherwise it will make the room cluttered. A compact cabinet should not stand out too much; it is better to arrange it so that it is not visually noticeable.
Drawing
Before making a cabinet, it is necessary to make a preliminary drawing of the product; it must indicate:
- width;
- height;
- depth;
- length;
- number of shelves;
- door sizes and method of fastening them.
Common sizes of cabinets for a standard balcony are:
- product height – 1050 cm;
- depth – 600 cm;
- length - 1000 cm.
It is worth noting that the dimensions mainly depend on the model of the cabinet and its design features. Most cabinets do not have sidewalls, since they are replaced by balcony walls . Also, in built-in furniture it is not necessary to make a back wall. This allows you not only to save on consumables, but also makes furniture items spacious and functional.
As for doors, they can be made:
- Sliding (allows you to save free space).
- Swing. This is a classic option and it requires free space to open the doors.
- With lifting table top. This vertical loading is convenient if you do not plan to place various things on the countertop.
- From roller shutters. This option is very convenient for small room sizes . They open and close easily and are functional. Thanks to their color palette (from white to any bright or dark), you can choose the optimal shade.
Tip : it is not necessary to make legs for the cabinet. Dust and dirt will always accumulate under them. Therefore, it is better to install a piece of furniture on the floor.
When creating a drawing of a cabinet for a balcony, you should immediately think about the materials for its manufacture.
Buy or make it yourself
Everyone chooses to make a cabinet themselves, to order, or buy a ready-made one, depending on their budget, availability of free time and personal preferences. Making it yourself will require a little effort and time, but it will be cheaper. If the money issue is not acute, then you can choose a suitable option in the store.
Important! Before you go looking for a finished bedside table, you need to measure the space on the balcony and decide on the size of the furniture.
The price of a cabinet depends on the materials and fittings. Wooden bedside tables with two hinged doors will cost 8500-9000 rubles. The same model, made of aluminum, costs 13,500-14,000 rubles.
Material
When choosing materials for making furniture, it is worth considering various factors. Namely, the materials intended for the manufacture of a balcony stand must:
Be light in weight. This will allow you to easily move the cabinet from one place to another.- Have small dimensions. So they can easily fit even into small apartments.
- Be resistant to sunlight, moisture and sudden temperature changes.
- Be resistant to corrosion. If there are metal elements, they must be treated with special anti-corrosion impregnations.
- The wood is treated with antiseptics and agents that protect the wood from pests (especially if the furniture is installed on open balconies).
You can make a cabinet for an unheated balcony from:
- MDF. This material has a soft level. Therefore, it is easily amenable to various types of processing. MDF facades can take on a variety of shapes and curves. It has a long service life of several decades. Thanks to the unique production technology of wood fiber boards, MDF is durable, practical and environmentally friendly.
Plastic.
It is resistant to frost, moisture, direct sunlight and ultraviolet rays. Plastic furniture will be an excellent solution for open balconies. It differs in designs, sizes and colors. But it is better to purchase such furniture items ready-made .If you want to make your own cabinet on the balcony out of plastic, try using plastic panels.
- Chipboard. This lumber is practical, durable, resistant to various irritants, stylish and attractive. Chipboard goes on sale in a wide range of colors, which opens up limitless imagination when choosing a design for a future piece of furniture.
- Linings. It is used when covering a room. In such an interior, a lining cabinet will look like a single whole with the balcony itself. To create a bright contrast between cladding materials and furniture items, it is recommended to choose lining with a different shade or texture.
- Tree. Wooden structures look noble and luxurious in any interior. When installing a wooden cabinet on a balcony, the wood must be treated with antiseptics to prevent it from being damaged by negative factors. When choosing wood, it is worth considering that it can be: strong, soft and hard. Hard rocks are quite difficult to work with. On the balcony, the easiest way is to build a cabinet from pine or birch . These lumber are affordable and easy to process.
Help : all of the above materials are resistant to negative factors (high moisture, sudden temperature changes, damage from direct sunlight).
As for the manufacture of furniture for a heated and glazed balcony, here you can use:
Chipboard.
Such furniture will be absolutely no different from furniture items located in living rooms. Laminated chipboard is distinguished by: moisture resistance, scratch resistance, a wide selection of textures and textures, and a variety of colors.Even a beginner in this field can cope with making a cabinet from laminated chipboard. Since the material can be easily processed with hand or electric tools.
- OSB. This material is made from wood chips. It is natural and safe for people. The main advantages of making furniture from OSB include: saving money, durability, and ease of use. It is advisable to use OSB in the manufacture of back walls, shelves, and drawers. This material can withstand heavy loads and has a perfectly smooth surface. To decorate OSB boards, they can be varnished, painted, decorated with leather or mosaic.
- Thick plywood. A material with a thickness of 8 mm is suitable here. Plywood has excellent technical characteristics. Here it is important to pay attention to the type of wood that was used in the manufacture of lumber . Attention is also drawn to the type of gluing of plywood sheets to each other. The positive aspects of using plywood for making furniture include: moisture resistance, resistance to chips, scratches and deformations, ease of use and operation.
Attention : when choosing laminated chipboard as the manufacturing material, you will need to trim all the parts so that the cabinet is as resistant to negative factors as possible.
Various materials are used as trim edges:
- PVC edge. It is distinguished by a wide range, long service life, resistance to moisture, scratches and deformation. You can glue the PVC edge with your own hands if you have a hair dryer.
- Edge tape. This is a more budget option. You can glue the tape using an iron. It is not as resistant to scratches and chips, but has an attractive appearance.
Tip : As for the color scheme, designers recommend installing furniture in light colors on small balconies. And on spacious loggias you can make furniture in wenge or dark walnut color.
Tools
When making a cabinet (its dimensions are indicated in our drawing), you will need to prepare the following individual materials:
lumber (chipboard, plastic, MDF, plywood or any other material of your choice);- wooden blocks with a section of 40 by 40 cm;
- metal corners;
- fasteners for shelves and hinges for doors;
- pens;
- screws and self-tapping screws;
- beams for the frame to give rigidity to the product.
When making a cabinet for a balcony, you will need the following tools:
- hacksaw;
- screwdriver or drill;
- building level;
- marker, pencil and tape measure;
- screwdrivers;
- hammer.
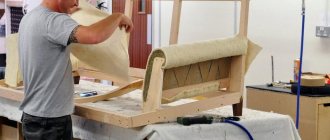
How to make it cheap and beautiful? Step-by-step instruction
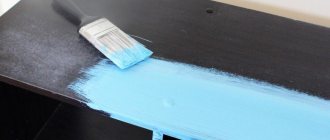
Before manufacturing the cabinet, its individual elements are prepared. They are cut from selected materials with an electric jigsaw. Also, details of the necessary elements can be ordered from a specialized company for cutting laminated chipboards.
In our case, the cabinet will not have side and back walls . That is, we will assemble a built-in cabinet that is spacious, compact and functional.
So, a step-by-step description of assembling a cabinet on a balcony will look like this:
First we assemble the frame. For this purpose, beams are useful, which are fixed parallel to the outer wall of the balcony.- We attach a support for the base of a piece of furniture to the floor covering.
- We check the accuracy of the location of the prepared parts with a level.
- We strengthen the supports in the load-bearing parts with metal corners.
- The load-bearing bars are connected to the stiffeners.
- Next, the hinges are installed and the doors are hung.
- The table top is laid on top and secured with corners.
- The final moment will be decorating the joints.
With a minimum of effort, you will have a stationary cabinet.
Tip : you can also put a regular wooden or aquarium cabinet on the balcony. A folding table and a balcony cabinet will increase comfort.
Taking measurements
It is convenient to take measurements using a tape measure, because it is flexible. When taking measurements, it is better to make a drawing and apply the dimensions directly to it. Do not forget to add a tolerance of 5 millimeters on each side, so that later the assembled cabinet can be inserted into place.
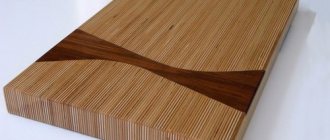
After taking measurements, we make a list of the so-called cutting, that is, the dimensions of the cabinet parts (width and height). We take these dimensions to the workshop where they cut MDF, fortunately there are many such “offices” now. There you choose a color and order covering with PVC tape. This will give the bedside table a solid appearance and increase its service life, since it is planned to use the bedside table on the balcony, where the microclimate is a little harsher than in the apartment. As a result, we get a stack of “spare parts” which, we hope, will turn into a bedside table.
Boards prepared for the bedside table.
Photo
In the following photos you can see options for decorating the resulting furniture: