If the owner of a summer cottage is a skilled builder, then the construction of the bathhouse and interior decoration is usually carried out himself, according to his own taste.
Photo of the interior inside the bathhouse
Since the main place in the room is the steam room, special attention is paid to its design. Regardless of the size of the room, it is important to correctly install the shelves for the bath, choose a convenient shape, reliable material for assembly, and think about the placement of each part.
Photo: the walls in the steam room are lined with pressed blocks of sea salt
To simplify the selection of raw materials and avoid manufacturing errors, we suggest reading this article.
What elements do the shelves consist of?
The main ones in this design are:
- Frame. Often this is a frame made of timber into which boards of permanent or collapsible flooring are fixed. The thickness and shape of the parts resemble the legs of a bench, which are connected to each other by transverse bridges. May have a stepped structure.
- Flooring. It consists of boards that are fixed in increments of 1–2 cm. They are laid on top of the frame. Performs the function of a couch, bench. It can be removable or stationary. In the first case, it is convenient to dry it before each use of the steam room. For convenience, it is equipped with a backrest and a stand under the headboard.
There are a number of requirements for shelving in a bathhouse:
- Low level of thermal conductivity. The material should not become very hot at a constantly high temperature. Therefore, the main raw material from which shelves are usually made is wood.
- Wooden racks are designed with rounded corners to avoid injuries during operation.
- The strength of the frame is very important so that the supports can withstand significant weight loads.
- The surface of the bench must be free of any elements made of iron or other metal. Because metal heats up very quickly and can cause serious burns.
When installing shelves for a sauna, it is recommended to leave a gap of up to 10 cm from the wall for rapid drainage of water droplets and better steam circulation.
Impregnation of wood shelf
Wood intended for canopies must be treated with special impregnations to prevent rotting and the appearance of fungus and mold, since the steam room is a place of high humidity.
- There are special impregnations that are designed for such purposes and contain only natural ingredients: oils that create a protective film. When using the steam room, no harmful substances are released.
- There are a number of antiseptics that are designed to impregnate wood. When purchasing a wood preservative, you need to choose one that is intended for interior work, since these days there are many wood impregnations, but not all of them are intended for indoor use.
You can use folk remedies: Use linseed oil, copper sulfate, Finnish mixture.
Choosing the type of wood for making benches and deck chairs
To determine suitable raw materials, consider the following:
- The use of softwood lumber is contraindicated. Otherwise, when heated, resin begins to release, which sticks to the body.
- The wood must be resistant to conditions of high humidity, constant temperature changes, and have high-quality antiseptic protection. Otherwise, the shelves will rot and quickly become deformed.
- There should be no chips, burrs or other defects on the surface.
- Low thermal conductivity of the material is necessary so that the benches do not heat up and this does not cause discomfort for vacationers.
Let's look at the properties of the most popular breeds that are suitable for shelving in a Russian bathhouse.
Aspen
Very popular among residents of the private sector due to the availability of raw materials and low price.
Other benefits of aspen include:
- resistant to moisture;
- does not rot;
- does not deform;
- has healing properties;
- cleans the air of bacteria and germs;
- does not require maintenance.
It is generally accepted that products made from aspen restore strength, give vigor, and act as a neutralizer of negative energy.
From constant exposure to moisture, aspen can change its shade to grayish.
Thermal aspen
Thermal aspen is wood that has been treated with high temperatures (over 200 degrees) and steam.
Resulting in:
- The humidity of the raw materials has decreased.
- Essential oils evaporated from the structure, which means the material became more resistant to fire.
- Density has increased. Therefore, thermoaspen absorbs less moisture.
Thermal aspen does not swell, does not rot, and lasts a long time. This material is considered a reliable decorative option for finishing bath rooms. Thermal aspen shelves and furniture look very beautiful.
Disadvantages: fragility and high price.
Larch
It is characterized by increased resistance to moisture. Has a strong solid structure. It is chosen for the manufacture of furniture, decoration in saunas, open verandas and gazebos.
Larch is an expensive species, so bathhouses are not often decorated with it.
Alder (black alder)
Alder is the optimal raw material for making steam room benches yourself.
Its advantages:
- high strength;
- low thermal conductivity;
- durability;
- wear resistance;
- does not deform;
- does not change color even after years;
- perfectly tolerates temperature changes and constant humidity.
More expensive than linden. The structure is uniform.
To contrast the colors in the steam room, you can assemble racks of light and black alder.
Linden
Linden is often used to decorate steam rooms. It has a pleasant aroma that has a relaxing effect on a person.
Among the advantages of raw materials:
- it is convenient to handle;
- a light weight;
- ease of installation;
- smooth surface;
- even over the years it does not lose its attractiveness;
- tolerates temperature changes and humidity well.
For homemade shelves, it is recommended to take thoroughly dried linden, otherwise the structures will begin to darken.
Linden is more expensive than alder, but in terms of quality and properties these species are almost equal.
Poplar
It is distinguished by soft and easy-to-work wood. Solid poplar has a light brown, sometimes white tone. Light in weight.
In terms of resistance to moisture and temperature changes, it is inferior to other breeds.
It is customary to make furniture and carved decorative elements from poplar.
Maple
The main advantage of maple is its strength. Products made from this raw material are difficult to break or damage, they do not crack.
Other advantages:
- long service life;
- ease of processing;
- affordable price;
- resistance to moisture, wear;
- homogeneous structure.
Examples of maple with a beautiful texture are the “sugar” and “bird’s eye” types.
Abacha (abashi, abash)
Abash has gained wide popularity in recent years for finishing and making furniture for baths and saunas.
This is the name of African oak. It differs from other breeds in a lot of advantages:
- The raw material tolerates temperature changes well.
- Due to its strength, it can withstand heavy weight loads.
- Looks beautiful.
- Lasts a long time.
- Does not rot, does not crack.
- When heated, abash emits a pleasant odor, which has a positive effect on the human respiratory system.
- Wood without knots. It is easy to handle. The surface is smooth.
- Even over time it does not lose its original appearance.
In the absence of high-quality ventilation in the steam room, the abash begins to darken in places. This is expensive material.
Abash is considered to be the leader in decorative and working properties among wood species that are suitable for creating sauna shelves.
But benches made from budget alder or linden will look no worse and last a long time.
Step-by-step recommendations for making your own wooden bath shelf
Before you get started, there are a few key points to consider:
- What kind of things is it intended for storing?
- How important is it to use a certain type of wood, such as oak or linden;
- What is the maximum load-bearing capacity it should provide? The strength of the structure and, by the way, its weight will directly depend on its “carrying capacity”;
- Where in the space of the bathhouse it will be located;
- The characteristic features of the interior are determined with which it must be consistent or, as newfangled high-flying designers like to say, “rhyme.”
In defiance of newfangled designers of different heights, we present the “Lyra” bathhouse shelf, which will allow the owner of a bathhouse with such an accessory to be known among his neighbors as a great expert in the field of chamber symphonic music and, possibly, foreign rock. As part of the variation of the same “Horseshoe” shelf, you can constantly adhere to the tradition of preserving valuable bath items under the constant protection of this well-deserved Slavic amulet.
What is necessary:
- Board 500 mm wide, 750 mm long and 25 mm thick for the frame;
- Three strips 750 mm long, 60 mm wide and 25 mm thick, for decorating the internal set;
- Two boards 15 mm thick, 200 wide, and 400 long for use as the load-bearing plane of the shelf in horizontal projection;
- Copper busbar 35 mm high and 1 mm thick for edging;
- A set of hanging fasteners for installation at three points and standard wood screws for fastening elements together, 25 and 35 mm long.
- Jigsaw with blade for curved cutting;
- Compass, ruler, bubble level for marking and assembly;
- A screwdriver or screwdriver with a working part for the specific self-tapping screw used.
The main sequence of work is as follows:
- Using marking tools, the outline of a lyre or horseshoe is drawn along the outer dimensions of 500x750 mm.
- Using a jigsaw, the outline is cut out from the rear sight.
- An internal vertical set is being recruited.
- The horizontal set is outlined by a copper busbar.
- A horizontal set is mounted.
- If the shelf is made in the “Lyra” version, the outer contour is sanded and coated with transparent polyurethane varnish. In this case, tinting a quarter or half a tone darker than the original color of the wood is allowed. In the “Horseshoe” version, the outer contour is painted with decorative acrylic water-soluble paint in the color of natural metal. On the surface of the product you can imitate defects and fasteners in the form of nail heads forged by a village blacksmith.
- Seats for fasteners are marked on the wall, and hanging elements are fixed to the counter parts of the shelf. The product is mounted on a wall with horizontal control using a bubble level.
Types of steam room shelf designs
Depends on the area and height of the room.
The standard placement of benches is along one or two walls, parallel, perpendicular to each other.
Proper installation of shelving involves placing it away from windows. Since in a steam room there is always a risk that the glass will burst due to high temperature and the fragments will injure vacationers.
Stepped
They are of the stationary type. They are more common than other species.
The shelves are fixed to one wall where there is no window. A multi-tiered structure is created according to the principle of steps.
For a village Russian bathhouse, the presence of a three-story bench is considered standard.
This arrangement is convenient because with each tier the degree of heating increases.
It is important to take into account that the distance from the ceiling to the top shelf must be at least 1.2 m. This distance will be comfortable for a person to sit or hover. In addition, the upper tier is attached above the line of the heating boiler or stove.
Folding
Another name is a compartment shelf. The principle of arrangement and operation is reminiscent of wall shelves on a train, which can be folded down when necessary.
Suitable for a steam room with a small area. The shelves are fixed on two opposite walls parallel to each other. The upper shelves fold down, the frame of which is formed from support legs with transverse crosspieces.
There is an option for fixing without racks, as if in a hanging position. Used for light weight loads. Requires competent calculations. Not suitable for DIY production.
To remove the pull-out bench, it is lifted towards the wall and lowered to its original position to open it.
Removable
They are also called collapsible, folding. This mobile design is convenient in steam rooms with a small area. Simplifies the process of drying the flooring.
The upper and lower benches are completely removable.
Corner (L-shaped)
For small steam rooms, corner benches are often installed.
They take up little space, but are not inferior in comfort to other types.
The upper and lower elements are adjacent to one partition along the longest wall, the middle ones along the short one, which is located nearby.
There can be 2-3 steps along each partition.
Regimental specifics
In essence, the shelves are a wooden flooring, a kind of bench, which is located along the wall of the steam room. When making shelves, you need to take into account the dimensions of the people who will visit the steam room.
Each visitor should be able to lie freely on the shelf. The multi-tiered shelves are due to the fact that hot air rises: it is always hotter under the ceiling of a steam room than a meter from the floor.
Thus, each visitor to the steam room can choose a comfortable temperature for themselves while relaxing on the first or second tier of shelves. The multi-tiered regiments are not limited to two tiers; there can be more. It all depends on the preferences of the bathhouse owner.
Arrangement of shelves in the steam room for comfortable movement
It is considered standard to install three-tier shelves in a bathhouse. The lower one will be cooler, the upper one will be the hottest.
The design is designed so that an adult can comfortably sit on any of the benches.
To do this, it is important to take into account recommendations regarding the main dimensions of the product.
Height
There are a number of optimal height indicators:
- 40‒60 cm. Distance between the first and second benches.
- 1.1 – 1.2 m. Height between the lowest step and the second shelf.
- 20 cm. This is the minimum allowable distance from the floor to the first step.
If among the regular vacationers or owners there are people of non-standard height, then the height and distances between the shelves should be selected individually.
Length
The recommended minimum range is from 1.5 to 1.8 m. With a length of 1.5 m, a person will be able to sit on a bench with their legs bent at the knees. On a 1.8 m shelf, most vacationers will be able to lie down at their full height.
Width
For the lower tier, which most often acts as a footrest, 40 cm is enough.
The standard width is 60 cm. With this size of the flooring, it will be comfortable to sit, but not to steam while lying down.
But on a 90 cm shelf it is already comfortable to lie down and sit with your legs bent.
There are benches 150 cm wide. Here the choice is individual. If the area of the room allows, then why not make them wide.
What should a bath shelf be like: design features
Most often in baths you can find two-tier structures. In this case, maximum functionality is achieved with the minimum area required for arranging the shelf. As a rule, the lower tier is used for sitting, and the upper tier is for lying. This design must be done correctly. A slight difficulty is that the width of the second floor must be sufficient to make it comfortable to lie on.
A comfortable stay in the steam room of a bath largely depends not only on the microclimate, but also on the quality and convenience of the shelves located
One of the most important criteria is the thickness of the structural components of the canopy - the log. The cost of the material depends on this indicator. The pattern in this case is as follows: the thicker the logs, the more expensive they are. However, it is not recommended to purchase products that are too thin, as they will sag under human weight.
Helpful information! To save on the construction of a bath shelf, it is recommended to place individual logs at a short distance from each other.
Before assembling bath furniture, you need to decide on its dimensions. The shelves in the steam room can have different sizes and shapes. However, there are traditional, most common dimensions. In accordance with this standard, the total height of the structure should be 70 cm. The distribution of sizes between floors is as follows: for the 1st tier - 40, and for the top - 30 cm.
The distance between the lags is a mandatory rule that should be strictly adhered to. However, you should not make the distance too large. If necessary, these products can be made independently, but to do this you need to have at least minimal wood processing skills.
It is advisable to leave a distance between the shelf and the ceiling of the steam room, in this case you can not only lie on it, but also sit comfortably
Before you begin assembling the bathhouse shelf, you should prepare materials, tools and make a drawing, according to which all subsequent work will be carried out. Its creation must be approached with all seriousness, since inaccuracies in the drawing will lead to installation errors.
You should take into account the number of people for whom the steam room was designed. The size of the room also plays an important role, so you should focus on them as well. As for choosing a location, it is not recommended to place shelves near the window opening. As a rule, this structure is placed along one of the blank walls, complementing the interior with benches.
Blueprints
To simplify and speed up the process of making benches for a steam room, it is recommended to draw up a visual diagram of their structure and location.
The dimensions of each part are marked on the drawing. If necessary, sketches of shelves are made from different angles.
The figure clearly shows whether the design of the benches will be folding, stepped or removable.
The location and distance of the elements from the stove or boiler are indicated.
A separate drawing should show the overall picture of the bathhouse with the location of the steam room, shower room, and rest room (if provided).
Don't forget to indicate the height of the ceilings and the distance of the bottom shelf from the floor.
The name and consumption of material for the benches (lining, board) are indicated, and the fastening elements are noted.
Material selection
When arranging a bathhouse with floors, you need to exclude metal, plastic and glass from the list of possible materials. Shelves made of these materials will not withstand the special microclimatic conditions of the bathhouse, and will quickly become unusable. The only right choice is natural wood. However, there are also some requirements for it:
- low thermal conductivity;
- resistance to the negative effects of moisture and high temperature;
- wear resistance;
- uniform and dense wood structure;
- absence of resins and pungent aroma.
Due to the presence of the latter requirement, some tree species are excluded immediately. We are talking about coniferous wood and cedar. They cannot be used for shelves in a bathhouse.
Linden shelf for a bath
Linden wood is considered one of the most optimal materials for arranging sunbeds in a bathhouse. This is explained by a number of advantages:
- wood processing is not difficult;
- the linden tree is almost completely free of knots;
- wood heats up slowly;
- in humid conditions, linden practically does not absorb water and dries quickly;
- When heated for a long time, it emits a light, pleasant aroma.
In addition, the healing properties of linden have long been known. The resins contained in its wood have a beneficial effect on the respiratory system.
The only nuance that needs to be taken into account when choosing linden as the main material for shelves in a bathhouse is that in conditions of high humidity and temperature, the wood can darken quite quickly.
Aspen shelves in the bathhouse
Aspen wood is considered one of the most budget-friendly options for finishing a steam room and creating shelves in a bathhouse. It perfectly withstands the rather difficult conditions typical of a steam room. Aspen shelves do not absorb water and are not subject to rapid heating.
In addition, aspen has gained popularity due to its low number of knots and cracks. This allows you to design fairly complex and massive structures.
When heated, aspen releases a light, pleasant aroma. The resins contained in wood have a beneficial effect on the respiratory system. Thanks to the special chemical components contained in the resin, after visiting the steam room a person will experience an emotional uplift, a pleasant state of health and a good mood.
The only disadvantage that aspen has is the possibility of the tree rotting from the inside. Visually the wood will appear flawless, but inside it may be damaged. This is why experts recommend cutting several boards when purchasing aspen to check the quality.
Alder and black alder
Lately, alder has become popular. This tree species has gained recognition due to its unique qualities:
- ability to withstand significant mechanical loads;
- the special structure of wood, due to which it does not absorb water, is characterized by an excellent level of wear resistance;
- low level of thermal conductivity, due to which the wood heats up very little;
- absence of deformations and cracks for a long period of time, even after several years the external attractiveness of the wood will remain at the same level.
If the project involves arranging shelves in dark colors, then you can use black alder. This is a special type of wood that has a darker texture, gives a pleasant aroma when heated and is practically not susceptible to rotting.
Due to the fact that the thermal conductivity of alder is minimal, using this material for shelves in a steam room would be the most ideal option. There are no knots in the wood, so lying on an alder bench will be pleasant and safe, as it will not heat up.
Larch shelves in a bathhouse
Larch is traditionally considered the best option for arranging shelves in a bathhouse. However, it is found only in large buildings, as it is characterized by a fairly high cost.
Wood of this species is popular due to its minimal level of tangential swelling. The value of this parameter does not exceed 0.3%, which in comparison with other types of wood is considered an excellent indicator.
In addition, the wood is resistant to decay and practically does not absorb water. Larch is characterized by one feature: when completely immersed in water for a long period of time, the wood only becomes stronger. Due to this, larch is often compared to oak.
How to make shelves with your own hands - step-by-step instructions
After developing the drawing, you can proceed to preparatory work.
Materials, tools
Materials you will need:
- Bars or thick boards for the frame. Standard section - 50*50 mm, 50*80 mm, maximum permissible - 100*100 mm.
- Edged boards, lining for flooring. Thickness - up to 25 mm. The width is taken no more than 4 times the thickness. The quantity depends on the fastener pitch. The recommended fixation step is from 1 to 2 cm.
- Fastening elements - galvanized self-tapping screws, steel corners. To make folding shelves, stainless steel hinges are also used.
The smaller the cross-section of the frame supports, the more often they will have to be installed in order to evenly distribute the load.
The wood used must be free of defects. The surface is checked for roughness.
Tools you will need:
- screwdriver;
- hacksaw for metal;
- construction mallet;
- hammer;
- tape measure, pencil;
- chisel;
- jigsaw;
- sandpaper.
Next, you should start making future benches.
Build process
It is necessary to pre-cut the supports of the required length and transverse lintels (the length is determined by the depth of the shelf).
The assembly steps are as follows:
- The frame is made from the top tier, close to the wall.
- Support bars are fixed to the walls along the edges of the future shelf and in the gaps. This creates a binding belt.
- Opposite these supports, a second row of racks is placed in parallel and connected to the first row by transverse jumpers.
- The supports are fastened together using the same horizontal jumpers, forming an external frame.
- The frame of the lower tier is attached to the outer trim. The procedure is repeated step by step in the same sequence.
It is faster to assemble the frame using steel angles, but craftsmen believe that cutting into half a tree is much more reliable. To do this, a groove is cut along the edges of each element, into which another element with a protrusion of a suitable size fits tightly.
To minimize the effect of moisture on the supports, before attaching the flooring, rubber or plastic gaskets are fixed to them.
To lay the flooring:
- Take a 20*120 mm edged board. Length - 3.5 m.
- Laying is done perpendicularly, along the frame posts.
- Fixed with pins or wooden nails. Step - 1-2 cm.
- The corners are rounded and carefully polished.
- An alternative is to secure the boards with galvanized screws from the inside of the frame so that they point outward.
- External screwing of screws from top to bottom is allowed, but the caps must be carefully sunk into the board so that when heated, the person sitting on the shelf does not get burned.
Vertical cladding between tiers is not required and is optional. But it’s better to do it if you want to give the whole structure integrity and strengthen it.
Vertical cladding also has its disadvantages. The main thing is that this becomes an obstacle to the wood drying quickly and complicates maintenance and cleaning of shelves.
In Finnish saunas it is customary to make a backrest above the top shelf. You can buy this accessory ready-made or assemble it yourself.
The partition is covered with slats up to 2 cm thick in increments of 40–60 cm, on top of which boards or lining are fixed.
Advice from the experts
Experienced craftsmen advise using the method of cutting into half a tree instead of steel corners. Rubber pads or plastic plates are placed under the racks to reduce the effect of moisture on the wood body.
During installation, it is necessary to use a building level to identify frame deviations.
- The screws should not stick out, so you need to carefully select the length of the material and compare it with the thickness of the board.
- It would be a good idea to treat the wood with antiseptic solutions, which are recommended for use inside the bath complex.
- The impregnation should not release toxic substances when heated.
After bathing procedures, it is necessary to thoroughly ventilate the room and wipe the benches with clean cloths. Building shelves in a bathhouse will not be difficult, and properly selected wood will last for decades, giving a feeling of comfort and bliss when visiting the steam room.
Sanding the finished structure
It is necessary to sand the boards so that they are comfortable and safe to sit on. It is recommended to perform both before assembly and after its completion.
This is done with a sanding machine or manually with sandpaper, gradually moving from coarse-grained to fine-grained paper.
After treatment, the surface becomes smooth, without burrs or knots, which means it will last longer.
Common shelf shapes
When making shelves for baths, take into account several shapes that can be given to them:
- Stepped shelves. They are placed along one wall using the principle of steps. Massive benches with several tiers are being constructed. Those occupying the upper shelves feel a higher temperature. The heat in the steam room is always concentrated in the upper part.
- Varieties of corner shelves. The advantage is its compact size. A large spatial volume is not taken up. Installing corner structures is an ideal solution for small baths. The shelves are arranged in such a way that the upper and lower parts are adjacent to one partition. The intermediate part is attached to the adjacent wall.
- Designs of prefabricated models. They are convenient for small steam rooms. Most often, the installation of removable shelves occurs at the bottom and top of the structure. When the shelves are dismantled, warm air accelerates. In turn, this allows all wooden elements in the steam room to dry much faster.
- Shape of folding shelves. The second name they have is compartment shelves. The design of the compartment shelves in a railway carriage is similar. The design works simply. The upper shelf can, if necessary, be raised and installed vertically to the wall surface. This functionality is beneficial. The design of the folding shelves allows you to save space in the room.
It is necessary to competently equip the resulting structure, equipping it with all the necessary components.
How to cover shelves in a bathhouse
Since the furniture and decoration in the steam room are exposed to high humidity, they require mandatory protection.
The exception is baths with good ventilation, where the wood quickly dries naturally without losing its shape and beautiful appearance.
To avoid rotting, deformation, and premature deterioration, wood is treated with special compounds:
- Acrylic varnishes. Create a protective film on top. They tolerate high temperatures well. They don't peel off. Non-toxic. Suitable for processing wood in baths and saunas.
- Impregnations. Antiseptics perfectly resist the process of decay and the formation of fungus. Increases the resistance of raw materials to moisture. They penetrate deeply into the structure, thereby significantly extending the service life of products.
- Wax, linseed oil. The wooden surface is rubbed, acquiring shine, becoming resistant to moisture, with a pleasant aroma. It is recommended to apply in two layers. The validity period is short, so in a year, or even earlier, the procedure will have to be repeated.
- Bleach. It is needed not for protection, but to give the dark wood a lighter shade.
Products that contain chemical components are prohibited for use in baths, since when heated they begin to release toxins that are dangerous to humans.
We recommend that you read our other articles on the topic:
- What is the best wood preservative to choose?
- Types of wood impregnations
Video description
The following video tells how to make shelves in a bathhouse with your own hands: a step-by-step description of all stages:
For vertical cladding, you can take lumber of a smaller thickness, since they will not experience a heavy load.
All upholstery elements, including the lounger itself, backrests and decorative details, are recommended to be made from wood of the same species, which reacts equally to all changes in the environment.
Protective treatment
Protective treatment with antiseptic compounds will help extend the service life of the shelf and maintain its original fresh appearance for a long time. It is especially necessary if the steam room does not have a ventilation system or the shelf design is closed.
When purchasing a protective composition, you need to make sure that it is intended specifically for use in saunas and baths, since all other products can release toxic substances when the temperature rises. Varnishes, paints, drying oils, solvent-based impregnations and various wood bleaches are not suitable for this purpose.
If desired, you can look for a tinting impregnation to change the shade of the wood, giving it a more noble look. Or tint only the decorative elements and cover the main structure with a colorless compound.
An example of using tinting compositions Source vodabereg.ru
Design
The decorative side of the shelves is no less important. Benches made from wood of different shades (dark and light) look interesting.
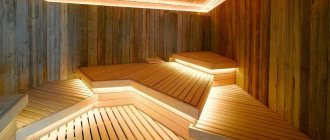
Particular attention is paid to lighting. Benches equipped with built-in LED lighting are an excellent way to decorate a steam room in an unusual way. .
The choice of lighting color is individual. Red makes the steam room visually even hotter, green – relaxes, blue – gives calmness.
It is allowed to install spotlights on the ceiling directly above the shelves. This will make the room seem larger.
You can approach the decoration of corner seats creatively by designing a carved or wavy backrest.
There are benches that resemble the shape of a chaise lounge or where the upper tier very smoothly transitions into the lower.
Seats with separate backs and corner carved fasteners for hanging towels look good.
If the room allows, then a separate stand for slippers and shelves for soap products are equipped.
By playing with the shape, design of the benches, and their placement, the steam room can be decorated in both antique, high-tech or modern style.
About terminology
However, you will have to start by clarifying exactly what the places for sitting and lying in the steam room are called. In the singular we say “shelves”, and not “canopy” and not “shelf”, and in the plural we say “shelves” (emphasis on “and” - polki), and not “shelves” and not “canopies”.
IMPORTANT! What do you name the yacht... this is the answer Google will give you to your query. If you ask illiterately, you will receive materials written by illiterate people who, most likely, do not understand the subject at all.
Features of care
To keep your racks clean and extend their service life, you must:
- Serious stains and dirt should be removed with a brush.
- For easy regular dust cleaning, use laundry soap.
- The use of any chemical detergents or washing powder is not allowed.
- After each visit to the steam room, thoroughly dry the benches and the entire room, and monitor the proper functioning of the ventilation.
You can make benches in the steam room yourself, following the instructions of the masters. It is important to take a responsible approach to choosing the type of wood, carefully consider the shape, size, location and treatment of the shelves so that being in the steam room is comfortable and safe for health.
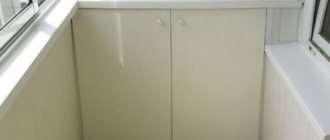
Types of bath furniture: photo gallery
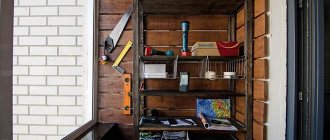
You can put a samovar in the dressing room
An interesting option is a designer bathhouse made from cut boards. The knightly style is suitable for decorating a Russian bathhouse.
A lived-in dressing room makes the bathhouse cozy Furniture for a simple rustic log bathhouse is easy to make with your own hands
A large bathhouse for many people is equipped with three-tier shelves Curved lines make bath furniture stylish and original For convenience, you can equip the shelves with lighting
Bathrooms in a Russian bath can be made of any width
You can make bath furniture with your own hands. The described recommendations and instructions will make the process quick and easy.
Pull-out shelf
Retractable shelves in a bathhouse are a type of folding ones. Also a way to save space. Another advantage of these folding structures is noticeable when the bathhouse is frequently used by an uneven number of people.
At any time, all unused shelves can be pushed back and protected from unnecessary moisture. This way they retain their fresh appearance of natural wood longer.
A retractable shelf does not require such specific fittings as a folding one. It's much easier to do. If we take into account that the shelves in modern baths are arranged in steps in height, then there will always be a place for a sliding panel.
The good thing about collapsible shelves in a bathhouse is that they can be easily replaced with new ones. This option is implemented when the steam room should look fresh and presentable. Convenient pull-out shelves meet these criteria fully. With frequent use, you can make several spare canopies in advance - in reserve.
Dimensions
Let's immediately divide it into frame and flooring, and we'll tell you separately about what to put a solid board on.
For frame
The most common size, which is often used to create frames, is a 50x50 mm block.
We came across a video in which the author says that he used a 40x30 mm block. In another, the racks in the places where the horizontal jumpers were made were made from a 50x70mm block - so that 20 mm protruded, and the jumper lay precisely on these protrusions.
In other words, focus on the design itself. Somewhere you might actually need a block of rectangular cross-section that forms the necessary protrusion.
ADVICE! The more racks, the less load on one particular rack.
If you use a solid board, you must have an embedded beam placed behind the lining, to which the bracket will be attached.
A wide shelf without support on the floor (see separate material about floorboards) is best done either on a bracket or on two beams - one embedded behind the external decoration, the second - like a ceiling beam (more about the construction of the ceiling here, about the roofs of bathhouses - here), hanging from wall to wall with support on the walls. Timber can be used 100x100 or 150x150 mm. It should not protrude or be flush with the edge of the shelf, that is, the shelf hangs a little over this beam.
For flooring
We have already mentioned that the best material for covering the shelf frame is planken. Its width as a shelf board for baths will be 70-90 mm.
The flooring board should not be too wide
The thickness of the board primarily affects its rigidity, so where the frame itself is strong and the distance between the posts is not large, you can take the thinnest board - nothing will happen to it under load.
And if you lay the paneling not along the shelf, but across it, you can also make it from a thin board.
The opposite is also true - the greater the distance between the posts, or where the support goes only to the wall, the board should be thick.
Solid wood shelves were mentioned earlier. Its dimensions are as follows: 15 cm in width and 6-7 cm in thickness. Watch the video, which says that such a board is optimal for a Russian bath, because it holds heat well.
Requirements for basic parameters
A Russian bath, like a Finnish sauna, requires maintaining perfect order in the steam room. This rule primarily applies to torn leaves from birch and oak brooms. In order for the room to be fresh and have a pleasant aroma, and not the smell of musty leaves, cleaning should be carried out especially carefully, including behind the benches. Therefore, when calculating floor parameters, the gap between the boards and the floor must be taken into account. It would seem like such a trifle, but it must be taken into account in construction.
In fact, the requirements for the main parameters of shops are:
- Compliance with rational dimensions for the height of steps;
- Compliance with the dimensions of the width of the benches;
- Taking into account the requirements for the length of sunbeds;
- Ensuring the structural strength of the floors, their functionality and rationality of location in the steam room.
The benches in the bathhouse must comply with the width dimensions.
But before moving on to revealing each of the parameters, it is worth briefly considering what the design of the benches in the steam room consists of.
The simplest and most functional is the frame structure of the floors. The basis is a slatted frame, one side of which is built from bars, the second side is made in the form of planks, tightly attached to the load-bearing walls. The boards of the benches are attached at one end to the frame, and at the other, they lie on a block against the wall. The lower steps have two support points - one on the post of the upper tier step, the second support point is a smaller post.
This scheme allows you to build a durable structure that will provide not only strength, but also functionality. Everything else is just subtleties that will be considered during the work process.
Floor height
Correct selection of floor height parameters is very important for a steam room. Typically, the ceiling height of a steam room is usually taken at the level of 2.1-2.25 m. A high ceiling creates an additional volume that needs to be heated, and the temperature there will be higher, while at the level of 1.2-1.6 meters the temperature for comfortable steam will not be enough. That's why 2.10-2.45 are the most optimal parameters for ceiling height. And if so, then the parameters for the height of the floors will be:
- The lower tier of the beds is 40-45 cm.
- Middle tier 80 cm;
- The upper tier is 120 cm from the floor level.
Thus, from the top point of the floor to the ceiling there remains 1.2 meters (with a ceiling height of 2.45), which is quite enough for normal steam and working with a broom.
The height of the lower tier of 40-45 cm is determined by two parameters - the first, practical, this height is enough to remove debris after procedures using cleaning equipment. The second indicator is related to the height of the rise - it is equal to the height of three steps of a regular staircase.
The height of the second and third tiers is associated with the possibility of the most effective bathing procedures. On the top shelf, the temperature promotes the maximum beneficial effect, and it is more convenient for the bathhouse attendant to work with brooms from the first step; there is no need to reach out to whip the steamer.
Width
The standard width of the shelves is determined depending on the purpose of the tier. The lower tier is usually not used in the steam room for procedures, or is used by those who do not like to steam with a broom, but at the same time do not deny themselves the pleasure of receiving a portion of warm water steam. Oh, yes, this place is to the liking of children, here they are comfortable both in terms of the height of the shelf and the temperature in the steam room. Therefore, despite the small height of the step, its width should ensure that both an adult and a child can sit down. The width of such a bench should be from 30 to 45 cm.
The second tier is usually used by adults to warm up. But it is not recommended to make it too wide. 40-45 cm is enough.
The upper tier is the most popular, so its width should be larger; there should be enough space to lie down and sit down normally. The optimal width of such a tier is 1.2-1.4 meters.
For those who build a bathhouse themselves, the width of the widest flooring may be different; in this case, experts recommend using a simple method for calculation - measure your height, divide the result by half and add 20 cm. The result obtained will be optimal for determining the width of the top shelf.
Cavity length
This parameter is usually overlooked, especially if the steam room is made “for yourself”, that is, it is enough to be content with the fact that you can just sit and warm yourself and whip yourself with a broom. Alas, you won’t really get pleasure from such a bathhouse. Therefore, when determining sizes you need to take into account:
- The minimum length should provide the ability to lie down and bend your legs;
- The average length of a bed is equal to the average height of a person plus 15 cm;
- The optimal length is 220 cm.
Wooden block hanger
Hangers are also made from maple or oak logs, always with knots. To create such a hanger, just find a photo of the finished product, and then use it as a visual aid. The procedure is simple, so if you correctly follow all the steps described below, you can make such a hanger without experience or special skills.
Cute wood hanger
- Choose a small log with branches that will resemble the hooks of a future hanger. The shape and dimensions of the sample can be arbitrary.
- Carefully cut the log into two parts so that knots remain on one half.
- Using a plane, process the surface of the workpiece, making it as smooth and even as possible. In other words, give the product a noble look.
- Make several of these hangers and coat each of them with varnish. The number of hangers that can be installed in the bathhouse is unlimited.
- Attach the hangers to the wall of the bathhouse with nails, although it is better to do this with self-tapping screws.
Use oak or maple logs
Each of the small hangers should be original and not similar to other products. Of course, you don’t need to take huge blanks to make them, because they will take up a lot of space in a cramped room.
Manufacturing technology
What could be better for clarity than video instructions? We have selected for you a small collection of videos that demonstrate all the design options we described above and contain a lot of useful information about the correct connections of parts.
Wall mounted:
Wall-mounted is more complicated:
Corner:
Corner:
Hanging: