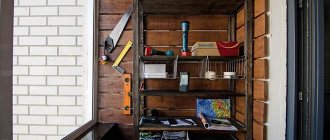
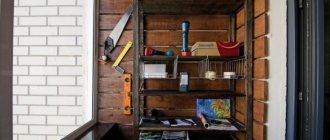
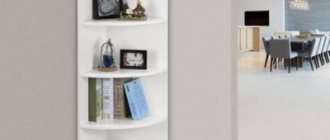
Simple wooden shelves
Wooden shelving in the garage
Most often, in garages, a simple stationary structure is made independently, located along one or two walls. In the latter case, it can be considered a corner.
This type of shelves has the following advantages:
- low cost compared to metal;
- simple and quick assembly without the need for metal processing (in particular, without welding);
- ease of maintenance;
- naturalness and good aesthetic qualities;
- with proper wood processing and care, a relatively long service life and high structural strength
An approximate view of such structures is given below.
Garage rack
The procedure for making such a structure is as follows:
- The materials from which the racks and the shelves themselves will be made are selected. Hardwoods (larch, oak) are suitable for racks, but, in extreme cases, ordinary pine can be used. The shelves themselves can be made from almost any wood material. Even plywood, chipboard or OSB can be used
- The racks should be made of timber with a cross-section of 10x10 or 5x10 cm. The cross members between the shelves are made from the same timber to give structural strength
- Shelves are cut from the selected material according to measurements
- All structural elements should be treated with an antiseptic before installation to avoid rotting or fungus
- The structure is assembled from racks and crossbars. If necessary, it is additionally reinforced with metal corners and attached to the wall, floor or ceiling
- The racks are marked vertically in the places where the shelves will be attached to them. Their fastening is carried out in various ways: self-tapping screws, tenons, and wood glue are used. In rare cases, dowels are used. Don’t forget about traditional nails, unlike self-tapping screws, they are less likely to come loose. To give extra strength to the shelves, they can also be mounted on metal corners
- After assembly, the ends of the rack are processed, and then the entire structure is varnished or painted
VIDEO: How to make a shelf out of wood
Shelves in the garage: order comes first. General design issues, simple options, step-by-step instructions for making your own (75+ Photos & Videos) + Reviews
Recreation area at the dacha: varieties and options for arranging it yourself (65+ Photos & Videos) + Reviews
Rack of several pallets
To make a spacious shelving unit in the living room, for example for books, you will need to prepare several pallets (from 2 to 4 pieces).
As for the tools, to assemble it you will need a standard set:
- sander;
- wood saw or grinder;
- nail puller;
- screwdriver
Materials you will need:
- paints and varnishes;
- fastening elements (screws, nails);
- brushes, roller;
- lumber.
The rack is assembled as follows:
- The prepared pallets are cut into pieces of two crossbars.
- The remaining boards will need to be sawed in half again. Since they will be used to make small shelves.
- We paint the prepared boards in the chosen color.
- We stack the pallets according to the existing diagram.
- We attach the structure to the wall.
Where can I get pallets?
Wooden pallets, although they are quite durable structures, are still considered by many manufacturers and transport companies as packaging material.
Pallets weakened by load cannot be reused for transporting heavy loads, so after use they are simply disposed of
You can obtain used packaging material using one of the following methods:
- Buy used pallets. You can easily find advertisements of this kind on thematic portals. The price of products ranges from 30-150 rubles per piece.
- Contact manufacturers or transport companies directly. Most of them are ready to give away used packaging for free, just so as not to throw it away themselves.
If desired, you can assemble the pallet yourself. It is enough just to stock up on boards with a thickness of 15-20 mm and wooden beams with a cross-section of 60-70 mm. Having determined for yourself the dimensions of the future structure, you only need to cut the boards into blanks of the required sizes, and then fasten the elements together according to the standard pattern.
Kitchen set
For a summer residence, it is not necessary to buy an expensive modular unit for the kitchen. It is enough to “conjure” the pallets. This requires skill and time. The boxes are connected and made into blocks of certain sizes. Sections can be closed with doors.
It is possible to furnish a house or cottage without sufficient financial resources. To do this you need to show imagination and make an effort. Working with pallets is easy and pleasant. Receiving decent results from your work is doubly joyful.
We make flower stands with our own hands, what materials can be used
To create such structures, you can use the following materials:
- plastic;
- metal;
- glass;
- tree;
- wire;
- combined raw materials.
Metal structures are considered durable and can support large pots. The stand looks very presentable and solid.
The plastic shelf is lightweight and versatile. Sections are freely removed and moved. The material does not require constant maintenance and is not afraid of water, and has a variety of colors. Plastic is quite flexible, so the racks can be given any shape, appearance and size.
It is difficult to build such a structure yourself; it requires certain skills.
Wooden shelves are more often used, although they are the least practical and durable. When watering a flower, water can get on the wooden base, which will subsequently cause swelling and rotting of the material.
To avoid this, the base should be treated with paint and varnish material and not install the structure in areas of the house where there is a lot of moisture.
Glass coasters look elegant and stylish. However, such a structure requires professional skills and constant care. Glass will not support much weight, so it is used only for small plants, and no more than two pots.
The wire must be thick. Use only for non-bulky, lightweight stands. Elegant compositions are performed in various styles. Used for indoor and outdoor spaces.
For combined sections, several materials are used simultaneously, for example: wood and metal, plastic and glass.
The structures can withstand a lot of weight and are well suited for home decor.
The choice always remains with the owner, after weighing all the pros and cons, you can start working.
Flowerbed
As the first way to make DIY crafts from pallets for your dacha, let’s consider a flower bed. For this craft you will need at least 4 identical, square-shaped pallets. In order to form a strong flower bed from them, you will need:
- 4 pallets;
- Nails;
- Hammer;
- Paint, optional.
First you need to prepare the pallets. If there is no need to decorate or stylize them, you can limit yourself to standard sandpaper processing. Next, when all the corners have been processed, you need to assemble the frame. To do this, you need to connect all 4 pallets so that they form a hollow cube.
After this, the cube can be placed in the country house or on the balcony. It is quite possible to place flowers and seedlings inside the cube. If the flowerbed is located on the balcony, then you will need 5 pallets, one of which will serve as the bottom. It needs to be covered with a durable film to prevent soil from seeping through the cracks between the boards.
Simple and fast
The easiest and fastest option to implement is a shelf in the form of a ladder. The photo below shows an example.
You will need:
boards or thick plywood; wood screws; drill; saw; pencil; ruler; special glue for wood products; sandpaper; paint or glaze on wood
Just make sure that they are intended for interior work.. First, decide what width and height your product will be, how many shelves you want to place
Use a pencil and ruler to mark the required dimensions and cut the required parts.
First, decide what width and height your product will be, how many shelves you want to place. Use a pencil and ruler to mark the required dimensions and cut the required parts.
Now on the racks you need to mark the places where the shelves are attached. Since our shelf-ladder will be placed against the wall, it is necessary to take into account the inclination of the shelves. It will also be necessary to cut at an angle the side of the racks that will stand directly on the floor. This will give greater stability to the structure.
It is better to mark the places for screwing in the screws with a drill. Then coat the surfaces with glue and assemble the bookcase. Now you can start painting.
A couple of painting tips:
- If you want the same product as in the photo, then choose a paint with more covering power. For example, universal enamel. Some craftsmen impregnate the wood with a special oil to create the effect of wood that has not been painted. You can also tint the material, which will even help “change” the type of wood;
- If your shelf will be used in a dry room, then there is no need to prime it.
Related article: Irish lace dress with patterns: master class with photos
This shelf is suitable for books and magazines, framed photos, flowers, etc.
Advantages of furniture made from pallets
The love for construction pallets consists of several components.
This is a fairly cheap material that is already assembled in a certain way. So in many cases, all that remains is to simply sand it, paint it and use it in the form of a bench, sofa, table and other home interior items and garden decorations necessary for the garden.
If handled correctly, furniture made from pallets will last for a long time. And the process of painting a tree will definitely appeal to the youngest garden owners.
The ease of installation and dismantling will help you create a unique item every time, quickly changing the surrounding space, or put away garden furniture for winter storage, extending its service life.
How to make a regular wooden shelf with your own hands
In order to make a tool rack with your own hands, you need to take appropriate measurements to determine the size of the structure. It is recommended to draw up a drawing that will contain the exact layout, dimensions, tools used and step-by-step execution of the work.
Take all the necessary measurements in the room to determine the dimensions of the future shelf.
When drawing up a sketch, you need to consider the following parameters:
- The distance between adjacent shelves is about 40 centimeters;
- The width of the rack should be no more than half a meter so that you can easily get the necessary tools;
- The distance from the bottom shelf to the floor must be at least 80 centimeters;
- The length of the shelf should be from one and a half to two meters.
The maximum depth is 50 centimeters; if it is more, it may be difficult to access tools and necessary items.
The second stage is the choice of design. Now let's look at a master class on installing garage shelving using bolts.
To do this, you will need the following tools: hammer drill, drills, bolts, drill, boards and metal corners. You will also need a tape measure, a pencil or marker, a tape measure and finishing material.
Wood requires simpler skills to work with it, the same goes for tools.
Now you need to decide on the number of shelves. You shouldn’t make too many of them, as the entire structure may not support too much weight.
You can start assembling the frame without shelves. Markings are applied to the racks and holes are drilled for greater reliability.
Apply the required markings on the racks if your structure is placed on the floor, and drill holes to secure the frame.
Now you need to connect all the parts. Attach boards, pre-cut to the appropriate size, using bolts and angles. For greater stability, attach the shelf to the wall.
Connect the elements and install a solid structure. If necessary, secure it to the wall.
Time for the final stage - finishing. It is recommended to use varnish for wood and stainless steel for metal. This will not only make the rack attractive, but will also improve some properties.
Stylish shelf for the garden, home or office from one product
From pallets you can make stylish and easy-to-use racks or shelves for shoes, flowers, etc. with your own hands.
To do this you will need to select materials. make a competent drawing, collect the necessary tools and begin the work process.
Materials and tools
The following materials will be required in the work process:
- prepared pallet;
- brushes and rollers;
- self-tapping screws, nails, screws;
- paints and varnishes.
Tools that will be useful:
- wood hacksaw;
- nail puller;
- hammer;
- sanding machine (if you don’t have one, you can use sandpaper of varying degrees of grit);
- screwdriver;
- level;
- tape measure and a simple pencil.
Drawing
Before you start making a practical shelving for your home or office, you need to prepare in advance a diagram of its assembly and manufacturing of parts . The drawing indicates the exact dimensions of all parts, options for connecting them to each other and other useful information.
The drawing of the shelving can be drawn by hand on a piece of paper, or the easiest way is to find a ready-made version on the Internet.
When drawing up the drawing you will need to take into account:
- The dimensions of the room , which will determine the size of the shelf.
- General interior of the room. It is worth noting that pallet racks fit perfectly into the following styles:
- loft;
- country;
- Provence
- Load capacity of the structure .
Here it is thought out in advance what will be placed on the shelves. If these are figurines, photo frames or other decorative items, then it can be made small. If books and various educational supplies are stored on the rack, the shelves will have to be additionally reinforced with corners.
The standard dimensions of pallet racks are:
- shelf thickness is at least 25 cm;
- length from 90 to 150 cm;
- depth – 50 cm;
- height between shelves – 55 cm.
You can make the simplest rack from one pallet as follows:
- We remove the crossbar from the pallet.
- We build in from 2 to 4 boards (shelves) at the same distance from each other.
- We polish the product.
- We process with paints and varnishes.
- We attach the finished product to the wall. To do this, we make markings on the surface, checking the accuracy of the work with a building level. The structure is hung on hinges and screwed with self-tapping screws.
Useful tips
It is not difficult to make shelves in the cellar with your own hands; it is much more difficult to keep the rack intact in the difficult conditions of this underground room. To avoid finding your cans of preserves on the basement floor one “fine” day, you should adhere to the following rules:
- control the operation of the cellar ventilation system; the microclimate and humidity of the basement depend on high-quality ventilation. It has been noted that it is natural (supply and exhaust) ventilation that better regulates the temperature and humidity of the cellar, so it should be given preference over artificial systems.
- Shelves that are aired every year last much longer, rot less, and rust more slowly.
- The wood of the shelves is regularly inspected for rotting. If pockets of rot are found, the shelves in the basement should be disinfected and antiseptically treated.
- Homemade shelves may not support the weight of the cans, so food items on the racks need to be spaced evenly.
- If the basement is very damp, you need to whitewash the walls and ceiling with slaked lime several times a year.
- You should not make shelves wider than 0.75 m, in which case they will sag and you will have to build supports.
Important! Typically, racks and shelves with jars are located to the right of the entrance to the basement, on the left there are bins with potatoes and other vegetables
Building shelves for cans of preserves is quite simple: it can be made from scrap materials using simple tools. In order for racks and shelves to serve for a long time, it is necessary to fulfill all the requirements listed above and follow the recommendations given. You can visually familiarize yourself with the process of building shelves for a cellar using photos and videos:
Accessories for landscaping
Using pallets you can make wonderful vertical flower beds. It is enough to hammer the slats on the bottom side with slats. Soil is filled inside the recesses or ready-made pots with plants are installed.
The flowerbed can be placed against the wall or support legs can be made in advance. It can be made even simpler: flowerpots with flowers are simply secured to the slats of a standard pallet.
How to prepare pallets for rack assembly?
Before thinking through the design of the future rack, and even more so assembling it, it is necessary to carry out some preparatory work. It will be convenient to do this not in an apartment, but on the street (weather permitting), in a garage or workshop - the preparation will be dusty.
Step-by-step instructions for handling pallets
Step one: clean the surface from dirt and dust, as well as rough areas of wood. For this it is better to use a grinding machine. Be sure to wear gloves, a protective mask and goggles to prevent sawdust from injuring your hands or getting into your eyes!
Surface cleaning
Step two: when the rough processing is done, you need to bring the wood to a smooth state. It is convenient to do this with fine sandpaper. Thoroughly sand all surfaces of the pallets that will “look” outward. It is not necessary to sand the inside of the pallets. To make the job easier, a sandpaper wheel can be placed on the same sander.
Sanding surfaces
Step three: if the rack will be located outdoors or in a room with low temperature or high humidity, you need to treat the wood with a special moisture-repellent and antifungal impregnation. There are transparent or colored options - choose at your discretion.
Impregnation treatment
What kind of furniture can be made
DIY furniture made from pallets, created step by step, can be presented in numerous forms. It can be used outdoors or indoors. The most popular designs are:
- sofas or armchairs, as well as other products designed for comfortable relaxation, and they can be hard or equipped with a soft seat;
- tables, both dining and coffee tables, with different shapes, heights and other parameters;
- shelves or racks, as well as full-fledged cabinets designed for storing a variety of small items;
- decorative elements that do not have any functionality, therefore they usually act exclusively as decoration of the territory or room.
Thus, wooden pallets can be used to create a variety of items. They have many differences, but in any case they are simple to create, so all actions can be easily done with your own hands.
Selection of materials
The most difficult thing is still the choice of design, because everyone’s wishes can be very different, and there are a huge number of options.
The choice of materials is another matter. Almost all shelving is made from two types of materials - wood and metal. In the first category we include not only traditional wood, but also fiberboard, chipboard and other derivatives.
Only you can decide how to make a rack with your own hands, but you should choose the material wisely, and therefore we will analyze each of them.
Let's start with metal
Metal is a durable material that does not burn, which is especially important when creating a shelving unit for a garage.
On the other hand, not everyone knows how to work with metal, but this is only if we talk about the traditional understanding of the issue.
Nowadays, the simplest shelving is often assembled from profiles, construction corners and similar analogues. Such designs turn out to be very practical, lightweight, but not very beautiful in terms of design.
Such a rack is perfect for a garage, but there is one condition - control of the weight of everything that will be stored on it.
Construction profiles are used to create false walls, various structures on the ceiling and walls. The load on them is not very large and this must be taken into account.
Having placed one in the garage, you should be prepared for the fact that it is better not to put sets of rubber on it, like other heavy tools.
Just imagine your reaction when you go into the garage in the morning before work and find a rack and all its contents dumped on your car - there will be very little pleasant in this.
Wood in almost every sense looks more interesting than metal, if we are talking about self-creation. Let's say you are thinking about how to make a rack for seedlings yourself, because you are growing vegetables.
In this case, you will need a wooden beam for the frame and simple boards for the shelves.
This is what the simplest wooden shelving design looks like. In this case, the tools you will need are a hacksaw, a tape measure, a hammer, and nails. The last items can be replaced with a screwdriver and self-tapping screws, if available.
You can put the same wooden rack with your own hands on a loggia for storing various things, in a storage room for conservation, or in a cellar for the same needs.
In addition, wood fits perfectly into almost any environment, and if desired, the color can be slightly changed using varnish or paint.
Decorating ideas
Pallet structures can be decorated in a variety of ways. Numerous design ideas are used for this. Most often used for these purposes:
- painting in different shades;
- use of upholstery and padding materials;
- creating all kinds of hangers, shelves, stands or other functional elements;
- use of painting;
- use of adhesive finishing materials.
Thus, creating furniture from pallets is an easy process that produces attractive, multifunctional and interesting pieces. They can be installed outdoors or in residential premises. If properly decorated, they will fully correspond to the tastes of users.
Manufacturing technology
So, let's look at the simplest DIY chaise lounge you can think of. For a dacha - a win-win option.
List of materials:
- 4 equal-sized rectangular pallets;
- 1 pallet is slightly wider than the others, square;
- boards – 50 by 100 m.
This is with the expectation that there will be a couple of sun loungers.
Algorithm of actions
- 4 pallets must be taken and placed in pairs on top of each other. Two at a time. There is no need to fasten them yet, the weight will hold them together without that.
- You should make sure that the square remaining tray is wide enough to turn into a backrest. It’s worth remembering that the pallet includes 3 layers - top, middle and bottom boards, between which air flows. The top ones should be long for a full back, and you will also need to attach a 50 by 100 mm board to them on each side.
- Disassembling the back tray: all bottom boards need to be removed, as well as the 2 outer middle boards. One or two boards in the middle will have to be left so that nothing threatens the stability of the upper boards. But you shouldn’t throw away waste in the form of removed boards - they will still be useful.
- The remains must be cut into 2 parts. It’s time to attach a 50 by 100 mm board to the top layer on both sides. These boards must be longer than the sides of the back (otherwise they will not be able to attach to the pallet).
- The backrest should be leaned the way the owner of the bed wants to see it in the final version.
- All that remains is to attach the backrest to the seat. Some people simply tie it down, but such a structure can be awkward and shaky. Therefore, it is better to fasten the structure with screws on both sides.
- The bed itself is ready, now it’s time for finishing work. Ideally, the tree should be primed and painted in a color that will harmonize with the site. If there is a kind of beach on the site (near a pool or pond), the lounger automatically becomes a beach one, and the bright colors of this design are more suitable.
Typically, such sun loungers are covered with mattresses and blankets or bedspreads. In bad weather, these deckings are removed into the house.
The next example is a curved chaise longue made from pallets; its design may seem a little more complicated than the previous one. But the drawing shows that there is nothing impossible here.
For this sun lounger you will need:
- 3 euro pallets;
- 2 boards 60 cm by 3 cm by 4 cm;
- acrylic varnish of a suitable color;
- 4 brass square corners;
- 4 brass rectangular corners;
- 80 universal screws;
- sandpaper;
- hacksaw or hand circular saw;
- screwdriver (preferably cordless).
Let's look step by step at how to make a curved lounger quickly.
- To begin with, the pallets need to be thoroughly sanded. First, go over them with the coarsest sandpaper, then reduce the grit of the paper and go to the finest one.
- You should take your own measurement - from the foot to the knee, and then divide 2 pallets by this measurement. One part will go to the foot, and the other will make an excellent seat. The short part of the second pallet will become supports, and the third pallet will rest on them.
- The individual parts of the first pallet must be installed vertically and secured at the angle that is most convenient for the manufacturer. The bottom boards will have to be shortened according to the length of the seat.
- If the seat is placed against the foot, it will be clear that the sawn ends need sanding. Now it's time to secure both parts with brass screws (large and small).
- An additional board must be placed on the pads of the seat and footboard. Protruding boards are sawed off after marking. Now you can screw the boards using screws. The pallets are turned over and the same actions are repeated on the other side.
- Now the third, still a whole pallet, is placed on its side. Using brass corners, a short fragment of the board (the one that was sawed off from the second pallet) is screwed to the upper half. The tilt of the future bed depends on the position of the corner. Almost ready, by the way.
- All that remains is to paint the foot and bottom of the chaise lounge with tint varnish. As soon as it dries, the structure can be assembled - it will not be difficult.
By the way, there is no need to screw all the elements of the sunbed. Some are held calmly by their own weight; individual parts will then be easier to move if the chaise longue “migrates” around the area.
You can be puzzled and make a combined design - a large and hospitable garden sofa, which with a slight movement of the hand can be divided into a narrow sofa-bench and a couch. At the very least, this idea is worth thinking about.
How to make a sunbed for a country house from two pallets is shown in the video.
Country chaise lounge from a pallet
To make a lounger, you will need several metal tubes for supporting structures and a soft mattress for comfort. The lounger itself is made from pallets, and the tubes allow you to create a strong support.
The main task of the master is to model the bed in compliance with the anatomical features of the human body. To do this, you can use a ready-made drawing of a country chaise longue or watch video tutorials on web resources.
Features of assembling metal shelving
Metal racks can be welded or assembled with bolts. There are usually no problems with welding. If a corner is used, the joints can be overlapped - a difference of 3-5 mm when laying shelves is unnoticeable. If you wish, you can cut out the excess in one of the shelves and butt weld, but trimming takes a lot of time, and you still won’t see much of a difference.
How to cut corners for a smooth connection
When assembling a frame for a bolted shelving, the order is as follows: first, assemble the squares of the sidewalls and shelves separately, then screw them together. It is advisable to have at least two bolts for each connection - for greater rigidity (less play).
If you assemble garage racks from a profile pipe with your own hands, the procedure is different. First, the sidewalls are assembled, and short crossbars are attached to them. You get two rectangles with crossbars. Then they are connected by crossbars.
Methods for bolting profile pipes
See the photo for how to make connections. In one case, welding is still needed - weld the heel pad, in another you can do without it - cut out the "ears", bend them and cling to them.
There is another way - special crab systems. These are metal plates with recesses molded to fit the profile. Pipes are placed into the grooves, then the two plates are bolted together.
Crab systems for profile pipes
Such a connection is unlikely to withstand very heavy loads, but there is an undeniable advantage - you don’t have to drill a bunch of holes in the metal. In a profiled pipe this is certainly easier than in a thick-walled corner, but it still takes a lot of time and effort.
By the way, the bolts used are M8 or M6, so large holes are required for them. It is easier to first drill with a thin drill, then expand to the desired size with a thick one. But even with this order, you will need a significant number of drills. To make them overheat less and break less often, place a jar of water nearby and periodically lower the drill into it.
Welded
Used to create large metal shelving. It has impeccable reliability and the ability to withstand even the most severe loads. Most often, shelves of this type are used to store large items.
There is one significant drawback - during redevelopment, it is often not possible to fit such a rack into the new space due to the non-demountable design. So if you love change, there is reason to think about choosing a different type.
Bolted
The main advantage of such a shelf is mobility. All parts are bolted together and can be easily dismantled if necessary. However, even with perfect assembly, there may be some play at the connection points. It is either present immediately or appears over time under the influence of the mass stored on the shelves.
The disadvantages of this design can be overcome by fixing it to the walls.
Combined
Typically found in spacious garages and technical rooms for car repairs. Most often it is formed through the so-called build-up - when there are more and more tools and storage items, but there is no other place for a new shelf and is not expected.
Sources
- https://www.yaprofi.net/polki-svoimi-rukami/
- https://stroychik.ru/garazh/polki-i-stellazhi-dlya-garazha
- https://www.asusfone.ru/svoimi-rukami/samodelnyj-stellazh-dlja-hranenija-v-sadovom-sarae-iz-staroj-mebeli
- https://postroika.biz/24568-stellazh-iz-dereva-svoimi-rukami.html
- https://garazhmechty.ru/polki-v-garazhe-svoimi-rukami.html
- https://1dacha-sad.com/delaem-stellazh-dlya-garazha-svoimi-rukami
Published: 06/11/2020
Finishing
After assembly, the product is completely ready for use. To extend the service life and make the chair aesthetically pleasing, it is recommended to cover it with paint and varnish coatings. This will increase the tree's resistance to increased humidity and prevent the possibility of splinters falling into the hands of users.
When finishing pallet furniture, special attention should be paid to paint and varnish materials:
- Transparent or colored varnish is suitable for these purposes. To preserve the natural structure of the wood, it is better to take a colorless varnish. And to get the desired shade of wood, you can use colored varnish.
- Paint for furniture pallets should be acrylic. Supplied by various manufacturers in a wide range of colors. The chair can be painted in one or more colors. It depends on your personal tastes and preferences, as well as the environment. To apply an ornament to a product, you will need a special stencil, which you can buy in a store or make yourself.
If the chair will be placed in the garden, then you should choose water-repellent paint. You can also decorate a new piece of furniture - hand-sewn pillows, a bedspread, or just a cape.
Tip: Pallets can be used to make a table or even a bed. And in the garden, next to such a chair, you can put a simple table or table in the gazebo.
Sources
- https://diz-cafe.com/postroiki/mebel-iz-poddonov-svoimi-rukami.html
- https://lkard-lk.ru/dom/shikarnoe-kreslo-iz-poddonov-svoimi-rukami-sovremenno-i-ne-kolhozno
- https://mebel-sovet.ru/derevyannaya/334-iz-poddonov-svoimi-rukami-poshagovo-foto
- https://dekodiz.ru/svoimi-rukami/mebel-iz-poddonov-pallet.html
- https://mblx.ru/drevesina/136-mebel-iz-poddonov-svoimi-rukami.html
- https://jamaster.ru/mebel-iz-poddonov-svoimi-rukami/
- https://samodel.guru/mebel/sdelat/kreslo/iz-poddonov-k.html
Step-by-step instruction
Step 1. Cut the lining, adjusting its length in accordance with the length of the rack. If the planks you bought are longer than the width of the structure, then the excess needs to be carefully cut off.
Trimming parts according to the length of the future rack
Step 2. Treat the surface of wooden products with impregnation, thereby protecting them from external factors.
Next, protective impregnation is applied
Impregnation application process
Step 3. Paint each of the structural elements. To save time, you can lay several planks together at once and paint them as one surface. Then turn them over to the other side and continue painting.
Convenient to process several boards at a time
Step 4. Once all the parts are painted, leave them outside until completely dry. The impregnation does not smell very pleasant, so it is not recommended to dry painted products indoors.
Wait until the wood is completely dry
Step 5. Make marks on the bars in the places where future shelves should be located. Then install metal corners in the designated places. If you have a screwdriver in the house, this will significantly speed up the work process.
Metal corners fixed
Step 6. Install the lower horizontal elements to create an “H” shaped structure. As a result, you need to make four such products.
There should be 4 such elements
Step 7. This is what the rack design should look like at this stage of manufacturing. She is not very attractive yet, but this can all be fixed.
Making a rack with your own hands
Step 8. Fasten the first shelf, or rather, the boards of the first shelf to the horizontal bars. It is not necessary to use screws for this - you can get by with ordinary nails.
Installing the first shelf using nails
Step 9. Start nailing the outermost board first, which will be visible to everyone. Here it is necessary to choose high-quality material, without defects. After installing all the elements, the bottom shelf will be ready.
Finished bottom shelf of the rack
Step 10. Make small stands for the legs of the structure being manufactured, thereby protecting the floor covering from mechanical damage. In addition, if you add a few laminate scraps, they can be used to level the rack in the future.
Stands for shelving legs
Step 11. Proceed to make the second shelf of the rack. All actions should be similar, only at this stage of work you can immediately install the upper horizontal lines.
Installation of the second shelf
Step 12. Make sure that the shelf, or rather, the planks from which it is made, lie on all horizontal lines. Ideally, all these elements should be in the same plane.
The boards must lie on all horizontal lines
Step 13. If there are large gaps between the shelves and horizontal bars, level them using small pieces of laminate. Simply cut out a strip and place it under the board in the desired location.
This gap needs to be corrected
Step 14: Do not screw the side of the square that attaches to the upright too tightly. When eliminating too large gaps, the horizontal will need to be moved a little. Once everything is level, screw the fasteners as tight as possible.
One part of the corner is not fully screwed
Step 15: Install the last shelf, making it slightly wider than the others. If the first two shelves use 5 planks, then the top one should have 6. This will increase the strength of the entire structure.
DIY rack is ready
Additionally, you can make a small ladder if the rack is high enough. The design of the staircase may vary. Now everything is ready and you can enjoy the result of the work done.
Preparation of the drawing
Having decided on the furniture option, you should start making the drawing. The diagram should show the following aspects:
Eurobook sofa - 130 photo recommendations on how to make and assemble a comfortable and compact sofaAssembling furniture with your own hands - 105 photos and a detailed video of how various furniture elements are assembled
- Do-it-yourself bookshelves - ideas for building shelves and shelves quickly and easily from scrap materials (155 photos and videos)
- Product dimensions: height, length of the tabletop (if available), width of the structure.
- Form.
- Fastening mechanisms.
- Auxiliary devices.
Supporting structures can include drawers for a chest of drawers, soft mattresses for a garden sofa, or a support structure for a dining table.
Modular shelving
Do-it-yourself wooden racks are made from solid wood. The structures have increased strength and stability. Along with wood, plywood is used to assemble shelf structures.
The material provides ample opportunities for assembling decorative modular shelving, made in eco style for vegetable boxes, minimalist boxes with different geometries for a separate arrangement or combination of an ensemble.
The first step in making a modular shelving is to develop a scheme for connecting individual niches into a complete structure.
Based on the dimensions of the product, the required amount of plywood is calculated and the parts are cut.
How to make a rack with your own hands from wood or plywood to hide the presence of fasteners? Assemble using dowels or countersunk screws, which are masked with wooden plugs.
Final sanding prepares the surface for paint application.
At the end, the hinges are screwed on and the elements are ready for use.
Additional items
The finishing of the various elements of any sofa made from pallets is carried out in several stages. Some of them are sold at the lumber preparation stage. It is then that the individual parts are primed and painted or varnished. In addition, this type of work includes upholstery.
An integral part of the type of furniture under consideration are mattresses and pillows. These additional elements can be purchased ready-made or made independently. It is possible to order pillows and a mattress according to the size of a ready-made sofa.
It is important to remember that the thickness of the mattress should be at least 20 cm, which will make the use of the furniture as comfortable as possible. An equally important point will be the choice of fabric for finishing. The best options would be natural and durable materials, which include:
The best options would be natural and durable materials, which include:
- suede leather;
- velours;
- chenille;
- microfiber;
- wear-resistant leatherettes.
Along with textiles, homemade sofas can be decorated with various decorative elements and even lighting. Don't forget about shelves, niches and drawers. You can find accessories for them in any specialized store.
Herringbone bookcase
The non-standard arrangement of shelves scares beginners, but assembling a wooden shelving rack with your own hands in the form of a Christmas tree is much easier than it seems.
To assemble a cantilever type rack with missing side walls, we will need a 15 mm furniture board. If a transparent coating will be used, choose an extra grade without visible defects. Paint coating allows the use of lower quality grades.
We cut out the supporting base from the shields. To further stabilize the rack, the base can be attached to a frame made of timber. We attach the back wall to the base.
Cut the shelves to the required size. The parts are attached to each other at an angle of 90 degrees. When assembling, it is better to use a square. To ensure base stability, the shelves are twisted together and screwed to the back wall.
The disadvantage of such a rack is its compact size, since the design features do not allow for the assembly of large-sized products.
Kitchen or desk
It is not difficult to make a standard table from the option described above. It is enough to complement the product with higher legs. The typical dimensions of such items are taken into account. The resulting item has a set of shelves that will expand the capabilities of existing storage systems.
You can additionally make doors and cover the back wall with wood. If desired, similar shelves can be made in the upper part. Here they simply secure part of the pallet.
Description of species
Depending on the place of use, racks are divided into two large categories.
Racks for boxes
Gravity racks for boxes are used when goods are stored in plastic containers. In such a situation, the cargo from the loading zone is sent to the shelves, where, under the influence of gravity, it gradually moves to the unloading point. Such shelves can also be placed on ordinary racks, which guarantees dynamic storage of goods.
Pallet racks
Cylindrical rollers installed in the channel of the gravity rack are responsible for the longitudinal movement of the load. There are also brake rollers that determine the speed of movement. When the first pallet reaches the stop, the movement is automatically interrupted.
Bed with headboard
Using the principle described above, it is easy to make a bed. Pallets make an excellent base. The pallets are simply put together. It is better to secure the boxes together.
The same wooden bars are used as a headboard. You just need to place them vertically. The mattress is placed on the resulting base. The bed is ready.
This option is ideal for a loft style and can be used in a country room or chalet. You won’t find a cheaper idea for a dacha.
We recommend reading:
- The best flowers for the garden: 155 photos of simple and stylish solutions for creating flowers
- Do-it-yourself landscaping - the best ideas for beautiful and functional site planning. Instructions, diagrams, photos, videos
- DIY flower beds - 150 photos of the best ideas + step-by-step instructions. Examples of the ideal combination and design of a flower bed
Recommendations for placing shelving
Installation of stationary shelving can be done in the kitchen, pantry or garage. Large open shelves provide great visibility. In this case, all items are easily obtained and just as easily returned to their place. It is better to install a closed shelving unit in a children's room or living room. For example, you can store a large number of books or toys there. The baby will be able to store his things in such a rack.
Kitchen shelving
Rack partition
If we talk about the rotating structure, then it can be installed almost anywhere, be it a children's room, a garage or a living room. The rack is more complex to make, and you also need to learn how to decorate it, because if you install the product in the middle of the living room, it will always be in sight of guests.
Coffee or coffee table
An original low table will decorate any interior. This piece of furniture is suitable for a living room, bedroom or veranda. The option can be placed in the garden. The small dimensions of the item will allow you to move the item freely.
We recommend reading:
- Garden gnomes: TOP-150 photos of exclusive options for a summer cottage. Instructions on how to select and place decorative gnomes on your site
- Figurines for the garden: TOP-200 photos of the best ideas. Choosing a place, instructions on how to do it yourself, video. Only original options from the gardener!
A hedge on a property: TOP-best ideas on what to use to make a beautiful hedge on a plot. Photo, diagram, instructions, tips from the gardener
A single pallet will serve as a table. It is better to further process the frame. For convenience, you can attach wheels.
If there is standard furniture around, then it is better to add legs to the pallet. For this you will need 1 more copy. The wooden “lattice” is simply sawn in half. The resulting parts are attached to the sides at the bottom of the product.
Sizing
As mentioned earlier, the dimensions of the rack depend directly on the dimensions of the room
To make shelves in a closet in an apartment, it is important for a home craftsman to consider several parameters before drawing up a diagram:
- width, length and height of the pantry - for the basic layout of the drawing;
- convenient access to the shelves and low height of the rack - for comfortable use of the product without the use of stands and ladders;
- the expected number of items that will be stored on the rack, their sizes, from height to width;
- load capacity - the higher it is, the more stiffeners there should be to ensure the strength of the structure;
- The slope of the floor is an important parameter, without taking it into account you can get an unstable product.
Based on the listed parameters, the home craftsman should sketch out the most detailed drawing, or take a ready-made diagram and substitute his own dimensions. Such a thorough and responsible approach will bring successful carpentry results.
Important! If the floor is uneven, then both stands for the shelving supports and additional fastening of the shelves to the wall of the pantry can help. The load capacity of the rack directly depends on the distribution of load on the shelves
The load capacity of the rack directly depends on the distribution of load on the shelves
Stylish nightstand
Pallets are cut into equal parts. The components are combined to achieve a cube shape. The product will be an excellent bedside table.
If you cut off the walls on 1 or 2 sides, you will get an original table. Inside the hollow space you can additionally arrange shelves.
Types of structures, photos
After you have chosen high-quality pallets for making a rack, it is worth considering the type of construction of the future furniture item.
Let's look at the photo. The most common models are:
- Floor-standing. Such products are distinguished by strength, spaciousness, stability, and massiveness. They are permanently attached to the wall, and without first dismantling they cannot be moved to another location.
- Mounted. They consist of several shelves (3-4 pieces) and are suitable for small spaces. Their advantages include compactness and ergonomics, which allows you to save free meters in the room.
- Mobile (on wheels). They are lightweight, compact and equipped with furniture wheels for ease of movement. This option is suitable for people who like to frequently rearrange the room.
How to decorate?
Recently, high demands have been placed on furniture items. In addition to practicality, functionality and ease of use, it should be stylish and beautiful in appearance.
A finished rack of pallets, the same shoe rack, can be decorated in different ways:
- Varnish . This option will highlight the unique texture of the wood. When choosing a varnish, preference can be given to both a transparent composition and a colored one. Here everything depends on the overall interior of the room and on the personal wishes of the master. Transparent varnish will give the product an attractive shine and emphasize its naturalness. With the help of color composition you can achieve interesting and original solutions;
- Paint . The paint color is selected based on the overall interior and the wishes of the owners. Bright and rich colors are used for children's rooms. It is very fashionable to paint a shelving unit in two different shades. Also in trend is applying designs to furniture items. To apply patterns and ornaments, you can use ready-made stencils if you do not know how to draw.
It is recommended to paint natural wood only with acrylic paints; water-based compositions are not suitable.
In conclusion, it is worth noting that pallets make original shelving for premises for various purposes . Such a piece of furniture will harmoniously fit into a child’s room, dining room or kitchen, or living room. Also, these furniture designs often decorate small office spaces where young and creative people work.
As you can see from the article, making a rack of any size, design and type of structure from pallets with your own hands is not so difficult. The main thing is to show your creative approach to making furniture, choose the right consumables and tools, and stock up on a little free time.