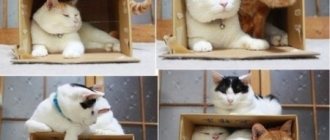
A small children's house, a piece of the baby's personal space, plays a huge role in his development and upbringing. Here we can talk about the development of responsibility, moral education, developing skills of caring for things, thriftiness, and the ability to make independent decisions.
Wooden playhouses are a great option to entertain children in the country house or in the courtyard of a country house . Ready-made structures are expensive, but such a house can be easily and quickly made with your own hands. It is enough to study the drawings, choose the appropriate one and follow the instructions. We bring to your attention the best ideas and projects of children's playhouses. Their construction does not require special skills - just desire and a minimal set of tools.
There is a wide variety of options in terms of manufacturing methods, materials, sizes and location. What materials can you use to build a house with your own hands and what do you need for this? Here you will find the answers you need.
We build it ourselves: drawings and dimensions of a children’s house in the country
Excellent compact houses for children made by domestic and foreign manufacturers are offered in stores. However, it is much more interesting to build a children's house with your own hands ; drawings with dimensions can be found on the Internet and you can choose the optimal one. Building a new corner of your own with a child of any age will allow you to spend time together and usefully, developing a trusting and warmer relationship. In addition, the house, to the construction of which the child had a hand, even in small things, will become an important object for him. Plus, it will teach him responsibility.
At the stage of drawing a drawing, it is necessary to communicate with the child: how he wants his house to look, in what shape, what color. This moment is important both for education and for the construction itself. This could be the house of a fairy-tale hero, a princess’s tower, or a cartoon garage.
We offer several drawings that will help you decide on a house or serve as the basis for creating your unique structure.
Externally, the house should be designed in accordance with the style of the residential building and the entire landscape. At the same time, the structure should be attractive to the child, so it can be decorated in bright colors and fit, for example, into the concept of a playground.
Classic and improvised materials for the house
Houses can be of varying degrees of complexity, reliability and high cost. However, even on a small budget there is an option that will suit the child’s taste and the parent’s wallet . Budget options made from cardboard or PVC pipes will serve to create structures no less interesting than classic wooden ones. A table, an unnecessary tent, a box of large household appliances - with the proper imagination, everything will come in handy. What can be used to create children's joy - choose for yourself.
Tree and derivatives
The most popular and traditional material for making a children's house is wood. A children's playhouse made of wood can be located on a flat area or on a tree , and be one- or even two-story. Its design can easily take into account the interests of the child: a rocket, a fairy-tale house, a ship, a space station - thanks to the shape or accessories, you can give it the chosen character.
You don't have to buy new boards. Used pallets are perfect for making a house. It is important to sort them correctly when choosing. You cannot take pallets with markings, from the market or with a strong smell. Cleanliness and environmental friendliness are the most important criteria for a children's building.
A plywood house is a simplified version of a wooden structure. This material is easier to find on the farm and easier to process. The frame is covered with plywood sheets or inserts are made into a wooden house.
Plastic
Plastic structures are simple and easy to assemble and very compact . They are easy to transport from place to place and disassemble if necessary. When choosing materials for building a house at home, you will be able to choose environmentally friendly plastic and be confident in the reliability of the new toy. Polycarbonate is best suited for this purpose.
Cardboard
Even more affordable than plywood is cardboard. Sheets of dense material can probably be found in any home. The advantage of such a house is that you can make different design options without fear of spoiling or destroying it. In addition, if the child decorates the house himself, it will become even more near and dear to him.
PVC pipes
For a compact house, affordable material such as PVC pipes is suitable; it is very easy to make it yourself. This route is the most economical, advantageous in terms of placement in a small area, easy to transport and assemble if necessary . The pipes from which the frame is formed are cut in accordance with the drawing. For tight fitting, a tarpaulin or thick fabric would be a good choice. A cape is sewn from the material, windows and doors are cut into it. The house is suitable for playing indoors or outdoors.
Below you will see photos of models of excellent houses for children that you can build on your site or in your apartment.
Results
The process when you build a log house yourself is not something very complicated. Of course, it is advisable to have at least minimal construction experience. However, even a complete beginner can easily construct such a building.
The main thing is patience, determination, and adherence to the basic rules for building houses made of timber.
If you use high-quality building materials, and also carefully approach the smallest details, then the finished house will turn out not only beautiful and comfortable, but also durable.
How to make a children's playhouse out of wood?
At a summer cottage, it is best to play in a wooden house, and construction can be carried out outdoors on a larger scale than in an apartment. Before you start building a house, you need to think about the main features of this object :
- what type will it be - closed or open;
- what size, on what area it will be located, its height;
- where it will be installed - on the ground or on a tree;
- what material do you plan to use;
- will there be windows, doors, if so, then from what material;
- the presence of extensions: a fence or other fence, terrace, sandbox, stairs, maybe a slide or swing;
- interior decoration - what, from what.
Make sure you have the necessary tools and equipment that you will need to work with wood. To build a house, you will need a plane, jigsaw, hacksaw, drill, chisel and screwdriver, keys, screwdrivers, chisels, glue and paints for finishing. From this basic set you can choose what you will need to build a particular object for your child.
An important point will be to ensure the child's safety while playing . To do this, it is necessary that the site for installing the house is as level as possible. If this is a tree, then there should be no doubt about its reliability. All wood, which is a building material, is carefully checked and processed: there should be no chips or knots. Also, the material must be environmentally friendly.
Carefully check that the screws are screwed in correctly. For roofing, choose soft coverings, for example, onduvilla, ondulin, without sharp edges. Periodically check the fastening points for strength.
DIY educational board
You can buy a busy board in a store, but making it yourself is much more fun. This process is simply addictive for adults! After all, only parents know what is interesting to their son or daughter. Based on this, they select elements for the intellectual development board.
I will describe my experience of creating a development board. After looking at photos of board layout options on the Internet, I went to a construction hypermarket to select and purchase elements. I didn’t have a plan - which elements I would attach.
Busy board - do it yourself
As a base, I chose a wooden furniture panel measuring 80 by 60 cm. It is easier to process than plywood. And a small board 6.5 cm wide. Because I wanted to make not just a “flat board”, but a three-dimensional one, so that something could be folded inside the opening niches. Remains of laminate worked perfectly as doors and back panels.
I bought the following at the store:
- Small loops (4 cm) - 4 pcs.
- Different handles for doors - 4 pcs.
- Standard and small latches - only 2 pcs.
- Hook shaped lock.
- Constipation in the form of a chain.
- A small bright lock with keys.
- Corner eyes for a lock and for attaching the entire structure to something - 4 pcs.
- Chain for attaching keys to the board - 1 m.
- Overlay for the keyhole (I had the key from the old door).
- Locking pin for interior doors.
- Small magnets for fixing doors - 4 pcs.
- Switch block with socket.
- A small lamp with a diameter of about 6 cm. Powered by batteries (price 100 rubles).
- Doorbell with battery-powered button (price 100 rub.)
- Steel corners for attaching the frame
- Self-tapping screws.
Advice. It is better to fasten each door with 2 hinges, otherwise it will warp.
Advice. It is better to choose iron handles with reliable fastening; a wooden handle - the baby would vomit it very quickly.
Important. At first I wanted to make a plug with a socket, but decided to abandon this idea. So that the child does not practice his skills of plugging everything into sockets around the apartment.
Advice. To prevent the ringer speaker from playing the melody very loudly, wrap it in foam rubber.
I asked my friends for an old phone number. I decided not to use the handset, just the dial for dialing.
From the tools:
- electric jigsaw;
- drill;
- cordless screwdriver;
- wire cutters to shorten screws.
Stages of work:
- I cut the board for the sides and for the “shelves” inside. I also treated them with sandpaper on the furniture board.
- I outlined the placement of the elements. I drew where the doors and holes for the telephone dial, switches, and key would be.
- Drilled holes with a drill. For doors, two diagonally are enough.
- Using a jigsaw, I cut out “windows for the doors” and holes for inserting a telephone dial and switches. Sanded the edges
- I attached the boards to the shield with self-tapping screws at the corners.
- The hinges had to be attached to laminate strips so that they were in the same plane as the doors.
- I screwed magnets to the sides of the “windows,” and metal plates to the doors to secure them in the closed state.
- We fasten the latches and latches with self-tapping screws.
- The bell elements can be hidden inside the box, and only the button can be displayed on the front panel.
- I glued the lamp.
- The back side was covered with laminate panels and secured with self-tapping screws.
- I made a carrying handle on top and corners with eyelets on the sides for attaching the entire structure to the handles of the chest of drawers.
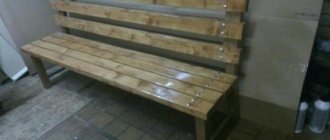
Frame for development board on the reverse side
Advice. This is where it was necessary to shorten the screws in order to screw the plates onto the thin laminate without any sharp ends sticking out.
And this is the front side of what happened
It took half a day to create such a toy, if you bought all the locks/buttons and the wooden shield itself in advance. The baby is one and a half years old - he is very happy. Likes to put different things in there and then take them out 
I also want to paste various bright pictures with cars, animals, etc.
Preparatory work
First of all, you need to decide on the location of the children's playhouse. The site should be within your field of vision and away from dangerous structures: cesspools, ponds, technical rooms. Based on the square footage of the selected area, the configuration of the building and additional structural elements are selected: stairs, flooring, benches, ladders, and so on. This is where ideas from already completed projects will come in handy.
Bright playhouse with climbing wall
Light green house with a slide
Simple wooden house
The photos look completely different, but each project is based on similar drawings:
For the manufacture of children's playhouses, environmentally friendly and safe materials are best suited: wood, plywood, antiseptics and water-based paints. Particular attention should be paid to the quality of processing of workpieces - their surface must be well sanded.
Foundation for a house made of timber
For timber houses, foundations that are not too massive are ideal, for example:
- Tape with a shallow type of filling over the entire area and with all load-bearing walls;
- From screw piles with overlaying concrete slabs;
- Columnar type foundation followed by the use of siding for cladding.
We select materials
To make a house measuring 180*160*140 cm with two window openings and one doorway you will need:
- 4 foam or cinder blocks;
- wooden blocks for the floor, racks and roof;
- floor and roof boards;
- wooden lining for cladding;
- roofing covering (the best option is Ondulin);
- metal mounting angles;
- furniture board;
- special nails for fastening the roof.
The result should be a rectangular children's playhouse, shown in the photo. But, of course, you can make changes to the project to suit your taste.
Soft bodyboard for kids
It is made from soft, pleasant-to-touch fabric – felt and textiles. This is an ideal development board for little ones. A soft bodyboard is sewn by analogy with a developmental rug. Such a product can resemble a pillow or a book.
Photo: soft bodyboards
You can make a busy board in the form of a bright cube from 4 sponges, soft napkins, beads, bells, rings, ropes and other details. Each side of the cube will have an original design. Children will love this educational soft cube and will have fun playing with it.
Step-by-step installation instructions
- Level the site on which your building will be located. For control, you can use a building level.
- Assemble a frame of the required size from bars and metal corners. In the corners of the structure, mark the places for the holes. Place the frame aside, dig holes and install blocks in them for an improvised foundation.
- Treat the surface of the blocks with bitumen mastic or cover with roofing felt. Place the frame in place and cover it with boards, leaving small gaps between the floorboards. When temperature and humidity levels change, wood can swell. If you lay the boards end to end, they may warp.
- Carefully treat the finished flooring with an antiseptic, and then with a layer of varnish or paint. Wait until completely dry.
- Attach racks, window and door elements to the base. Use metal corners to strengthen the structure.
- Install the upper lintels and rafters, forming a gable roof. If necessary, the junction of the rafters can be strengthened with spacers. Do not forget to treat all wooden elements with an antiseptic or fungicidal impregnation.
- After this, you can begin sheathing. For this purpose, it is best to use ready-made wooden lining, but to save money, you can take a pre-sanded edged board.
- Sheath the entire frame and gables, leaving window and door openings blank. If desired, install carved trims.
- Place the sheathing boards on the rafters. Fasten the roofing according to the manufacturer's instructions. In the presented project, Ondulin sheets were used.
- Paint the house in bright colors, using stencils, apply designs to the inner and outer surfaces of the walls.
- Take care of the additional arrangement of the playhouse. Children will love the various ladders and ledges for climbing, hammocks, pillows and so on.
If possible, it is better to involve children in the work. It will be much more interesting for a child to play in a house that he built with his own hands. Even if his help consisted only of handing over nails and screws.
Caulking process
When a log house is built from glued or profiled timber, caulking is not carried out. At the same time, if we are talking about building a house from ordinary timber, you cannot do without it. Caulking is a process of insulating inter-crown joints by compacting various natural insulation materials.
The following materials are used for caulking:
- Natural moss with excellent thermal insulation properties. This material also perfectly resists the formation of fungus and mold. And this increases the service life of the building. In all respects, this material is ideal. Its only drawback is that it is very inconvenient to make caulk with its help;
- Linen tow. This material also has a number of advantages, which are completely negated by the fact that it crumbles after five years. Because of this, you have to re-caulk;
- Hemp hemp is an excellent material. It was widely used by our great-grandfathers. Its structure is very similar to natural wood;
- Jute is an imported natural material that is produced in ribbon format. It is very convenient to use, which is why it is widely used in modern construction of timber buildings;
- Linen batting is a material that is a mixture of flax and batting; its main disadvantage is its strong absorption of moisture.
Main features of the caulk:
- The process starts from the top crown moving downwards;
- First, the crown is caulked from the outside and then from the inside;
- First, rough caulking is carried out to isolate large cracks, and then cosmetic caulking is carried out to give a pleasant appearance to the seams.
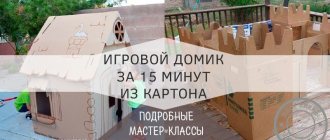
Construction of a children's cardboard house
A small temporary house made of cardboard will delight your child without leaving your apartment. After all, it is more intended specifically for indoor spaces, since moisture, sun and temperature changes make an already unreliable structure completely fragile.
To make such a model you will need thick cardboard . These can be individual sheets or a ready-made large box. You can use the drawing below and transfer it to the material. The parts must be cut carefully, avoiding crumbling and creasing. You can connect using cut grooves and fix them with glue, tape, or a stapler. The house can be decorated by the child himself; appliqués, stickers, and pieces of fabric can be used as decoration.
What is a business board?
This is a game development board with various parts and elements located on it that are safe for children to play. Such parts are capable of moving, opening and closing, clicking, rotating, lighting and blinking, and making sounds.
The bodyboard may include:
- padlock, latches, latches. Children will open them, close them, push them in;
- a doorbell with a soft sound, a clock dial;
- buttons and switches - after pressing them, the light comes on;
- an old telephone set, the circle of which must be twisted with your finger;
- a socket not connected to electricity, and a plug connected to it;
- ribbons, laces and ropes from which children will tie bows;
- snaps and buttons, zippers and various fasteners;
- shreds from pieces of fabric, oilcloth, paper, foil;
- abacus or beads - the child will sort them out in his hands.
You can decorate the development board with pictures of nature, drawings of animals and birds, images of letters and numbers. You can add whatever your imagination desires to such a product. The busy board can be constantly supplemented with new elements when the child grows up or becomes uninterested in playing. You will understand this yourself by his behavior.
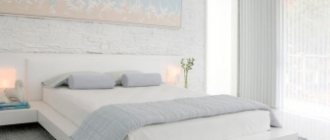
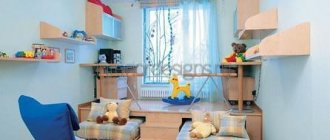
Interior of a house for children
The interior of a home for children, like a home for adults, should reflect the interests and tastes of the little owner. At the same time, we must not forget about its safety: more soft parts, fewer sharp corners, reliable connections. The more different details and little things there are, the more interesting it will be for a young researcher to live in it . Bright colors and cute decor will complete the arrangement of the house.
What a development board will teach a child
Today, great attention is paid to the early development of children. Parents try to teach the baby various wisdom early. A busy board is necessary to keep your child busy with an interesting educational game. He will explore the world on his own, even without the help of his elders.
During such exciting activities, the baby develops the following skills:
- logic - the child builds a chain of conclusions: to ring the bell, you need to press a button; to open the door, you need to pull the latch up;
- fine motor skills of the hands - the baby learns to work with small objects, receives new tactile sensations;
- perseverance - a daughter or son will finish the job they start in order to achieve a positive result - tie a bow, open a lock;
- attention and memory - children remember their actions with small details and objects, and later they will perform them automatically.
According to the Montessori method, parents should not interfere with the process of their child playing with a busy board. Let your child find solutions and draw conclusions on his own.
Roof of a children's house in the country
The construction market offers a wide selection of roofing materials - from budget slate to expensive natural tiles. For playhouses, it is better to purchase an inexpensive but reliable roof that you can quickly install with your own hands.
Ondulin fully meets these criteria. The sheet weighs only 6 kg, which allows it to be installed alone. The material is safe for children's health.
You don’t even need to leave your dacha to purchase. You can order roofing and components on the online store website shop.onduline.ru. Delivery is made from the warehouse of your nearest dealer within three working days.
Don't waste time searching for suitable materials - devote it to your loved ones!
Shrinkage of a timber house
The greatest shrinkage is observed near log walls. In some cases, per three meters of wall, shrinkage can reach ten centimeters. For rounded logs, the shrinkage is slightly less, it can reach eight centimeters.
Depending on the moisture content of the timber, shrinkage may vary:
- Timber with natural humidity parameters shrinks from 6 to 10 centimeters per 3 meters of wall;
- Glued laminated timber shrinks up to two centimeters.
Due to the fact that a log house made of laminated veneer lumber is characterized by minimal shrinkage, it can be finished immediately upon completion of construction work.