Despite the abundance of various furniture in stores, a simple stool has been and remains a fairly popular piece of furniture in the home. It is especially relevant if the apartment is decorated in a rustic style - in a kitchen with such a design, an ordinary stool will be simply irreplaceable.
But it’s not easy to buy a quality product now, so it’s easier to make it yourself. How to make a stool with your own hands from wood? The drawing, diagram and step-by-step instructions are in this material.
How to make a stool with your own hands from wood
Types of stools
Stools or chairs without legs come in different types. A limited number of models are sold in furniture stores. In turn, there are many more types of hand-made stools:
- Classic kitchen stool
- Transformable chair
- Miniature stool
- Bar stool
- Stool with drawers
- Stool with height adjustment
- garden furniture
- Folding model
- Step stool
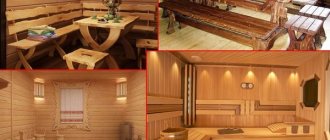
The most important thing is that you can make a stool of any size and any design, which is clearly illustrated by various photos of hand-made stools from different craftsmen.
Soft cases
You can make capes and covers for stools with your own hands. Soft stools will not only add comfort to everyday life, but also decorate the interior.
In addition to convenience, the use of covers and capes significantly extends the service life of stools. After all, they often not only sit on them, but also stand on them with their feet or use them in some other way other than their intended purpose.
A stool is the most common piece of furniture in every home. Anyone can make it comfortable, beautiful and durable. Don't be afraid to experiment!
Materials for the stool
One of the advantages of making your own stool is that it can be made from any material. Many owners choose environmentally friendly materials:
- Tree
- MDF
- laminated chipboard
That is why the question often arises of how to make a stool out of wood with your own hands. Solid wood is a very expensive material and such furniture is rare on the open market. However, it’s not difficult to do it yourself; you just need to stock up on a few boards. In this case, the boards can be from:
- Pines are the most inexpensive tree.
- Oak or beech - durable tree varieties
- Aspen, ash or linden - their wood is silky and tender. But such wood is short-lived.
In addition to natural wood, you can also use ordinary wood for the stool from old furniture made of chipboard or MDF. For this furniture, you can even use regular plywood or thick cardboard.
Manufacturing
As mentioned above, there is nothing particularly difficult about making your own inexpensive but attractive chipboard stool. The main thing is to first draw up detailed drawings and indicate on them all the dimensions of the future structure. Having such an “action plan” in hand will make your work much easier and more convenient, because at any moment you will be able to check whether you are doing everything correctly.
Preparation and cutting of material
The first stage of making a stool from chipboard yourself will be preparing and sawing the specified material that imitates wood. Different craftsmen use different tools for this, but an electric jigsaw is considered more convenient and practical - it’s easier to work with. It is advisable to use a tool with short teeth. The jigsaw should work at the highest speed - this is the only way all the cuts will be clean and even.
Having at hand a template (a detailed drawing with all the details) of the future stool, you can proceed to its creation. The paper or cardboard blank must be attached to the wood boards and outlined with a pencil. This way, it will be easier for you to cut out all the parts efficiently and accurately. All small irregularities remaining after cutting should be removed using sandpaper or sandpaper.
The cut bars must be carefully polished and tried on each other. Sanding is especially important if small households will use homemade furniture in the future. Having prepared all the necessary parts for the future structure, you can move on to the final stage before assembly - drilling all the necessary holes. Make sure that they are all at the same level.
Assembly
When all the parts are cut and prepared, you can begin to directly assemble the stool. Before you start assembling the furniture structure, you need to treat all cut edges with a special ribbon. It should be selected in accordance with the color of the material itself. Ribbons of contrasting colors are also appropriate.
The tape should be applied to the edges of the legs and seats, and then glued using a hot iron. The latter should be applied quickly, making short movements. The heated tape must be pressed down with a clean rag. The glue located on the back side of the applied coating sets almost immediately - it will not heat up or cool down for a long time.
All parts of the stool must be assembled using screws and confirmations. Some craftsmen first glue all the parts and then fasten them with self-tapping screws - it’s easier that way. The seat of the resulting stool can be made soft by installing foam rubber and upholstery.
Decoration
The stool will look more attractive if you equip it with padding and upholstery. The upholstery of such furniture can be oilcloth, woven or leatherette. Each master chooses the best option himself. Foam rubber is often used as filling.
Stool Tools
In addition to the materials to create such furniture, you will also need the following tools:
- Pencil, ruler and tape measure
- Jigsaw
- Hammer
- Nails
- Hacksaw
- Sandpaper
- Screwdriver or drill
- Wood glue
Advice. Small tools and parts, such as nails or screws, should be laid out separately on a white cloth - this will make them easier to find and take while making the stool.
Choosing chipboard
First you need to prepare tools and materials so that you don’t frantically search for some kind of screw or piece of wood later. You should choose in advance the design of the stool, its shape, color, and decide whether the seat will be soft. It is advisable to draw a drawing or at least a sketch in which to indicate all the dimensions of the product.
It is recommended to use chipboard for manufacturing, but it is better to give preference to the more expensive option - laminated chipboard.
The first material has one advantage - it can be processed as you wish. But laminated chipboard is the same material, only covered with a film of paper and resin (laminate). In order to make such a film, paper with a certain color, texture, and sometimes ornament is used. Melamine resin is used to make the paper tougher.
Drawings for a stool
Before you start making the product, it is important to think through and calculate the drawings of the stool. It is important to take into account the standard sizes:
- The seat width can be 40-45 cm.
- Seat height – 65-75 cm.
- Height for a bar stool – 90-120 cm.
Height from the floor and seat width are the main dimensions. In addition to them, additional ones need to be taken into account:
- Width and size of legs
- The height of placement of the drawers or crossbars that stand between the legs
- Bottom bars between legs, if planned
- Additional oblique fastenings for drawers
After the drawings are made, it is necessary to transfer them to the material. And then cut wood, chipboard or plywood according to specific patterns.
Advice. For the seat, you can use chipboard or plywood, and for the legs and drawers it is better to use solid wood. You can make a stool entirely from chipboard with your own hands, but this will make the furniture less wear-resistant.
Types of furniture products
Stools can differ in size and appearance, as well as in the materials from which they are made. So, most often they are made from ordinary wood, but there are stools made of metal, plastic, and also those created by combining various materials (for example, the seat can be wooden and the legs can be metal). It is worth noting that, if desired, the seat of the stool can be made soft or simply covered with fabric to give the product a beautiful appearance or achieve a certain level of comfort when sitting on it. The legs may also differ in appearance. There are products with simple, even legs, and there are those whose lower part is a real work of art. It can be patterned, carved and decorated in every possible way.
Products made from natural wood are strong and durable, and also have an original design, which is why they do not lose their popularity
On a note! There are stools that differ in appearance depending on the purpose of their use.
Table. Types of stools.
| Type | Short description |
| Kitchen | This is the simplest and most common option that can be found in many apartments. These stools are used in the kitchen. |
| Bar | Such stools are distinguished by a large seat height, and for a more comfortable position, they have a special foot support underneath. They are used in bars for comfortable seating at a high bar counter. |
| Tourist | This stool is usually foldable and quite durable. Its seat is usually fabric, but is made of durable material that can withstand changes in humidity and temperature. The legs are made of aluminum, which is the lightest type of metal. |
| Musical | This stool is needed specifically by musicians to play musical instruments. It can change its height and also rotate around its axis. |
Children's stool
On a note! In addition to these types of stools, there are also specialized products that differ in certain characteristics (for example, strength, height, etc.). These include children's stools, which are very small in size.
How to assemble a stool
Once the main parts have been cut or created, you can begin to assemble the furniture. The assembly process occurs in the following sequence:
- Each part must be sanded and polished with sandpaper
- Use a pencil to mark places on the legs for attaching drawers or additional parts.
- Once again, try on the height of the legs and drawers, then mark and drill holes for the screws
- Apply glue to the joints of the parts: drawer and legs
- Connect the drawers to the legs
- Install additional fasteners between the drawers.
- Place the seat upside down. Install the legs with drawers on it and secure it.
- Install additional crossbars or other parts between the legs.
- Cover the product with varnish and apply decor.
The evolution of a backless chair
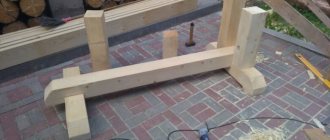
According to frescoes and writings, stools appeared in ancient times. Initially, the product was a small bench. The seat board was installed on 2 supports (stones, logs). The thing was for a long time the preserve of the nobility.
In the Middle Ages, stools acquired shapes close to modern ones. Later, variations with a storage box, products with a single support leg, and rotating models appeared.
Original furniture ideas
The size of the stool depends entirely on the ideas that the owners want to bring to life. In addition to the standard four-legged stool, it can be:
- A small folding chair with three or four legs, which is created from a flexible seat and three base legs.
- Step stool, where an additional step extends
- A transformable chair that can be furniture with a backrest or a stepladder
The most complex design is a transforming chair, the seat of which is made of two halves. One of them can serve as an additional step when turning into a stepladder.
For a step stool, you need to make an additional step, which will be smaller than the seat, and will also have two additional legs. Also, for such a design you will need crossbars with puzzles, with the help of which an additional step will be extended.
Where to begin
It is immediately necessary to clarify that there are several options for homemade stools. The product can be folded or combine the function of a stepladder; there are high chairs and practical benches, complemented by drawers. If we talk about a classic stool, it consists of the following elements:
- a rectangular or square seat with a side of 300 mm; a round seat with a radius of about 350 mm is often made;
- legs - 4 pieces, made of rectangular timber 400-500 mm high;
- drawers - the upper trim of the legs in the amount of 4 pieces, giving the structure the necessary rigidity;
- The legs are additional stiffening ribs that are installed in the middle of the support posts.
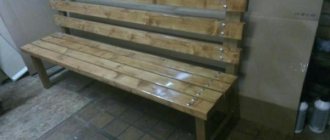
A simple design involves straight wooden legs. They are the easiest to cut and secure. This is exactly what the configuration of an ordinary wooden stool looks like, capable of taking its rightful place in the kitchen. The sizes vary and depend on the height of who will most often use such furniture and for what purpose, but most often the height is about 40 cm.
Stool decor
After the stool is assembled, the entire product should be processed and stylishly decorated. To make the stool last longer you need to:
- Apply glue to all seams and joints of parts.
- Cover the legs and others with several layers of varnish
- Cover the legs or drawers with painting
- Decoupage the legs and then also varnish them
A stool where the lower part of the legs is painted or covered with decoupage pictures looks stylish.
Advice. Another option for decorating a stool is to decorate the legs in an antique style. This will require additional paint and wax. First you need to paint the edges of the legs with contrasting paint, and then treat it with wax and rub it in. After that, paint again with a different paint. This will create stylish creases and antique cracks.
Simple compact model
A country house is often a small room, where in some cases several guests need to be accommodated at once. Therefore, small dimensions of seating furniture in this context are preferable to beauty and convenience. And the compact stool will perfectly cope with the task assigned to it. In addition, having good stability, it is suitable as a stand and a small ladder, and will be convenient for older people in some agricultural work, for example, when picking berries from bushes.
In other words, a chipboard stool is an irreplaceable thing. So how can you make it yourself?
Seat decoration
The final moment will be the design of the seat. Sitting on a hard chair is very uncomfortable. Therefore, for a stool it is better to choose the following options:
- Static foam seat. To do this, the foam rubber is glued to the seat, and a removable pillowcase is pulled on top.
- Removable pillow with leg ties
- Soft pillowcase with elastic band and foam insert
- Simple Fur Cape
To make the stool comfortable and comfortable, the seat should be soft and well secured: with an elastic band or ties.
Then the guests will be happy, and the household will love this piece of furniture because of its warmth and comfort.
Useful tips
If you decide to make your own chipboard stool, you should familiarize yourself with some useful tips and tricks from experienced craftsmen.
- Laminated chipboard sheets do not have to be new. You can take parts from old, unnecessary furniture.
- When drawing a stool, you need to maintain a balance between its top and bottom, otherwise the furniture will not be stable.
- To work with a jigsaw, you need to put on a special pick with small teeth.
- The upholstery is a decoration of the stool; it is not necessary to fix it. This procedure often takes a lot of time, but without this addition, the furniture may look too simple.
- When cutting out and adjusting all the details of a furniture structure made of chipboard, you need to be careful and careful. You should not rush, so as not to damage the stool or the surface of the material.
- Do not neglect drawing up templates, diagrams and drawings of the future design. With these components, all work will be much faster and easier.
Photos of do-it-yourself stools
Universal solutions
To make a supporting frame, you can easily use metal pipes. Moreover, they can be standard round or profile rectilinear. Thanks to the reliable metal frame, the need to make frames and supports disappears.
If there is a shortage of boards for making a seat, some craftsmen purchase a single sheet of chipboard. This idea for DIY stools has one feature - the sawn slab will definitely have to be upholstered. The second option is to stretch the wire between the drawers. You can place a pillow on this seat to soften sitting time.