A garden swing made of wood on a personal plot is fun entertainment for children and relaxing relaxation for adults. Ready-made models are usually standard, and they are not cheap. To fully express your creative potential, and at the same time save a considerable amount of money, you can make the design yourself. You will need at least a little skill in working with wood, the necessary tools and 1-2 free days. Step-by-step instructions will help you implement your plans quickly, accurately and as simply as possible.
Varieties of wooden swings
You can install various structures on your site:
- Children's mini swings that don't require much space. A chair or seat with a backrest is suspended on a horizontal beam, a strong tree branch or any strong support. The main thing is to minimize the risk of injury to the child from slipping and falling.
- “Nest” swing, where metal rings braided with cord or covered with fabric are used as a seat. You can make such structures with your own hands from a gymnastics hoop or a profile bent pipe.
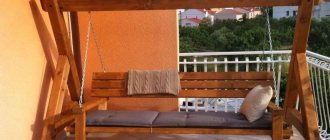
- A swing-bench for several people to ride at the same time, reaching a length of 2-2.5 m. The materials are wood, metal, plastic or combinations thereof. To protect from rain and sun, install a canopy made of polycarbonate or waterproof awning fabric.
- A hanging ball chair is an original design in the form of a sphere with seating inside. In the traditional design, it is woven from flexible rattan. At home, bent metal tubes and durable plastic cord are used.
Showing your imagination, you can make a wooden swing with your own hands from anything. Home craftsmen use various items that have served their time - car tires, wicker baskets, old chairs, armchairs and even sofas.
Useful tips
The advantage of rope swings for children is that they can swing and rotate around their axis. This attraction is fun for children. In the second option, it is optimal to hang the seat with one rope. If it is a cocoon, then it is attached directly to the frame. In the case of a circle, four branches of rope about 1 m long are removed from the hoop. At the top they converge at one point. From this knot one rope is launched all the way to the support.
When hanging a rope ride, you need to remember that the swing can swing in different directions. Ropes do not provide any restrictions in this regard. To avoid injury, there should be no obstructions in the swing area.
Garden swing design, drawings
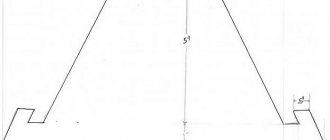
To indicate the scope of work and calculate the approximate consumption of materials, a drawing is drawn up, which you can do yourself or use a ready-made one from the Internet. For example, this simple option
The design is more complex with composite racks and jibs
Diagram of a swing with a canopy
Double swing for those who like challenging but interesting tasks
The design of a simple garden swing made of wood includes:
- supports made of timber, boards or cleaned round timber of small diameter, which can be A-, X- or U-shaped, with triangular or trapezoidal side elements;
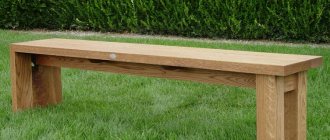
- seats made of wooden planks with or without backrests, armrests;
- suspensions - chains, polypropylene ropes, ropes;
- fastening elements.
If a canopy is to be built, a light, durable frame will be built for mounting the roofing material.
All wooden elements are screwed together with bolts, self-tapping screws, or with additional gluing of the joints. In some connections, nails, staples, and overlays are used. Fasteners must be resistant to corrosion.
For garden swings, inexpensive lumber is usually used - pine, spruce. Larch has the greatest moisture resistance. It is used to make critical parts that are in direct contact with the ground.
Important. If the supports are not stable enough, it is recommended to concrete them to a depth of at least 0.5 m. The wood must first be treated against rotting and wrapped in waterproofing material - roofing felt, film.
For comfort, you can put pillows on the seat or sew soft, removable covers. A mosquito net will help protect you from flies and mosquitoes.
Materials and tools
To build a wooden swing with your own hands, 3 m long with a 1.2 m bench and with A-shaped supports, you will need:
- for racks - 4 beams with a section of 100x100 mm and a length of 3 m;
- for the crossbar - 80x100 mm timber of the same length;
- for side lintels - board 32x100 or 40x100 mm, 6 m long;
- for the seat frame - a 50x50 mm block with a total length of 5 m;
- chain or rope for suspensions;
- for attaching suspensions and seats - carbines, ready-made rings, pieces of reinforcement or thick nails;
- stainless or galvanized fasteners - bolts, self-tapping screws, nails, linings;
- clamps, tools for cutting and sanding wood;
- drill, screwdriver;
- antiseptic impregnation, paints and varnishes;
- shovel, cement, sand, roofing felt (for concreting supports);
- tape measure, pencil, square.
What components will you need to buy?
Before starting work, the home master must prepare the following:
- Three-meter beam (with d from 10 to 15 cm) in the amount of 4 pieces
- Bars with d 8 cm and d 4-5 cm
- Pine and birch boards 10x2.5x250 cm (about 15 pieces)
- Board 15x5x300 cm
- 100 self-tapping screws 80x4.5
- Self-tapping screws 51x3.5 (200 pieces)
- Eye bolts (4 pieces)
- Welded chains with a thickness of 0.5 cm, the length of which corresponds to the height of the swing (2 pieces)
- Galvanized screws 12x100 with rings (2 pieces)
- paints and varnishes
- Saw
- Electric drill
- Screwdriver/screwdriver
- Hand drill/shovel
- Brushes
- Roulette
- Building level
Selecting a location
Before you make a garden swing from wood with your own hands, you need to choose the right place on the site:
- the site must be level for easy installation of supports, with a comfortable and safe surface;
- the structure can be placed next to a barbecue, oven or barbecue, but avoid sparks from open fire;
- maintain a safe distance from buildings, poles, trees, fences.
To protect the recreation area from rain, wind or sun, install a canopy or install the structure on a covered terrace or veranda. A garden swing looks very organic, surrounded by climbing plants, under a spreading shady tree, near a small pond that can be dug out by hand.
Wooden swing: step by step instructions
Before you make a garden swing from wood, you need to prepare the lumber - plan it until smooth, treat it with antiseptics, and cut it to size according to the drawing. If you have an electric planer or a hand router, chamfer the edges of the parts. This operation will allow you to avoid scratches or splinters during assembly and further operation of the structure.
Chamfering with an electric plane
Frame making
If the supports are to be concreted, the production of the racks begins with processing the upper ends of the beams. To do this, they are cut at an angle, using a square or template for marking. A horizontal crossbar will later be attached along the cutting line.
This node can be solved in various ways. The support beam is attached to the posts along the cutting line as in the photo
You can place the beam directly on the ends of the posts and secure it firmly
If the supports are connected below, the horizontal beam is laid at the intersection point in the resulting nest
The inclined posts are fastened together with boards in 2-3 places. They provide rigidity and serve for uniform load transfer.
If the supports are sufficiently stable, you can do without concreting. The side posts are cut along the bottom edge, having calculated in advance the angle of the beams at the top point, and then the joints of the semi-assembled structure are adjusted in place.
Assembling side supports from two boards with intermediate reinforcing ties
The crossbar is mounted “on edge” to provide the necessary bending strength. They are secured to the posts with through connections using bolts and washers. Additionally, the joints can be reinforced with galvanized or wooden overlays and staples.
When concreting, the lower part of the supports is wrapped with roofing felt and installed in pre-dug (or drilled with a hand drill) holes. A layer of crushed stone and sand is poured onto the bottom. The structure is fixed and the base is poured with concrete.
How to make a swing seat from wood
A 50x50 mm block is sawn into 60 cm long pieces. The height of the back and the width of the bench will be the same. The ends adjacent to each other are cut at a slight angle to give an anatomically comfortable shape - you can sit on such a seat, reclining slightly.
The frame elements are connected to each other with bolts or joined “together” and the fastening points are reinforced with glue and overlays. For a seat 1.2 m long, the bars are installed in increments of 40 cm.
The connection “to the paw” is performed as follows:
- A rectangular or trapezoidal section is cut out at the ends of the timber.
- Coat the joint planes with glue.
- Connect in 2 mutually perpendicular directions.
- Additionally, they are tightened with bolts, wood rivets or self-tapping screws.
Photo of how to make swing seats from wood
Planks are attached to the seat frame
Armrests are installed on the side of the bench at such a height that you can comfortably rest your hand. In addition to comfort when riding, they serve as protection against sideways falls.
Assembly of the structure
When the wooden supports of the garden swing are ready and stand securely on the ground, we begin to assemble the entire structure. First, strong suspensions (chains, ropes, ropes) are attached to the seat.
This can be done in various ways:
- Drill holes in the bars, thread a chain or rope through them and place the hangers under the seat. Tie the ends with a strong knot or secure
- Hammer nails into the side elements of the frame and make eyelets from them, then secure the hangers with carabiners or rings.
- Use ready-made eye bolts with threads.
Then the upper ends of the hangers are attached to the crossbar. This node can be solved in different ways:
- Buy ready-made fasteners designed specifically for such structures. It is installed using the provided mounting plate with holes, then a rope or chain is threaded into the ring.
- Use a powerful hinged bolt or a pin with a bent end, insert it into the hole drilled in the beam, and secure with a nut and washer;
- Instead of a hairpin, you can take a piece of reinforcement or large nails and cut threads at their ends.
- Wrap a strong chain around the crossbar several turns and secure with wire or a ring.
Another way to attach hangers
Important. To distribute forces evenly, wood fasteners are used together with washers. This protects soft wood from destruction as a result of dynamic loads.
In swings designed for light weight users, the role of fastenings can be played by the suspensions themselves. To do this, form loops at the ends of the rope and use them to secure the seat. The bench is suspended at a height of 40-60 cm from the ground. A higher or lower position is uncomfortable for placing your feet while riding.
DIY finishing of a wooden swing
The wooden swing itself is quite colorful for the design of a personal plot. Decorative techniques will help you achieve greater effect:
- tinting to resemble noble types of wood followed by varnishing in several layers;
- painting with compounds that harmonize in color with other buildings;
- artistic wood carving;
- antique stylization or fairy-tale plot;
- design of side pillars with grilles;
- making an arched canopy from bright polycarbonate or making it in the form of a gable “tower”;
- hanging pots with beautiful flowering plants;
- laying LED strip along the frame for illumination at night;
- use of textiles, pillows, removable covers.
You can decorate the swing using a manual or programmable tabletop router. The figured details look very impressive, giving the design an elegant look.
Bench with milled back
Even the simplest wooden swing, painted in bright colors or decorated with multi-colored lanterns, will become the “highlight” of the garden and a source of pride for the owner.
About the knots and method of hanging shells on a tree
Of course, we are far from the idea of harming trees. And we understand that a thin rope will damage the tree. Therefore, we recommend using a spacer between the barrel and the trim. In this case, we took what was at hand - we cut an old car mat into several pieces.
As for the knots, for reliability and to avoid rubbing of the rope, they should be double and have 2-3 twists around the trunk. The liana is tied to a tree, as in a home complex, using an additional clutch rope. At the same time, in order to avoid rubbing the vine from the branch and reduce the impact of the vine on the branch, it is better to twist it itself in a knot.
And now a little about how to hang all these shells on a tree . There are four ways and we actually combined them all. The first, the simplest, is to take a stepladder and hang the shells on those branches and in those places where you can reach from the ground. We started with this, planting the most convenient branches in places close to the trunk (our walnut’s strong branches had a large vertical rise and we could no longer reach the areas farthest from the trunk with a stepladder). The second way, the most romantic, is to follow the children’s path and climb a tree into those areas that are accessible to an adult. It's less convenient, but it evokes a lot of emotions. Of course, this method is risky; it requires getting not into the places where children will climb, but into those where the projectile is suspended.
We had to use the third method when all the convenient places were occupied, but we understood that the potential of our tree was far from exhausted. This method is called “ throwing the ball ”. The rope is tied to a throwable object that is heavy enough to be controlled. This could be a sock or a bag filled with sand, for example. This object is thrown over a high branch (4-5 meters) in a place close to a local fork or twig, which will serve as a natural limiter. Then the ball, flying over the branch, falls to the ground along with a rope loosely tied to it. The rope (which has to be double) is adjusted according to the projectile and shortened in place, the knot is tied at a convenient height. This is how we hung our ball and yoga hammock (two casts). Each time the attraction took about 15 minutes and turned out to be quite doable. The method is limited by the presence of the rope and the height to which you can throw the ball. Well, and your patience. The fourth, most expensive, but manageable method is to call climbers who will climb the tree and tie everything as it should (as an option, lower the rope from the tree in the right places under the carabiner), using special skills and equipment. Such guys will have a great understanding of knots and will be able to offer you how to bring the suspension from a height of 5-7 meters down, about 3 meters, to which you can then attach shells with carabiners and unfasten them at the end of the season. The last two methods have a big advantage. The high-altitude suspension of the projectiles at 5 meters and above gives amplitudes that are unusual for normal conditions, which will turn any swing into an exceptional one. This swing will be interesting for both children and adults. The only point is that the impact force of a high-hanging swing will also be exceptional, so it is better to either make it soft (yoga hammock, ball, textile swing) or do it outside the complex.
Well, for fans of wall bars and gladiator nets, you can arrange a mobile version of them between the trees. This requires a thick climbing cord and certain skills, but it’s worth a try anyway. So, having trees on a summer cottage or in an accessible forest, as well as a set of various equipment, you can deploy a full-fledged frameless sports complex for children, which can be easily removed at the end of the season. To do this, you need to use a little imagination and remember the principles of organizing a climbing environment, which will be relevant in these conditions.
DIY SwingFor outdoors
How to care for a wooden swing
The tree is subject to the destructive effects of many unfavorable factors. Fluctuations in temperature and humidity cause wood to crack. Sun rays provoke photoaging. Woodworms gnaw through numerous passages, and mold and fungi quickly render wooden structures unusable.
Regular care will help protect against all this:
- impregnation with antiseptic solutions;
- treatment with waterproof paints;
- varnishing with compositions for external use.
Events should be carried out at least once every 1.5-2 years.
Important. If possible, it is advisable to place the structure in a dry room for the winter, for example, a garage or shed. This will greatly extend the life of the garden swing.
Metal frames
Before you start making such structures, you should make sure that you have the necessary tools and equipment. Having welding equipment and the skills to work with it, you can build a rather beautiful and elegant frame.
Thanks to the strength of the material, all parts are small and compact, and they will take up minimal space in the yard. The design, in general, does not differ from the wooden versions, but there are still some differences.
Combined swing
Very often, swings on personal plots have a combined design - the supports are made of profile steel pipe, and the comfortable seat is made of wood. This option has certain advantages: the metal is less susceptible to moisture and, with proper care, lasts a very long time.
Steel profiles do not rot or crack. Assembly is possible both with bolts and welding. The strength of the steel frame allows it to withstand high loads. A swing with a wooden seat and metal elements decorated with openwork forging looks very impressive.
Folding swing
This design option will allow you to use the swing not only for a seat, but also as a comfortable wide bed. The bench is made of 2 independent parts, which are connected to each other via hinges.
To unfold the swing, remove the chain from the side eyes and fix it in the new position. A spacious and comfortable relaxation device is ready.
Swing-folding bed
For children
The design for a child can be quite simple and unique, since the age and size of a person will change over the years, there is no need to concrete such products.
Some parents decorate the yard with swings and balance beams made from scrap materials, such as car tires. Thanks to such solutions, your beloved child will practice coordination and have fun with friends.
Log swing
Exercises on a log swing are very useful for the physical development of children. The simplest design, similar to a swing scale, consists of a support and a log swinging on it.
You can use a section of the same log as a support post. The rotation unit is made of a metal rod and washers. To help children hold on, small wooden handrails are attached to the swing.
The prepared parts are assembled very quickly. It takes very little effort, but the end result is laughter and joy for children.
Simple and fun fun - log swing
Swing gazebo with table
The holiday option for a large group is quite difficult to manufacture. The swing consists of a durable frame with a canopy, 2 benches, a table and a movable platform. Thanks to the hinged mounts, even a child can swing the structure.
To make the frame, planed smooth logs or strong beams with a section of 100x100 mm, 150x150 mm are used. The tabletop and seats with backrest are made of 25 mm thick boards. Hinges are located in places where furniture is attached to the platform, as well as at the points of intersection of horizontal planes with vertical structures. This method ensures the stability of all objects on the table - water in glasses does not spill even with strong rocking.
Photo of a hybrid of a swing and a gazebo.
Contact with soil
The frame can be either portable or stationary, but usually the owners try to secure the frame to the plane as securely as possible.
The work may require certain drawings and precise measurements of all workpieces. Due to the light weight of the finished structure, it is not particularly stable, so the main supports are tightly attached to the asphalt or the pillars are concreted into the ground.
Such manipulations give the structure reliability and stronger fixation at the moment of swinging. They also think about safety locks on the crossbar to prevent the seat from unplanned overturning over it at intense speeds.