How sometimes we want to find that shadow that will give us the freshness of the morning or the luxury of the evening for a long time. And we won’t find anywhere better than under a tree! No matter how the sun tries to reach us, we are surrounded by branches, in which it is easy to hide from the summer heat. This is where the hammock comes to mind! An irreplaceable thing! But store-bought ones are either too expensive, too unreliable, and sometimes just inconvenient.
So a bright thought was born in my head! Why not make a hammock yourself?!?!!! When I began to research the question of whether this was real, out of habit I began to collect a collection that would include all the subtleties and secrets of working with a hammock. And, of course, I immediately decided to share this collection with you!
General description of the design
A hammock chair is a movable element that is suspended from the ceiling or any support. Its design is quite simple and consists of:
- textile base (its quality is durable and wear-resistant fabric);
- crossbars that distribute the load;
- sling _ They are made using strong rope or braided cord;
- suspension _ It can be either rings with a spring or ceiling mounts.
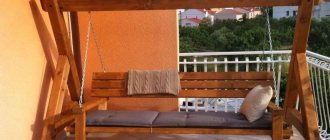
Important : macrame swings are often installed on balconies, loggias, and verandas.
As can be seen from all of the above, a macrame swing is a comfortable and soft hanging structure. It's nice to swing from side to side with them in the garden at the dacha or on the veranda on summer evenings.
How to hang our wickerwork?
In order to secure the hammock, you will need a reliable object on top. This can be a strong branch of an adult and strong tree, or a hook firmly fixed to the ceiling. The main thing is to make sure that such fastening will be reliable, and that the branch or hook can withstand a significantly greater load than a person in a hammock chair. Otherwise, there is a high risk of failure, because when moving in a chair, the impact on the object from above increases.
In conclusion, it is worth noting that this is a very economical craft if you have the right tools. The hammock is easy and quick to make and can last quite a long time. An excellent addition to the country landscape, and also very functional.
Advantages and disadvantages of a hammock chair
The main advantages of a macrame swing hammock include:
- no sharp corners. This allows even small children to use the swing without fear of injury;
- removable soft seat that can be easily washed in a machine - automatic;
- relaxation while swinging. With such designs, stress and fatigue are relieved after a hard day at work;
- large selection of models. Macrame swings can either be purchased ready-made or made independently, using your imagination and personal preferences;
- ease of operation and maintenance;
- safety and naturalness (durable and hypoallergenic fabrics are used when sewing them);
- Possibility of use at any time of the year. In summer, macrame garden swings are hung in the garden under spreading trees, and in winter they can be hung in a house, apartment or on the balcony.
As for the shortcomings, they include only:
- the impossibility of attaching to the ceiling in old houses, since unreliable ceilings may simply not cope with the load;
- problematic when mounted in a room with suspended or suspended ceilings. In this case, part of the ceiling will have to be dismantled in order to hang the swing. Therefore, having decided to install a homemade macrame swing in a house with suspended ceilings, you need to think about their installation at the renovation stage.
Attention: when deciding to purchase a macrame swing for a home where it is not possible to make a high-quality ceiling mount, you should choose models with a support. Their advantages include: mobility, compactness and the ability to be moved to any convenient place.
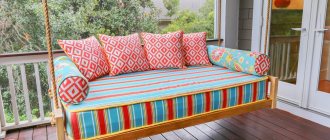
Fabric hammock: master class with photos
relaxing in such a hammock is a pleasure
DIY tools and materials
To make a fabric hammock you will need:
- two pieces of dense fabric (2 × 0.9 and 2.12 x 0.9 m);
- two narrow fabric strips (0.9 × 0.13 m);
- 20 fabric rectangles (0.18 × 0.11 m);
- linen cord (40 m);
- two wooden slats (0.90 m each);
- scissors;
- sewing machine;
- threads;
- needle;
- iron;
- pencil;
- drill.
All materials for creating a hanging bed can be found in any hardware store, their price is low
How to make: step by step instructions
- Make the first mark with a pencil at a distance of 2.5 cm from the edge. Place the next marks in increments of 8.5 cm. There should be 10 of them in total. Check the accuracy of the markings: the latter, like the first, should deviate 2.5 cm from the edge. Make the holes so that the cord folded in half can pass through them freely.
- Drill the holes.
- Make loops from the prepared fabric rectangles: bend the edges by 0.5 cm so that the fabric does not fray, and sew.
- Take a fabric measuring 2.12 x 0.9 m.
- Fold the narrow edge on each side first by 1 cm, and then by another 5. Sew along the bottom edge of the fold.
- Place the previously made loops on both sides according to the markings on the rail: the middle of each loop should coincide with the hole. Sew the loops, stitching them crosswise for strength.
- Place both pieces of fabric right sides together and stitch both long edges, leaving about 1 cm. Turn them inside out. It is advisable to iron the resulting fabric to smooth out the seams.
- Fold each narrow strip of fabric in half with the wrong side out, iron and stitch on three sides, stepping back from the edge 0.5 cm, leaving one edge unstitched. Turn out the resulting ribbons and iron. Fold the unstitched edges inward and stitch.
- Sew the finished ribbons along the edges of the fabric near the loops - this will give additional strength to the product. It is necessary to stitch the tapes along the entire perimeter.
- Connect the canvas and slats with a linen cord.
- Make sure that the cord is tensioned evenly, converging at the suspension point at a distance of 80–90 cm from the rail.
- Thread the cord into the resulting loops and braid it, including the place where the rope loops adjoin the cord.
- Hang a hammock and enjoy your holiday!
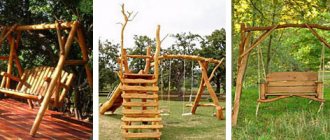
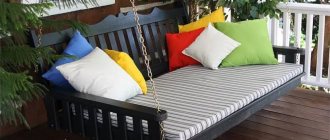
Varieties of design
There are many types of macrame swings. The most popular include:
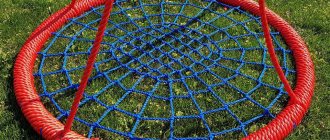
- Swing "Nest" . They differ from each other in size and load capacity. But they all have the same type of design. The base of the product is a metal hoop wrapped in a thick rope. Inside the circle there is a net made of rope. Such a product is suspended on ropes from a support. Thanks to this, you can swing on a swing in a circle on one support point or on two axes. The “Nest” swing will appeal to small children, teenagers and even adults. They are installed in the garden or on the veranda, and are used not only as a swing, but also as a comfortable bed. For weaving the seat, the following are used: rope, rattan, wooden rods, decorative cords. When choosing the macrame technique, the pattern on the product turns out graceful and elegant, formed from dense rope knots. If you wish, you can make a macrame garden swing with your own hands from two hoops. One hoop will act as a seat, the second as a backrest. This option will please you with its convenience and ease of use.
- Chair "Cocoon" . The design features include the fact that its seat and back have the same height, and the streamlined shape of the structure is connected at the top. Such models are available both closed and open. You can completely immerse your feet in them, hiding completely from the outside world. Various materials are used to make your own cocoon. They are most often woven from ropes, rattan, and willow vines. The wicker body of the product using the macrame technique gives them lightness, airiness and elegance.
- Hanging chairs - swings . Their shape is formed using the chosen weaving technique. For these purposes, it is best to choose durable rope or rattan (as these materials hold their shape well and for a long time). Swing chairs can have their own support or be suspended from the ceiling or tree on brackets.
Attention : the wicker garden swing “Cocoon” does not cause discomfort due to the open space. They are well blown with fresh air from all sides, and they can clearly see what is happening around them.
Fastening with hints of Empire style
When the mesh is ready, you can start creating fasteners.
Take a strong, rigid 50-centimeter cord (cross-section - 1 cm). Measure 5 cm on one side and 10 cm on the other, dividing the length in half. This mark is wrapped with tape, cut off and burned, removing the film. The rope is connected into a ring, tightly wrapping the joint with threads. Then the remaining section is wound to the joint. The threads are wound in 3-4 layers, while the edges are made thicker. After this, super glue is poured into the middle and also soaked on all sides.
In the store you need to buy a fastener called a thimble - a steel eyelet. It is placed on the opposite side of the winding, fixing it all with thread and filling it with glue. Then they make an openwork fastening. The principle is very simple:
- prepare 10 pieces of 2 m each in advance;
- they are thrown onto the formed shaft;
- then the upper threads are crossed with the lower ones, while the outer ones are passed between them, throwing them to the sides and carefully tightening.
After this macrame master class you will get a nice triangle. At the end of the work, there should be two cords left, which should be tied using a straight knot. Next, each axis is conscientiously tightened. This fastening is necessary in duplicate.
Spacers are made from ordinary shovel handles or plastic pipes. Holes are drilled on them at intervals of 5 cm.
Mounting methods
As for the methods of attaching a hammock chair in a country house or indoors, it can be:
- ceiling _ For these purposes, a durable ceiling hook is used, onto which a chain holding the product is attached. With this design it is easy and pleasant to swing from side to side;
- axial _ This option is attached to the ceiling or a strong branch, but there are slings on its sides. On such a product it will not be possible to swing from side to side, but it is easy to rotate around an axis;
- with double suspension in the form of a platform . This option is a strong and stable base, equipped with additional sidewalls. You can easily install a double swing chair on such a mount;
- rod _ Involves the use of a curved stand with a ring stop at the bottom. On top of the rod there is a suspension made of a spring, onto which the swing is attached.
Learn how to weave a hammock step by step with your own hands with a work diagram
To complete the craft, you need:
- Ruler
- Scissors
- 2 wooden beams - durable material. With pre-made holes for threading the hammock material.
- Durable clothesline.
To ensure that your hammock is not only visually pleasing, you must use good, wear-resistant material. For this, just in time, you will need a clothesline, about 1 cm thick.
Not only thick clotheslines, but also cords have high strength. The only difference between it and rope is its unusually low level of comfort. Still, it is more comfortable to sit on a soft rope than on a hard cord.
Step-by-step instructions for making a hammock using macrame technology:
- Cut 20 m for fasteners, the rest of the rope in equal parts of 6 meters.
- Secure each rope with a loop and a knot on the bar.
- Knot patterns for weaving a hammock.
- The optimal cell size is about seven cm: this way you will have a comfortable rest without falling through or getting tangled in the hammock.
- When you have finished the hammock, attach the tails of the cords with knots to the second plank and to both straps with fasteners. The hammock can be hung on supports after first checking its strength.
When you find a place where it is better to secure the craft, you will be pleasantly surprised by the quality and appearance of the hammock. Enjoy using it, we wish your product a long service life!
One of the many recreational items is a hammock. He came to us from ancient times. It was with the help of a hammock that people could fall asleep in unusually unsuitable conditions. Previously, the hammock was used exclusively by sailors, since there was nowhere to rest while sailing. The hammock was built to create comfort. Because the sea lacked comfort and tranquility.
Mainly, pay attention to the reliability of the hammock supports. It happens that, quite by accident, a person can spend a couple of hours lying in it.
Therefore, before you start using the item, test it for strength and endurance.
This craft will be of particular importance and relevance in the summer. Therefore, you can start making it in mid-spring. An ideal place to relax may be a hammock, which is located in the country. Soviet people who have dachas do not have the habit of relaxing there. They are used to working hard in the garden, working on the territory, constantly improving it. Therefore, if you still have a hammock at your dacha, you may be tempted to relax at least a little during a break between work. Or maybe even fall asleep after a difficult harvest.
Appreciate your work, find time and place to relax. A hammock, designed and made with your own hands using the macrame technique, will help you with this. Don’t be lazy and adapt things to suit your comfort, thereby creating comfort. After all, in the modern world, sometimes this is just not enough.
Hammock on slats
This product is a little more complicated than the previous one. Its size is calculated in a similar way. The width can be reduced slightly - up to 90 cm. You need to add 20 cm to the length, since part of the fabric will go to the hem, where the handle will then be inserted. The narrow parts of the fabric where the head and legs will be located need to be sewn with a double seam and the strips secured in them.
This is done like this: you need to fold 20 cm of fabric from the edge of the canvas and sew a double seam so that the resulting drawstring includes a wooden block and leaves a little margin. Then you need to step back from the resulting seam at a distance equal to the diameter of the eyelet and go through the line again. In the resulting area, you need to insert fittings for the loop in increments of 12-15 cm. The second edge of the canvas needs to be processed in the same way.
Sizing and drawing
Before you start making a chair, you need to decide what size it will be. In a large one, if you surround yourself with more pillows, of course, it will be more comfortable, but sometimes a small one can feel more comfortable. Also, if you have to use the chair indoors, its size will depend on the size of the room. A large object in a small room will look bulky and awkward, and there will be no feeling of comfort.
A child's hanging chair can have a seat size from 50 to 90 cm, and an adult's from 80 to 120 cm. The height of the finished structure will depend on the installation method. In order for homemade hanging chairs to be safe, it is necessary to calculate their load-bearing capacity with a margin. A child must withstand the weight of a seated person of about 90-100 kg, and an adult - 130-150 kg.
Having decided on the size and purpose, you can draw a small drawing on which the model will be depicted to scale. This simplifies the calculation of the dimensions of parts used in assembly. All elements of the frame can be drawn separately on paper, and then transferred to the blanks, increasing the size.
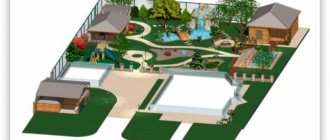
When drawing a picture, you can take any ready-made version as a basis or draw your own. It is very important to design the environment in which the chair will subsequently be installed or suspended, as its size must be determined taking into account the dimensions of the rest of the furniture. But the material for the seat will need to be adjusted during the work process, when the frame is ready. It is unlikely that it will be possible to calculate the amount of fabric or rattan from the drawings.
Schematic definition of the dimensions of a chair on a stand
Diagram of a round chair without a stand
Quick hammock in 10 minutes
Now we need to disassemble the version of the hammock for the laziest. It does not take much time and does not require knowledge with certain equipment. To create, you definitely need strong hands. The sewing machine or weaving can be left alone.
To make a quick, beautiful hammock, you need to have with you:
- lining fabric at least 150 cm;
- several carbines;
- at least 5 m of reliable rope.
The entire list of materials will be as cheap and simple as possible. The process of creating a hammock will be just as fast:
- The front and back of the fabric need to be twisted to create pointed edges;
- With the help of a rope you need to deceive the edges, like a broom;
- Now the rope at the ends just needs to be wrapped with additional cord for convenience.
- Thanks to two carabiners, you can attach the hammock to tree branches.
This is very convenient if the company is going to go camping and spend the whole sunny day there. In total, the costs will be a maximum of 300 rubles.
Provided that a person wants to buy a ready-made hammock, he can spend from 3 thousand. It is easy to construct and can even be folded into a backpack. The bed will not withstand too much weight, but this can be corrected if you take several layers instead of one.
Tools and materials
Today, hanging devices can be bought everywhere, from supermarkets to specialized outdoor equipment stores . But it’s still much more pleasant to make a hammock with your own hands. To do this you will need a certain set of tools and materials:
- The main fabric is the main element of the hammock. A durable and dense material (canvas, tarpaulin or denim) is best suited for this role. Although such fabrics last less than synthetics, they are much more comfortable and also breathable.
- Hanging ropes should be selected taking into account the strength of the material. It is desirable that they withstand a weight of 130-200 kg.
- Wooden planks, which are sold in a specialty store. You can cut them yourself. The diameter of the slats should be 4-5 cm.
- In addition, depending on the model, additional elements may be needed, such as eyelets or padding polyester, which can be used to fill hammock pillows.
- A sewing machine that can work with rough fabrics.
- Felt pen or chalk.
- Measuring tape, ruler and square.
- Scissors.
Weaving macrame chairs: making the base
Instead of rings, you can buy sports hoops in the store or make them yourself from metal-plastic pipes with a diameter of 35 mm.
To calculate the required pipe length, you need to multiply the diameter of the required circle by 3.14.
Experienced needlewomen recommend first making accurate calculations of the chair and thinking through its design.
To connect the ends of a metal-plastic tube bent into a circle, you can use a small wooden sleeve, which must be secured with self-tapping screws. It is best if the physically difficult work of bending metal-plastic pipes into a ring is performed by a man.
After the rings are ready, they need to be wrapped with thread. The turns of the cord should be placed close to each other with good tension. The larger circle is used for the back, and the smaller one for the seat.
More interesting than the Lego game
Assembling a structure is perhaps one of the most exciting activities. The spacer is suspended using cables. Marks are made at the ends of the threads so that knots can be tied. All 10 cords are lowered into each hole. The marks are fixed with needles.
Now you need a hanging weight. Water is filled into the bottle so that it weighs ½ the mass of the spacer, that is, 0.5 kg. She is tied using a boa constrictor knot. And at the end of the cable a hook made of a pin is attached.
As a result, a bottle weight is attached to each rope. When tensioning it, make a mark under the spacer with a marker. After the procedure, the pins and bar are removed. The mesh is put on the handle, the warp threads are passed through the holes and tied to the openwork fabric at the place of the marks. The excess is cut off and the ends are melted. The edging cable is threaded around the perimeter of the hanging hammock, having previously connected it to the fastening. The second side is made according to the same scheme. A real work of art is ready for the garden museum.
Video with detailed instructions for weaving a hammock using the macrame technique
And here is macrame - to understand what they are saying, turn on the subtitles.
Full version of the work from start to finish:
There are many options and techniques. And we were convinced of this today. All that remains is to see how to work on a hammock using the macrame technique from the very beginning to the end. But we saw that macrame can be different, from intricate patterns to regular mesh. Therefore, any person, both those who have just decided to make their first hammock, and those who have been trying different options for a long time, will find a lot of useful and interesting information for themselves.
But, if you have already tried all this, and you have something to say and offer something new, write! Share! And we will all be grateful to you for this! I think your friends will also be grateful if you share the link to this article with them!
To make a hanging bed based on knot weaving, you will need to be patient. However, the time and effort spent are worth it; the resulting hammock will be spacious, comfortable, environmentally friendly, transportable and definitely unique. After all, everyone chooses the sizes, weaving method, and materials independently.
What is woven for home interior decor using macrame technique?
With the advent of knitted yarn and multi-colored cords, the weaving technique received a new impetus for development. Today, things made using the macrame technique once again decorate our homes.
There are a lot of possibilities for what can be made using the macrame technique for decoration:
- Wall panels for the home.
- Macrame pillows and blankets, not only made from cord, but also from felting yarn.
- Curtains for windows, doorways, interior partitions for the home.
- Lamps and lampshades for the home.
- Macrame bags.
- Tracks on the table.
- Napkins and hot mats.
- Macrame carpets and floor runners for home decor using the macrame technique.
- Vases for the home.
- Hanging chairs and hammocks.
- Macrame baskets for home decor.
- New Year's panels and toys for the Christmas tree.
It’s probably impossible to list everything! It's amazing that macrame home decor has become so popular and diverse.
What is home decor made from using macrame technique?
- Cotton cord is the most common material. It can be either natural white or linen, or painted in any color of the rainbow. The thickness of the cord for macrame is also different.
- Synthetic cord.
- Knitting yarn.
- Yarn for felting in skeins.
Macrame wall panels for home decor
Wall panels for home decor can be found today in classic home interiors and in boho style. This is perhaps the most popular thing in the macrame technique and at the same time the most voluminous.
To work, you will need a lot of cord at once, the ability to weave different knots and connect the threads during the weaving process, and hide the joints. You will also have to get some driftwood and process it in order to attach the panel to it. The snag can be replaced with a round or flat stick, preferably made of natural wood. A novice needlewoman is unlikely to cope with such work.
Macrame panel for home decor on a straight stick
Macrame panel for home decor on a wooden driftwood.
Let's start creating
To make a simple hammock, you will need:
- thread the edges onto a 60 mm wide fabric and sew the folded piece lengthwise using a household machine;
- the loops are located at the required distance for fixation with holes for rings in the hammock;
- using a wood base, the tool makes holes for the tin hinges of the product;
- cut the fabric from the holes to fix the ring;
- cut a piece of fabric according to the finished pattern;
- insert metal fasteners into the holes for the ring;
- The hammock is now easy to thread through the loops and hang on the stands.
- for ring fastenings you need to drill holes with a tool at a distance of about half a meter;
Typesetting row
Usually, along the edges, the mesh threads are attached to wooden rods, but they can also be brought into a corner to be grabbed by a metal ring (this will be discussed below). The ends of the ropes from which work begins are called a set row. In practice, more than one method of attaching threads is used; let’s look at the 4 most common ones.
Method 1: Horizontal hinge jumper on the front side
- The thread is folded in half and placed on a wooden handle with the loop facing up.
- The loop bends back and goes under the rod.
- Both ends are threaded into the resulting loop and tightened.
Method 2: crossbar on the wrong side
- The rope is folded in half and placed under the wooden base with the loop facing up.
- The thread folded into a ring is bent forward and wound over the rod.
- Both ends are inserted into the created loop and tightened.
Method 3: Double Hitch (Extended or Extended Hitch)
The crossbars remained on the wrong side. The typesetting row made in this way is denser; the wooden handle does not show through it.
- The thread folded in half is secured using method No. 2.
- Each end (separately) performs one turn.
- The thread that goes around the base is pulled over the loop formed at the bottom.
The attachment to the handle will be even tighter if you make more turns at each end. The same typesetting row can be made so that the bends of the nodes are on the front side, but such a solution looks less neat.
Method 4: Attaching only one end of the thread to the rod
- The upper end of the thread placed under the cutting is fixed at a distance of 2–3 cm from it.
- The lower end of the thread is draped over the base to the right of the upper, then, going around it, it makes a turn; the thread is pulled down.
- The next turn is performed to the left of the upper end, the operation is repeated in a mirror manner. After tightening it, the knot is ready.
When using threads of different colors or different lengths, several fastening methods can be used. For example, first hang one rope using method No. 3, not forgetting to leave a gap in the middle of the fastening. Then a second thread is tied to the left space using method No. 2.
The second option for weaving a hanging chair
This option of weaving a macrame chair can be called economical in comparison with the first. The first chair took 800-900 m, but this is only 400. Accordingly, you will weave such a chair faster.
We begin again to make a hanging chair from the seat. In this version it is crocheted. Crochet a round napkin, then tie it to the hoop (using the same hook - do not cut the thread).
In this option, it is better to wrap the hoop with twine in advance.
We begin to make the loop in the same way as in the first version. I signed everything in detail in the photo instructions.
The threads used to weave the square knots are marked in blue and green. As a result, they securely hold the seat: two in front and two in back.
There's really no need to go through the trouble of coming up with a complex pattern for the seat of a hanging hammock chair. After all, it will still be covered with a pillow or feather bed. But a beautiful skirt with fringe will significantly improve the appearance of your chair.
Well, I prefer the “solid” back of macrame chairs; a mesh of double flat knots is prettier when there is a small distance between them and a lot of ropes are involved. But that's up to you to decide.
Please note that you can not only modify macrame patterns, but also the very basis of the design of your hanging chair. Add a circle on top of the same diameter as the seats and you have a great mini hanging tent.
You can completely abandon the round base.